In this article I describe how to install Gentoo Linux 3.10.17 (64-bit, with systemd + Gnome 3) in a virtual machine (VM) running on VMWare Fusion 6 for Mac OSX version 10.9 (Mavericks). This should work the same way on a different host, such as Parallels or VMWare Workstation for Windows or Linux.
I’ll mention upfront that the boot time with systemd left me speechless. From pressing “Play” to booting to Console (multi-user mode without GUI) it takes 3.5 seconds. When booting to X11 graphical mode up to the login window it takes 4.5 seconds, and with auto-login a total of 9 seconds. Shutdown takes 2 seconds. Note: the host is an iMac 27 late 2013 core i7 (Haswell).
The official manual for this type of installation is the Gentoo Linux AMD64 Handbook – a perfect manual with great detail. Consider this article extra ammunition that will serve as an example. I also recommend reading these two important links related to the new systemd on Gentoo and Gnome 3.8 on Gentoo.
Preparing the virtual machine
Download the ISO install-amd64-minimal-latest date.iso from the Gentoo mirrors. To find it, navigate to this directory: /mirror/gentoo/releases/amd64/autobuilds/current-iso.
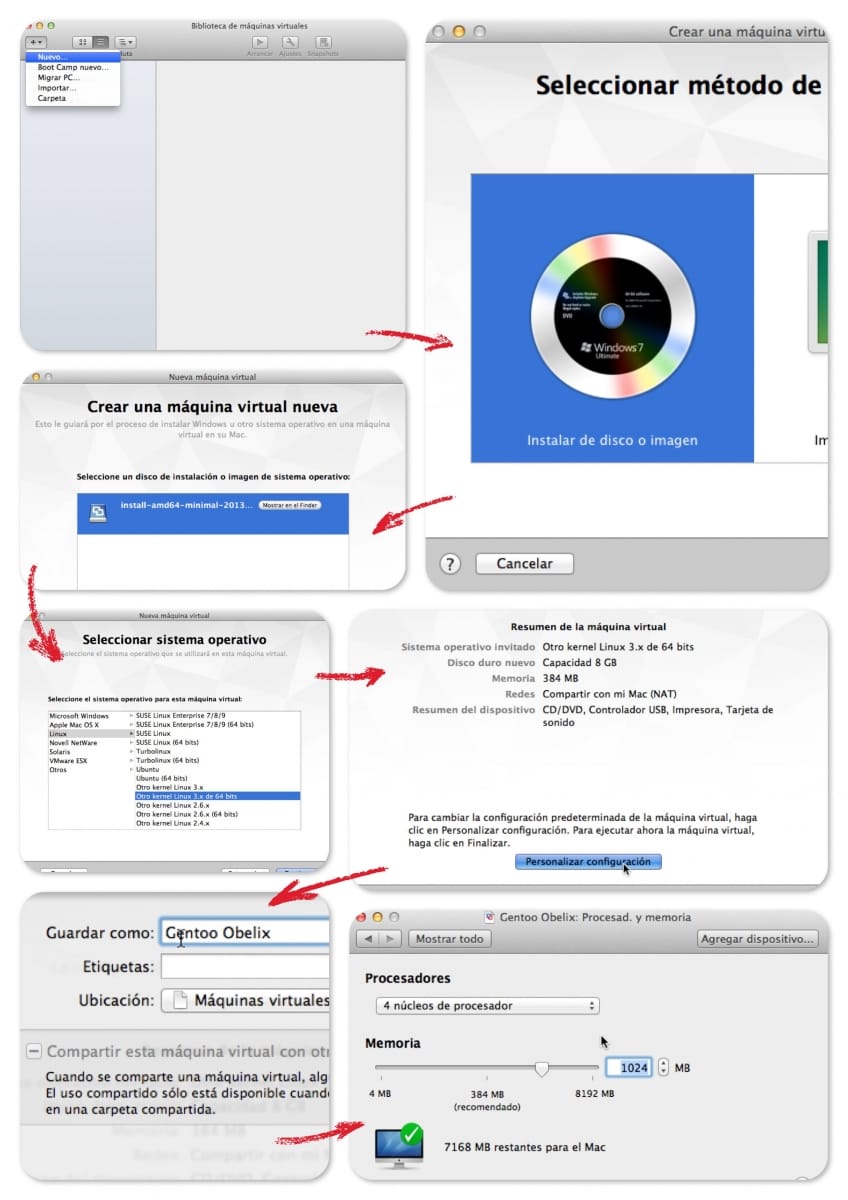
Start VMWare Fusion, create a new virtual machine, indicate that you’ll use the ISO as a boot disk, assign at least 1GB of RAM, 20GB of disk space and the network in NAT mode.
Remember: I give the virtual disk at least 20GB, to avoid problems with Gentoo’s “distfiles”.
- Disk configuration
Create Partition 1 /boot of 50M, partition 2 SWAP of 512M and partition 3 ROOT with the rest up to 20GB
# fdisk /dev/sda
Device Boot Start End Blocks Id System
/dev/sda1 * 2048 104447 51200 83 Linux
/dev/sda2 104448 1153023 524288 82 Linux swap / Solaris
/dev/sda3 1153024 41943039 203395008 83 Linux
# mkfs.ext2 /dev/sda1
# mkfs.ext4 /dev/sda3
# mkswap /dev/sda2
# swapon /dev/sda2
# mount /dev/sda3 /mnt/gentoo
# mkdir /mnt/gentoo/boot
# mount /dev/sda1 /mnt/gentoo/boot
- Date
# date 121508312013
Continue via SSH You might want to continue from a remote session. In my case I prefer it – I open a terminal (iTerm) on the Mac and connect directly to the virtual machine using SSH, where I’ve previously set a password for root and started the service. The reason: In VMWare Fusion it still captures the mouse and I don’t have the tools installed, so I prefer the comfort of the Mac environment.
# passwd
:
# /etc/init.d/sshd start
- Download and extract Stage3 and Portage
I download to /mnt/gentoo from one of the Gentoo mirrors
- /mirror/gentoo/releases/amd64/autobuilds/current-iso –> stage3-amd64-
.tar.bz2 - /mirror/gentoo/snapshots –> portage-latest.tar.bz2
# cd /mnt/gentoo/
# tar xvjpf stage3-*.tar.bz2
# cd /mnt/gentoo/usr
# tar xvjpf ../portage-*.tar.bz2
- Enter the new environment
From now on I enter directly into the new environment with chroot, so “/” (root) will point to the new disk we just formatted and where we extracted all the software. Important: don’t forget to copy resolv.conf :-)
# cp /etc/resolv.conf /mnt/gentoo/etc
We enter the environment…
# mount -t proc none /mnt/gentoo/proc
# mount --rbind /sys /mnt/gentoo/sys
# mount --rbind /dev /mnt/gentoo/dev
# chroot /mnt/gentoo /bin/bash
# source /etc/profile
# export PS1="(chroot) $PS1"
make.conf file:
# These settings were set by the catalyst build script that automatically
# built this stage.
# Please consult /usr/share/portage/config/make.conf.example for a more
# detailed example.
CFLAGS="-O2 -march=native -pipe"
CXXFLAGS="${CFLAGS}"

# WARNING: Changing your CHOST is not something that should be done lightly.
# Please consult http://www.gentoo.org/doc/en/change-chost.xml before changing.
CHOST="x86_64-pc-linux-gnu"

# These are the USE flags that were used in addition to what is provided by the
# profile used for building.
USE="opengl alsa pulseaudio gtk gnome qt4 -gpm"
PORTDIR="/usr/portage"
DISTDIR="${PORTDIR}/distfiles"
PKGDIR="${PORTDIR}/packages"

# By LuisPa. -l'n' n=+1 CPUs
MAKEOPTS="-j5 -l5"
EMERGE_DEFAULT_OPTS="--nospinner --keep-going --jobs=5 --load-average=5"

# USE
USE="opengl alsa pulseaudio gtk gnome qt4 -gpm"

# Language
LINGUAS="es en"

# Mirrors
GENTOO_MIRRORS="http://gentoo-euetib.upc.es/mirror/gentoo/"

# Keyboard and graphics
INPUT_DEVICES="keyboard mouse vmmouse evdev"
VIDEO_CARDS="fbdev nv vesa vmware intel"
Read the news

(chroot) livecd usr # eselect news list
(chroot) livecd usr # eselect news read 'n'
Timezone

(chroot) livecd usr # cd /
(chroot) livecd / # cp /usr/share/zoneinfo/Europe/Madrid /etc/localtime
(chroot) livecd / # echo "Europe/Madrid" > /etc/timezone
Prepare /etc/fstab

/dev/sda1 /boot ext2 noauto,noatime 1 2
/dev/sda2 none swap sw 0 0
/dev/sda3 / ext4 noatime 0 1
- Choose the right Profile
This step is important. In my installation I’m going to set up the system with the new systemd, so we need to choose the appropriate profile. Now is the time.
(chroot) livecd / # eselect profile list
:
[5] default/linux/amd64/13.0/desktop/gnome/systemd
:
(chroot) livecd / # eselect profile set 5
- Portage - accept_keywords
# Open Source VMWare tools
app-emulation/open-vm-tools-kmod ~amd64
app-emulation/open-vm-tools ~amd64

# Systemd
sys-apps/systemd-ui ~amd64

# iproute
dev-haskell/appa ~amd64
dev-haskell/iproute ~amd64
dev-haskell/byteorder ~amd64
- Prepare the /etc/portage/package.use file
# For splashutils
media-gfx/splashutils fbcondecor -gpm -mng png truetype -hardened
media-libs/lcms static-libs
media-libs/libjpeg-turbo static-libs
app-arch/bzip2 static-libs
media-libs/libpng static-libs
virtual/jpeg static-libs
media-libs/libmng static-libs
media-libs/freetype static-libs
sys-libs/zlib static-libs

# X11
media-libs/mesa xa
dev-libs/libxml2 python
x11-libs/libdrm libkms

# VMWare
app-emulation/open-vm-tools X fuse
x11-libs/cairo X
x11-libs/gtk+ X

# Gnome
gnome-base/gdm -gnome-shell
net-fs/cifs-utils -acl
net-fs/samba -client
gnome-extra/evolution-data-server vala

# Firefox
media-plugins/gst-plugins-meta ffmpeg
- Hostname, passwd and tools
Hostname This system will use systemd, so I configure locale, keymaps, date, etc. later. For now I only set up the hostname.
With systemd, /etc/conf.d/hostname is no longer used, so I’ll edit the two files it uses directly:
menhir

PRETTY_NAME="VM Gentoo Linux Menhir"
ICON_NAME="menhir"
Root password – essential before the next boot !!!
(chroot) livecd init.d # passwd
New password:
Retype new password:
passwd: password updated successfully
Essential Gentoo tools
# emerge -v eix genlop
# eix-update
Graphical environment
Here you need to decide what you prefer, since this virtual machine can be configured in two different ways.
- UVESA Frame Buffer mode
- VMWGFX Frame Buffer mode (my preferred)
The first, in UVESA mode, you configure CONFIG_FB_UVESA in the kernel. In this mode the graphical Grub menu will work before boot, the splash screen during boot, and even 3D acceleration in X11. However, the downside is you won’t be able to switch to virtual consoles with Ctrl-Alt-Fx – in fact, it hangs the X11 session.
If you want to use UVESA, here’s the .config file for UVESA mode. The second, in VMWGFX mode, uses the recommended frame buffer driver for VMWare Guests (CONFIG_DRM_VMWGFX_FBCON), supports 3D acceleration, integrates perfectly with X11, and allows switching to virtual consoles. The only downside is it doesn’t use splash during boot, and in fact doesn’t use the graphical Grub menu before boot either.
If this is your choice, here’s the .config file for VMWGFX mode (it’s my preferred option). Why do I prefer VMWGFX? Because I prefer using a silent and fully automated startup – we’re talking about a virtual machine where I want a super-fast boot, so I won’t see the “splash” screens anyway (maybe for a tenth of a second), so it’s better to have X11 properly integrated with the consoles. Kernel Installation
Kernel download
# emerge -v gentoo-sources
[ebuild N ] sys-devel/bc-1.06.95 USE="readline -libedit -static"
[ebuild N ] sys-kernel/gentoo-sources-3.10.17:3.10.17 USE="-build -deblob -experimental -symlink"
:
Download the .config file Download a copy of whichever .config file you prefer from the two above. In my case I use the .config for VMWGFX – both are versions for the gentoo-sources-3.10.17 kernel optimized for systemd and VMWare. Copy/Paste that content into the /usr/src/linux/.config file Installing v86d
# emerge -v v86d
# eselect python set --python3 python3.3
Installing Splashutils (only if using UVESA)
The splash-themes-* packages are used to set the look during boot and of the console windows. Don’t confuse them with the Grub theme used before boot.
# emerge -v splashutils
# emerge -v media-gfx/splash-themes-livecd media-gfx/splash-themes-gentoo
Compilation and installation
# cd /usr/src/linux
# make && make modules_install
# cp arch/x86_64/boot/bzImage /boot/kernel-3.10.17-gentoo
# cp System.map /boot/System.map-3.10.17-gentoo
Grub 2
I install Grub
# emerge -v grub:2
# grub2-install /dev/sda
Prepare Splash (only if using UVESA)
The 1680x1050 resolution is the one I’ve chosen because it fits my 27" monitor. In your case, adapt it to whatever suits you best. Keep in mind that on the next reboot, when switching to graphical mode, the VMWare window will resize to this size.
# cd /etc/splash
# splash_geninitramfs -g /boot/initramfs-genkernel-3.10.17-gentoo -v -r 1680x1050 natural_gentoo
# splash_geninitramfs -a /boot/initramfs-genkernel-3.10.17-gentoo -v -r 1680x1050 emerge-world
:
/etc/default/grub file
# Copyright 1999-2013 Gentoo Foundation
# Distributed under the terms of the GNU General Public License v2
# $Header: /var/cvsroot/gentoo-x86/sys-boot/grub/files/grub.default-2,v 1.4 2013/09/21 18:10:55 floppym Exp $
#
# To populate all changes in this file you need to regenerate your
# grub configuration file afterwards:
# 'grub2-mkconfig -o /boot/grub/grub.cfg'
#
# See the grub info page for documentation on possible variables and
# their associated values.

GRUB_DISTRIBUTOR="Gentoo"

GRUB_DEFAULT=0
GRUB_HIDDEN_TIMEOUT=0
GRUB_HIDDEN_TIMEOUT_QUIET=true
GRUB_TIMEOUT=3 # During installation use 3, when done change to 0

# Boot with systemd in verbose mode
# GRUB_CMDLINE_LINUX="init=/usr/lib/systemd/systemd rootfstype=ext4"
# Boot with systemd in silent mode
GRUB_CMDLINE_LINUX="init=/usr/lib/systemd/systemd quiet rootfstype=ext4"

# Append parameters to the linux kernel command line for non-recovery entries
#GRUB_CMDLINE_LINUX_DEFAULT=""

# Note: I don't use any because I work in VMWGFX Frame Buffer mode, without splash
#
# For a verbose boot
#GRUB_CMDLINE_LINUX_DEFAULT="video=uvesafb:1680x1050-24,mtrr:3,ywrap splash=verbose,theme:natural_gentoo console=tty1"
#GRUB_CMDLINE_LINUX_DEFAULT="video=uvesafb:1680x1050-24,mtrr:3,ywrap splash=verbose,theme:emerge-world console=tty1"
# For a silent boot
#GRUB_CMDLINE_LINUX_DEFAULT="video=uvesafb:1680x1050-24,mtrr:3,ywrap splash=silent,fadein,theme:natural_gentoo console=tty1"
#GRUB_CMDLINE_LINUX_DEFAULT="video=uvesafb:1680x1050-24,mtrr:3,ywrap splash=silent,fadein,theme:emerge-world console=tty1"

# Uncomment to disable graphical terminal (grub-pc only)
#GRUB_TERMINAL=console

# The resolution used on graphical terminal.
# Note that you can use only modes which your graphic card supports via VBE.
# You can see them in real GRUB with the command \`vbeinfo'.
GRUB_GFXMODE=1680x1050
GRUB_GFXPAYLOAD_LINUX=1680x1050

# Path to theme spec txt file.
# The starfield is by default provided with use truetype.
# NOTE: when enabling custom theme, ensure you have required font/etc.
#GRUB_THEME=/boot/grub/themes/starfield/theme.txt

# Background image used on graphical terminal.
# Can be in various bitmap formats.
#GRUB_BACKGROUND="/boot/grub/mybackground.png"

# Uncomment if you don't want GRUB to pass "root=UUID=xxx" parameter to kernel
GRUB_DISABLE_LINUX_UUID=true

# Uncomment to disable generation of recovery mode menu entries
#GRUB_DISABLE_RECOVERY=true
Install GRUB
# grub2-mkconfig -o /boot/grub/grub.cfg
If in the future I need to modify the Kernel, these are the steps for compilation/installation:
# cd /usr/src/linux
# make && make modules_install
# mount /boot
# cp arch/x86_64/boot/bzImage /boot/kernel-3.10.17-gentoo
# cp System.map /boot/System.map-3.10.17-gentoo
The splash_geninitramfs lines are only needed if using UVESA:
# splash_geninitramfs -g /boot/initramfs-genkernel-3.10.17-gentoo -v -r 1680x1050 natural_gentoo
# splash_geninitramfs -a /boot/initramfs-genkernel-3.10.17-gentoo -v -r 1680x1050 emerge-world

# grub2-mkconfig -o /boot/grub/grub.cfg
# umount /boot
Installing systemd
I run some tweaks and installations to avoid later blocks or problems…
# rm /etc/mtab
# ln -sf /proc/self/mounts /etc/mtab
# USE="-systemd" emerge -v sys-apps/dbus
# emerge -v openrc
The “reinstallation” of openrc is important (to a version equal to or greater than 0.12.4) to avoid conflict with kmod
# emerge -v systemd
Reboot
I exit chroot, unmount and reboot the machine
# exit
# cd
# umount -l /mnt/gentoo/dev{/shm,/pts,}
# umount -l /mnt/gentoo{/boot,/proc,}
:
# reboot
Basic configuration
We continue with the basic system configuration. We’ve already booted with systemd for the first time, but you have an English keyboard, the network isn’t working, etc. – you don’t have locales, etc. Now we start fixing these things. First and foremost, the keyboard :-) Keyboard and Locale
# localectl set-keymap es # modifies /etc/vconsole.conf
# localectl set-x11-keymap es # modifies /etc/X11/xorg.conf.d/00-keyboard.conf
# localectl set-locale LANG=es_ES.UTF-8 # modifies /etc/locale.conf
# localectl
System Locale: LANG=es_ES.UTF-8
VC Keymap: es
X11 Layout: es
Locale-gen
I prepare the locale.gen file
en_US ISO-8859-1
en_US.UTF-8 UTF-8
es_ES ISO-8859-1
es_ES@euro ISO-8859-15
es_ES.UTF-8 UTF-8
en_US.UTF-8@euro UTF-8
es_ES.UTF-8@euro UTF-8
Run "locale-gen"
# locale-gen
Networking
Let’s get “connected”… I install, enable and start DHCP. Services in “systemd” are scheduled for future boots with “systemctl enable” and can be started or stopped with “systemctl start/stop”
# emerge -v dhcpcd
# systemctl enable dhcpcd.service
# systemctl start dhcpcd.service
Another essential – I enable and start the SSH daemon so I can connect to this VM via SSH.
# systemctl enable sshd.service
# systemctl start sshd.service
Note: If sshd doesn’t work, try:
# systemctl disable sshd.service
# systemctl enable sshd.socket
Vixie-cron
I install, enable and start cron
# emerge -v vixie-cron
# systemctl enable vixie-cron.service
# systemctl start vixie-cron.service
Date and time
To configure date/time you should use “timedatectl”
# timedatectl set-local-rtc 0
# timedatectl set-timezone Europe/Madrid
# timedatectl set-time 2012-10-30 18:17:16 <= Set the time first.
# timedatectl set-ntp true <= Enable NTP
Open-VM and systemd-ui
I install the VMWare tools, the open source version.
# emerge -v open-vm-tools sys-apps/systemd-ui
Update to the latest
I reboot the machine, and when it comes back the first thing is to run a “perl-cleaner” and then a full update.
# reboot
:
# perl-cleaner --reallyall
:
# emerge -DuvN system world
Installing Gnome
Installation
# emerge -DuvN --keep-going world gnome-base/gnome
Note: webkit-gtk failed (out of memory errors?). This affected other programs that weren’t installed due to the missing dependency. I shut down the VM, increased its memory to 2GB, rebooted and ran:
# EMERGE_DEFAULT_OPTS="" emerge -v webkit-gtk
It completed successfully, I repeated the previous command which completed correctly.
# emerge -DuvN --keep-going world gnome-base/gnome
This process installed gnome-base/gnome-3.0.0-r1
I activate graphical mode by default
# ln -sf /usr/lib/systemd/system/graphical.target /etc/systemd/system/default.target
Gnome activation
# systemctl enable gdm.service
# systemctl start display-manager
User and reboot
From a shell I add a regular user and finally reboot the machine
# groupadd -g 1400 luis
# useradd -u 1400 -g luis -m -G cron,audio,cdrom,games,cdrw,users,wheel,audio,vmware -d /home/luis -s /bin/bash luis
:
# reboot
Notes
Switching between Console and X11 mode
Change the symbolic link and start the virtual machine
Console mode
# ln -sf /usr/lib/systemd/system/multi-user.target /etc/systemd/system/default.target
# reboot
X11 mode
# ln -sf /usr/lib/systemd/system/graphical.target /etc/systemd/system/default.target
# reboot
Removing the “WRITE SAME failed” message
If during boot and just before starting X11 you see that message, the way to remove it is as follows:
# find /sys | grep max_write_same_blocks
/sys/devices/pci0000:00/0000:00:10.0/host2/target2:0:0/2:0:0:0/scsi_disk/2:0:0:0/max_write_same_block
I add this device to a new configuration file, which must end in .conf and reside in /etc/tmpfiles.d/:

# cat > /etc/tmpfiles.d/write_same.conf <<EOD
# Type Path Mode UID GID Age Argument
w /sys/devices/pci0000:00/0000:00:10.0/host2/target2:0:0/2:0:0:0/scsi_disk/2:0:0:0/max_write_same_blocks - - - - 0
EOD
Viewing the LOG
One of the interesting changes is that the traditional way of viewing log files is gone. Here are some useful commands:
- View the log:
journalctl - View the log continuously:
journalctl -f - View the log from the last boot:
journalctl -b - Boot log, ERROR or higher only:
journalctl -b -p err - Disk sda log:
journalctl /dev/sda - Log between dates:
journalctl --since=2014-01-15 --until="2014-01-20 23:59:59 - Since yesterday:
journalctl --since=yesterday - Log for “abaco”:
journalctl /bin/abaco - Log for “abaco” and also “curl”:
journalctl /bin/abaco /bin/curl - Apache log:
journalctl -u httpd --since=07:30 --until=08:30 - SSHD continuously:
journalctl -f /usr/sbin/sshd