This post describes what’s behind (at a technical level) the IP service offered by Movistar Fusion FTTH (Fiber) and how to replace the router they install with a GNU/Linux-based machine that will act as a Router (along with an Ethernet Switch) to provide the same Data, Television (IPTV), and Voice (VoIP) services.
After reading this post, I recommend continuing with video on demand for Movistar and the lab to extend your local network to a remote site with an Ethernet Bridge.
| 2023 Update: This post is quite old and after the introduction of DRM it’s no longer possible to watch channels with VLC, OpenELEC, or TVheadend, but the possibility of replacing the Movistar Router with a neutral router or Linux still stands, as long as you have the ONT or the Movistar Router in Pure Bridge / ONT mode. |
Starting Point
Let’s see what they leave you when they install “the fiber.” The “black” cable that arrives at home is a fiber (singlemode 657-A2) that the technician “splices” inside an ICT-2 type rosette, which in turn offers an SC/APC output connector. From that connector, a standard fiber patch cord goes to the ONT, and from there two cables come out — one phone cable usually connected to your home’s phone input and one Ethernet cable connected to the router.
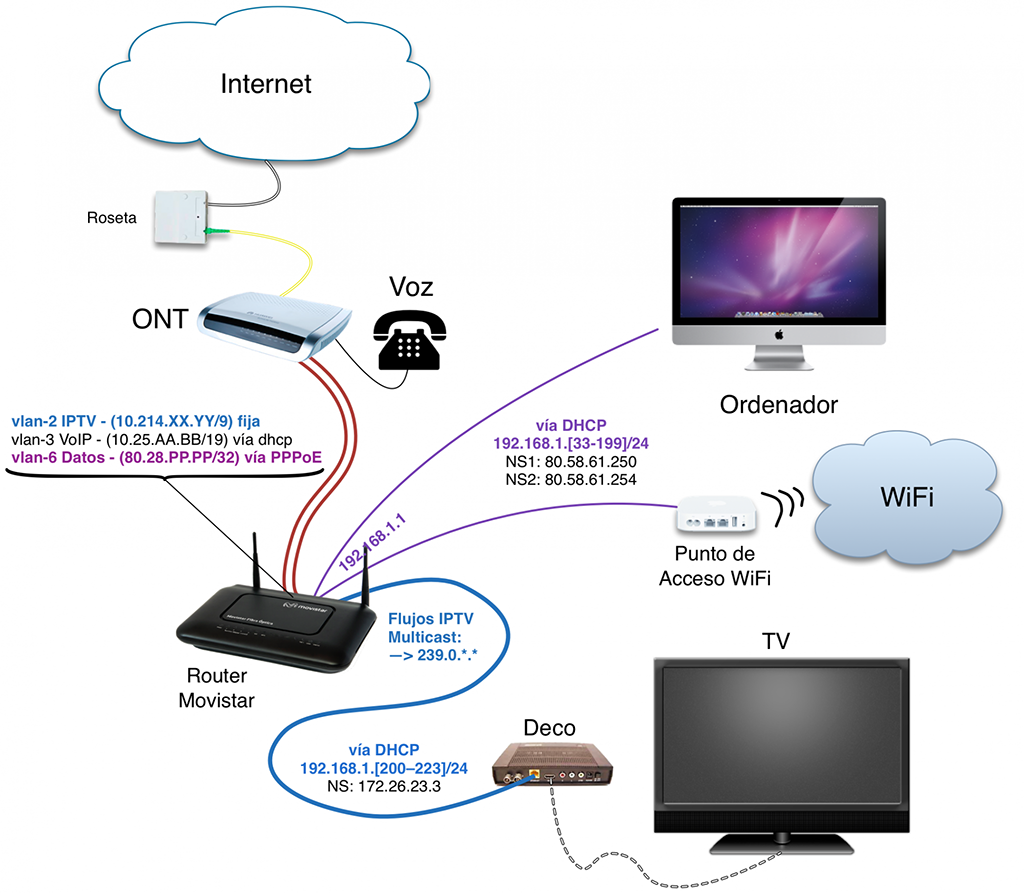
The ONT is the device that terminates the “optical” part. Its acronym stands for Optical Network Termination and it converts the optical signal to electrical — specifically, it offers a traditional Ethernet interface (I use port ETH1). Loosely speaking, it would be something similar to the PTR of an analog phone line when we had ADSL.
The next device is the Router, which receives from the ONT through the Ethernet cable three VLANs — one for each service: VLAN-6 for “data,” VLAN-2 for IPTV, and VLAN-3 for VoIP. Its function is to switch between the appropriate VLAN and the “intranet” depending on what service is consumed and/or the client’s configuration (set-top box, computer, phone).
Final Goal
The goal is to replace the Movistar Router with a Linux machine (I use Gentoo) along with an Ethernet Switch to provide all three services: Data, IPTV, and VoIP.
We need a switch because we need its ethernet ports, and above all because it’s much simpler (and cheaper) than installing ethernet port cards in your Linux box… It’s critical that your Ethernet 10/100/1000 Switch supports VLANs (802.1q) and Multicast (IGMP Snooping), and above all that your Linux machine has a NIC that supports VLANs (which is the most common).
Oh, and if you need to buy that switch, I recommend you take the opportunity to get one that supports “port mirroring” — it’ll come in very handy for troubleshooting by capturing and analyzing traffic with WireShark.
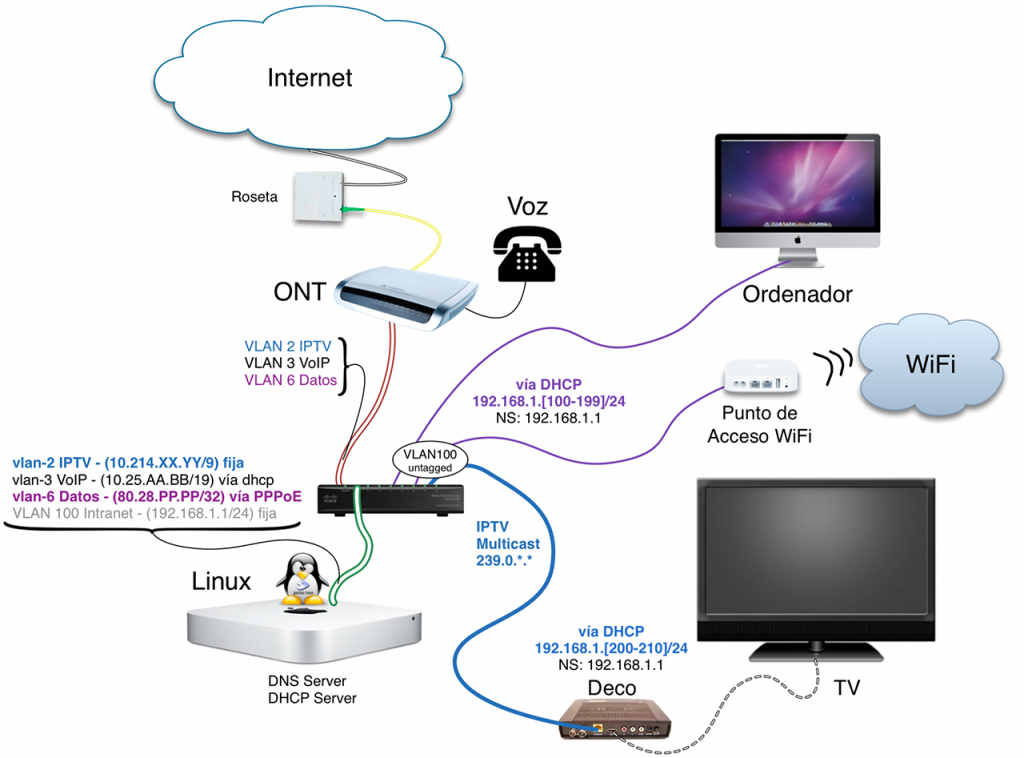
In the diagram above you have the final configuration. In my case I use a Mac Mini “repurposed” with Gentoo GNU/Linux (which I’ll soon upgrade to an Intel NUC), a Cisco SG 200-08 Ethernet Switch.
I connect the ONT’s Ethernet output (ETH1) to the switch port (where I’ll configure VLANs 2, 3, and 6 tagged; in my example I used port 1), connect the Linux box to port 2 (where I configure VLANs 2, 3, 6, and 100 Tagged), and the remaining ports are configured as access ports for VLAN 100 (untagged) where I’ll connect intranet devices: computer, Wi-Fi access point, and set-top box.
Complete Network Configuration
Now I’ll dive into the details of the Linux configuration so you can understand how to make it work. I’ll start with a general overview of the entire network configuration and then go into detail for each of the three services.
Network interface and VLAN configuration on Linux (remember this is the Gentoo distro; in your case it may be different, so the files documented here should serve as examples and reference):
config_enp2s0f0="null"
mtu_enp2s0f0="1504"
vlans_enp2s0f0="2 3 6 100"
vlan2_name="vlan2"
vlan3_name="vlan3"
vlan6_name="vlan6"
vlan100_name="vlan100"
config_vlan2="10.214.XX.YY/9"
config_vlan6="null"
config_vlan100="192.168.1.1/24"
config_ppp0="ppp"
modules="dhclient"
config_vlan3="dhcp"
dhcp_vlan3="nogateway nodns nontp nosendhost nonis"
link_ppp0="vlan6"
plugins_ppp0="pppoe"
username_ppp0='adslppp@telefonicanetpa'
password_ppp0='adslppp'
pppd_ppp0="
 updetach
 noauth
 defaultroute
 ipcp-accept-remote
 ipcp-accept-local
 lcp-echo-interval 15
 lcp-echo-failure 3
 persist
 holdoff 3
 mru 1492
 mtu 1492
 lock
 noaccomp noccp nobsdcomp nodeflate nopcomp novj novjccomp
"
rc_net_ppp0_provide="!net"
The configuration above implies the following:
- WAN (External)

    - vlan6 (data) - PPPoE to receive the IP. Default route
    - vlan2 (iptv) - Static IP and RIP to receive IPTV routes
    - vlan3 (voip) - IP via DHCP. Route via RIP. No DNS/NIS/NTP

- LAN (Internal)

    - vlan100 (intranet) - Private range 192.168.1/24 with ".1" for Linux.
Output of the ifconfig command: I’ve changed the IPs to match the diagram above.
# ifconfig
enp2s0f0: flags=4163<UP,BROADCAST,RUNNING,MULTICAST>  mtu 1504
        ether 11:22:33:44:55:66  txqueuelen 1000  (Ethernet)
        RX packets 1366700756  bytes 1796575658464 (1.6 TiB)
        RX errors 3  dropped 300332  overruns 0  frame 3
        TX packets 1371022373  bytes 1805554316729 (1.6 TiB)
        TX errors 0  dropped 0 overruns 0  carrier 0  collisions 0
        device interrupt 16

lo: flags=73<UP,LOOPBACK,RUNNING>  mtu 65536
        inet 127.0.0.1  netmask 255.0.0.0
        loop  txqueuelen 0  (Local Loopback)
        RX packets 1025365  bytes 692058711 (659.9 MiB)
        RX errors 0  dropped 0  overruns 0  frame 0
        TX packets 1025365  bytes 692058711 (659.9 MiB)
        TX errors 0  dropped 0 overruns 0  carrier 0  collisions 0

ppp0: flags=4305<UP,POINTOPOINT,RUNNING,NOARP,MULTICAST>  mtu 1492
        inet 80.28.PPP.PPP  netmask 255.255.255.255  destination 80.58.67.163
        ppp  txqueuelen 3  (Point-to-Point Protocol)
        RX packets 62838909  bytes 80275340154 (74.7 GiB)
        RX errors 0  dropped 0  overruns 0  frame 0
        TX packets 33578297  bytes 8751086608 (8.1 GiB)
        TX errors 0  dropped 0 overruns 0  carrier 0  collisions 0

vlan2: flags=4163<UP,BROADCAST,RUNNING,MULTICAST>  mtu 1504
        inet 10.214.XX.YY  netmask 255.128.0.0  broadcast 10.255.255.255
        ether 11:22:33:44:55:66  txqueuelen 0  (Ethernet)
        RX packets 1255455700  bytes 1667405535815 (1.5 TiB)
        RX errors 0  dropped 0  overruns 0  frame 0
        TX packets 128629  bytes 12264838 (11.6 MiB)
        TX errors 0  dropped 0 overruns 0  carrier 0  collisions 0

vlan3: flags=4163<UP,BROADCAST,RUNNING,MULTICAST>  mtu 1504
        inet 10.25.AA.BB  netmask 255.255.192.0  broadcast 10.25.255.255
        ether 11:22:33:44:55:66  txqueuelen 0  (Ethernet)
        RX packets 17697  bytes 943607 (921.4 KiB)
        RX errors 0  dropped 0  overruns 0  frame 0
        TX packets 23323  bytes 5580893 (5.3 MiB)
        TX errors 0  dropped 0 overruns 0  carrier 0  collisions 0

vlan6: flags=4163<UP,BROADCAST,RUNNING,MULTICAST>  mtu 1504
        ether 11:22:33:44:55:66  txqueuelen 0  (Ethernet)
        RX packets 62878158  bytes 80779704539 (75.2 GiB)
        RX errors 0  dropped 0  overruns 0  frame 0
        TX packets 33613070  bytes 9490852380 (8.8 GiB)
        TX errors 0  dropped 0 overruns 0  carrier 0  collisions 0

vlan100: flags=4163<UP,BROADCAST,RUNNING,MULTICAST>  mtu 1504
        inet 192.168.1.1  netmask 255.255.255.0  broadcast 192.168.1.255
        ether 11:22:33:44:55:66  txqueuelen 0  (Ethernet)
        RX packets 41268354  bytes 16754406776 (15.6 GiB)
        RX errors 0  dropped 7  overruns 0  frame 0
        TX packets 1325467487  bytes 1783103909820 (1.6 TiB)
        TX errors 0  dropped 0 overruns 0  carrier 0  collisions 0
Routing (Passive RIP)
I’ll get ahead of something you’ll need and document it now. Telefonica uses Passive RIP to send us several routes for its IPTV service and a single route for its VoIP service. It’s advisable to enable passive RIP on the VLAN2 (iptv) and VLAN3 (voip) interfaces. Another option is to configure them manually (static routes). In my case I’ve preferred to use RIP, so I install Quagga (a fork of Zebra, a routing software suite that provides OSPF, RIP, and BGP-4 implementations across platforms)
- I install quagga:
# emerge -v quagga
- Configuration:
/etc/quagga/zebra.conf
!
! Zebra configuration saved from vty
! 2014/09/27 19:32:29
!
hostname bolica
password XXXXXXX
enable password XXXXXXX
log file /var/log/zebra.log
!
interface enp2s0f0
!
interface lo
!
interface ppp0
!
interface tunl0
!
interface vlan2
!
interface vlan3
!
interface vlan6
!
interface vlan100
!
ip forwarding
ipv6 forwarding
!
!
line vty
!
- Configuration:
/etc/quagga/ripd.conf
hostname ripd
!
! Zebra configuration saved from vty
! 2014/10/11 19:29:17
!
hostname ripd
password XXXXXXXXXX
log file /var/log/ripd.log
!
router rip
 version 2
 network vlan2
 network vlan3
 passive-interface vlan2
 passive-interface vlan3
!
line vty
!
Below are the routes you’ll see when everything is up and running (we haven’t gotten there yet, but here’s the final result)
# ip route

_____(WAN)__________________
default via 80.58.67.163 dev ppp0 metric 4010
80.58.67.163 dev ppp0 proto kernel scope link src <80.28.XX.YY>

_____(VLAN3 VoIP)___________
10.25.192.0/19 dev vlan3 proto kernel scope link src <10.25.X.X> metric 5
10.31.255.128/27 via 10.25.192.1 dev vlan3 proto zebra metric 3

_____(Internal localhost)___
127.0.0.0/8 dev lo scope host
127.0.0.0/8 via 127.0.0.1 dev lo

_____(VLAN2 IPTV)___________
10.128.0.0/9 dev vlan2 proto kernel scope link src <10.214.XX.YY>
172.26.22.0/26 via 10.128.0.1 dev vlan2 proto zebra metric 3
172.26.22.56/29 via 10.128.0.1 dev vlan2 proto zebra metric 3
172.26.23.0/27 via 10.128.0.1 dev vlan2 proto zebra metric 3
172.26.23.4 via 10.128.0.1 dev vlan2 proto zebra metric 3
172.26.23.5 via 10.128.0.1 dev vlan2 proto zebra metric 3
172.26.23.23 via 10.128.0.1 dev vlan2 proto zebra metric 3
172.26.23.24 via 10.128.0.1 dev vlan2 proto zebra metric 3
172.26.23.30 via 10.128.0.1 dev vlan2 proto zebra metric 3
172.26.80.0/21 via 10.128.0.1 dev vlan2 proto zebra metric 3

_____(VLAN100 Intranet)_____
192.168.1.0/24 dev vlan100 proto kernel scope link src 192.168.1.1
The next step is to start both daemons. Here are the commands on Gentoo:
# /etc/init.d/zebra start
# /etc/init.d/ripd start
You can connect to both daemons and see what’s happening. First the general zebra daemon and then ripd
# telnet localhost 2601
:
Password:
bolica> enable
Password:
bolica# show ip route
:
bolica# quit

:

# telnet localhost 2602
:
Password:
ripd> enable
ripd# show ip rip
:
bolica# quit
Source NAT
For intranet devices (PCs, computers, Wi-Fi phones) to reach the Internet, you need Source NAT. For the set-top boxes to reach Imagenio, you also need Source NAT, and for VoIP phones or VoIP apps to reach their service, you also need Source NAT.
The machine will know which traffic goes to Internet, IPTV, or VoIP thanks to routing (the destination address), so with three iptables lines the machine will switch using the appropriate output interface and set the corresponding source IP address.
Traffic from the set-top box will always want to go to addresses starting with 172.26*, so the Linux machine will route them out through VLAN2 (iptv). The same happens with traffic destined for the VoIP proxy address (10.31.255.128/27), which goes out through VLAN3 (voip). The rest of the traffic is switched through the ppp0 link.
Below are the lines to configure Source NAT for the three interfaces.
For vlan 6 (internet data)
# export ipVLAN6=\`ip addr show dev vlan6 | grep inet | awk '{print $2}' | sed 's;\/.*;;'\`
# iptables -t nat -A POSTROUTING -o ppp0 -s 192.168.1.0/24 -j SNAT --to-source ${ipVLAN6}

or easier:

# iptables -t nat -A POSTROUTING -o ppp0 -j MASQUERADE
For vlan 2 (IPTV)
# iptables -t nat -A POSTROUTING -o vlan2 -s 192.168.1.0/24 -j SNAT --to-source 10.214.XX.YY

or easier:

# iptables -t nat -A POSTROUTING -o vlan2 -j MASQUERADE
For vlan 3 (VoIP)
# export ipVLAN3=\`ip addr show dev vlan3 | grep inet | awk '{print $2}' | sed 's;\/.*;;'\`
# iptables -t nat -A POSTROUTING -o vlan3 -s 192.168.1.0/24 -j SNAT --to-source ${ipVLAN3}

or easier:

# iptables -t nat -A POSTROUTING -o vlan3 -j MASQUERADE
I. Internet Access Service (vlan6)
As I just mentioned, we receive Internet through VLAN-6 and PPPoE (PPP over Ethernet) is used to receive the IP address. So the only thing needed is to enable PPPoE over the VLAN6 interface (see the earlier example /etc/conf.d/net)
If you have problems, I recommend adding a line with the string debug in the pppd_ppp0="..." option. This way you can observe what’s happening in the syslog. Once it’s stable, remove that line.
Whether you’ve contracted a fixed or dynamic IP, the configuration is the same — when the PPP daemon starts, the machine will receive its IP, install a default route through that interface, and you’re done.
MTU
WARNING!: One of the disadvantages of PPPoE is that it reduces the MTU to 1492 and the negotiated TCP MSS (Maximum Segment Size) to 1452, so we need to do the same on our Linux box. Where? The MTU in one place and the MSS in another:
- MTU: The PPPD handles defining the MTU in
/etc/conf.d/net - MSS: The MSS must be configured with
iptables
Within iptables we have two options to specify the MSS:
--clamp-mss-to-pmtuRestricts the MSS to the Path MTU value minus 40 bytes = 1452--set-mssSets the value directly (equivalent to the IOS command:ip tcp adjust-mss 1452)
In my case I use the first option. I’ve added the following lines to the “beginning” of my script where I have all the iptables commands, so it affects all packets:
:
iptables -A FORWARD -p tcp --tcp-flags SYN,RST SYN -j TCPMSS --clamp-mss-to-pmtu
iptables -t mangle -A FORWARD -p tcp --tcp-flags SYN,RST SYN -j TCPMSS --clamp-mss-to-pmtu
:
Source NAT: As I mentioned before, Source NAT is needed so that traffic originating from network clients goes out to the internet with the address we have on the ppp0 interface
# export ipVLAN6=\`ip addr show dev vlan6 | grep inet | awk '{print $2}' | sed 's;\/.*;;'\`
# iptables -t nat -A POSTROUTING -o ppp0 -s 192.168.1.0/24 -j SNAT --to-source ${ipVLAN6}

or easier:

# iptables -t nat -A POSTROUTING -o ppp0 -j MASQUERADE
Startup: We prepare the future boot
# ln -s /etc/init.d/net.lo net.ppp0
# rc-update add net.ppp0 default
- I start the service:
# /etc/init.d/net.ppp0 start
You’ll receive a fixed or dynamic IP depending on your contract. That IP will be like 80.28.PP.PP. Note that in my case it starts that way and ends with my assigned IP (I contracted a fixed IP), but in your case it could be anything else depending on what Movistar has provisioned for you.
II. VoIP Voice Service (vlan 3)
The VoIP Service arrives through VLAN-3. The configuration is simple — the Linux machine must receive an IP address via DHCP, do Source NAT through this interface, and install a single route (Note: install a single specific prefix for that route, don’t set it as the default route).
DHCP client: In the Linux DHCP client configuration, you need to specify that it should “not” overwrite NIS, NTP, or DNS, and also that it should “not” install a default route through VLAN3. We saw this in the network configuration at the beginning, but as a reminder, these are the specific lines in /etc/conf.d/net
vlan3_name="vlan3"
modules="dhclient"
config_vlan3="dhcp"
dhcp_vlan3="nogateway nodns nontp nosendhost nonis"
If you use netplan, the corresponding lines would be:
    # Movistar VoIP
    vlan3:
    id: 3
    link: eth0
    dhcp4: yes
    dhcp4-overrides:
        use-routes: false
    routes:
    - to: 10.31.255.128/27
        via: 10.22.0.1
Through this interface we’ll only need a single route, and we can install it manually (as in the netplan example above), or if you use RIP and quagga, learn it; modifying the /etc/quagga/ripd.conf file would look like this:
 router rip
 network vlan3
 passive-interface vlan3
Remember to check if you’re configuring it correctly — these are the routes you should receive. Keep in mind that 10.25.192.1 will vary over time; that’s an IP set by Movistar and known at the time it delivers your IP via DHCP. Another one I’ve frequently seen is 10.22.0.1.
# ip route
:
10.25.192.0/19 dev vlan3 proto kernel scope link src 10.25.ZZZ.ZZZ metric 5
10.31.255.128/27 via 10.25.192.1 dev vlan3 proto zebra metric 3
:
Source NAT: Again, so that traffic originating from your SIP client (residing on VLAN100 with address 192.168.1.xxx) that goes out through vlan3 does so with the Linux machine’s source IP address (received via DHCP, something like 10.25.ZZZ.ZZZ). As a reminder, these are the commands I run:
# export ipVLAN3=\`ip addr show dev vlan3 | grep inet | awk '{print $2}' | sed 's;\/.*;;'\`
# iptables -t nat -A POSTROUTING -o vlan3 -s 192.168.1.0/24 -j SNAT --to-source ${ipVLAN3}

or easier:

# iptables -t nat -A POSTROUTING -o vlan3 -j MASQUERADE
Testing the SIP Service
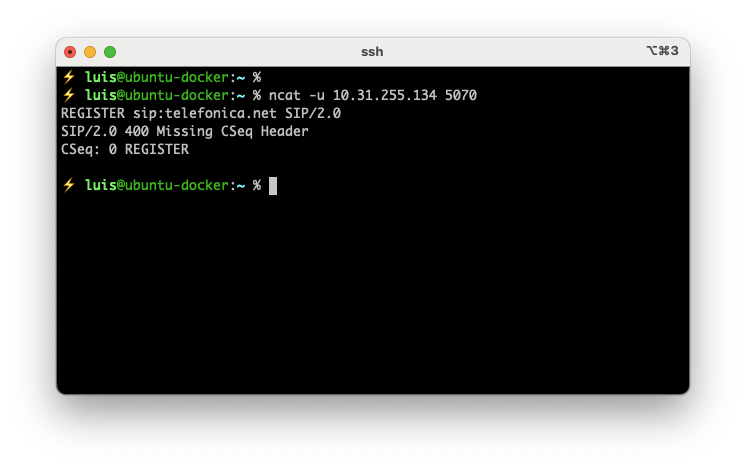
Using netcat/nc/ncat. Install it on your Linux box to check if the SIP server responds. First run:
ncat -u 10.31.255.134 5070
Then copy and paste the following line and press Enter.
REGISTER sip:telefonica.net SIP/2.0
You should receive something like:
SIP/2.0 400 Missing CSeq Header
CSeq: 0 REGISTER
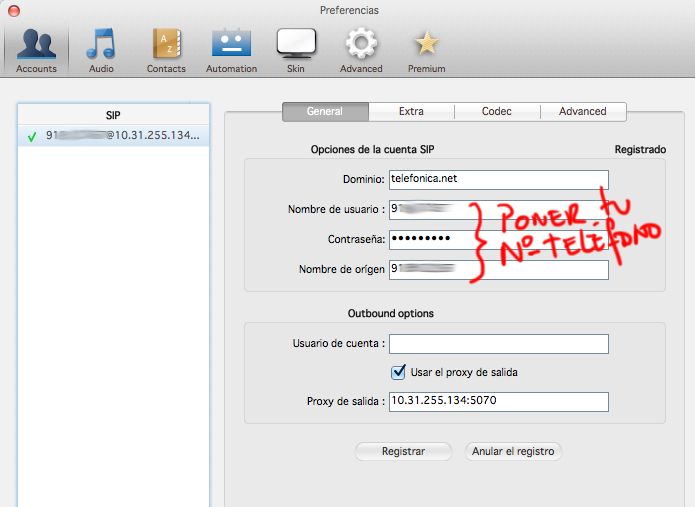
SIP Clients
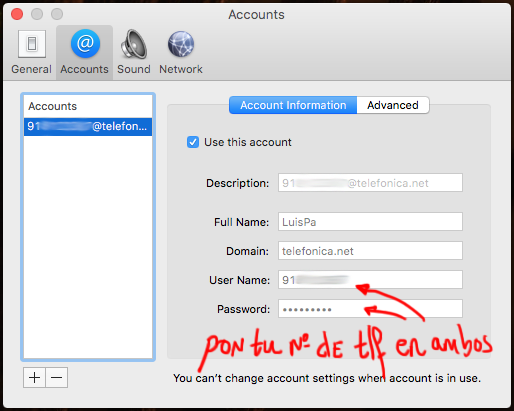
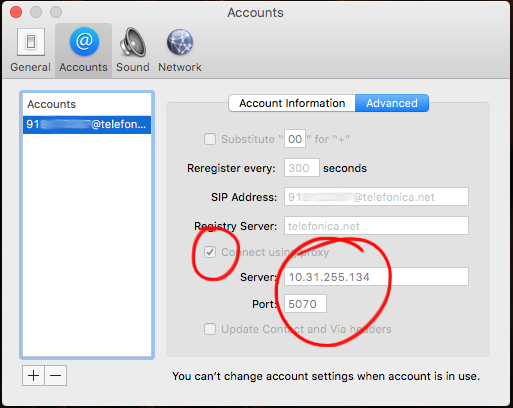
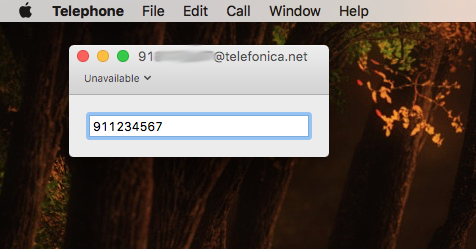
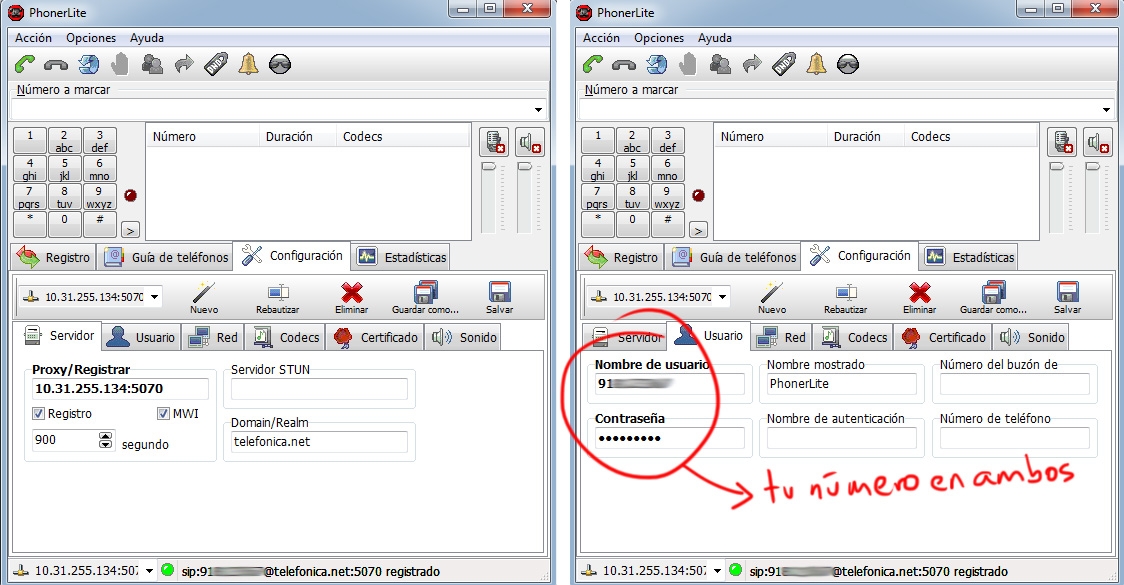
You should now be ready to test with a SIP client from a computer on the intranet (vlan100) or from a SIP phone. Here’s an article comparing many VoIP clients.
The data you need is:
Proxy/registrar: 10.31.255.134:5070
Domain/realm: telefonica.net
STUN: [empty]
Username: [your phone number]
Password: [your phone number]
I’ve tested with a couple of clients. The free version of “Zoiper” for macOS works but didn’t fully convince me. In any case, here’s my configuration:
Another much simpler macOS client is Telephone, available on the App Store, it’s free, and I liked it more than the previous one for its simplicity.
Another client I tested is “PhonerLite” for Windows (in my case running in Parallels on macOS), and I have to say it worked much better (very clean with no errors in registration, call, and call reception traffic). A shame it only exists for Windows.
Another example, with an iPhone app. In this case “Zoiper” for iPhone. When on my home network it’s not needed, only when I’m away (for example traveling in another country) — I need to bring up a VPN to my home to make calls as if I were in Spain:
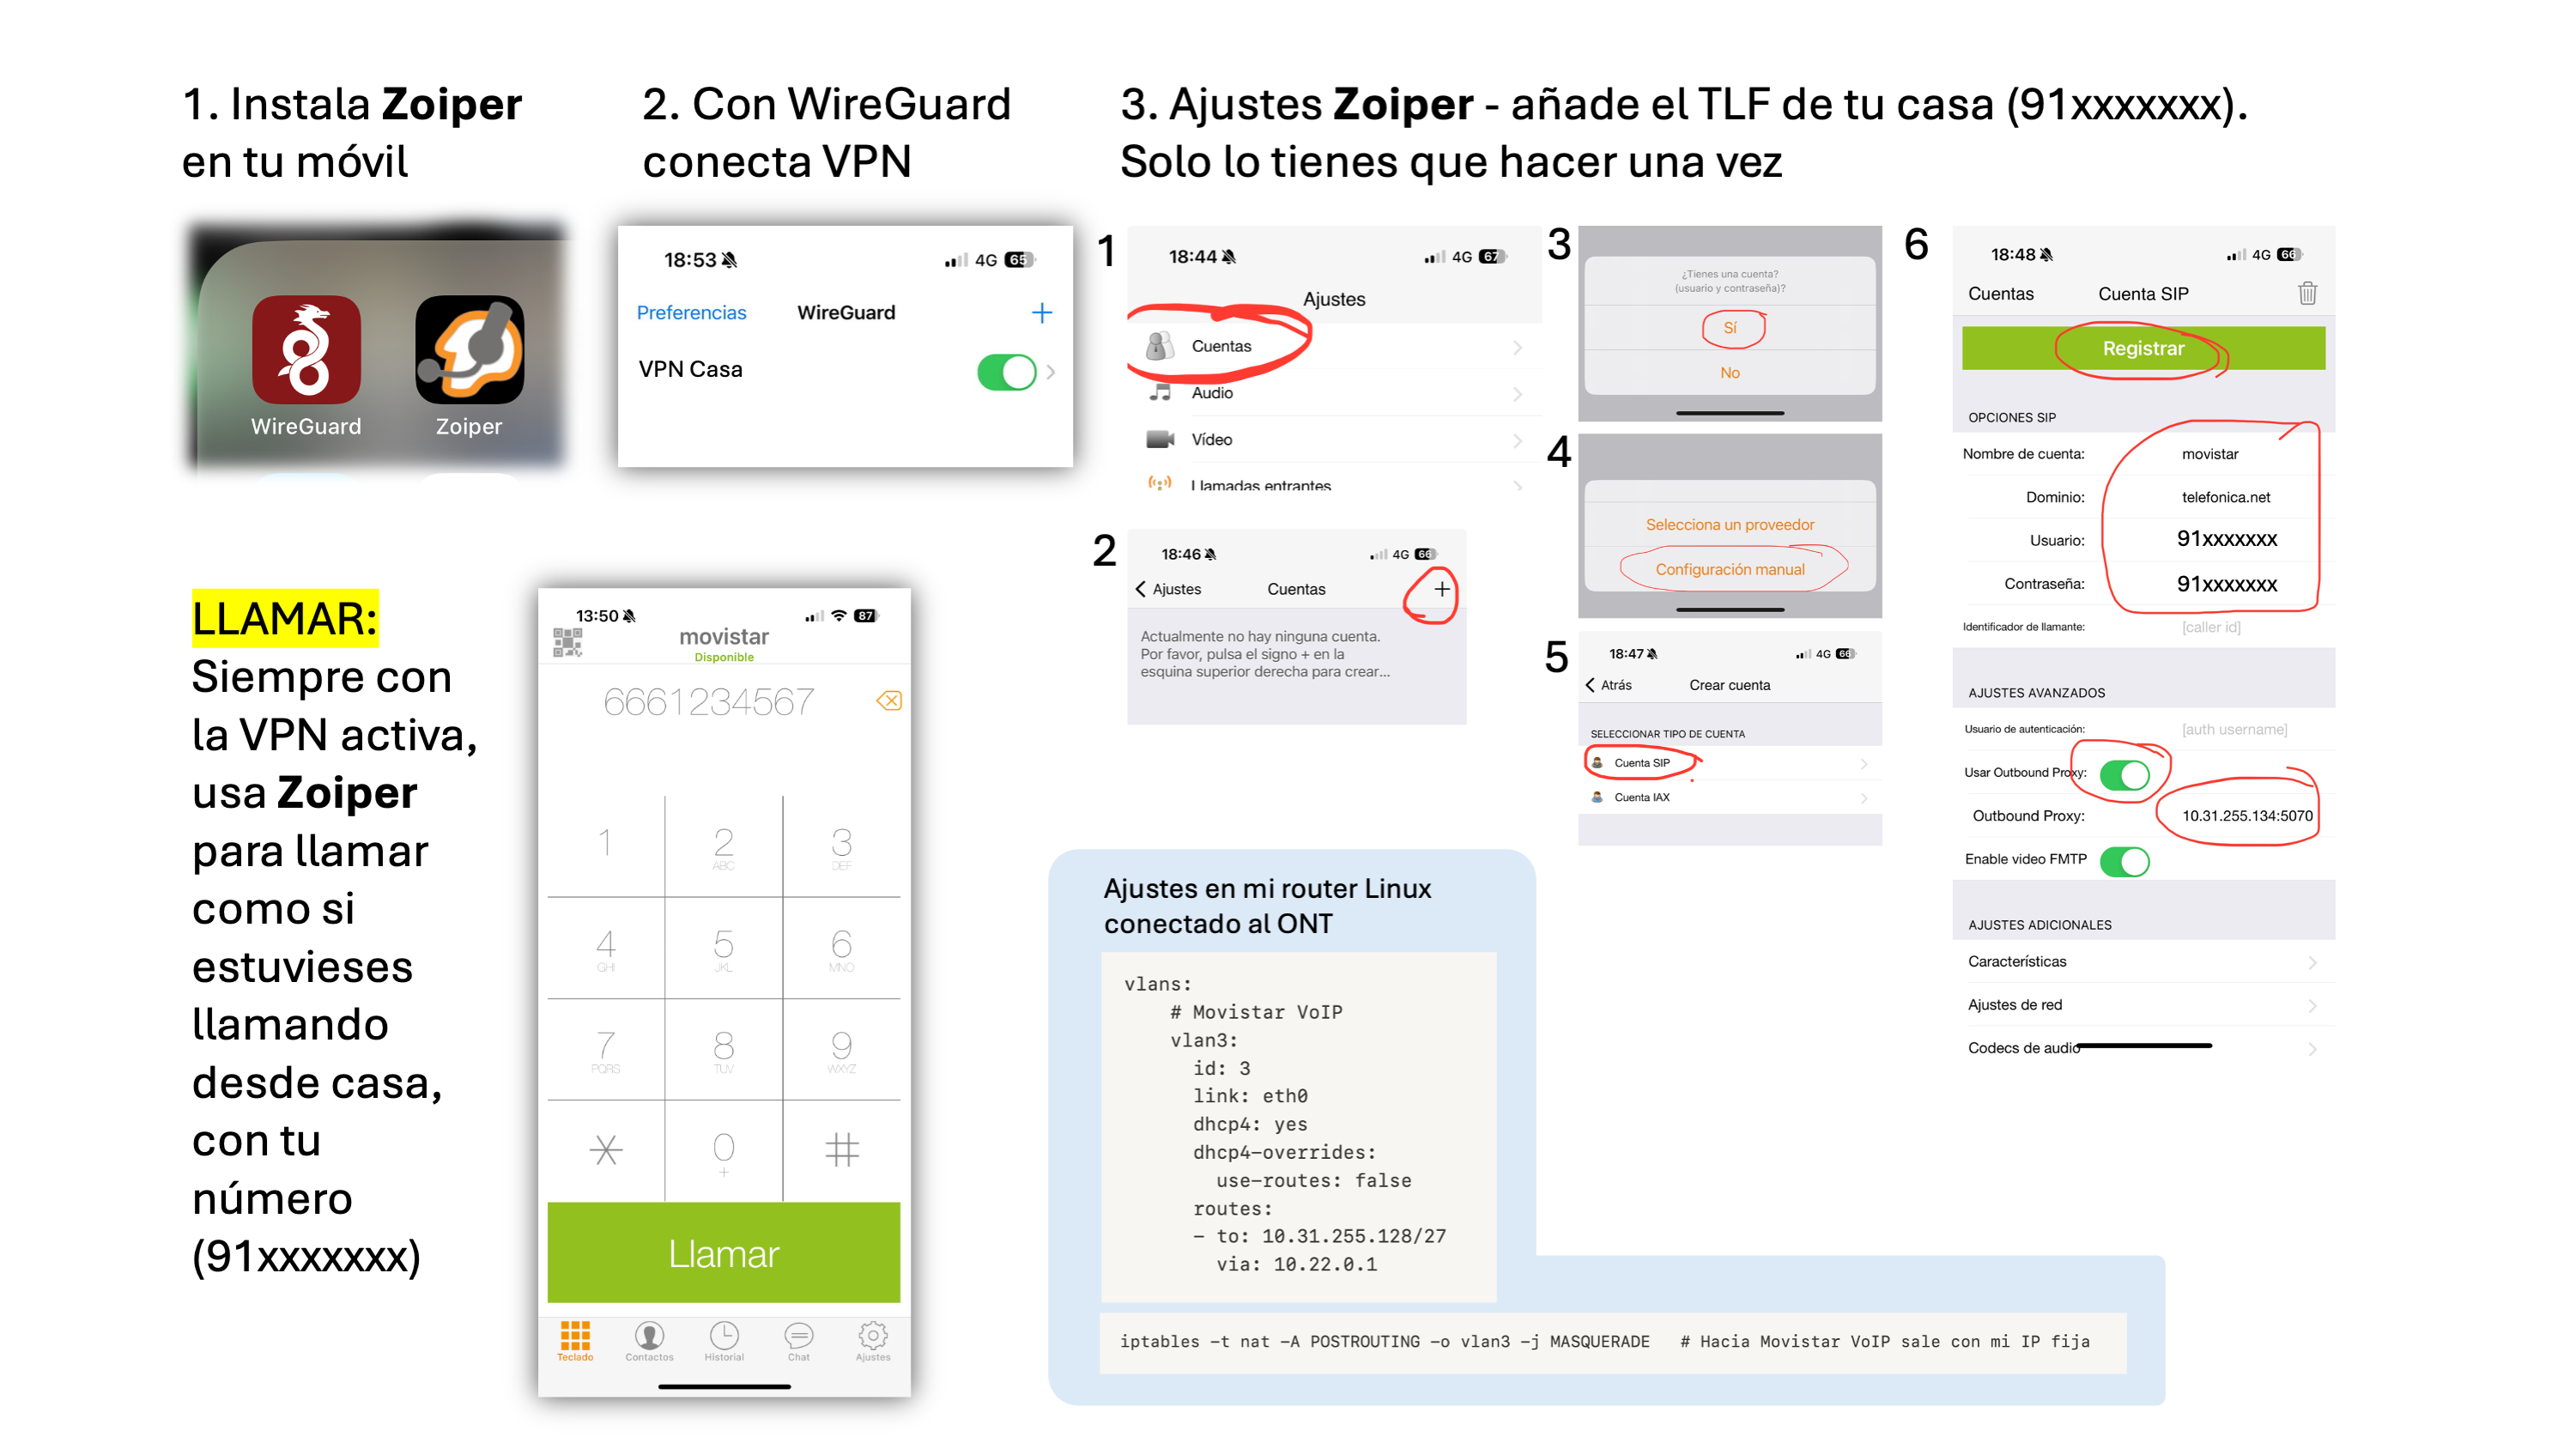
I’ve noticed a big difference between one software and another (in terms of stability). The traffic between the softphone and the registration server happens over UDP, and it’s important to have SourceNAT active on the Linux box as described in the networking section.
III. Television Service (vlan2)
IPTV traffic is delivered from the ONT through VLAN-2, where we’ll find OPCH, DVBSTP, and Multicast Stream services.
- OPCH: Imagenio servers that tell the set-top box the portal configuration, movies, etc.
- DVBSTP: Transfer protocol for the SD&S (Service Discovery & Selection) service, through which programming and channel information is sent to set-top boxes. Here’s a link to the standard.
- Multicast Streams: Traffic flows with “multicast” destination addresses, i.e., among others, the MPEG streams with the TV channel data that the set-top box has subscribed to.
On VLAN2 it’s important to use the same static IP address assigned by Movistar to the original Router — you need to find out what 10.214.X.Y/9 address it has. To find that IP you have a couple of options: 1) access the original router’s configuration or 2) “spy” with tcpdump or wireshark on the vlan 2 traffic (if your switch supports port-mirroring).
Note: If you want to try option (1), the original router configuration, you’ll need to change the Movistar Router password. Warning! It will no longer be manageable from the Movistar portal, so do this at your own risk and follow this simple process: Factory reset the router, start it up again and connect it to the ONT, it will auto-provision and get assigned a random password — wait for everything to work again. Enter the router configuration via Alejandra (movistar.es->Mi Movistar->Configure your router). In the menus you’ll see a “Password” option — follow all the steps (it will ask for multiple confirmations) to change the password. From there you can connect to the router from your intranet using http://192.168.1.1, username 1234 and the password you set.
Traffic types on vlan 2
Below are the traffic types I’ve observed on vlan2 with WireShark:
From the set-top box to Imagenio:
- UDP queries to the DNS Server (172.26.23.3)
- HTTP/TCP connection to Imagenio Services (172.26.22.23), for example Recordings, Settings, Personalization
From Imagenio to the set-top box [UDP - Multicast Flows]:
239.0.[0,3,4,5,6,7,8,9].* CHANNELS239.0.2.30:22222 OPCH239.0.2.129:3937 DVBSTP239.0.2.131:3937 DVBSTP239.0.2.132:3937 DVBSTP239.0.2.155:3937 DVBSTP
The remaining ranges should be configured to route through VLAN6 (or VLAN3 for VoIP). The set-top boxes use VLAN2 for 99% of traffic, but I observed some traffic on VLAN6…
Set-Top Box Boot
I power off the set-top box for more than 30 seconds (for a full restart), turn it on, and this is the activity I observe:
- After boot it makes a DHCP Request
- It should receive its IP, default router, DNS Server
172.26.23.3, andoption 240(see next point)
- It should receive its IP, default router, DNS Server
- It makes an IGMP Report (Join) to group
239.0.2.30, multicast traffic starts arriving and it subscribes to other groups (239.0.2.2, 239.0.2.129-134, 239.0.2.154-155) - In parallel it asks DNS for the IP of
main.acs.telefonica.net, tries to connect to it on port7008.- The TLS session fails with Expired Certificate Error - Probably (though I’ve never verified) it’s because at this point the set-top box hasn’t updated its date yet, it has 1/1/1970.
- NOTE: IT’S IMPORTANT THAT IT CONNECTS TO THIS SITE, despite the certificate error (if it can’t connect, it won’t progress in its boot). The certificate error doesn’t matter.
- I enter the Set-top box Configuration (each remote has a different key). By the time we get here I see it has managed to update the date (thanks to multicast traffic) and we can confirm the DHCP parameters, etc.
- If I leave the set-top box on the configuration menu, I observe that multicast traffic keeps arriving and it occasionally tries to connect to
main.acs.telefonica.net(still giving certificate errors, which as I’ve seen can be ignored). - I exit the Configurator, it shows “Loading ()()()” for a while… and behind the scenes it connects via TCP/HTTP to several sites, including
[http://www-60.svc.imagenio.telefonica.net:2001/appserver/mvtv.do?...](http://www-60.svc.imagenio.telefonica.net:2001/appserver/mvtv.do?...). - After quite a bit of TCP exchange (and of course lots of multicast is arriving) I start seeing images on the TV screen.
- After a while, the menus are loaded and everything is ready.
- As soon as I select a channel, it makes an IGMP Report (Join) and the channel starts playing.
Quite a lot happens behind the scenes even before reaching the configuration menu. If you don’t have routing properly configured (see the previous section), the DNS Server (172.26.23.3), IGMP Snooping, Multicast forwarding, RPF (see below), etc., you’ll have some kind of problem. Be careful because it’s very confusing when some things work and others don’t (multicast, unicast, nat, rtsp)…
DHCP for the Set-Top Boxes
On VLAN-100 I have the normal devices that access the internet — desktop, laptop. We also have the decoder(s). To facilitate provisioning (IP assignment, etc.) I use a DHCP server on Linux and deliver each network device its IP address, the DNS server IP, etc. I create a pool for normal devices and assign static, specific IPs for each set-top box MAC address (you’ll find the MAC address on a sticker on the back). You’ll see that I also deliver the OPCH address.
Example configuration using the ISC DHCP Server, file /etc/dhcp/dhcpd.conf:
:
ddns-update-style none;
authoritative;
:
option opch code 240 = text;
:
shared-network lan {
:
    subnet 192.168.1.0 netmask 255.255.255.0 {
        option routers 192.168.1.1;
        option subnet-mask 255.255.255.0;
        option domain-name "tudominio.com";
        option domain-name-servers 192.168.1.1;
        option interface-mtu 1496;
        allow bootp;
        allow booting;
        pool {
           range 192.168.1.210 192.168.1.249;
           # allow unknown-clients;
        }
    }
}
:
:
host deco-cocina {
        hardware ethernet 4c:9e:ff:0c:50:2c;
        fixed-address 192.168.1.200;
        option domain-name-servers 172.26.23.3;
        option opch ":::::239.0.2.10:22222:v6.0:239.0.2.30:22222";
}
IGMP Proxy
The set-top box JOINs will enter from VLAN100 into the Linux box, and it will be responsible for re-sending them toward VLAN2. This can be done in two ways: 1) Enabling the Ethernet Bridge option in the Kernel, or 2) much easier and recommended: using a program called igmpproxy.
This small program does two things:
- It listens for IGMP Joins/Leaves from the set-top boxes on the downstream interface (VLAN100, where the set-top boxes are) and replicates them on the upstream interface (VLAN2 where the sources are). The instant it replicates (sends to Movistar) the JOIN, multicast traffic (the video) will start arriving through the upstream interface (VLAN2).
- It installs and “Activates” routes in the Linux kernel so it (the kernel) can forward multicast packets. The moment it received the JOIN (1), it will try to install and “Activate” a route in the Kernel. If successful, the Kernel will start forwarding packets received on VLAN2 toward the set-top box(es) on the VLAN100 interface (downstream).
| IMPORTANT: igmpproxy does not forward the Multicast packets itself — it only replicates Joins/Leaves and installs/activates routes in the Kernel. It will be the kernel that handles forwarding packets coming from Movistar (upstream) to the set-top boxes (downstream). |
Preparing the Kernel for Multicast Forwarding
We focus on the forwarding layer, assuming everything above is already working and multicast UDP packets are arriving on the upstream interface (VLAN2). We need to install/activate routes in the Kernel and “convince” it to forward the traffic — it needs to do multicast routing. It’s very important to have the following configured in the Kernel:
:
CONFIG_IP_MULTICAST=y
CONFIG_IP_MROUTE=y
:
Then comes the part that causes the most headaches. We have everything, but “it doesn’t work” — traffic arrives on VLAN2, multicast is active in the kernel, igmpproxy is running, but routes “DON’T ACTIVATE.” They appear to be installed in the kernel but “don’t activate.”
What’s the solution? It consists of disabling RPF (Reverse Path Forwarding) checking on “ALL” and on the upstream interface (VLAN2), which is where the traffic from sources arrives. You must run these two commands during your machine’s boot:
| IMPORTANT: Don’t forget to disable RPF on the “All” option in addition to “vlan2” or it won’t work. |
___ Set "0" on the "All" option ____
# echo "0" > /proc/sys/net/ipv4/conf/all/rp_filter

___ Set "0" on the Upstream Interface ____
# echo "0" > /proc/sys/net/ipv4/conf/vlan2/rp_filter
Why do I need to disable RPF? Because normally the sources send their traffic from IP addresses that I don’t have in my routing table, and on Linux RPF is enabled (“1”) by default, so those packets get “blocked.” The simplest way to fix it is 1) insert routes to those sources through vlan2 or 2) disable RPF (the option I’ve chosen), so the Kernel allows “activating” them and from that moment on you’ll see it start forwarding traffic.
You need to disable (0) on All and vlan2, leaving the rest active (1) where RPF will continue working. You’ll notice that loopback (lo) is also disabled — that’s correct.
/proc/sys/net/ipv4/conf/all/rp_filter        0
/proc/sys/net/ipv4/conf/default/rp_filter    1
/proc/sys/net/ipv4/conf/vlan100/rp_filter    1
/proc/sys/net/ipv4/conf/vlan2/rp_filter      0
:
/proc/sys/net/ipv4/conf/lo/rp_filter         0
/proc/sys/net/ipv4/conf/ppp0/rp_filter       1
___ CHECK YOUR INSTALLATION ___
# for i in /proc/sys/net/ipv4/conf/*/rp_filter ; do echo $i; cat $i; done
Source NAT and Firewall (iptables)
Although I explained this before, a reminder: for the set-top box packets to go out through VLAN2 with your IP address (on vlan2), Source NAT is needed.
# iptables -t nat -A POSTROUTING -o vlan2 -s 192.168.1.0/24 -j SNAT --to-source 10.214.XX.YY

or easier:

# iptables -t nat -A POSTROUTING -o vlan2 -j MASQUERADE
Optional — if your Linux box is an internet router and you use iptables as a firewall, remember to accept multicast packets. Here’s a reminder:
iptables -I INPUT -d 224.0.0.0/4 -j ACCEPT
iptables -I OUTPUT -d 224.0.0.0/4 -j ACCEPT
iptables -I FORWARD -d 224.0.0.0/4 -j ACCEPT
igmpproxy Installation and Configuration
First we need to install the program. Here’s an example on Gentoo: emerge -v igmpproxy
Next you need to modify the configuration file. In the configuration it’s important to add the source prefix in the upstream (altnet 172.0.0.0/8 line). Note that I make a very exaggerated aggregate but it doesn’t matter in my case because I don’t have other multicast sources on my network.
- File
/etc/igmpproxy.conf
quickleave

phyint vlan2 upstream  ratelimit 0  threshold 1
        altnet 172.0.0.0/8

phyint vlan100 downstream  ratelimit 0  threshold 1

phyint enp2s0f0 disabled
phyint lo disabled
phyint ppp0 disabled
phyint vlan6 disabled
Startup on Gentoo:
# rc-update add igmpproxy default
# /etc/init.d/igmpproxy start
Troubleshooting
Check several things if you’re having problems with the IPTV service. To start, you should be able to ping the internal DNS Server that Movistar has on its own network for this TV service.
# ping 172.26.23.3
64 bytes from 172.26.23.3: icmp_seq=1 ttl=126 time=7.54 ms
64 bytes from 172.26.23.3: icmp_seq=2 ttl=126 time=4.24 ms
:
Warning! Some people have told me that this “ping” doesn’t work for them but the rest of the functions do. In fact, it worked for me for many months and suddenly stopped working, so better use the following — this should work and involves DNS queries. Try for example querying the SOA record from that DNS Server:
# dig @172.26.23.3 imagenio.telefonica.net | grep SOA
imagenio.telefonica.net. 10800  IN  SOA mmsdmco1-01.imagenio.telefonica.net. postmaster.imagenio.telefonica.net. 2015080901 86400 7200 2592000 345600
:
Instead of starting the daemon in the background, during testing or to troubleshoot and see “what’s happening,” run igmpproxy manually like this:
# /usr/sbin/igmpproxy -d -vv /etc/igmpproxy.conf
Additionally, you can check in other terminals how multicast routes are being inserted in the kernel, the traffic passing through each source, etc.
bolica ~ # cat /proc/net/ip_mr_cache
Group    Origin   Iif     Pkts    Bytes    Wrong Oifs
810900EF 3A4D1AAC 0      26264 35595536        0  2:1
560500EF 01481AAC 0      58765 78415404        0  2:1
4C0000EF 11481AAC 0      14704 19172500        0  2:1
9B0200EF 27141AAC 0        780   829104        0  2:1
810200EF 27141AAC 0        168   172648        0  2:1
1E0200EF 27141AAC 0       1430   848580        0  2:1
FAFFFFEF F301A8C0 -1         0        0        0
FAFFFFEF 0101A8C0 -1         0        0        0

bolica ~ # cat /proc/net/ip_mr_vif
Interface      BytesIn  PktsIn  BytesOut PktsOut Flags Local    Remote
 0 vlan2      774846616  584180         0       0 00000 2673D60A 00000000
 1 vlan3             0       0         0       0 00000 6BC2190A 00000000
 2 vlan100           0       0  774846616  584180 00000 0101A8C0 00000000
 5 ppp0              0       0         0       0 00000 B9FB1C50 00000000

# ip mroute
(172.26.20.41, 239.0.2.2) Iif: vlan2 Oifs: vlan100
(172.26.20.41, 239.0.2.30) Iif: vlan2 Oifs: vlan100
(172.26.20.39, 239.0.2.130) Iif: vlan2 Oifs: vlan100
(172.26.20.39, 239.0.2.129) Iif: vlan2 Oifs: vlan100
(172.26.20.39, 239.0.2.155) Iif: vlan2 Oifs: vlan100
Verify that routing is active (and RPF is disabled) in the kernel:
___ GENERAL ____
# cat /proc/sys/net/ipv4/ip_forward
1

___ UPSTREAM INTERFACE (VLAN2) ____
bolica ~ # cat /proc/sys/net/ipv4/conf/vlan2/forwarding
1
bolica ~ # cat /proc/sys/net/ipv4/conf/vlan2/rp_filter
0

___ DOWNSTREAM INTERFACE (VLAN100) ____
bolica ~ # cat /proc/sys/net/ipv4/conf/vlan100/forwarding
1
bolica ~ # cat /proc/sys/net/ipv4/conf/vlan100/rp_filter   (No need to disable RPF here)
1

___ WHEN STARTING IGMPPROXY YOU'LL SEE THESE SET TO 1 ____
bolica ~ # cat /proc/sys/net/ipv4/conf/vlan2/mc_forwarding
1
bolica ~ # cat /proc/sys/net/ipv4/conf/vlan100/mc_forwarding
1
Verify your RPF configuration
# for i in /proc/sys/net/ipv4/conf/*/rp_filter ; do echo $i; cat $i; done
IGMP Snooping
It’s important to prevent the intranet where the set-top boxes (or other receivers) reside from being flooded with Multicast traffic on all its ports. If we do nothing, when sending multicast traffic toward VLAN100 the switch will replicate it to all ports belonging to that VLAN — a storm of unnecessary traffic we don’t need. Where we especially don’t want it is on the Wi-Fi access points — imagine receiving an extra 10, 20, 30Mbps; it would be disastrous for Wi-Fi client quality.
To fix this, you don’t need to do anything on the Linux box — only on the ethernet switch. It’s as simple as enabling IGMP Snooping, which you can usually do per port, port groups, per VLAN, etc. depending on the switch.
By enabling it we’re telling the switch to snoop on IGMP traffic, maintain a map of which ports request to subscribe to (multicast) flows, and thus know who to send to and who not to.
Watching TV
If you’ve made it this far, you’ll be eager to “watch” TV. There are several options for doing so. The first and most obvious is to use the “set-top box” that Movistar provides with the service, but you could also try using an IPTV client.
Movistar “Set-Top Box” Client
This is the most straightforward and simple method. To configure it, repeatedly press the menu key after starting it up — when the last square is blinking during boot. You’ll enter the firmware configuration menu, and from there you can enable (it comes this way by default) DHCP. Entering with the menu key isn’t really necessary — it’s just to see that it receives the correct IP from the DHCP Server.
Once it’s powered on and connected to your TV, everything should work — well, almost everything (later you’ll see the Video on Demand topic).
“VLC” IPTV Client
Another obvious and simple method: use the best video client out there — VLC. In fact, before trying other options, this is the one I recommend. Once launched on your computer, select “Open Network” and use the following URL: rtp://@239.0.0.76:8208 to watch TVE-1. That’s it — you’ve used VLC as an IPTV client with multicast protocol.


Example Channel List File
| At this link I leave the Movistar TV Channel List (valid as of October 2014). Save the content in a file named Movistar.m3u and use it from VLC. |
TVHeadend (as IPTV client)
A much better option: step into the world of Media Centers, where you’ll need clients like XBMC/KODI on computers or Raspberry Pis. To “serve” them, the best I’ve tested so far is Tvheadend, so I recommend installing Tvheadend (GitHub tvheadend). It’s a DVR (Digital Video Recorder) and TV streaming server that supports all kinds of sources: DVB-C, DVB-T(2), DVB-S(2), ATSC, and also “IPTV (UDP or HTTP)” — the latter being precisely what interests me.
You might ask: why do I want a TV Streaming Server if “that’s precisely” what I already have working? The answer is that I’m not going to use it to receive satellite or DTT sources and convert them into multicast streams. I’m going to use it as an intermediary that reads Movistar TV multicast streams and delivers them via the HTSP protocol to IPTV clients on my network.
One advantage is that you can use “cheap” Media Centers like a Raspberry Pi with OpenELEC (XBMC) that comes with the TVHeadend HTSP client built in (check out this other post about a Media Center integrated with Movistar TV). Another important advantage is that with TVHeadend we can integrate the Movistar TV EPG.
I’m installing the latest version available on GitHub because I need version 3.9+ to take advantage of its full power. Installation process:
totobo ~ # echo "=media-video/libav-11.3 ~amd64" >> /etc/portage/package.accept_keywords
totobo ~ # echo "=media-tv/tvheadend-9999 **" >> /etc/portage/package.accept_keywords
totobo ~ # echo "media-tv/tvheadend avahi dvb dvbscan ffmpeg zlib xmltv"  >> /etc/portage/package.use
totobo ~ # emerge -v media-tv/tvheadend
:
totobo ~ # /etc/init.d/tvheadend start
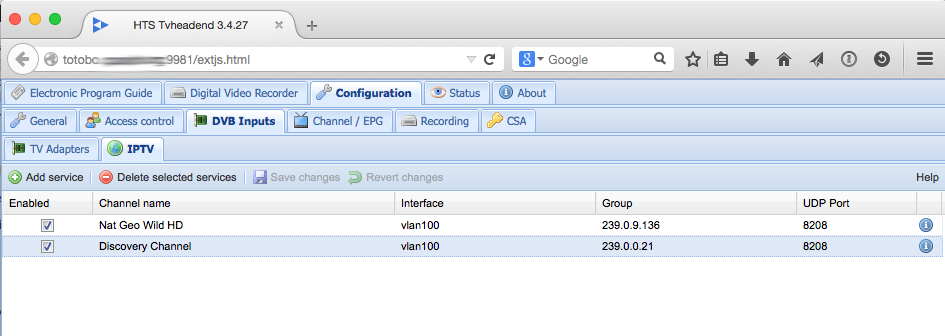
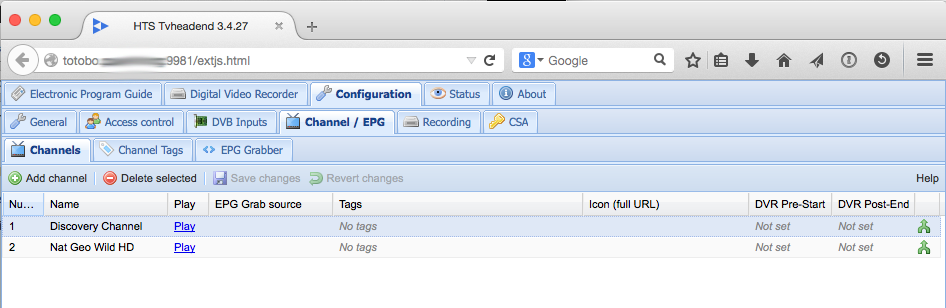
Once started, I can connect to its web interface on port 9981 (http://your_linux_ip:9981), register IPTV sources, channels, and “see” who’s accessing them. In the following example I’ve configured two channels:
Next I configure my Raspberry Pi client with OpenElec to connect to TVheadend using the “TVHeadend HTSP Client” plugin

One of the advantages is the ability to monitor who’s using the service and how much bandwidth they’re consuming (an HD Movistar channel is typically ~10Mbps).

udpxy
To achieve this we have this small package which is simply brilliant. It’s a Daemon that allows relaying UDP multicast traffic to TCP (HTTP) clients. In other words, it handles multicast traffic on one side and lets us watch channels over HTTP on the other. Translated: it lets any client PCs, Macs, Linux boxes, etc. with an IPTV client that only supports HTTP watch the channels.
First I install it (Gentoo): emerge -v udpxy and configure it:
UDPXYOPTS="-a vlan100 -p 4022 -m vlan2 -c 16"
Here we’re saying: listen on TCP port 4022 on vlan100, subscribe to multicast groups through the vlan2 interface, and with the -c 16 argument we tell it to support up to 16 clients (note that by default it serves a maximum of 3 clients). When a client asks to watch a specific channel through vlan100 (over HTTP), it will subscribe to that channel on vlan2 and as soon as it starts receiving the video (via multicast on vlan2) it will forward it to the client over HTTP on vlan100.
Startup on Gentoo: /etc/init.d/udpxy start
From here you can connect to sources using the HTTP protocol. As an example with VLC, using the following Network address you should see TVE2:
[http://192.168.1.1:4022/udp/239.0.0.2:8208](http://192.168.1.1:4022/udp/239.0.0.2:8208)
**Example Channel List File in HTTP format**
| At this link I leave the Movistar TV Channel List in HTTP format (valid as of October 2014), in case you prefer the UDPXY vs IGMP Proxy + RTP option. |
udpxrec
Another gem… that comes with udpxy and allows us to schedule recordings. Not bad at all!
Example:
udpxrec -b 15:45.00 -e +2:00.00 -M 1.5Gb -n 2 -B 64K -c 239.0.0.2:8208 /mnt/Multimedia/0.MASTER/videos/Pelicula.mpg
Schedules a recording of the multicast channel 239.0.0.2:8208 at 15:45 today, with a recording time of two hours or also stopping if the file size exceeds 1.5Gb. The socket buffer size is set to 64Kb; increments the nice value by 2 (Linux process priority) and specifies the output file.
xupnpd
And the last gem, this other program xupnpd that allows announcing channels and multimedia content through DLNA. Via DLNA (UPnP) it will deliver a customized list of Imagenio channels to LAN devices. There are multiple clients that can consume this service, for example VLC, so you don’t have to create an .m3u file on each computer.
Installing xupnpd on Gentoo is a bit more complicated than usual — you need layman, so here’s a quick guide in case you don’t have it installed:
- File:
/etc/portage/package.accept_keywords
=app-portage/layman-2.3.0 ~amd64
=net-misc/xupnpd-9999 **
- File:
/etc/portage/package.unmask
=net-misc/xupnpd-9999
- File:
/etc/portage/package.usr/layman
app-portage/layman git mercurial
- Install
layman
# emerge -v layman
# mkdir /etc/portage/repos.conf
# layman-updater -R
# layman -L
# layman -a arcon
- Install
xupnpd
# emerge -v xupnpd
Configuration: note that I only show which options I changed from the original file
- File `/etc/xupnpd/xupnpd.lua
:
cfg.ssdp_interface='vlan100'
cfg.embedded=true <== Disable Logging
cfg.udpxy_url='http://192.168.1.1:4022'
cfg.mcast_interface='vlan100'
cfg.name='TV Casa'
:
Next, prepare an “m3u” file — I recommend copying/pasting all the channels from the file shown in the IGMP Proxy > VLC Client > “Movistar.m3u via RTP” section. Don’t use the HTTP one. Copy/paste the channels you’re interested in and create an M3U file in the playlists directory with any name: /etc/xupnpd/playlists/Movistar TV.m3u
- Daemon startup (Gentoo):
# /etc/init.d/xupnpd start
There you go — now you just need to consume this service with any UPnP client, for example Smart TVs (for those you don’t have a set-top box for), VLC, or XBMC-based media centers.
- From a Smart TV, look for the Plug’n’Play option
- VLC, select
Local Network>Universal Plug'n'Play - Media Center, for example based on Raspberry Pi + XBMC and configure it with the “PVR IPTV Simple Client” Add-On to access this service.
For the PVR IPTV Simple Client, it’s configured like this:
:
General
 Location: Remote Path (internet address)
 MRU Play List URL: http://192.168.1.1:4044/ui/Movistar%20TV.m3u
 Cache m3u at local storage (x)
 Numbering channels starts at: 1
:
Video on Demand Access
There’s one last detail I’ve left for the end. The Movistar Fusion Video service allows selecting and watching video on demand in two situations: 1) playing a recording you’ve scheduled, or 2) playing a video from the Movistar TV guide.
It’s a bit complicated, so I’ve created a dedicated technical post that you’ll find at video on demand for Movistar
Summary
The startup order for all scripts seen in this article is shown below. Note that I’ve scheduled them to start at boot (on Gentoo it would be done like this: rc-update add zebra default).
# /etc/init.d/zebra start
# /etc/init.d/ripd start
# echo "0" > /proc/sys/net/ipv4/conf/vlan2/rp_filter
# /etc/init.d/igmpproxy start
# /etc/init.d/udpxy start
# /etc/init.d/xupnpd start