In this post I describe how to install Gentoo Linux on a Raspberry Pi 2. I needed to compile Tvheadend for ARMv7 and set it up on a MOIPro, so I opted to use Gentoo as a development machine for ARM. Regardless of the use case, if you follow these steps you’ll have a Gentoo Linux on an RPi2.
Requirements:
- A Micro-SD (I used a 16GB class 10)
- PC or VM with Gentoo Linux (with access to the Micro-SD)
- A 2A power supply
- An RPi2 + USB keyboard
Format the Micro-SD
I recommend the Quick Format option of the SDFormatter program:
- Insert the card which will mount as “
NO NAME”. - Find the device (turned out to be
/dev/disk3):df -h - Run SDFormatter
- Unmount the volume:
sudo diskutil unmount /dev/disk3s1

Prepare the File Systems
To prepare the Micro-SD File Systems I’ll use a PC (or Virtual Machine) where I already have Linux installed and that can also access the Micro-SD.
For me the easiest approach was to use a VM with Gentoo Linux (x86_64) running on Parallels for MacOX. After starting it, I connect the Micro-SD to the virtual machine, which recognizes it as /dev/sdb.
From this virtual machine, using fdisk, I create three partitions on the Micro-SD:
- Partition 1: Type “c” (W95 FAT32 (LBA)), 50MB. This will be the boot partition.
- Partition 2: Type “82” (Linux SWAP), 256MB. Partition for the SWAP area
- Partition 3: Type “83” (Linux), rest of the disk space for root
obelix:~ luis$ ssh -l root menhir.tudominio.com
:
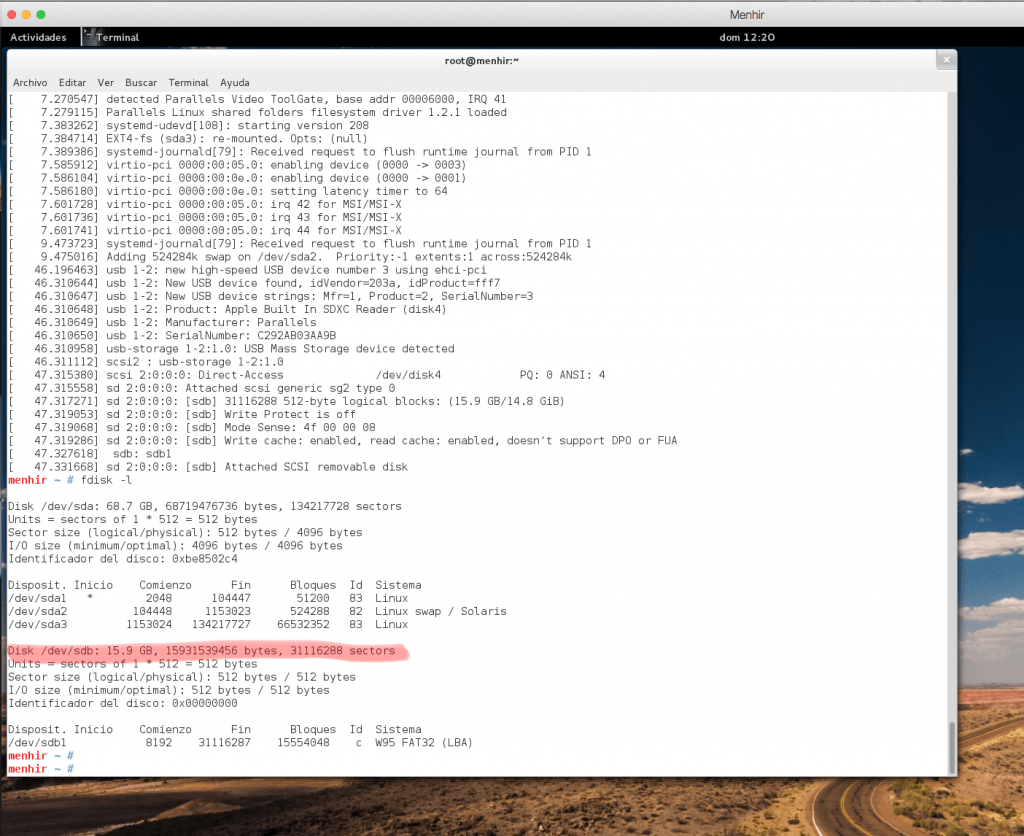
menhir ~ # fdisk -l
Device Boot Start End Sectors Size Id Type
/dev/sdb1 * 2048 100351 98304 48M c W95 FAT32 (LBA)
/dev/sdb2 100352 600063 499712 244M 82 Linux swap / Solaris
/dev/sdb3 600064 31116287 30516224 14,6G 83 Linux
- I create the filesystems and mount them
menhir ~ # mkfs.vfat -F 16 /dev/sdb1
menhir ~ # mkfs.ext4 /dev/sdb3
menhir ~ # mkswap /dev/sdb2

menhir ~ # mkdir /mnt/sd_boot
menhir ~ # mkdir /mnt/sd_root

menhir ~ # mount /dev/sdb1 /mnt/sd_boot/
menhir ~ # mount /dev/sdb3 /mnt/sd_root/
Prepare the “/boot” partition
As you saw before, the boot partition is VFAT type (the native format of MSDOS and Windows), and is used to boot the Linux we’re going to install on the Raspberry. What we’ll do is leverage a project from the Raspberry team available on GitHub to facilitate this entire boot process.
You could do a full clone of the project (careful! it’s huge) or better… use svn to download only the /boot directory (GIT doesn’t allow downloading directories from a project, but fortunately GitHub supports subversion).
menhir ~ # mkdir rpi2
menhir ~ # cd rpi2/

___OPTION 1___
menhir rpi2 # git clone https://github.com/raspberrypi/firmware.git

___OPTION 2___  <== RECOMMENDED
menhir rpi2 # svn export https://github.com/raspberrypi/firmware/trunk/boot
- I copy the contents of the boot directory to the boot filesystem /mnt/sd_boot/:
___OPTION 1___
menhir rpi2 # cp -r firmware/boot/* /mnt/sd_boot

___OPTION 2___
menhir rpi2 # cp -r boot/* /mnt/sd_boot
- I create a /mnt/sd_boot/cmdline.txt file
root=/dev/mmcblk0p3 rw rootwait console=ttyAMA0,115200 console=tty1 selinux=0 plymouth.enable=0 smsc95xx.turbo_mode=N dwc_otg.lpm_enable=0 kgdboc=ttyAMA0,115200 elevator=noop

[dropshadowbox align="center" effect="lifted-both" width="550px" height="" background_color="#ffffff" border_width="1" border_color="#dddddd" ]
| WARNING: Next we will compile our own Kernel and overwrite the one we just copied. |
Compile the ARM Kernel
The next step is to create my own Kernel by compiling for ARM for the RPi2. I’m going to do this from my Virtual Machine with Linux x86_64, this is called “cross-compiling” and therefore I’m going to install the crossdev package.
- I install GIT and CROSSDEV:
menhir ~ # emerge -pv dev-vcs/git crossdev
| I create a local “output overlay” (more information here) |
Overlays contain additional ebuilds that are not part of the main portage tree. The overlay I need to create is local to this Gentoo where I’m going to do the “crossdev”
menhir ~ #
menhir ~ # mkdir -p /usr/local/portage/{metadata,profiles}
menhir ~ # echo 'OverLayLuisPa' > /usr/local/portage/profiles/repo_luis
menhir ~ # echo 'masters = gentoo' > /usr/local/portage/metadata/layout.conf
menhir ~ # chown -R portage:portage /usr/local/portage
menhir ~ #
menhir ~ # mkdir -p /etc/portage/repos.conf
menhir ~ # cat > /etc/portage/repos.conf/local.conf
[OverlayLuisPa]
location = /usr/local/portage
masters = gentoo
auto-sync = no
^D
- I create the
toolchainto be able to compile and generate code for ARM.
menhir ~ #
menhir ~ # crossdev -S -v -t armv7a-hardfloat-linux-gnueabi

 * crossdev version:      20140917
 * Host Portage ARCH:     amd64
 * Target Portage ARCH:   arm
 * Target System:         armv7a-hardfloat-linux-gnueabi
 * Stage:                 4 (C/C++ compiler)
 * ABIs:                  default

 * binutils:              binutils-[stable]
 * gcc:                   gcc-[stable]
 * headers:               linux-headers-[stable]
 * libc:                  glibc-[stable]

 * CROSSDEV_OVERLAY:      /usr/local/portage
 * PORT_LOGDIR:           /var/log/portage
 * PORTAGE_CONFIGROOT:
:
Next I need to get the Kernel .config file. This step is important, doing it manually can lead to errors. It’s best to leverage the work already done by the Raspberry team or download a copy of my .config file.
Option 1: Download this version of the
.configfile.Option 2: Leverage the work done by the Raspberry team. I access a RASPBIAN installed on an RPi2, for example Raspbian 2015-05-05, extract the Kernel config and copy it to the Linux I’ll use to compile the Kernel.
___ ON AN RPi2 WITH RASPBIAN ___
:
pi@raspberrypi ~ $ sudo su -
root@raspberrypi:~# dd if=/proc/config.gz of=originalRPi2Config.gz
root@raspberrypi:~# mv originalRPi2Config.gz /home/pi/
root@raspberrypi:~# exit

___ ON THE x86 LINUX WHERE I'M GOING TO COMPILE THE KERNEL ___
menhir rpi2 # scp pi@192.168.1.53:originalRPi2Config.gz .
:
menhir ~ # cd rpi2/
menhir rpi2 # gunzip originalRPi2Config
menhir rpi2 #
- I download the Linux sources
menhir ~ # cd rpi2
menhir rpi2 # git clone --depth 1 git://github.com/raspberrypi/linux.git
:
menhir rpi2 # cp originalRPi2Config linux/.config
- Prepare the kernel (
make oldconfig)
menhir rpi2 # git clone --depth 1 git://github.com/raspberrypi/linux.git
menhir rpi2 # cd linux
menhir linux # ARCH=arm CROSS_COMPILE=/usr/bin/armv7a-hardfloat-linux-gnueabi- make oldconfig
- Optionally you can modify it (
make menuconfig)
menhir linux # ARCH=arm CROSS_COMPILE=/usr/bin/armv7a-hardfloat-linux-gnueabi- make menuconfig
- Compile the kernel (make)
menhir linux # ARCH=arm CROSS_COMPILE=/usr/bin/armv7a-hardfloat-linux-gnueabi- make -j9
(NOTE: -j'n', where 'n' is the number of CPUs+1)
- I copy the kernel image (linux/arch/arm/boot/Image) to the Micro-SD (/mnt/sd_boot/kernel7.img).
menhir linux # mv /mnt/sd_boot/kernel7.img /mnt/sd_boot/kernel7.img.old
menhir linux # cp arch/arm/boot/Image /mnt/sd_boot/kernel7.img
Install Stage3
- I download the latest Stage3 (check here for the latest one)
menhir ~ # wget http://distfiles.gentoo.org/releases/arm/autobuilds/current-stage3-armv7a_hardfp/stage3-armv7a_hardfp-20150508.tar.bz2
menhir ~ # tar xpjf stage3-armv7a_hardfp-20150508.tar.bz2 -C /mnt/sd_root/
- I copy the linux sources
menhir rpi2 # cp -R /root/rpi2/linux /mnt/sd_root/usr/src/linux
- I edit the
CFLAGSline in themake.conffile
CFLAGS="-O2 -mcpu=cortex-a7 -mfpu=neon-vfpv4 -mfloat-abi=hard"
- I edit the fstab
/dev/mmcblk0p1          /boot           vfat            defaults        0 2
/dev/mmcblk0p2          none            swap            sw              0 0
/dev/mmcblk0p3          /               ext4            defaults        0 1
- I change root’s password. You need to create the password and modify the
/mnt/sd_root/etc/shadowfile.
menhir etc # openssl passwd -1
Password:
Verifying - Password:
$1$9M1234sS$W/9C51234gxyxO2xE8Fnl0
menhir etc # nano /mnt/sd_root/etc/shadow
__CHANGE THE '*' after root with the HASH you got
- In the
/mnt/sd_root/etc/inittabfile, comment out the lines0:12345:respawn:/sbin/agetty -L 9600 ttyS0 vt100.
Install Portage
- Download and extract the latest version of portage
menhir ~ # wget http://distfiles.gentoo.org/snapshots/portage-latest.tar.bz2
menhir ~ # tar xpjf portage-latest.tar.bz2 -C /mnt/sd_root/usr
Boot
- Unmount the filesystems
menhir ~ # sync
menhir ~ # umount /mnt/sd_boot
menhir ~ # umount /mnt/sd_root
Boot your new Pi2 with Gentoo Linux. Insert the Micro-SD into the Pi and power it on. That’s it, you should have an RPi2 with Gentoo Linux ready to boot.
Migrate to systemd and configure
Once the machine reboots we need to complete the installation. I recommend migrating to systemd to speed up the boot. There are also many things still to configure.

- Set the clock
localhost ~ # date MMDDHHMMYYYY
- Overwrite
/etc/portage/profileto add systemd
menhir ~ # mkdir /etc/portage/profile
menhir ~ # cp /usr/portage/profile/targets/systemd/* /etc/portage/profile
menhir ~ # rm /etc/portage/profile/eapi
menhir ~ # emerge -avDN @world
Hostname: With systemd we stop using /etc/conf.d/hostname, so I’ll directly edit the two files that systemd uses:
$ cat /etc/hostname
gentoopi

$ cat /etc/machine-info
PRETTY_NAME="Gentoo Pi"
ICON_NAME="gentoo"
- Recommended adjustments when working with Gentoo
localhost ~ # emerge -v eix genlop
localhost ~ # eix-update
- I prepare mtab, creating a special symbolic link
localhost ~ # rm /etc/mtab
localhost ~ # ln -sf /proc/self/mounts /etc/mtab
- I activate systemd. I add
init=/usr/lib/systemd/systemdto the/boot/cmdline.txtfile so that on the next boot it uses systemd.
root=/dev/mmcblk0p3 rw rootwait console=ttyAMA0,115200 console=tty1 selinux=0 plymouth.enable=0 smsc95xx.turbo_mode=N dwc_otg.lpm_enable=0 kgdboc=ttyAMA0,115200 elevator=noop
- Reboot
localhost ~ # reboot
Keyboard and Locale
I configure the keyboard and locales with systemd by running the following three commands:
The first command modifies /etc/vconsole.conf
# localectl set-keymap es
The next one modifies /etc/X11/xorg.conf.d/00-keyboard.conf
# localectl set-x11-keymap es
The next one modifies /etc/locale.conf
# localectl set-locale LANG=es_ES.UTF-8
The last one is simply to verify
# localectl
System Locale: LANG=es_ES.UTF-8
VC Keymap: es
X11 Layout: es
Prepare the locale.gen file
en_US ISO-8859-1
en_US.UTF-8 UTF-8
es_ES ISO-8859-1
es_ES@euro ISO-8859-15
es_ES.UTF-8 UTF-8
en_US.UTF-8@euro UTF-8
es_ES.UTF-8@euro UTF-8
Compile the “locales”
# locale-gen
Networking
Let’s “connect”. I install, enable and start DHCP. Services in systemd are scheduled for future boots with systemctl enable and can be started or stopped with systemctl start/stop.
# systemctl enable dhcpcd.service
# systemctl start dhcpcd.service
If all else fails you can always assign a static IP while you fix the problem. Find out the name of the interface, here’s an example:
# dmesg | grep -i e1000
[    3.563105] e1000: Intel(R) PRO/1000 Network Driver - version 7.3.21-k8-NAPI
[    3.563111] e1000: Copyright (c) 1999-2006 Intel Corporation.
[    3.917422] e1000 0000:02:00.0 eth0: (PCI:66MHz:32-bit) 00:0c:29:c2:79:ea
[    3.917429] e1000 0000:02:00.0 eth0: Intel(R) PRO/1000 Network Connection
[    4.038847] e1000 0000:02:00.0 enp2s0: renamed from eth0
[    5.288029] e1000: enp2s0 NIC Link is Up 1000 Mbps Full Duplex, Flow Control: None

# ifconfig enp2s0 192.168.1.242 netmask 255.255.255.0
# ip route add default via 192.168.1.1
Enable SSHD
Another essential, I enable and start the SSH daemon to be able to connect to this VM via ssh. If in the future you want to forward X11, remember to set X11Forwarding yes in the /etc/ssh/sshd_config file.
# systemctl enable sshd.service
# systemctl start sshd.service
Note: If sshd doesn’t work for you, try:
# systemctl disable sshd.service
# systemctl enable sshd.socket
Vixie-cron
I install, enable and start cron
# emerge -v vixie-cron
# systemctl enable vixie-cron.service
# systemctl start vixie-cron.service
Date and time
To configure date/time you should use timedatectl. Don’t miss this post about how to set up the (NTP service)
# timedatectl set-local-rtc 0
# timedatectl set-timezone Europe/Madrid
# timedatectl set-time 2012-10-30 18:17:16 <= Set the correct time first.
# timedatectl set-ntp true <= Enable NTP
Update portage
First do a “perl-cleaner” and then a complete update.
:
# perl-cleaner --reallyall
:
# emerge -DuvN system world
User and reboot
From a shell I add a normal user and finally reboot the machine. Here’s an example:
# groupadd -g 1400 luis
# useradd -u 1400 -g luis -m -G cron,audio,cdrom,cdrw,users,wheel -d /home/luis -s /bin/bash luis
:
# passwd luis
New password:
Retype new password:
:
Reboot again…
# reboot. (Or "halt" to shut it down)
Compile Tvheadend 4.1 for MOI Pro
As I mentioned at the beginning of this post, I built a Linux (Gentoo) on a Raspberry Pi2 to have a development platform for ARM and get executables for this platform. The main use case is to compile my own version of Tvheadend for my MOI Pro. In May 2015 the available version on GitHub was HTS Tvheadend 4.1-49.

Compilation
- Prepare a working directory on the “Gentoo Pi2”
With a normal user (no need to be root), I download the sources from GitHub.
luis@gentoopi ~ $ mkdir -p $HOME/src/tvheadend
luis@gentoopi ~ $ cd src/tvheadend
luis@gentoopi ~/src/tvheadend $ git clone https://github.com/tvheadend/tvheadend.git /home/luis/src/tvheadend
- Update Tvheadend to the latest version
Switch to the master version:
luis@gentoopi ~/src/tvheadend $ git checkout master
Only if this is a re-compilation, because time has passed and you want to sync to the latest version and recompile:
luis@gentoopi ~/src/tvheadend $ git pull
luis@gentoopi ~/src/tvheadend $ make clean
luis@gentoopi ~/src/tvheadend $ rm -fr build.linux
- Configure before compiling
The configuration is done with the following command:
luis@gentoopi ~/src/tvheadend $ ./configure --disable-libav --disable-libffmpeg_static --disable-avahi --cpu=armv7a --release --enable-kqueue --enable-bundle
- Compilation
luis@gentoopi ~/src/tvheadend $ make
Installation on MOI Pro
- Transfer the executable
I transfer the new executable to the MOI Pro device, to the /usr/local/bin directory. Since I compiled with the --enable-bundle option, the executable includes all necessary files embedded.
luis@gentoopi ~/src/tvheadend $ scp build.linux/tvheadend root@moipro.tudominio.com:.
:
[root@MOIPro ~]# mv tvheadend /usr/local/bin/tvheadend
:
- Make a backup of the original version
Although I’m going to install a version in parallel with the existing one, without deleting or modifying it, I always make a Backup of the factory Tvheadend.
[root@MOIPro ~]# systemctl stop tvheadend
:
[root@MOIPro ~]# systemctl disable tvheadend
:
[root@MOIPro ~]# cp /usr/bin/tvheadend /usr/bin/tvheadend.original
:
[root@MOIPro ~]# cd /media/mmcblk0p1/usr/share/
[root@MOIPro /media/mmcblk0p1/usr/share]# tar cvfz 2015-05-24-backup-share_tvheadend.tgz tvheadend/
:
[root@MOIPro ~]# cd /\(null\)/.hts/
[root@MOIPro /(null)/.hts]# tar cvfz 2015-05-24-tvheadend-backup.tgz tvheadend/
:
- Create a new tv.service service file
I create a new /etc/systemd/system/tv.service file to be able to start the daemon from /usr/local/bin without conflicting with the existing one (tvheadend.service).
[Unit]
Description=TV streaming server
After=syslog.target

[Service]
Type=forking
PIDFile=/run/tvheadend.pid
ExecStart=/usr/local/bin/tvheadend -f -p /run/tvheadend.pid -C -u root -g root
ExecStop=/usr/bin/rm /run/tvheadend.pid
Restart=always
RestartSec=1

[Install]
WantedBy=multi-user.target
- Transfer the configuration
I already had a Tvheadend configuration in /otro/path/.hts/tvheadend, so I copy it to the directory the new executable will use /root/.hts/tvheadend.
[root@MOIPro ~]# cp -R /otro/path/.hts/tvheadend /root/.hts/
- Disable the old and enable the new
I disable the Tvheadend that comes with the MOI Pro and enable the new one.
[root@MOIPro ~]# systemctl disable tvheadend
rm '/etc/systemd/system/tvheadend.target.wants/tvheadend.service'
[root@MOIPro ~]# systemctl enable tv
ln -s '/etc/systemd/system/tv.service' '/etc/systemd/system/multi-user.target.wants/tv.service'
- Start the new Tvheadend
I start the new Tvheadend, it will detect a configuration with an old format (v16) and convert it to version v17 and then v18.
[root@MOIPro ~]# systemctl start tv

- View the Logging
You can view the log in another terminal in parallel with the command journalctl -f.
:
2015-05-24 10:12:25.426 [   INFO] config: backup: migrating config from 0.0.0~unknown (running 4.1-49~ge7b5e7f)
2015-05-24 10:12:25.426 [   INFO] config: backup: running, output file /root/.hts/tvheadend/backup/0.0.0~unknown.tar.bz2
2015-05-24 10:12:25.427 [   INFO] config: migrating config from v16 to v17
2015-05-24 10:12:25.428 [   INFO] spawn: Executing "/bin/tar"
2015-05-24 10:12:25.430 [   INFO] config: migrating config from v17 to v18
: