The goal is to make X11 (X-Window) applications work “also” from root. Making them work from a regular user is straightforward, but then switching to root with su/sudo and having X11 work is not allowed in Linux. The X11 connection only belongs to the user you logged in with via SSH.
However there’s always a trick, and to give you a heads up, the solution involves reusing the X11 credentials of the original user you connected with, their cookie list. We’ll lend them to root using different methods, as we’ll see later.
SSH Configuration
I’ve documented an introduction to SSH in another post if you’re interested. Here we’ll look again at the SSH configuration on both server and client, focusing on the X11 part. If you want to know much more about SSH, check the official openssh documentation
SSH Server and X11
To set the scene, I’m testing with ssh as luis (from a Mac), connecting to a linux server with sshd called cortafuegix (gentoo). This is the server’s SSH configuration:
- Server
sshdconfiguration:
cortafuegix ~ # cat /etc/ssh/sshd_config
# Config LuisPa
PubkeyAuthentication yes
PasswordAuthentication no
AuthenticationMethods publickey
UsePAM no
X11Forwarding yes     # !! X11 !!
X11DisplayOffset 10   # !! X11 !!
X11UseLocalhost yes   # !! X11 !!
AddressFamily inet
PrintMotd no
PrintLastLog no
Subsystem sftp /usr/lib64/misc/sftp-server
AcceptEnv LANG LC_*
SSH Client
The SSH client I use is the one that comes with MacOS (idefix). This is the configuration file I use for my luis user.
- Client
sshconfiguration:
➜  ~ > confcat /Users/luis/.ssh/config
PubkeyAuthentication yes
Host *
    ForwardAgent yes                    #
    ForwardX11 yes                      # !! X11 !!
    ForwardX11Trusted yes               # !! X11 !!
    XAuthLocation /opt/X11/bin/xauth    # !! X11 !!
    ControlPath ~/.ssh/sockets/%r@%h-%p
    ControlPersist 600
    AddKeysToAgent yes
    UseKeychain yes
    IdentityFile ~/.ssh/id_rsa
Notes related to X11:
- On the SERVER:
X11Forwarding yes: I allow X11 forwarding with my clientsX11DisplayOffset 10: First display number (DISPLAY variable)X11UseLocalhost yes: Bind X11 forwarding to theloopbackaddress
- On the CLIENT:
ForwardX11 yes: I allow X11 forwardingForwardX11Trusted yes: Connecting with-Xor-Ywill have the same effectXAuthLocation /opt/X11/bin/xauth: To avoid the “No xauth data…” error
In X-Window terminology, what we see is called the Server. On the Mac, XQuartz is the server and displays on screen what remote clients request. The Applications are called Clients. In this case, an example would be xclock running on the linux machine.
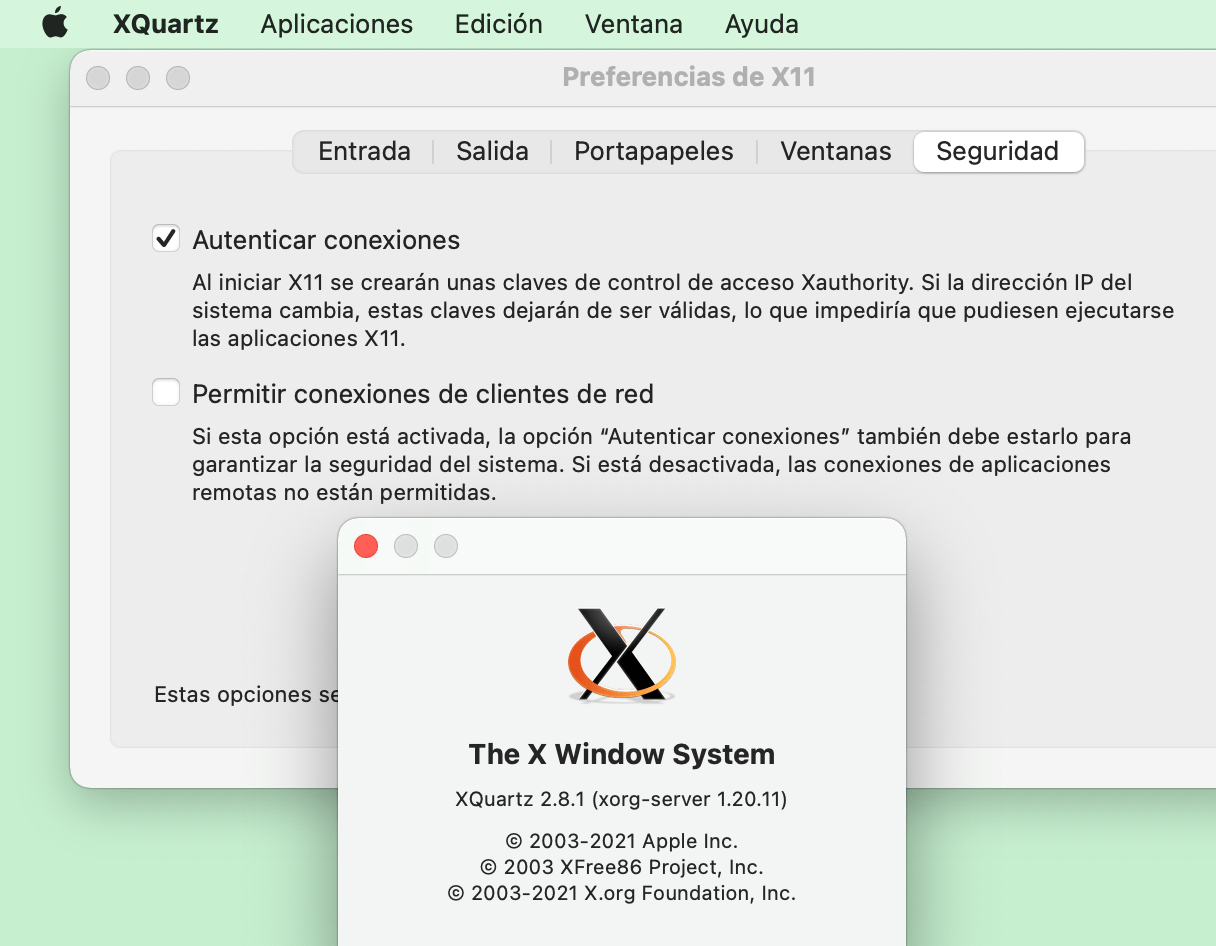
Note: XQuartz is an open source project that develops a version of the “X.Org X Window System” that works on MacOS. The installation process is very simple, download the DMG you’ll find at XQuartz.com and install it on your Mac. Don’t forget to reboot your Mac after installation or some things won’t work (for example ssh won’t be able to set the DISPLAY variable).
If xclock gives you the error “Warning: Missing charsets in String to FontSet conversion” the solution is simple, modify your /etc/profile and add the following: alias xclock='LC_ALL=C /usr/bin/xclock'
By setting ForwardX11Trusted yes on the Mac, I’m saying to ignore the “X11 SECURITY” extension, which means any Application on the linux can access my XQuartz Server.
For X11 to work from the client we’ll use ssh -X or ssh -Y. The first (-X) checks ForwardX11Trusted while the second (-Y) ignores it. By setting its value to yes I’m saying that it doesn’t matter whether you connect with -X or -Y, in both cases the “X11 SECURITY” extension is ignored, meaning it doesn’t matter if you connect with -X or -Y, the effect will be the same.
Proof of concept
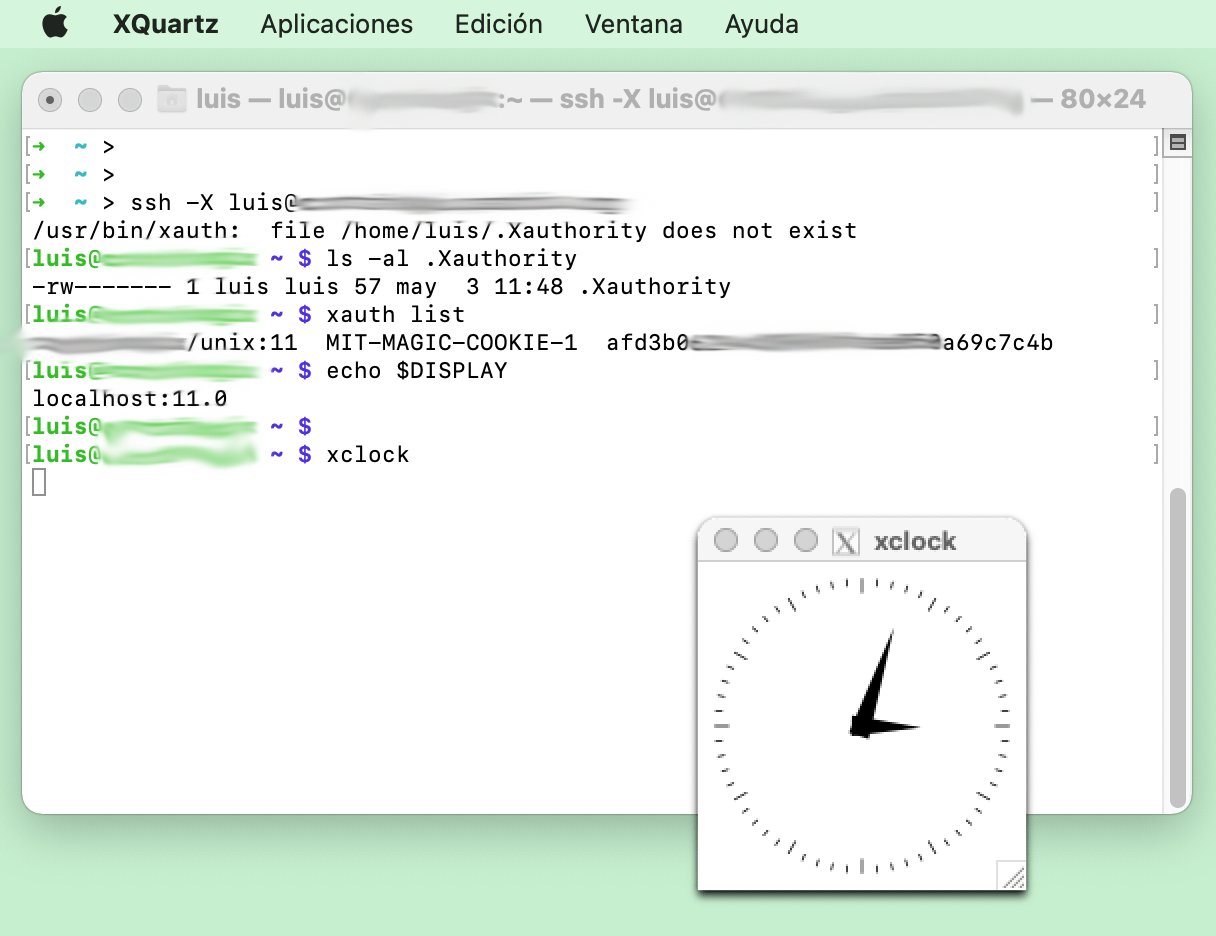
To start from scratch, I delete the $HOME/.Xauthority file on my server (as well as any $HOME/.xauth* file), both for my luis user and for root.
X authentication is based on cookies, a chunk of data that only the server and your user know. When connecting, a magic-cookie is created and stored in the luis file: /home/luis/.Xauthority. In the following example we see that when connecting it didn’t exist, it gets created (the sshd server does this), inserting the magic cookie and setting the DISPLAY variable.
➜  ~ > ssh -X luis@cortafuegix.tudominio.com
/usr/bin/xauth:  file /home/luis/.Xauthority does not exist

luis@cortafuegix ~ $ ls -al .Xauthority
-rw------- 1 luis luis 57 may  3 11:48 .Xauthority

luis@cortafuegix ~ $ xauth list
cortafuegix/unix:11  MIT-MAGIC-COOKIE-1  afd3b06294cd3963efade050a69c7c4b

luis@cortafuegix ~ $ echo $DISPLAY
localhost:11.0

luis@cortafuegix ~ $ xclock
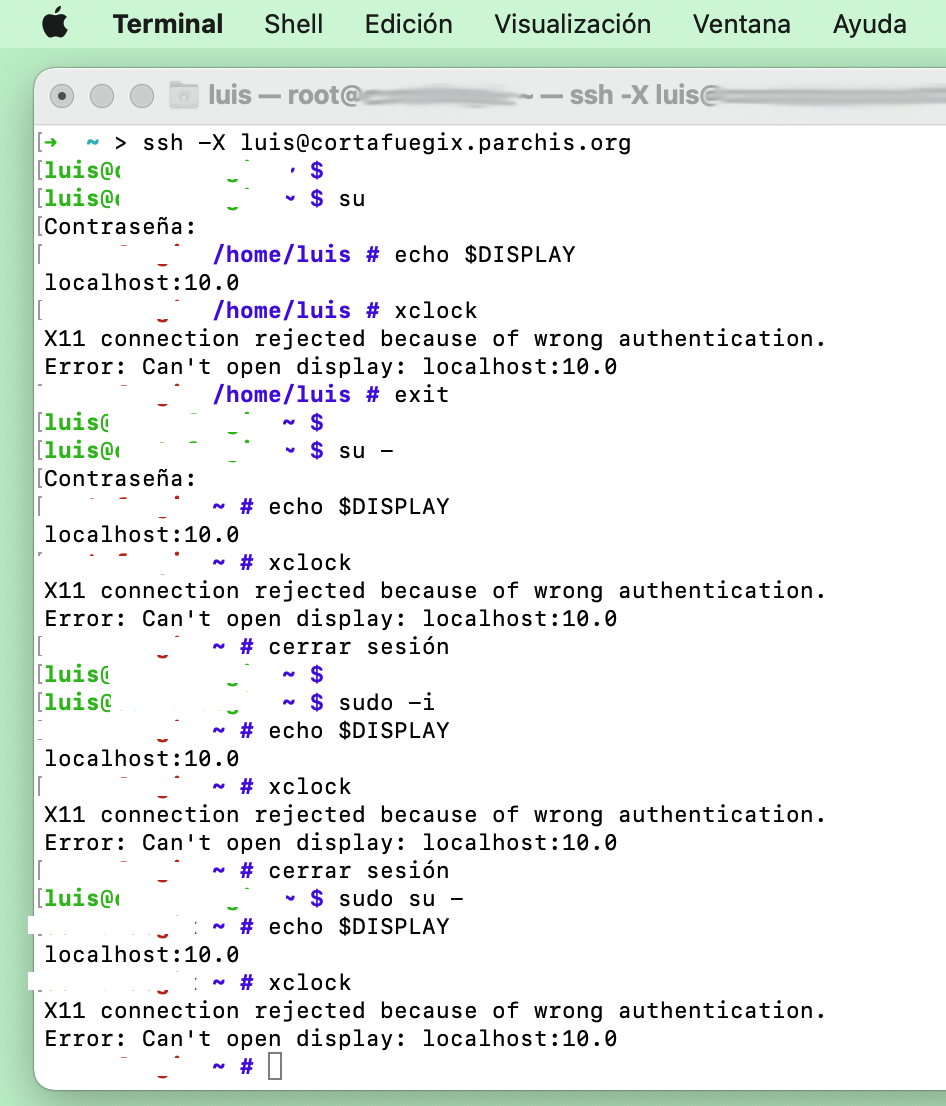
I switch to root to see how the problem appears. Regardless of the method I use, even having the DISPLAY variable set correctly, I can never get it to work:
➜  ~ > ssh -X luis@cortafuegix.tudominio.com

luis@cortafuegix ~ $ su  (Doesn't matter the command: "su -", "sudo -i", "sudo su -")
:
cortafuegix ~ # echo $DISPLAY
localhost:10.0

cortafuegix /home/luis # xclock
X11 connection rejected because of wrong authentication.
Error: Can't open display: localhost:10.0
The solution
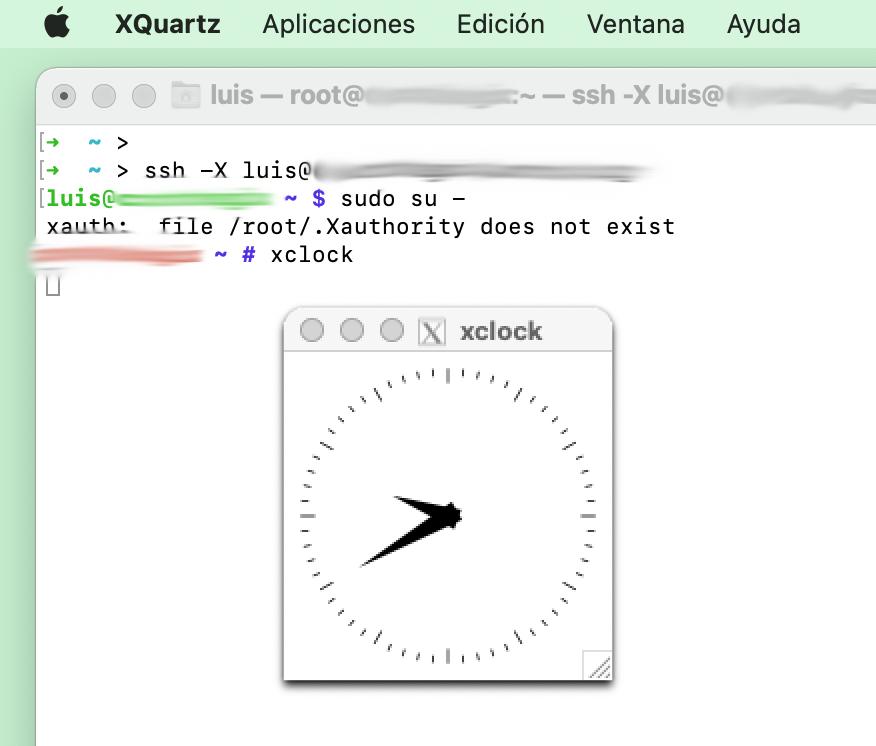
As I mentioned, X authentication is based on cookies, a chunk of data that only the server and your user know. In the previous example luis connects via ssh to the server and X11 works. The first time, the cookie is created in (~/.Xauthority). For it to also work when switching to root, I need that magic cookie, so let’s see what options we have to lend it to root.
Method 1: Copy/Paste
This method works very well if I’m the only one who logs in as root on my servers. What I do is read luis’s cookie and add it to root’s .Xauthority. To achieve this I’m going to add a series of commands to root’s .profile to do precisely that:
cortafuegix ~ # cat .profile
:
su - luis -c 'xauth list' |\
              grep -E "localhost|`hostname`" |\
              xargs -n 3 xauth add
Note that the .profile must be executed or it won’t work, therefore:
- These work:
su -,sudo -i,sudo su -orsudo -i xclock - These don’t work (the first time):
suorsudo xclock. They don’t execute root’s.profile. However, if you’ve already logged in at least once with the above commands, then these will start working.
BEWARE! it works, but it’s a bit of a hack because it will only work for one user (imagine a linux with multiple users logging in as root) and because it can be confusing that sometimes it doesn’t work… depending on which command you use and whether .Xauthority is already created or not…
Method 2: XAUTHORITY
This option is another little hack… it consists of using the XAUTHORITY environment variable pointing to the user’s .Xauthority file (in my example luis). I add a line to root’s .profile and that’s it. You don’t need to run the xauth command and you don’t need the /root/.Xauthority file.
/root/.profile
export XAUTHORITY=/home/luis/.Xauthority
I don’t like this one too much either, so I haven’t enabled it. Let’s look at the third option.
Method 3: using pam_xauth.so
There’s the possibility of enabling the pam_xauth.so module in the last line of the /etc/pam.d/su file. I add the following:
session optional pam_xauth.so
When switching to root, a file of type ./xauthXXXXXX (where XXXXXX are random values) will be automatically created in root’s HOME with the cookie from the original user (luis), and when exiting the session this temporary file will be deleted. You can find more information in man pam_xauth
Let’s test it. I remove option 1 from .profile and enable this new option in /etc/pam.d/su:
cortafuegix ~ # cat .profile
:
# THE FOLLOWING 3 LINES ARE DISABLED
#su - luis -c 'xauth list' |\
#              grep -E "localhost|`hostname`" |\
#              xargs -n 3 xauth add


cortafuegix ~ # cat /etc/pam.d/su
:
session  optional pam_xauth.so
This option is a bit more proper Linux, although as you’ll see in the following table it doesn’t cover all cases either.
Summary
Available options
Depending on which of the three you choose, you’ll get X11 on root to work or fail.
| (1) .profile | (2) XAUTHORITY | (3) pam_xauth.so | |
|---|---|---|---|
| su | SEMI-FAIL | FAIL | OK |
| su - | OK | OK | OK |
| sudo su - | OK | OK | FAIL |
| sudo -i | OK | OK | FAIL |
| sudo xclock | SEMI-FAIL | FAIL | FAIL |
| sudo -i xclock | OK | OK | FAIL |
My proposal
In my case I combine options (1), (3) and an alias:
| File | Code |
|---|---|
.profile (root) | ``su - luis -c ‘xauth list’ |
/etc/pam.d/su | session optional pam_xauth.so |
.profile (Luis) | alias sudo='sudo -i' |