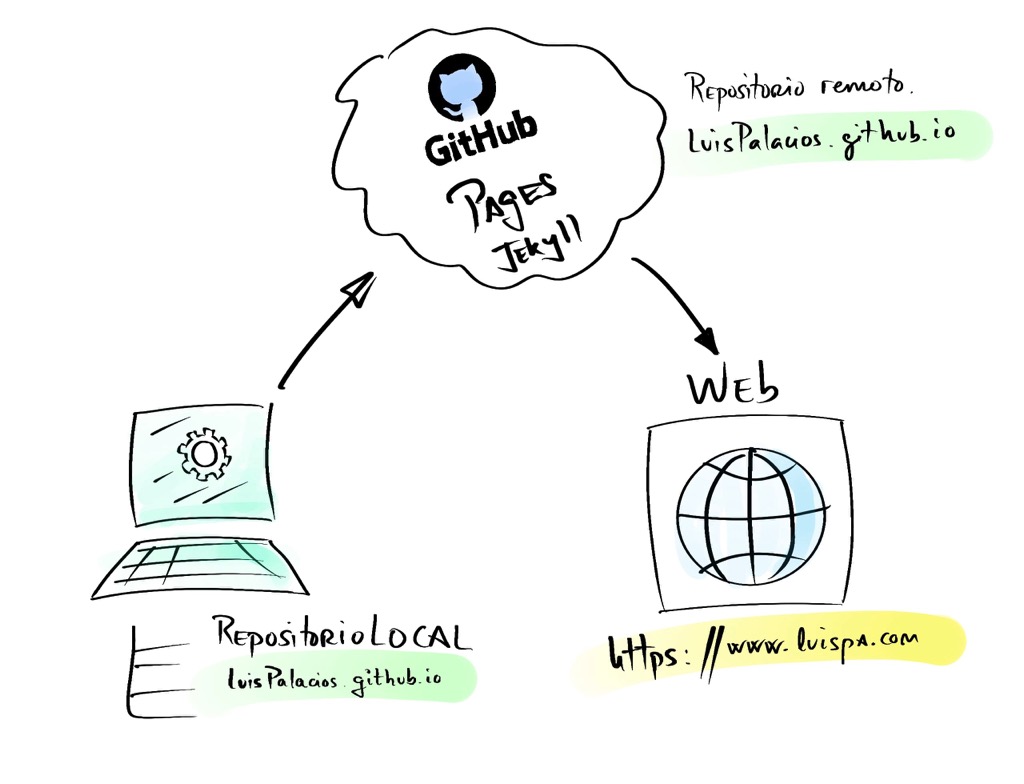
In this post I describe how I set up this static blog “built” with jekyll and hosted on GitHub Pages. The source files are in the repository LuisPalacios.github.io. The site is finally configured on my domain: https://www.luispa.com
You probably know GitHub, a collaboration and code sharing platform (using the git version control system). By the way, more info in my post about GIT.
Well, it has a very useful feature called GitHub Pages, which allows you to publish your own web pages hosted by GitHub itself. It integrates perfectly with the static site generator called Jekyll, which has blogging capabilities and is super suitable for building blogs or personal websites. By the way, it’s written in Ruby and its creator is Tom Preston-Werner, the co-founder of GitHub.
The process I followed, in a very brief summary:
- Set up my workstation (install: Brew, Ruby, Jekyll, Bundler, GIT),
- Create a new dedicated directory and a local repository for the future LuisPalacios.github.io
- Write “posts” in markdown format (new or migrated from my old blog)
- Connect to the local version of the site on my computer and test…
- Do a
git pushto the remote repository to create LuisPalacios.github.io - Watch GitHub generate the pages automatically.
- Connect to the public web version of the site
| You can find tips and additional documentation about how I set up my blog in the GitHub issues, especially in the ones I’ve closed and resolved. |
Setting up my computer
Below we’ll see step by step what I did on my workstation, a Mac. You can use Windows, Mac, or Linux. Further on I also show commands for Linux.
If it’s a Mac, I use the version of Ruby that comes with Homebrew instead of the one that ships with the Mac to avoid issues with SIP (Systems Integrity Protection - source). I also followed a couple of useful links: Jekyll Installation or about Git on GitHub and also Bundler.
Homebrew
If you work on a Mac and you’re a developer or need low-level or command-line tools, it’s very likely you’ll need to install Homebrew (or brew for short). It’s a package management system that simplifies the installation, updating, and removal of software on Apple’s Mac OS and GNU/Linux operating systems. Originally created by Max Howell, the program has gained popularity in the Ruby on Rails community. What I like most is that it gives you access to the latest versions of a ton of free software.
Installation
➜ ~ > /usr/bin/ruby -e "$(curl -fsSL https://raw.githubusercontent.com/Homebrew/install/master/install)"
See what’s installed:
➜  ~ > brew list
➜  ~ > brew cask list
Update brew:
➜  ~ > brew [-v] update
➜  ~ > brew [-v] upgrade
Installation examples:
➜  ~ > brew install wget
➜  ~ > brew install imagemagick
I make sure brew is properly installed and up to date
➜  ~ > brew update
➜  ~ > brew doctor
➜  ~ > brew --version
Homebrew 3.1.2
➜  ~ > nano $HOME/.zshrc
    PATH=$HOME/bin:/usr/local/bin:/usr/local/sbin:$PATH
    launchctl setenv PATH "/usr/local/bin:/usr/local/sbin:$PATH"
Python
Installing Python isn’t necessary for what we’re discussing here, but it’s a good time to do it if you’ll need it in the future. Here’s a post about Python on MacOS
Ruby
Ruby is an interpreted, reflective, object-oriented programming language, created by the Japanese programmer Yukihiro “Matz” Matsumoto, who began working on Ruby in 1993 and publicly released it in 1995. We need Ruby to run Jekyll.
- Installation on MacOS with Homebrew:
➜  ~ > brew install ruby
➜  ~ > nano $HOME/.zshrc
   export PATH=$HOME/0_priv/bin:/usr/local/bin:/usr/local/sbin:/usr/local/opt/ruby/bin:$PATH
   launchctl setenv PATH "/usr/local/bin:/usr/local/sbin:/usr/local/opt/ruby/bin:$PATH"
- Installation on Ubuntu
% apt-get install ruby-full
- Set up Gem installation in HOME (to avoid having to install at system level), valid for both MacOS and Ubuntu
➜  ~ > nano ~/.zshrc
export GEM_HOME=~/gems
export PATH=~/gems/bin:$PATH
Bundler
It’s a software package manager that makes working with Jekyll and its dependencies easier.
➜ ~ > gem install jekyll bundler
Months later, after updating Homebrew, Ruby, and macOS itself, I ran into problems with the gem command. I fixed it by running the following:
➜ ~ > gem cleanup && gem pristine --all
Jekyll
Jekyll is a simple generator for static websites with blogging capabilities; it’s written in Ruby by Tom Preston-Werner (co-founder of GitHub) and it’s extremely fast.
To install it on my Mac I followed this source
Proof of concept
Once I have everything above installed, I try to verify that everything works…
➜  ~ > jekyll new test
New jekyll site installed in /Users/luis/test.
➜  ~ > cd test
➜  ~ test > bundle add webrick
➜  ~ test > bundle exec jekyll serve
From a browser I connect (and it works) to my own computer at: http://127.0.0.1:4000/
luispalacios.github.io
I follow the instructions from pages.github.com and its official documentation to create my LuisPalacios.github.io repository
I clone locally and change to the directory.
➜  ~ > cd github/LuisPalacios.github.io
➜  LuisPalacios.github.io git:(master) >
I create the new branch, without history or content, named gh-pages and switch (checkout) to that branch. I decide that the root directory ([GitHub sources](GitHub sources)) will be the “./docs subdirectory”, so I need to create it and then create the gh-pages branch and check out to it. GitHub will publish from that branch.
My root directory is at: “./docs”
➜  docs git:(master) > git checkout --orphan gh-pages
Switched to a new branch 'gh-pages'
➜  LuisPalacios.github.io git:(master) > mkdir docs
➜  LuisPalacios.github.io git:(master) > cd docs
I create a new “site” with Jekyll
➜ docs git:(gh-pages) ✗ > jekyll new .
I open the Gemfile that was created and comment out the line starting with gem “Jekyll” and also add the “github-pages” gem on the line starting with # gem “github-pages”
#gem "jekyll", "~> 4.2.0"
gem "github-pages", "~> 214", group: :jekyll_plugins
Finally I run a bundle update
➜ docs git:(gh-pages) ✗ > bundle update
Local access
One of the advantages is that I can run a local “web server” on the same computer where I’m editing the Markdown files. To achieve this, I change to the posts directory (./docs) and run the following:
docs git:(gh-pages) ✗ > bundle add webrick             <== Only once
docs git:(gh-pages) ✗ > bundle exec jekyll serve
To update the pages on GitHub I simply make my first commit and push the current branch (the “gh-pages” branch) to the remote (the one on GitHub) as its upstream.
➜  docs git:(gh-pages) ✗ > git commit -m "initial commit"
➜  docs git:(gh-pages) ✗ > git push --set-upstream origin 'gh-pages'
Add docs and sync (push)
➜  docs git:(gh-pages) ✗ > cd ..
➜  LuisPalacios.github.io git:(gh-pages) ✗ > git add docs
➜  LuisPalacios.github.io git:(gh-pages) ✗ > git commit -m "add docs"
➜  LuisPalacios.github.io git:(gh-pages) > git push
On GitHub I configure the “publishing source for your GitHub Pages site”
- On GitHub, navigate to the site’s repository
- Under the repository name, click on Settings
- In the left sidebar, click on Pages.
- Under Source, select the gh-pages branch and the /docs directory and save it
| After a few minutes it will be available here |
|---|
| https://luispalacios.github.io |
The next step is optional. In my case I have my own domain so I followed the guide to redirect my domain to GitHub pages (basically setting up a CNAME with your provider) and I also enabled SSL, so my blog site is now here:
| Documentation on how to redirect your domain |
|---|
| https://www.luispa.com |
Pagination
On many websites, especially blogs, it’s very common to split the main list of posts into smaller lists and display them across multiple pages. Jekyll offers a pagination plugin to automatically generate a paginated blog, so I followed the Jekyll manual on how to configure pagination:
- I enable pagination in the
_config.ymlfile
paginate: 3
paginate_path: '/page-:num/'
- I delete the original
indexfile./docs/index.markdown
➜ docs git:(gh-pages) ✗ > mv index.markdown ..
- I create the
./docs/index.htmlfile at the site root.
{% raw %}
---
layout: default
draft: false
cover:
  image: "/img/posts/logo-jekyll.svg"
  hidden: true
---

<!-- Loop over the different posts -->
{% for post in paginator.posts %}
  <h1><a href="{{ post.url }}">{{ post.title }}</a></h1>
  <p class="author">
  <!-- Display the date in Spanish -->
  <span class="date">{% assign m = post.date | date: "%-m" %}
                      {{ post.date | date: "%-d de" }}
                      {% case m %}
                      {% when '1' %}enero
                      {% when '2' %}febrero
                      {% when '3' %}marzo
                      {% when '4' %}abril
                      {% when '5' %}mayo
                      {% when '6' %}junio
                      {% when '7' %}julio
                      {% when '8' %}agosto
                      {% when '9' %}septiembre
                      {% when '10' %}octubre
                      {% when '11' %}noviembre
                      {% when '12' %}diciembre
                      {% endcase %}
                      {{ post.date | date: "de %Y" }}</span>
  </p>
  <div class="content">
    {{ post.excerpt }}
  </div>
{% endfor %}

<!-- Pagination links -->
<div class="pagination">
    Page:
  {% if paginator.previous_page %}
    <a href="{{ paginator.previous_page_path }}" class="previous">
      Previous
    </a>
  {% else %}
    <span class="previous"></span>
  {% endif %}
  <span class="page_number ">
    ( {{ paginator.page }} of {{ paginator.total_pages }} )
  </span>
  {% if paginator.next_page %}
    <a href="{{ paginator.next_page_path }}" class="next">Next</a>
  {% else %}
    <span class="next ">Next</span>
  {% endif %}
</div>
{% endraw %}
Search
One of the most useful features of a blog is the ability to search within its articles, but unfortunately Jekyll doesn’t come with or implement such a function. I found an alternative in this project Simple-Jekyll-Search.
- I download the scripts to my computer:
➜  ~ > npm install simple-jekyll-search
added 2 packages, and audited 3 packages in 708ms
found 0 vulnerabilities
- I copy the scripts to
docs/assets/js
➜  > cd $HOME/prog.git/github-luispa/LuisPalacios.github.io
➜  > cp $HOME/node_modules/simple-jekyll-search/dest/simple-jekyll-search.* docs/assets/js

➜  > ls -al docs/assets/js
total 48
drwxr-xr-x  5 luis  staff   160  2 may 13:37 .
drwxr-xr-x@ 7 luis  staff   224  2 may 12:38 ..
-rw-r--r--  1 luis  staff  9854  2 may 13:37 simple-jekyll-search.js
-rw-r--r--  1 luis  staff  4379  2 may 13:37 simple-jekyll-search.min.js
-rw-r--r--  1 luis  staff  2491  2 may 07:49 vanilla-back-to-top.min.js
- I create the
search.jsonfile in the root directory of my blog (remember it’sdocs)
➜  ~ > cd prog.git/github-luispa/LuisPalacios.github.io/docs
➜  ✗ > cat > search.json
{% raw %}
---
layout: none
draft: false
cover:
  image: "/img/posts/logo-jekyll.svg"
  hidden: true
---
[
  {% for post in site.posts %}
    {
      "title"    : "{{ post.title | escape }}",
      "category" : "{{ post.category }}",
      "tags"     : "{{ post.tags | join: ', ' }}",
      "url"      : "{{ site.baseurl }}{{ post.url }}",
      "date"     : "{{ post.date }}"
    } {% unless forloop.last %},{% endunless %}
  {% endfor %}
]
{% endraw %}
I modify my ./docs/_includes/footer.html file:
{% raw %}
<!-- HTML element for performing the search -->
<div id="search-container">
    <input type="text" id="search-input" placeholder="search...">
    <ul id="results-container"></ul>
</div>

<!-- Script pointing to the JS script that will perform the search -->
<script src="/assets/js/simple-jekyll-search.js" type="text/javascript"></script>

<!-- Configuration -->
<script>
    SimpleJekyllSearch({
    searchInput: document.getElementById('search-input'),
    resultsContainer: document.getElementById('results-container'),
    json: '/search.json'
    })
</script>
{% endraw %}
Improvements
Issues
Instead of continuing to expand this post, what I’ve done is create issues on GitHub with each of the modifications and improvements I wanted to add.
You can find them among my closed issues about this blog
Updates
Update Homebrew
➜  ~ > brew update
➜  ~ > brew upgrade
Update bundle
➜  ~ > cd prog.git/github-luispa/LuisPalacios.github.io/docs
➜  docs git:(gh-pages) > bundle update
Troubleshooting
Whether I’ve cloned the repository from scratch or I’m having issues, this sequence has always helped me:
brew update
brew upgrade

cd $HOME
rm -fr .gems
gem install jekyll bundler

cd 00.git/02.github-luispa/LuisPalacios.github.io/docs
[rm Gemfile.lock] (if it exists)
bundle install

# Now I can start my local server
JEKYLL_ENV=development bundle exec jekyll serve --drafts --port 4001
When I’ve had to update something
$ e docs/Gemfile
#gem "github-pages", "~> 214", group: :jekyll_plugins
gem "github-pages", "~> 228", group: :jekyll_plugins
gem uninstall liquid -v 4.0.3
gem update --system
To update bundle
gem cleanup && gem pristine --all
bundle lock --update --bundler
bundle update
Sometimes I’ve had permission issues during installation. To fix them:
# cd /opt/homebrew/Cellar/ruby/3.3.5/lib/ruby/gems/3.3.0/specifications
# rm -fr *.gemspec
Useful links
To improve my notes site, some useful links: