Python is a multi-paradigm interpreted programming language. pip manages packages from PyPI (the Python Package Index). PipEnv lets you create a virtual environment to run your application in isolation with the necessary libraries. Jupyter Lab is a web application that serves as a bridge between code and explanatory text.
In this post I install Python, Pip, and PipEnv to be able to run Python applications. I show how to create a development, testing, and documentation environment with JupyterLab, all on MacOS, so let’s start from the beginning.
Python 3, Pip, PipEnv on MacOS
Python is an interpreted programming language whose philosophy emphasizes code readability. It’s a multi-paradigm language, as it partially supports object orientation, imperative programming, and to a lesser extent, functional programming.
MacOS comes with very old versions of Python 2 and 3, which we won’t use, but we shouldn’t delete or overwrite them either. What we’ll do is install the latest versions of Python, Pip, and PipEnv in a different location on disk.
For the main one, Python, we have two options:
- Install Homebrew and from there install Python (preferred)
- If you’re a software developer, you’ll very likely install more tools from Homebrew (my case), in fact some may depend on having Python installed from it, so my recommendation is to go the Homebrew route. Even so, I’ll document here how to install it from python.org
- Install Python directly from https://www.python.org
Pip is essential — it’s the package management system used to install and manage Python packages from PyPI, the Python Package Index, the official software repository for third-party applications in the Python programming language.
PipEnv is another must-have. Python applications use packages and modules that are not part of the standard library, and managing which versions and libraries can become unmanageable. The solution is to create a virtual environment without conflicts, and we have three ways to do it:
Virtualenv: Virtualenv was the default way to create a virtual environment for many years. It’s still used by many although people are moving to
pipenvor conda.Conda: Makes package installation much easier, it’s closely tied to Anaconda, but it’s perhaps too large/heavy, so in my case I always go with PipEnv…
PipEnv (my favorite): Pipenv was created due to many shortcomings of virtualenv and is my preferred method. It works on Windows, Linux, and Mac; and on all of them it works exactly the same (changing the path where things are stored). Its best feature is that it creates (and manages) exclusive virtual environments in a separate folder linked to the project you’re working on.
| Note: You’ll need to modify your .bashrc or .zshrc file, depending on which shell you use. Since 2019, Apple recommends zsh. Check which shell you have configured in System Preferences > Users & Groups > (right-click on your user) Advanced Options > Login Shell (change to zsh). |
Installing Python from python.org
| Note: this option is not the one I use, I leave it here in case you prefer it |
- Download the latest version for MacOS from here
- Run using Finder
"Install Certificates.command" from /Applications/Python 3.9
- Open the command line (Terminal.app or iTerm) and run
/Applications/Python 3.9/Update/Shell Profile.command
- We modify the command line to prepend the new Python3 in $PATH and create a couple of aliases, this way I avoid running the old versions of Python/Pip that come with MacOS. Remember, never delete the original Python that ships with OSX.
# In the $HOME/.zshrc file
export PATH=/usr/local/bin:/usr/local/sbin:$PATH
echo "alias python=/usr/local/bin/python3" >> ~/.zshrc
echo "alias pip=/usr/local/bin/pip3" >> ~/.zshrc
- In addition to Python we need the essential
pip, the package manager used to install and manage Python packages from PyPI, the Python Package Index. 8.1. Installing PIP frombootstrap.pypa.io
curl https://bootstrap.pypa.io/get-pip.py -o get-pip.py
python3 get-pip.py
- Installing PipEnv
pip install pipenv
- Check the versions
$ python --version
Python 3.9.2
$ pip --version
pip 21.0.1 ...
$ pipenv --version
pipenv, version 2020.11.15
Installing Python via Homebrew
Homebrew installs everything you need that Apple doesn’t include out of the box. If you don’t have it, install it by running a single command, more info here (Homebrew).
| Note: This is my favorite option and the one I always use |
- With Homebrew ready, we start the Python installation
brew install python
* It will not only install Python but also the essential `pip`, the package management system used to install and manage packages from **PyPI**, the [Python Package Index](https://pypi.org). It's the official software repository for third-party applications in the Python programming language.
- We install PipEnv (using
piporbrew). In my case I usually usepip
$ pip install pipenv
[[$ brew install pipenv]]
- We modify the command line to prepend the new Python3 in $PATH and create a couple of aliases, this way I avoid running the old versions of Python/Pip that come with MacOS. Remember, never delete the original Python that ships with OSX.
# This is an example of my $HOME/.zshrc file
export PATH=/usr/local/bin:/usr/local/sbin:$PATH
echo "alias python=/usr/local/bin/python3" >> ~/.zshrc
echo "alias pip=/usr/local/bin/pip3" >> ~/.zshrc
- Check the versions
$ python --version
Python 3.9.2
$ pip --version
pip 21.0.1 ...
$ pipenv --version
pipenv, version 2020.11.15
Proof of concept: Create a mini project
I’m going to create a mini Python project, with a single source file called main.py under a virtual environment prepared with pipenv. Remember that you must install the necessary libraries with pipenv always from your project directory. In this example I use the requests library.
➜  ~ > mkdir proyecto
➜  ~ > cd proyecto
➜  proyecto > pipenv install requests
:
Your virtual environment is configured and the file /Users/luis/myproject/Pipfile is created, which contains a list of all the libraries needed for your project:
[[source]]
url = "https://pypi.org/simple"
verify_ssl = true
name = "pypi"

[packages]
requests = "*"

[dev-packages]

[requires]
python_version = "3.9"
Note: If you use a version control system (for example GIT) I recommend keeping both Pipfile and Pipfile.lock files within GIT. Only exclude Pipfile.lock if you’re using multiple Python versions.
The three most typical commands you’ll use are pipenv install, pipenv uninstall, and pipenv lock. The latter creates the Pipfile.lock file where all dependencies (and sub-dependencies) of your project are declared, their latest versions, and the current hash of the downloaded files. This ensures repeatable and deterministic builds.
It’s always recommended to update all dependencies before going to production, so continuing with this proof of concept, let’s “pin” the dependencies for this mini project:
➜ myproject > pipenv lock
We create the source file
➜  proyecto > cat > main.py
import requests
response = requests.get('https://httpbin.org/ip')
print('Your IP address is: {0}'.format(response.json()['origin']))
and we run it from a safe environment (pipenv run python main.py)
(proyecto) ➜  proyecto > pipenv run python main.py
Your IP address is: 80.31.238.6
Setting up the “Jupyter Lab” environment
Jupyter Lab is a web application that lets you code, execute, and “document”. The latter is one of the most interesting parts of this post. Let’s go for it — I create a Jupyter Lab environment; an online editor (that runs in your browser) that lets you work with text documents called Jupyter notebooks, launch terminals, or other custom components. The best thing about these notebooks is that you can include content beyond just source code.
Proof of concept: Simple Jupyter notebook
Again, let’s create a sample project that generates some graphs displayed using the matplotlib and numpy libraries.
➜  ~ > mkdir plot
➜  ~ > cd plot
➜  plot > pipenv install matplotlib numpy
:
We install jupyterlab inside the project
➜ plot > pipenv install jupyterlab
We start our Jupyter Lab environment and continue from the browser:
➜  plot > pipenv run jupyter lab
:
    To access the server, open this file in a browser:
        file:///Users/luis/Library/Jupyter/runtime/jpserver-15847-open.html
    Or copy and paste one of these URLs:
        http://localhost:8888/lab?token=b9eb71b1ee64adf9b199bf7a6f2fb7f9b2d5835d1914e3ab
        http://127.0.0.1:8888/lab?token=b9eb71b1ee64adf9b199bf7a6f2fb7f9b2d5835d1914e3ab
It sets up a server listening on port 8888 and shows us a URL along with a token to connect to it. Normally it launches the browser and connects automatically, or we CMD-click or copy/paste to connect to the environment.
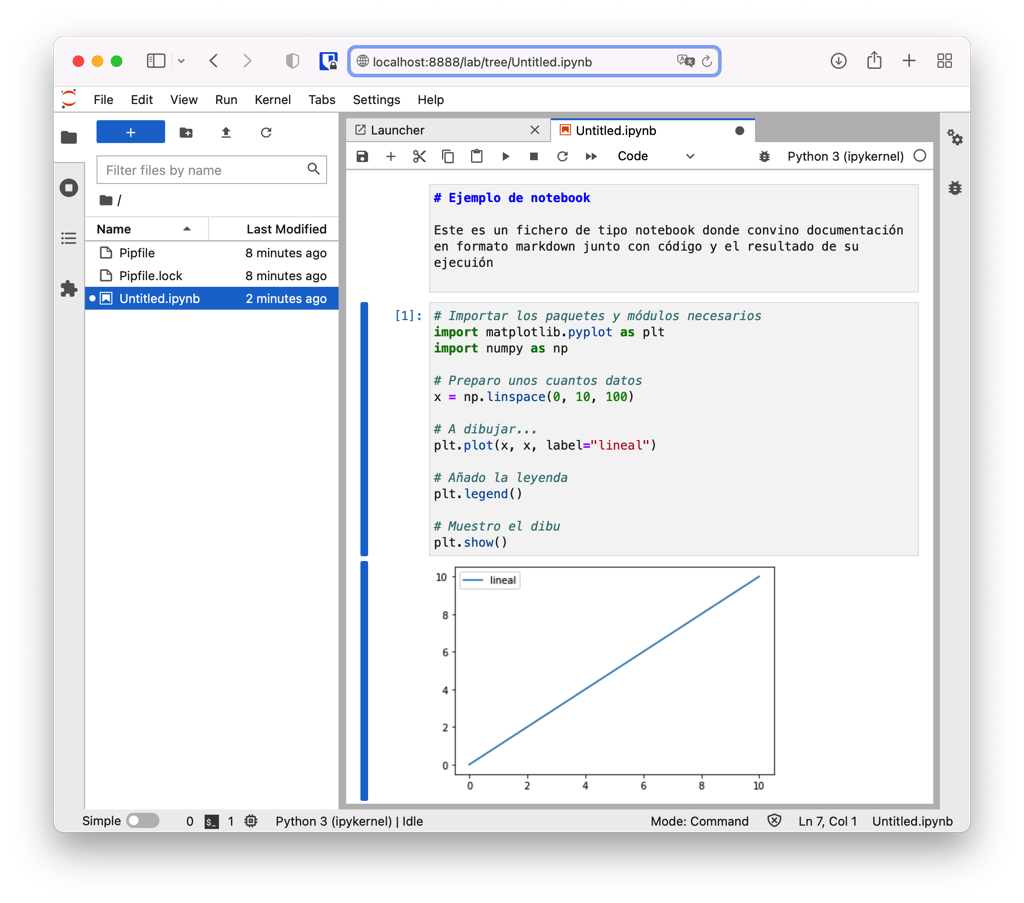
- We create a notebook: File > New > Notebook (Python3)
- We rename it: right click, rename >
plot.ipynb - We add a markdown text cell and a code cell and run it
# Notebook example

This is a notebook file where I combine markdown documentation with code and its execution output
# Import necessary packages and modules
import matplotlib.pyplot as plt
import numpy as np

# Prepare some data
x = np.linspace(0, 10, 100)

# Let's plot...
plt.plot(x, x, label="linear")

# Add the legend
plt.legend()

# Show the plot
plt.show()
Proof of concept: Data Science Jupyter notebook
If we want something more complex, a more elaborate environment with multiple libraries, below you’ll see how to install them. In this example we want to work with pandas, matplotlib, seaborn, prophet… we enter our new project (I’ve called it proyecto_pandas) and install the libraries.
➜  > mkdir proyecto_pandas
➜  > cd proyecto_pandas
➜  proyecto_pandas >
➜  proyecto_pandas > pipenv install
➜  proyecto_pandas > pipenv check
➜  proyecto_pandas > pipenv install matplotlib numpy pandas
➜  proyecto_pandas > pipenv install tabulate
➜  proyecto_pandas > pipenv install openpyxl
➜  proyecto_pandas > pipenv install Cython convertdate lunarcalendar holidays
➜  proyecto_pandas > pipenv install pystan
➜  proyecto_pandas > pipenv install jupyterlab
➜  proyecto_pandas > pipenv install seaborn
➜  proyecto_pandas > pipenv install plotnine plotly
➜  proyecto_pandas > pipenv install ipywidgets
➜  proyecto_pandas > pipenv install jupyter_client # (for fbprophet.diagnostics cross_validation to work)
➜  proyecto_pandas > pipenv run jupyter nbextension enable --py widgetsnbextension # (for fbprophet.diagnostics cross_validation to work)
➜  proyecto_pandas > pipenv install prophet
➜  proyecto_pandas > pipenv install lxml html5lib beautifulsoup4 sqlalchemy feather-format matplotlib xlrd scipy ipykernel pexpect ipython-sql Faker
SQL with JupyterLab
If we want to use SQL with JupyterLab, I recommend using the extension made by Catherine Devlin, IPython SQL Magic.
The IPython SQL magic extension makes it possible to write SQL queries directly in code cells, as well as read the results directly into pandas DataFrames (Source). This works for both traditional notebooks and modern Jupyter Labs.
I install IPython SQL Magic:
pipenv install ipython-sql
Additionally, we’ll combine it with magic commands, a set of convenient functions in Jupyter Notebooks designed to solve some of the common problems in standard data analysis. You can see all available magic commands with the help of %lsmagic
Therefore, from now on I’ll be able to load this extension in my notebooks:
%load_ext cql
We load the database
%sql sqlite:///tarjetasblack.db
Show the table contents
%tables
Run commands
%sql select * from movimiento;

Environment administration
Removing the PipEnv environment
If we want to remove the virtual environment of a specific project, we change to its directory and run pipenv --rm
➜  ~ > cd plot
➜  plot > pipenv --rm
Removing virtualenv (/Users/luis/.local/share/virtualenvs/plot-djKM4O4f)...
Performing updates
Installing is relatively easy, but with so many programs and modules on your system it’s important to know how to update them.
If you installed Python with Homebrew
Run the following commands
export HOMEBREW_VERBOSE=1
brew update
brew upgrade
$ pip list --outdated --format=freeze |\
    grep -v '^\-e' |\
    cut -d = -f 1  |\
    xargs -n1 pip install -U
In newer versions of pip,
$ python3 -m pip list --outdated --format=json |\
    jq -r '.[] | "\(.name)==\(.latest_version)"' |\
    xargs -n1 pip3 install -U
If you installed Python natively
- Update Python on your MacOS by reinstalling the latest version.
- Update pip by running the command
pip install --upgrade pip - Update everything you’ve installed with
pipvia: