Configuration of a NUC with Ubuntu + Open vSwitch + VLANs + KVM + VMs using netplan and Open vSwitch. The networking is based on OVS and Netplan for both the Host and the virtual machines.
Last year I documented here how to configure Open vSwitch with KVM. In this post I’ll get straight to the point, showing the desired final state and how to configure it.
Introduction
Netplan
Netplan is a utility for easily configuring networking on a Linux system. You simply create a YAML description of the required network interfaces and what they should do. From this description, Netplan will generate all the necessary configuration for the rendering tool to do its magic and activate it. Netplan reads configuration from /etc/netplan/*.yaml and generates backend-specific configuration files in /run, handing them off to the machine’s particular daemon or backend to “render” that configuration. The supported backends are:
- NetworkManager
- Systemd-networkd <== used in Ubuntu 22.04.1
Open vSwitch
Open vSwitch (OVS) is an open-source virtual bridge. Geared toward automation and improving switching in virtual machine environments. Take a look at the OVS Wikipedia page for an introduction.
- It can work on a single Hypervisor or in a distributed fashion across several.
- It’s considered the most popular implementation of OpenFlow, a controller/protocol for managing hardware switches (that support OpenFlow), where the network can be programmed by software, independent of the hardware vendor. My installation will be standalone, without an external controller (I don’t use OpenFlow).
- It supports standard management interfaces and protocols (e.g., NetFlow, sFlow, IPFIX, RSPAN, CLI, LACP, 802.1ag).
- It’s designed to distribute switching across multiple physical servers, similar to VMware’s
vNetwork distributed vswitchor Cisco’sNexus 1000V. - It supports many more features — here is the full list.
| Note: Open vSwitch can work with TUN, TAP, and Internal Ports (its own). In my configuration I DO NOT USE TUN or TAP interfaces, I only use its own Internal Ports. |
As a reminder, TUN and TAP are virtual network devices that reside in the kernel — TUN operates at layer 3 (routing) and TAP at layer 2 (bridges/switching). They work using sockets in user space. They have traditionally been used with the standard Linux kernel bridge and with KVM/QEMU.
With Open vSwitch I only use its own Internal Ports instead of TAP interfaces. Moreover, be careful with examples documented with tap and Open vSwitch, as they can be misleading. In this post (and in my production setup) with KVM/QEMU and OVS, I only use Internal Ports. The reason is that Open vSwitch can work with TAP but treats them like a regular interface — meaning it doesn’t open them via sockets (the standard way), and that implies certain limitations. I recommend reading the article: Q: I created a tap device tap0, configured an IP address on it, and added it to a bridge…: in the OVS Common Configuration Issues.
Its main components are:
ovs-vswitchd: The OVS daemon (core) along with theopenvswitch_mod.kokernel module. Both handle switching, VLANs, bonding, and monitoring. The first packet is handled by the daemon in user-space, while the rest of the switching is handled by the kernel module.ovsdb-server: The second-in-command — a lightweight database server that stores the OVS configuration.

Installation
Ubuntu Installation
Before diving into networking, here’s a mini summary of the Ubuntu host server installation on an Intel NUC:
- Download Ubuntu Server LTS 22.04.1
- Verify the download, copy the image to a USB (using BalenaEtcher)
- Follow the installation tutorial
- Boot from USB, NUC (F10) -> UEFI Bootloader -> Try to install Ubuntu Server
- Spanish, Spanish, Ubuntu Server, Ethernet, Default mirror, update installer
- Use entire disk, create user, install openssh, skip snaps
- When installation finishes, reboot.
- Create public/private key pair for SSH access
- Update the operating system
apt update && apt upgrade -y && apt full-upgrade -y
apt autoremove -y --purge
systemctl reboot -f
- Check if old kernels can be cleaned up
uname -a
dpkg --list | grep linux-image
apt purge linux-image-xxxxxx
- Clean up the system
apt clean
journalctl --vacuum-time=2d
journalctl --vacuum-size=500M
Open vSwitch Installation
After installing Ubuntu Server LTS 22.04.1:
- I install OVS
root@luna:~# apt install openvswitch-switch
- Ubuntu enables and starts the
openvswitch-switch.servicewhich in turn starts the two daemons mentioned above.
root@luna:~# ps -ef | grep ovs
root        1179       1  0 13:29 ?        00:00:00 ovsdb-server /etc/openvswitch/conf.db -vconsole:emer -vsyslog:err -vfile:info --remote=punix:/var/run/openvswitch/db.sock --private-key=db:Open_vSwitch,SSL,private_key --certificate=db:Open_vSwitch,SSL,certificate --bootstrap-ca-cert=db:Open_vSwitch,SSL,ca_cert --no-chdir --log-file=/var/log/openvswitch/ovsdb-server.log --pidfile=/var/run/openvswitch/ovsdb-server.pid --detach
root        1238       1  0 13:29 ?        00:00:00 ovs-vswitchd unix:/var/run/openvswitch/db.sock -vconsole:emer -vsyslog:err -vfile:info --mlockall --no-chdir --log-file=/var/log/openvswitch/ovs-vswitchd.log --pidfile=/var/run/openvswitch/ovs-vswitchd.pid --detach
Network Tools Installation
- I install VLAN support and some useful tools
root@luna:~# apt install net-tools nmap vlan
Configuration
I set up luna with the following configuration:
- Interface
eth0connected to a switch port in trunk mode - The server itself accesses the network through
vlan100with a static IP - Future KVM guests (VMs) will instantiate
Internal Portsdynamically.
Disabling IPv6
- I won’t use IPv6 at all, so I permanently disable it
root@luna:~# cat /etc/default/grub
:
GRUB_CMDLINE_LINUX_DEFAULT="ipv6.disable=1"
:
root@luna:~# update-grub
root@luna:~# reboot -f
Netplan Configuration
- I prepare the final
netplanfile, but don’t activate it yet. I assign the nameeth0to the ethernet interface, disable the WiFi interface, and define the IP on vlan100 (using the vnet100 interface I’ll create later).
root@luna:~# cat /etc/netplan/00-red-luna.yaml
root@luna:~# cat /etc/netplan/00-red-luna.yaml
#
# Network config for the luna server
# By LuisPa 2023
#
network:
  version: 2
  renderer: networkd

  wifis: {}

  ethernets:
    eth0:
      optional: true  # Ignore network to speed up boot time
      match:
        macaddress: "94:c6:91:1a:a6:3e"
        name: eno1
        name: eth0
      set-name: eth0
      dhcp4: no

    lunabr:
      dhcp4: no

    vnet100:
      optional: true
      addresses:
      - 192.168.105.253/24
      routes:
      - to: default
        via: 192.168.105.1
      nameservers:
        addresses: [192.168.105.224]
        search: [yourdomain.com]
| From now on be careful if you’re connected via SSH — the following commands will cut the connection, so it’s better to switch to the console and continue from there. |
OVS Configuration
- I create the
lunabrbridge. I add theeth0port to thelunabrbridge as a Trunk port (nothing special needed — physical ports are added in Trunk mode by default). I create thevnet100interface solunacan work on vlan100. Theseovs-vsctlcommands are persistent (remember the database).
root@luna:~# ovs-vsctl add-br lunabr
root@luna:~# ovs-vsctl add-port lunabr eth0  # This is where the connection drops
root@luna:~# ovs-vsctl add-port lunabr vnet100 tag=100 -- set Interface vnet100 type=internal
Activating the Configuration
- I activate the netplan configuration I prepared earlier, switch my server’s network cable to a TRUNK port on the switch, and reboot.
root@luna:~# netplan apply
:
SWITCH THE CABLE from luna to a TRUNK port on the Switch
:
root@luna:~# reboot -f
- After boot, I connect to
lunavia SSH from a laptop on vlan100, verify the port status, bridge, etc.
➜  ~ ssh luis@192.168.105.253
:
root@luna:~# ip link
1: lo: <LOOPBACK,UP,LOWER_UP> mtu 65536 qdisc noqueue state UNKNOWN mode DEFAULT group default qlen 1000
    link/loopback 00:00:00:00:00:00 brd 00:00:00:00:00:00
2: eth0: <BROADCAST,MULTICAST,UP,LOWER_UP> mtu 1500 qdisc fq_codel master ovs-system state UP mode DEFAULT group default qlen 1000
    link/ether 94:c6:91:1a:a6:3e brd ff:ff:ff:ff:ff:ff
    altname enp0s31f6
3: wlp58s0: <BROADCAST,MULTICAST> mtu 1500 qdisc noop state DOWN mode DEFAULT group default qlen 1000
    link/ether a0:c5:89:aa:13:c4 brd ff:ff:ff:ff:ff:ff
4: ovs-system: <BROADCAST,MULTICAST> mtu 1500 qdisc noop state DOWN mode DEFAULT group default qlen 1000
    link/ether 82:d4:11:3d:34:37 brd ff:ff:ff:ff:ff:ff
5: lunabr: <BROADCAST,MULTICAST,UP,LOWER_UP> mtu 1500 qdisc noqueue state UNKNOWN mode DEFAULT group default qlen 1000
    link/ether 94:c6:91:1a:a6:3e brd ff:ff:ff:ff:ff:ff
6: vnet100: <BROADCAST,MULTICAST,UP,LOWER_UP> mtu 1500 qdisc noqueue state UNKNOWN mode DEFAULT group default qlen 1000
    link/ether 7e:14:01:8e:72:5b brd ff:ff:ff:ff:ff:ff
root@luna:~# ovs-vsctl show
f283cd6c-17e8-4bf3-be1a-b50904e91fc3
    Bridge lunabr
        Port lunabr
            Interface lunabr
                type: internal
        Port eth0
            Interface eth0
        Port vnet100
            tag: 100
            Interface vnet100
                type: internal
    ovs_version: "2.17.3"
Adding KVM/QEMU
- I install
KVM/QEMUandvirt-manager. The installation is relatively straightforward — at the beginning of the post about Vagrant with Libvirt KVM I explain how to do it.
root@luna:~# apt install qemu qemu-kvm libvirt-clients \
                   libvirt-daemon-system virtinst
root@luna:~# apt install virt-manager
| Note: I don’t install bridge-utils (Linux Ethernet Bridge utilities) because we don’t need them — we’re using OVS. |
- I add my user to the
libvirtandkvmgroups… andrebootso thatqemu-system-x86_64works later.
root@luna:~# adduser luis libvirt
root@luna:~# adduser luis kvm
root@luna:~# systemctl reboot -f
Dynamic OVS + Libvirt + QEMU/KVM Configuration
I take advantage of the integration between Libvirt and Open vSwitch to avoid static configurations. I let libvirt call ovs-vsctl to create (when starting VMs) and destroy (when stopping VMs) the bridge ports.
Open vSwitch Integration with Libvirt
Open vSwitch supports the networks managed by libvirt in bridged mode (not NAT). More information here.
- I’ll create a persistent Libvirt network from an XML file. I create the file
/root/switch-lunabr.xmlwhich defines the ability to access the TRUNK or individual VLANs from future virtual machines.
<!-- Example XML file to create a persistent virtual network within Libvirt.
-->

<network>
  <name>switch-lunabr</name>
  <forward mode='bridge'/>
  <bridge name='lunabr'/>
  <virtualport type='openvswitch'/>
  <portgroup name='Sin vlan'>
  </portgroup>
  <portgroup name='Trunk Core'>
    <vlan trunk='yes'>
      <tag id='2'/>
      <tag id='3'/>
      <tag id='6'/>
      <tag id='100'/>
    </vlan>
  </portgroup>
  <portgroup name='Vlan 2'>
    <vlan>
      <tag id='2'/>
    </vlan>
  </portgroup>
  <portgroup name='Vlan 3'>
    <vlan>
      <tag id='3'/>
    </vlan>
  </portgroup>
  <portgroup name='Vlan 6'>
    <vlan>
      <tag id='6'/>
    </vlan>
  </portgroup>
  <portgroup name='Vlan 100' default='yes'>
    <vlan>
      <tag id='100'/>
    </vlan>
  </portgroup>
</network>
- I disable the
defaultnetwork installed by default
root@luna:~# virsh net-autostart --disable default
Network default unmarked as autostarted

root@luna:~# virsh net-destroy default
Network default destroyed

root@luna:~# virsh net-undefine default
Network default has been undefined
- I activate the new persistent network from the file I just created
root@luna:~# virsh net-define switch-lunabr.xml
(Creates the file /etc/libvirt/qemu/networks/switch-lunabr.xml)

root@luna:~# virsh net-start switch-lunabr
Network switch-lunabr started

root@luna:~# virsh net-autostart switch-lunabr
Network switch-lunabr marked as autostarted

root@luna:~# virsh net-list
 Name        State    Autostart   Persistent
----------------------------------------------
 switch-lunabr   active   yes         yes
- From my VMs I’ll see the new options when selecting the Network.
- The best part is yet to come. Once the VM starts, a new interface called vnetN will be dynamically created with the configuration set in the XML. In this example we selected VLAN100, which in the XML has
tag id='100', so it will create an internal virtual port withtag: 100.
Virtual Machine with Dynamic TRUNK Port
It’s possible to deliver the TRUNK port to a VM and have it created in OVS dynamically during startup. First I install my VM and then add a network interface. In my case I start virt-manager as follows:
luis@luna:~$ type vm
vm is aliased to `LC_ALL=C virt-manager'
luis@luna:~$ vm
- I create a VM based on Ubuntu and add a Bridge-type interface.
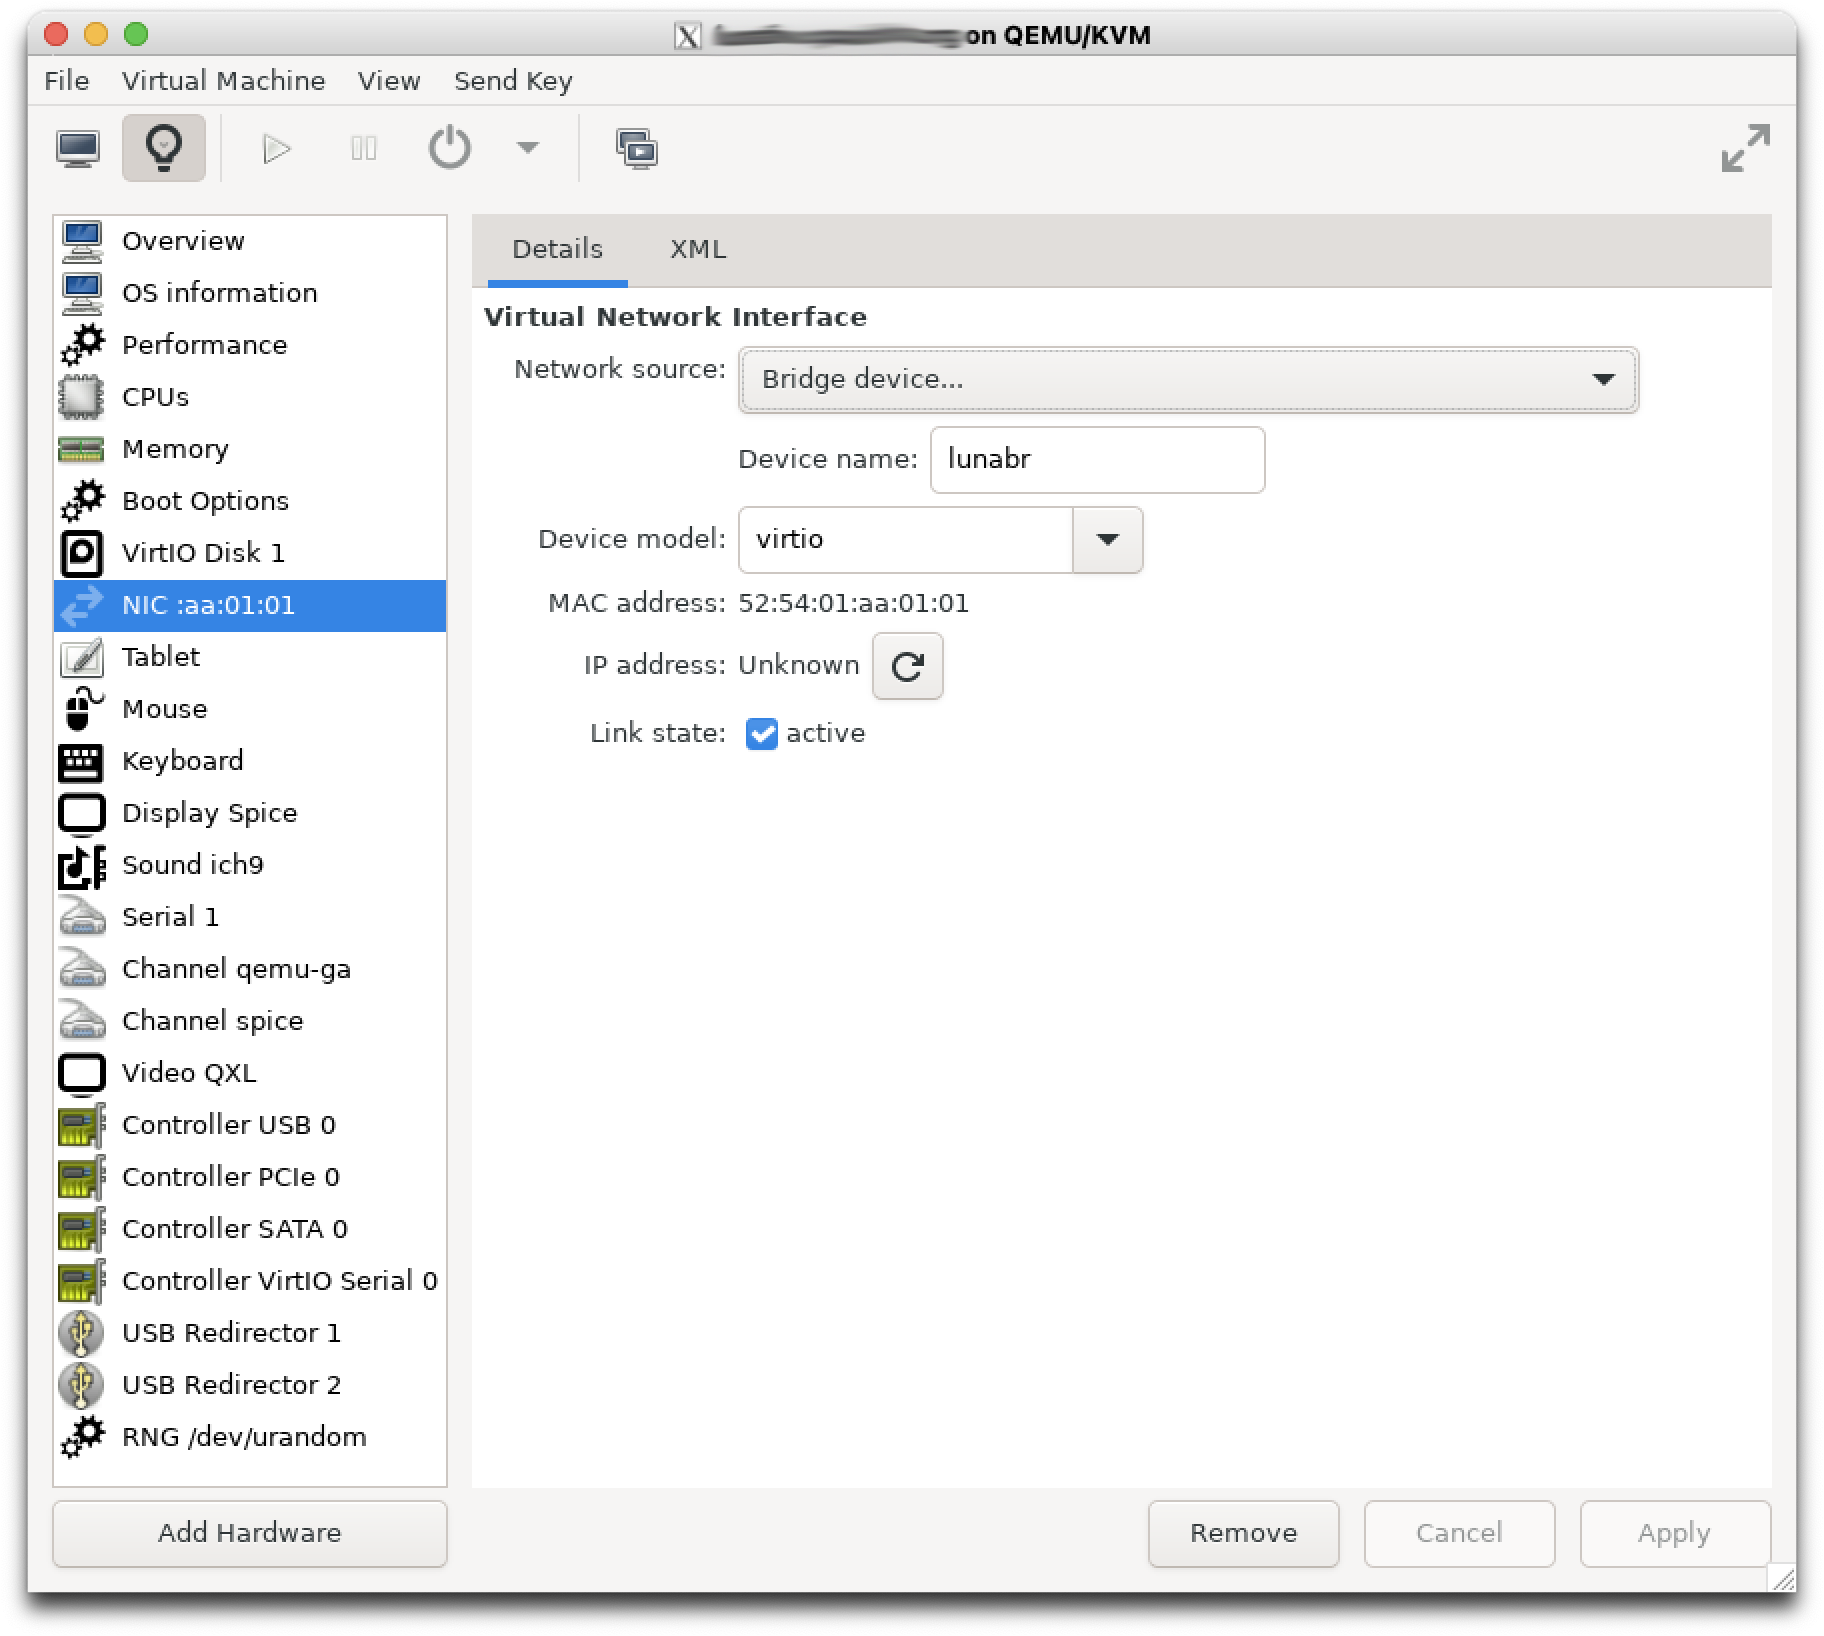
| IMPORTANT — this creates an incomplete configuration. If we enter the XML section, we see that it doesn’t specify which VLANs we want to present to the virtual machine. If I try to start the VM, it will return the error libvirt unable to add trunk bridge port vnetXX operation not supported. |
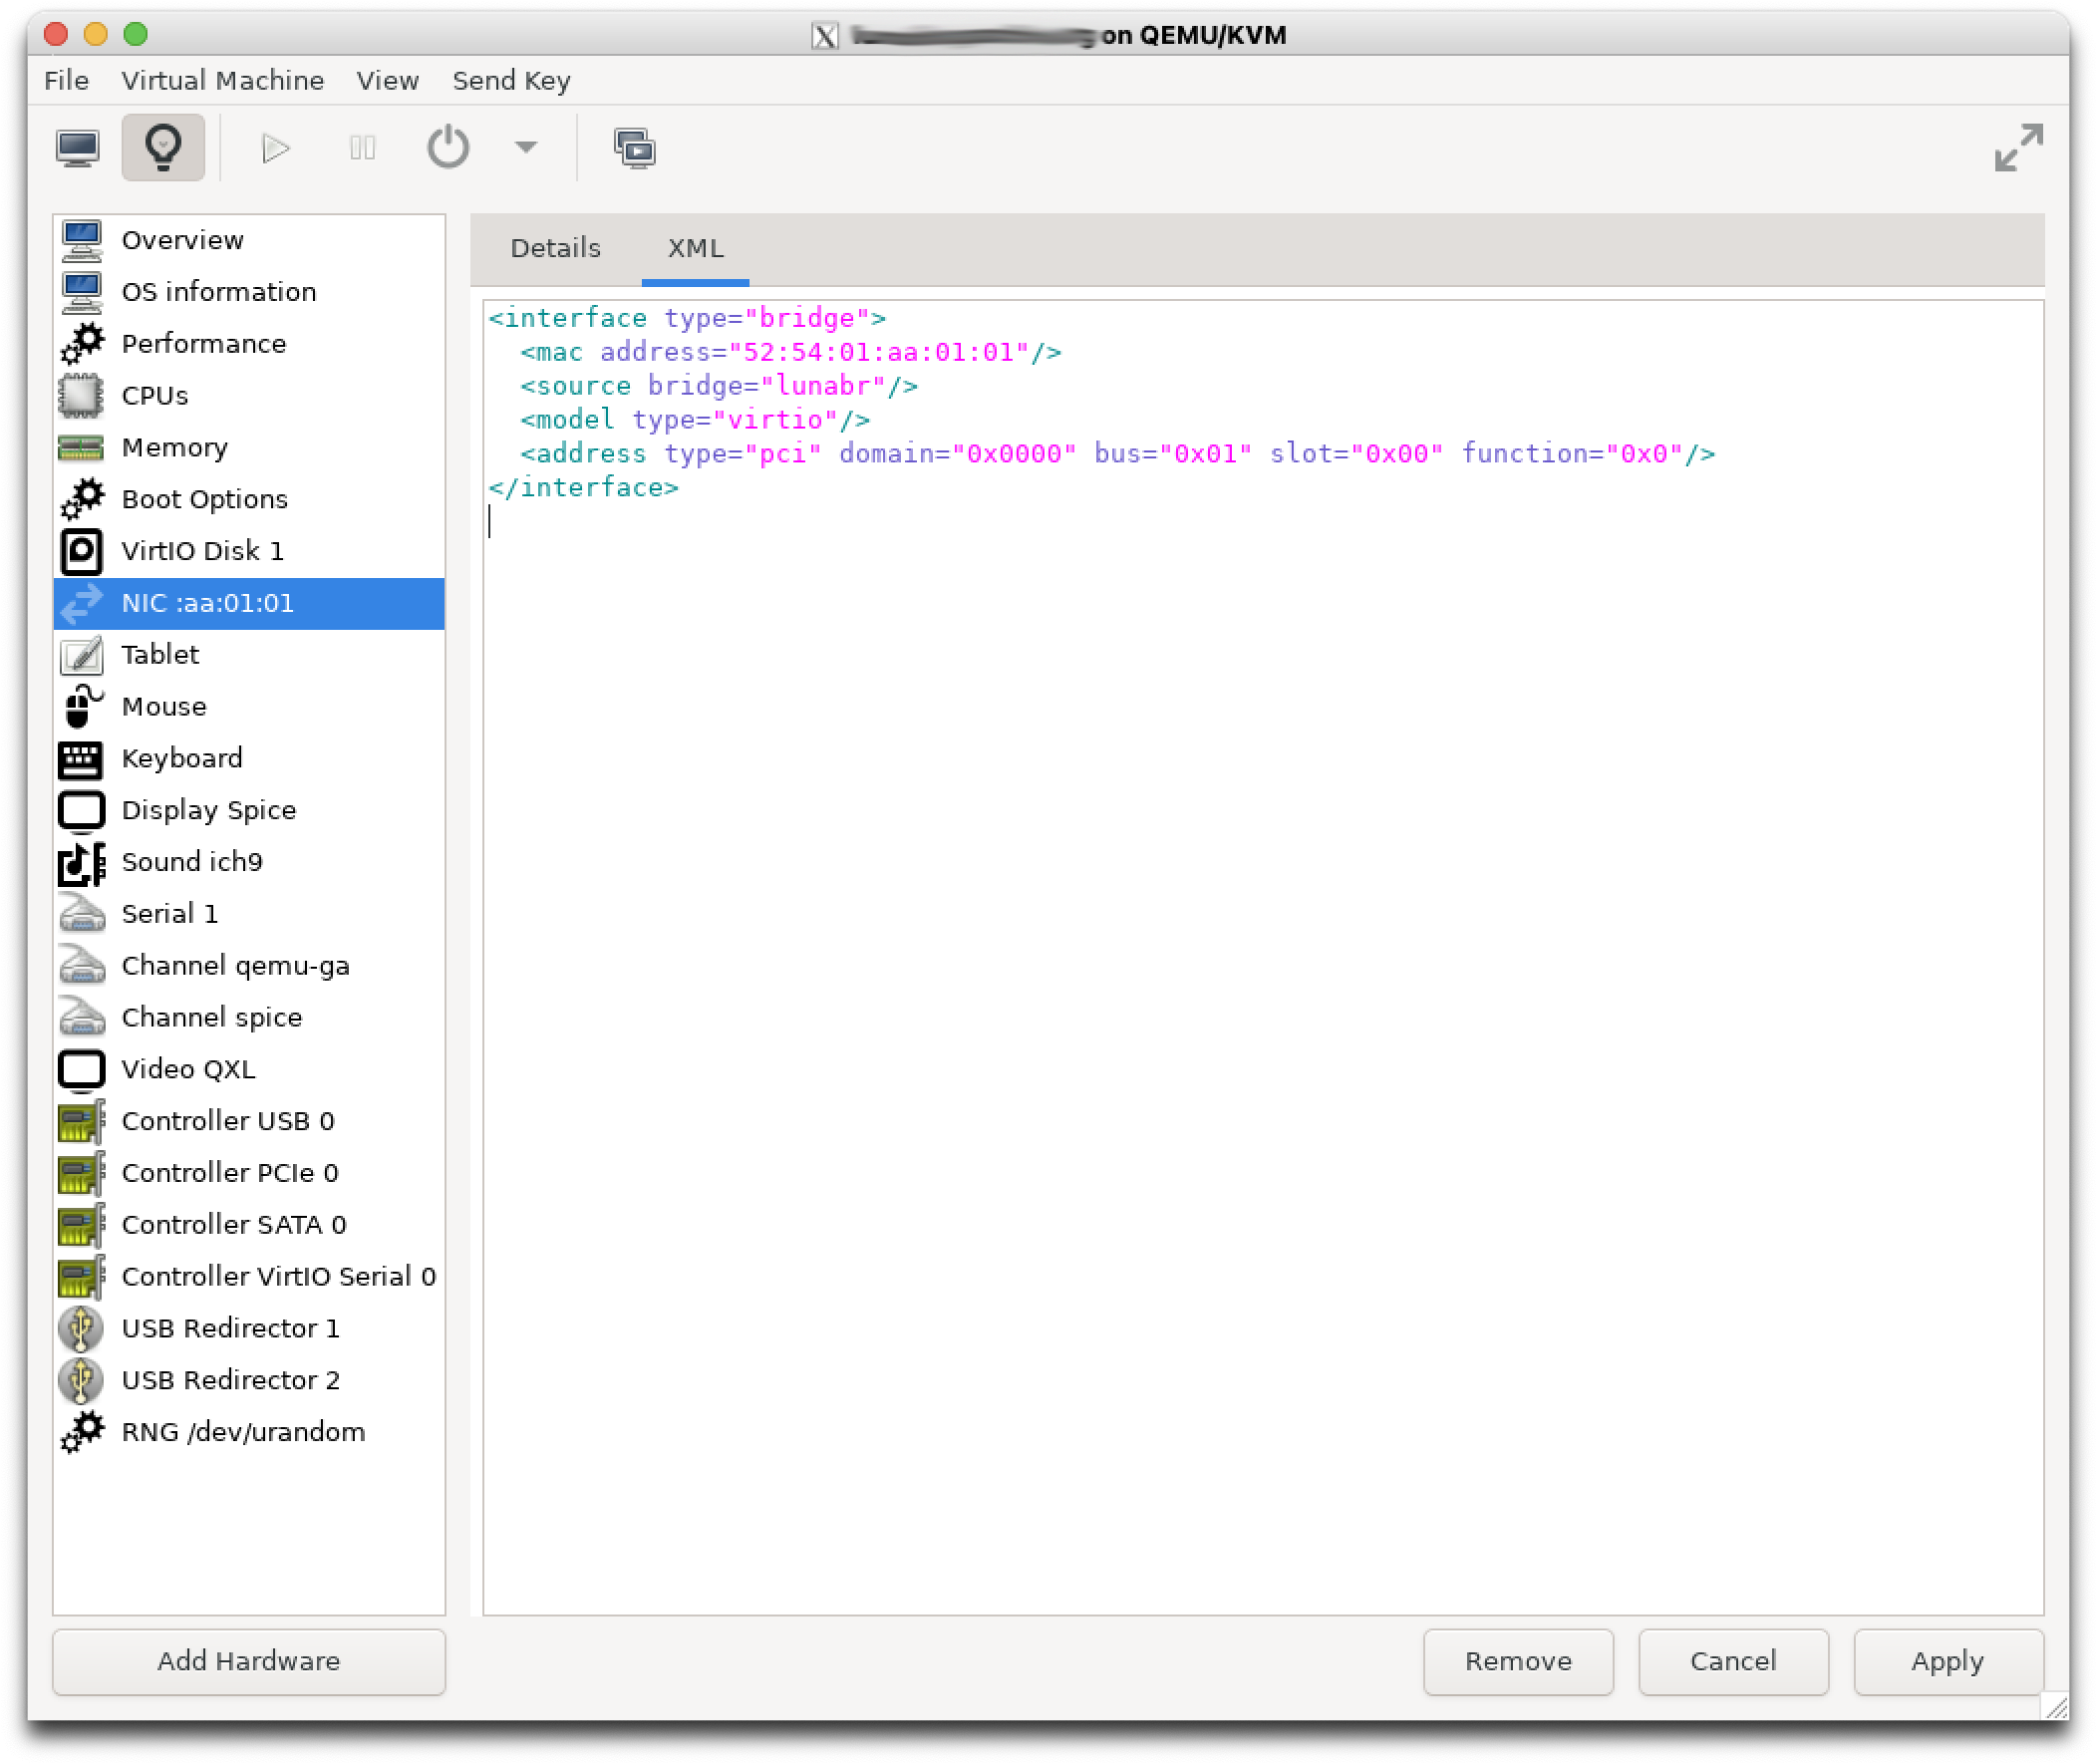
- I edit the XML section and manually add some parameters. The ID in
<parameters interfaceid="">is one I made up.
$ virsh edit lunafw.yourdomain.com
:
<interface type="bridge">
  <mac address="52:54:01:aa:01:01"/>
  <source bridge="lunabr"/>
  <vlan trunk="yes">
    <tag id="2"/>
    <tag id="3"/>
    <tag id="6"/>
    <tag id="100"/>
  </vlan>
  <virtualport type="openvswitch">
    <parameters interfaceid="7d072813-014c-41f9-9f0d-4ebc350b9887"/>
  </virtualport>
  <target dev="vnet5"/>
  <model type="virtio"/>
  <alias name="net0"/>
  <address type="pci" domain="0x0000" bus="0x01" slot="0x00" function="0x0"/>
</interface>

- From here the VM will start correctly.
VM Configuration Examples
To work with this TRUNK in the Virtual Machine, you’ll need to configure it appropriately. Each operating system has its own way of doing it.
- Ubuntu LTS 22.04 with
netplan
# Netplan by LuisPa
network:
  ethernets:
      eth0:
        optional: true
        match:
            macaddress: '52:54:01:aa:01:01'
            name: enp1s0
            name: eth0
        set-name: eth0
        dhcp4: no
  vlans:
      vlan6:
        optional: true
        id: 6
        link: eth0
        macaddress: "52:54:01:aa:00:06"
        dhcp4: yes
      vlan100:
        optional: true
        id: 100
        link: eth0
        macaddress: "52:54:01:aa:01:00"
        addresses:
        - 192.168.105.1/22
        nameservers:
          addresses:
          - 192.168.105.224
          search:
          - yourdomain.com
  version: 2
- Gentoo Linux with
systemd-networkd.service
Multiple files need to be created in the /etc/systemd/network directory.
gentoo-lunafw /etc/systemd/network # ls -al
total 76
drwxr-xr-x 2 root root 4096 feb 14 10:33 .
drwxr-xr-x 9 root root 4096 feb 14 09:53 ..
-rw-r--r-- 1 root root  110 feb 14 08:54 eth0.network
-rw-r--r-- 1 root root    0 feb 14 09:52 .keep_sys-apps_systemd-0
-rw-r--r-- 1 root root  115 feb 14 10:26 vlan100.netdev
-rw-r--r-- 1 root root   98 feb 14 10:26 vlan100.network
-rw-r--r-- 1 root root  108 feb 14 10:33 vlan2.netdev
-rw-r--r-- 1 root root   90 feb 14 10:23 vlan2.network
-rw-r--r-- 1 root root  108 feb 14 10:33 vlan3.netdev
-rw-r--r-- 1 root root   90 feb 14 10:28 vlan3.network
-rw-r--r-- 1 root root  108 feb 14 10:32 vlan6.netdev
-rw-r--r-- 1 root root   90 feb 14 10:31 vlan6.network
-rw-r--r-- 1 root root   38 feb 14 08:50 vSwitch100.netdev
-rw-r--r-- 1 root root  454 feb 14 10:25 vSwitch100.network
-rw-r--r-- 1 root root  159 feb 14 10:23 vSwitch2.netdev
-rw-r--r-- 1 root root  184 feb 14 10:29 vSwitch2.network
-rw-r--r-- 1 root root  159 feb 14 10:31 vSwitch3.netdev
-rw-r--r-- 1 root root  184 feb 14 10:29 vSwitch3.network
-rw-r--r-- 1 root root  163 feb 14 10:30 vSwitch6.netdev
-rw-r--r-- 1 root root  184 feb 14 10:30 vSwitch6.network

------------ eth0.network ---------------
#
# VM's main interface
#
[Match]
Name=eth0

[Network]
VLAN=vlan2
VLAN=vlan3
VLAN=vlan6
VLAN=vlan100


------------ vlan100.netdev ---------------
#
# Virtual Network Device (netdev) to define VLAN 100
#
[NetDev]
Name=vlan100
Kind=vlan

[VLAN]
Id=100


------------ vlan100.network ---------------
#
# Connect vlan100 to the "vSwitch100" bridge
#
[Match]
Name=vlan100

[Network]
Bridge=vSwitch100

------------ vlan2.netdev ---------------
#
# Virtual Network Device (netdev) to define VLAN 2
#
[NetDev]
Name=vlan2
Kind=vlan

[VLAN]
Id=2

------------ vlan2.network ---------------
#
# Connect vlan2 to the "vSwitch2" bridge
#
[Match]
Name=vlan2

[Network]
Bridge=vSwitch2

------------ vlan3.netdev ---------------
#
# Virtual Network Device (netdev) to define VLAN 3
#
[NetDev]
Name=vlan3
Kind=vlan

[VLAN]
Id=3

------------ vlan3.network ---------------
#
# Connect vlan3 to the "vSwitch3" bridge
#
[Match]
Name=vlan3

[Network]
Bridge=vSwitch3

------------ vlan6.netdev ---------------
#
# Virtual Network Device (netdev) to define VLAN 6
#
[NetDev]
Name=vlan6
Kind=vlan

[VLAN]
Id=6

------------ vlan6.network ---------------
#
# Connect vlan6 to the "vSwitch6" bridge
#
[Match]
Name=vlan6

[Network]
Bridge=vSwitch6

------------ vSwitch100.netdev ---------------
[NetDev]
Name=vSwitch100
Kind=bridge


------------ vSwitch100.network ---------------
#
# To switch traffic on vSwitch100, we need to create
# the vSwitch100.network file (in addition to vSwitch100.netdev)
# and Match with vSwitch100
#
[Match]
Name=vSwitch100

# In the case of Switch100, I need an IP address. This machine
# will have a static IP on the virtual bridge "vSwitch100" (to which I'll add
# VLAN100).
#
[Network]
Address=192.168.105.222/24
DNS=192.168.105.224
Gateway=192.168.105.1
IPForward=yes


------------ vSwitch2.netdev ---------------
#
# Virtual Bridge named "vSwitch2" that I'll use
# for accessing the Movistar IPTV service
#
[NetDev]
Name=vSwitch2
Kind=bridge


------------ vSwitch2.network ---------------
#
# To switch traffic on vSwitch2, we need to create
# the vSwitch2.network file (in addition to vSwitch2.netdev)
# and Match with vSwitch2
#
[Match]
Name=vSwitch2


------------ vSwitch3.netdev ---------------
#
# Virtual Bridge named "vSwitch3" that I'll use
# for accessing the Movistar VoIP service
#
[NetDev]
Name=vSwitch3
Kind=bridge


------------ vSwitch3.network ---------------
#
# To switch traffic on vSwitch3, we need to create
# the vSwitch3.network file (in addition to vSwitch3.netdev)
# and Match with vSwitch3
#
[Match]
Name=vSwitch3


------------ vSwitch6.netdev ---------------
#
# Virtual Bridge named "vSwitch6" that I'll use
# for accessing the Movistar data service
#
[NetDev]
Name=vSwitch6
Kind=bridge


------------ vSwitch6.network ---------------
#
# To switch traffic on vSwitch6, we need to create
# the vSwitch6.network file (in addition to vSwitch6.netdev)
# and Match with vSwitch6
#
[Match]
Name=vSwitch6