Proxmox VE is a powerful and easy-to-use open-source virtualization platform that enables the deployment and management of virtual machines (VMs with KVM/QEMU) and containers (CTs based on LXC). Proxmox offers Templates to minimize the creation time of new instances of these virtual machines or containers.
In this post I focus on how to create my own Virtual Machine Templates along with a cloud-based image and cloud-init.
Heads up
Templates with Cloud-Based Images
What is a VM Template in Proxmox? It’s a regular VM that we convert into a “Template,” and from it we can quickly clone new identical VMs. If we combine them with cloud-based images and cloud-init, we get a very powerful asset for creating agile and lightweight VMs.
These cloud-based images (VM cloud-based images) are pre-installed disks that are very useful because they have a minimal size and allow agile deployment of virtual machines. cloud-init is a standard for customizing instances in the “cloud” (in my case, instances in Proxmox). It allows you to parameterize the user, password, SSH keys, and other conveniences to save us work during installation.
Creating a Template
Note: CLI commands differ between images; I updated this post with new versions and different paths.
The first step is to download a cloud-based image. I connect to the Proxmox server and change to the “storage” directory I use for images:
- Based on Ubuntu: You need to download a
.imgfile.
curl -O -J -L https://cloud-images.ubuntu.com/minimal/releases/noble/release/ubuntu-24.04-minimal-cloudimg-amd64.img
# I rename it for convenience
mv ubuntu-24.04-minimal-cloudimg-amd64.img ubuntu-24.04.img
- Based on Debian. You need to download a
.rawand rename it.
cd /mnt/rapid/isos/template/iso
curl -O -J -L https://cloud.debian.org/images/cloud/trixie/latest/debian-13-genericcloud-amd64.raw
# It needs to end in .img, I rename it for convenience
mv debian-13-genericcloud-amd64.raw debian-13.img
- Based on Alpine. I chose Generic (Alpha), Release 3.22.1, Arch x86_64, Firmware UEFI, Bootstrap cloud-init, Machine Virtual. It offers a
.qcow2download. I copied the link, downloaded it from Proxmox, and converted it to.img.
cd /mnt/rapid/isos/template/iso
curl -O -J -L https://dl-cdn.alpinelinux.org/alpine/v3.22/releases/cloud/generic_alpine-3.22.1-x86_64-uefi-cloudinit-r0.qcow2
qemu-img convert -f qcow2 -O raw generic_alpine-3.22.1-x86_64-uefi-cloudinit-r0.qcow2 alpine-3.22.1.img
From here I’ve used the Ubuntu example, but with Debian or Alpine it’s exactly the same.
- I create a new VM with no installation media attached (I won’t be installing the OS) and no hard disk (since its disk will be the cloud image I downloaded earlier). I give it the minimum: 1 CPU, 1024 RAM (I can change this in future cloned VMs).
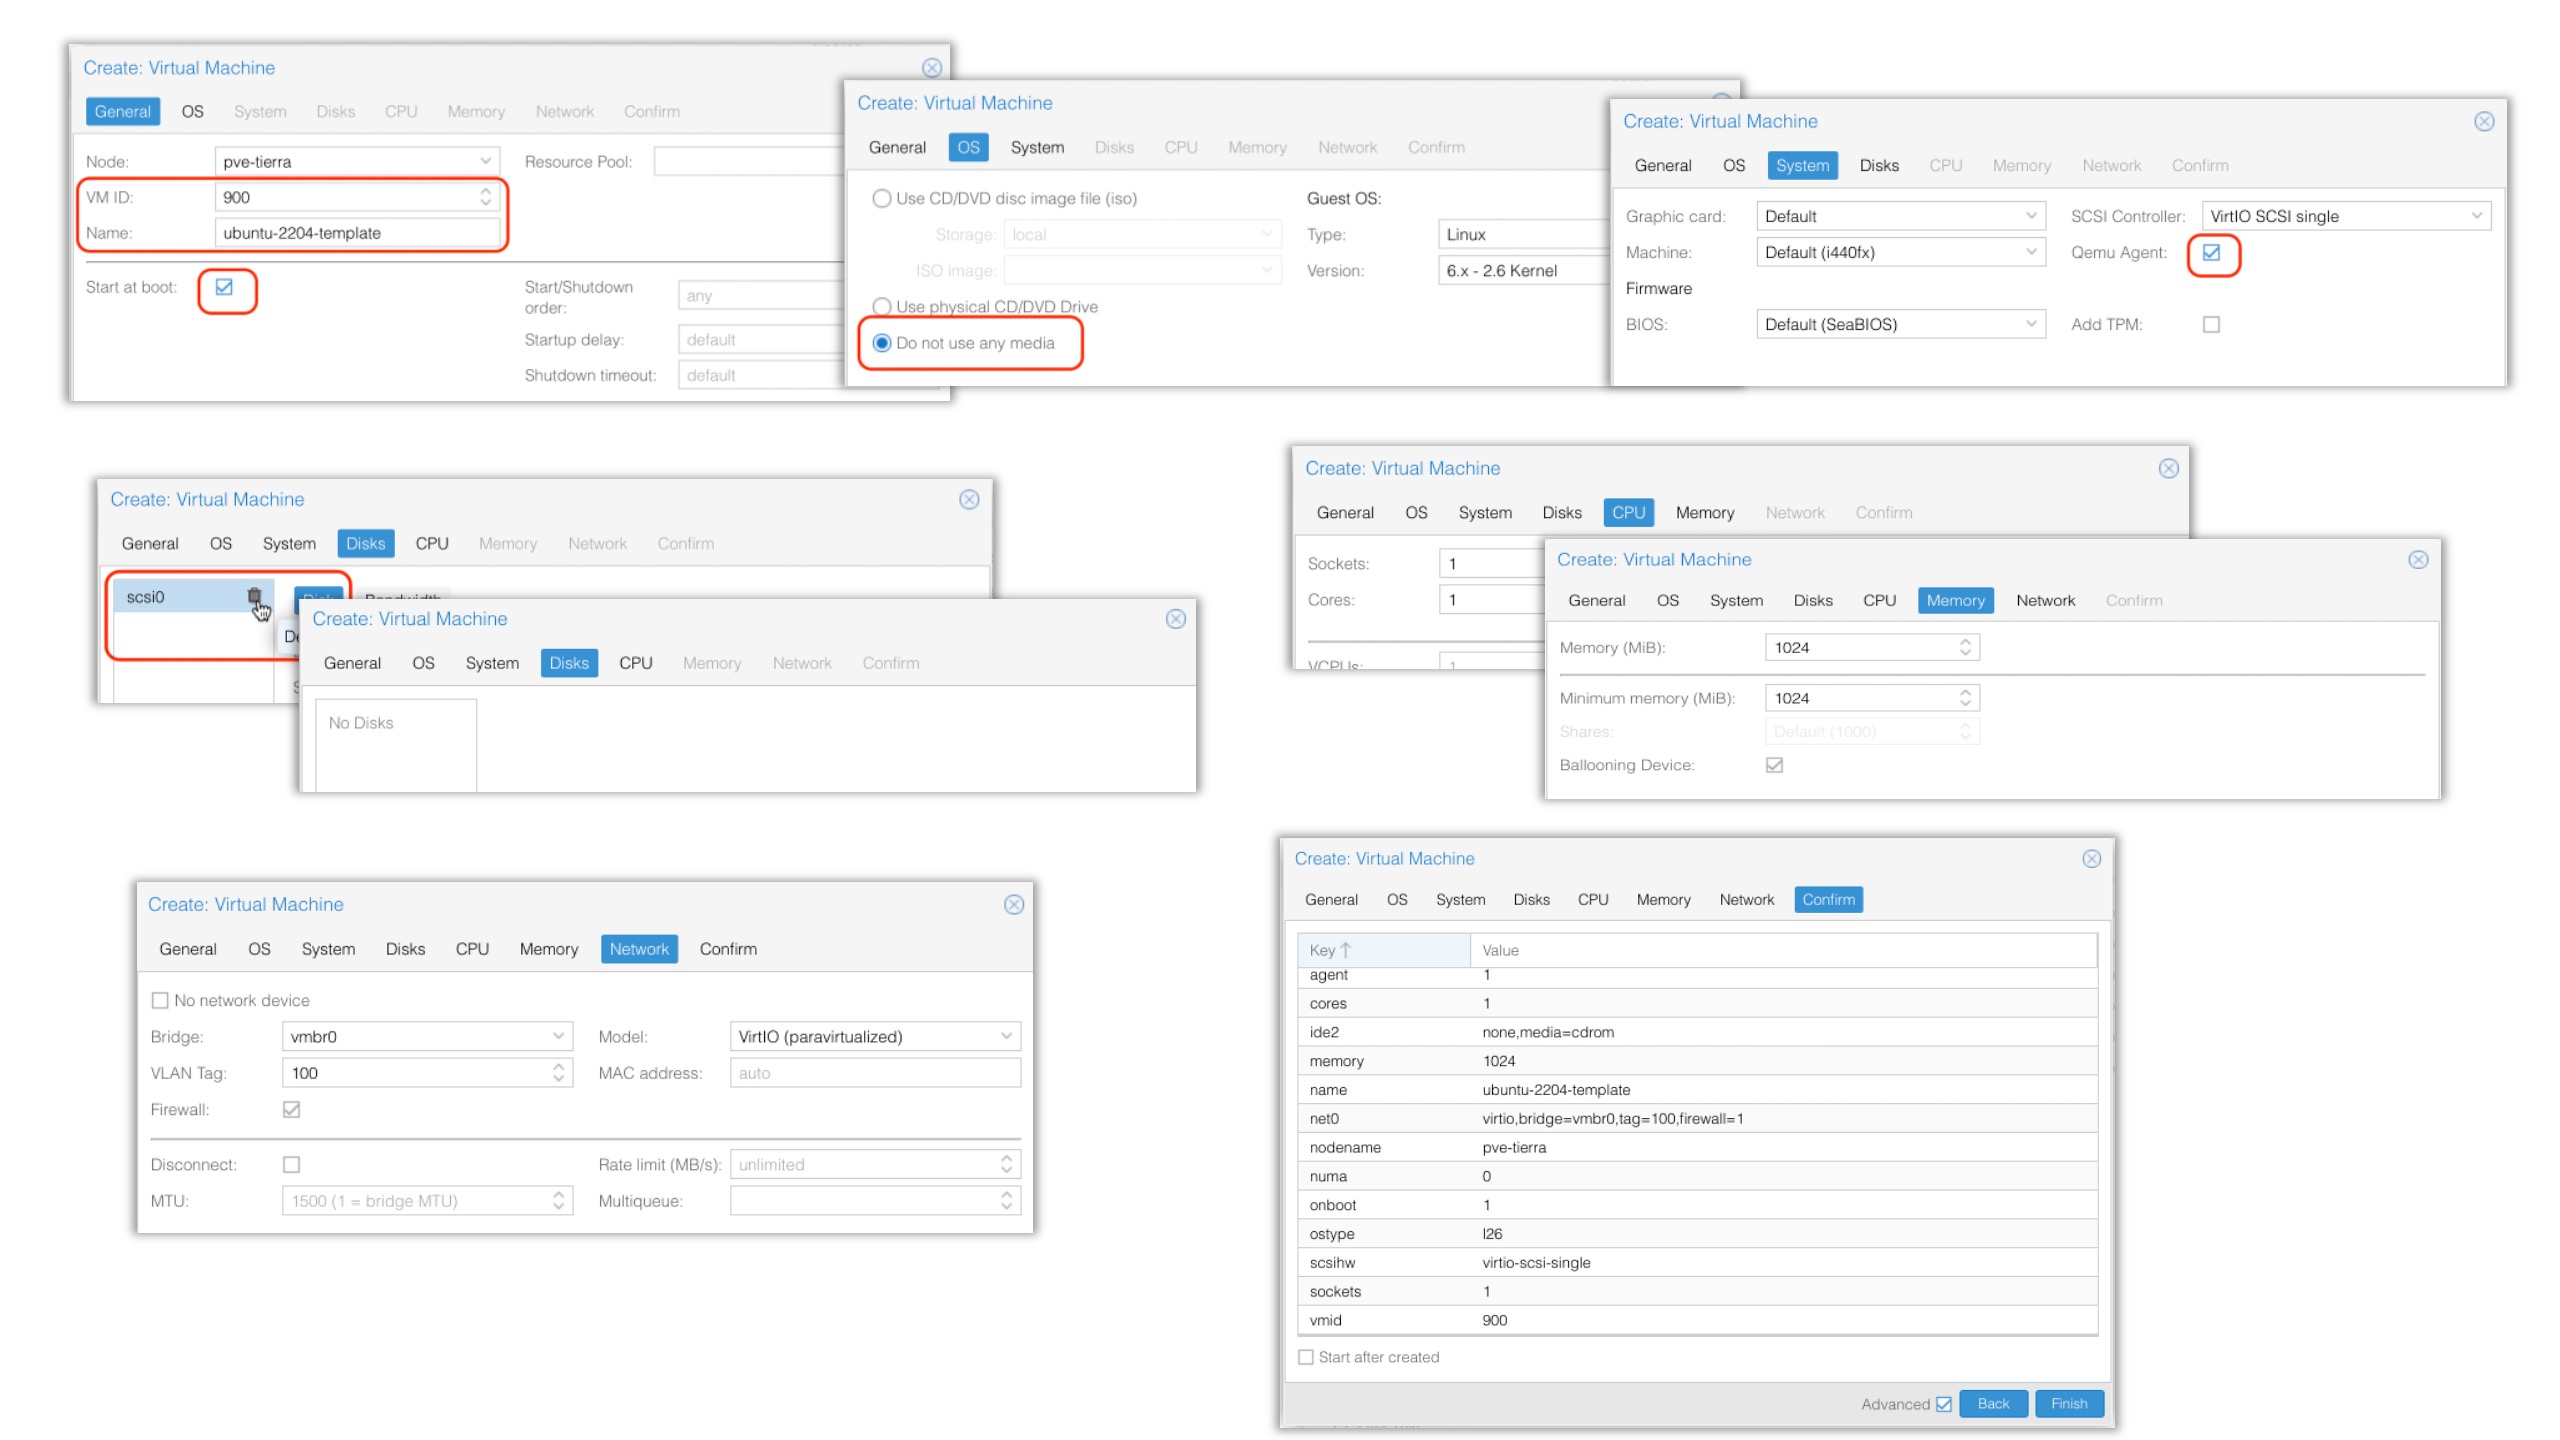
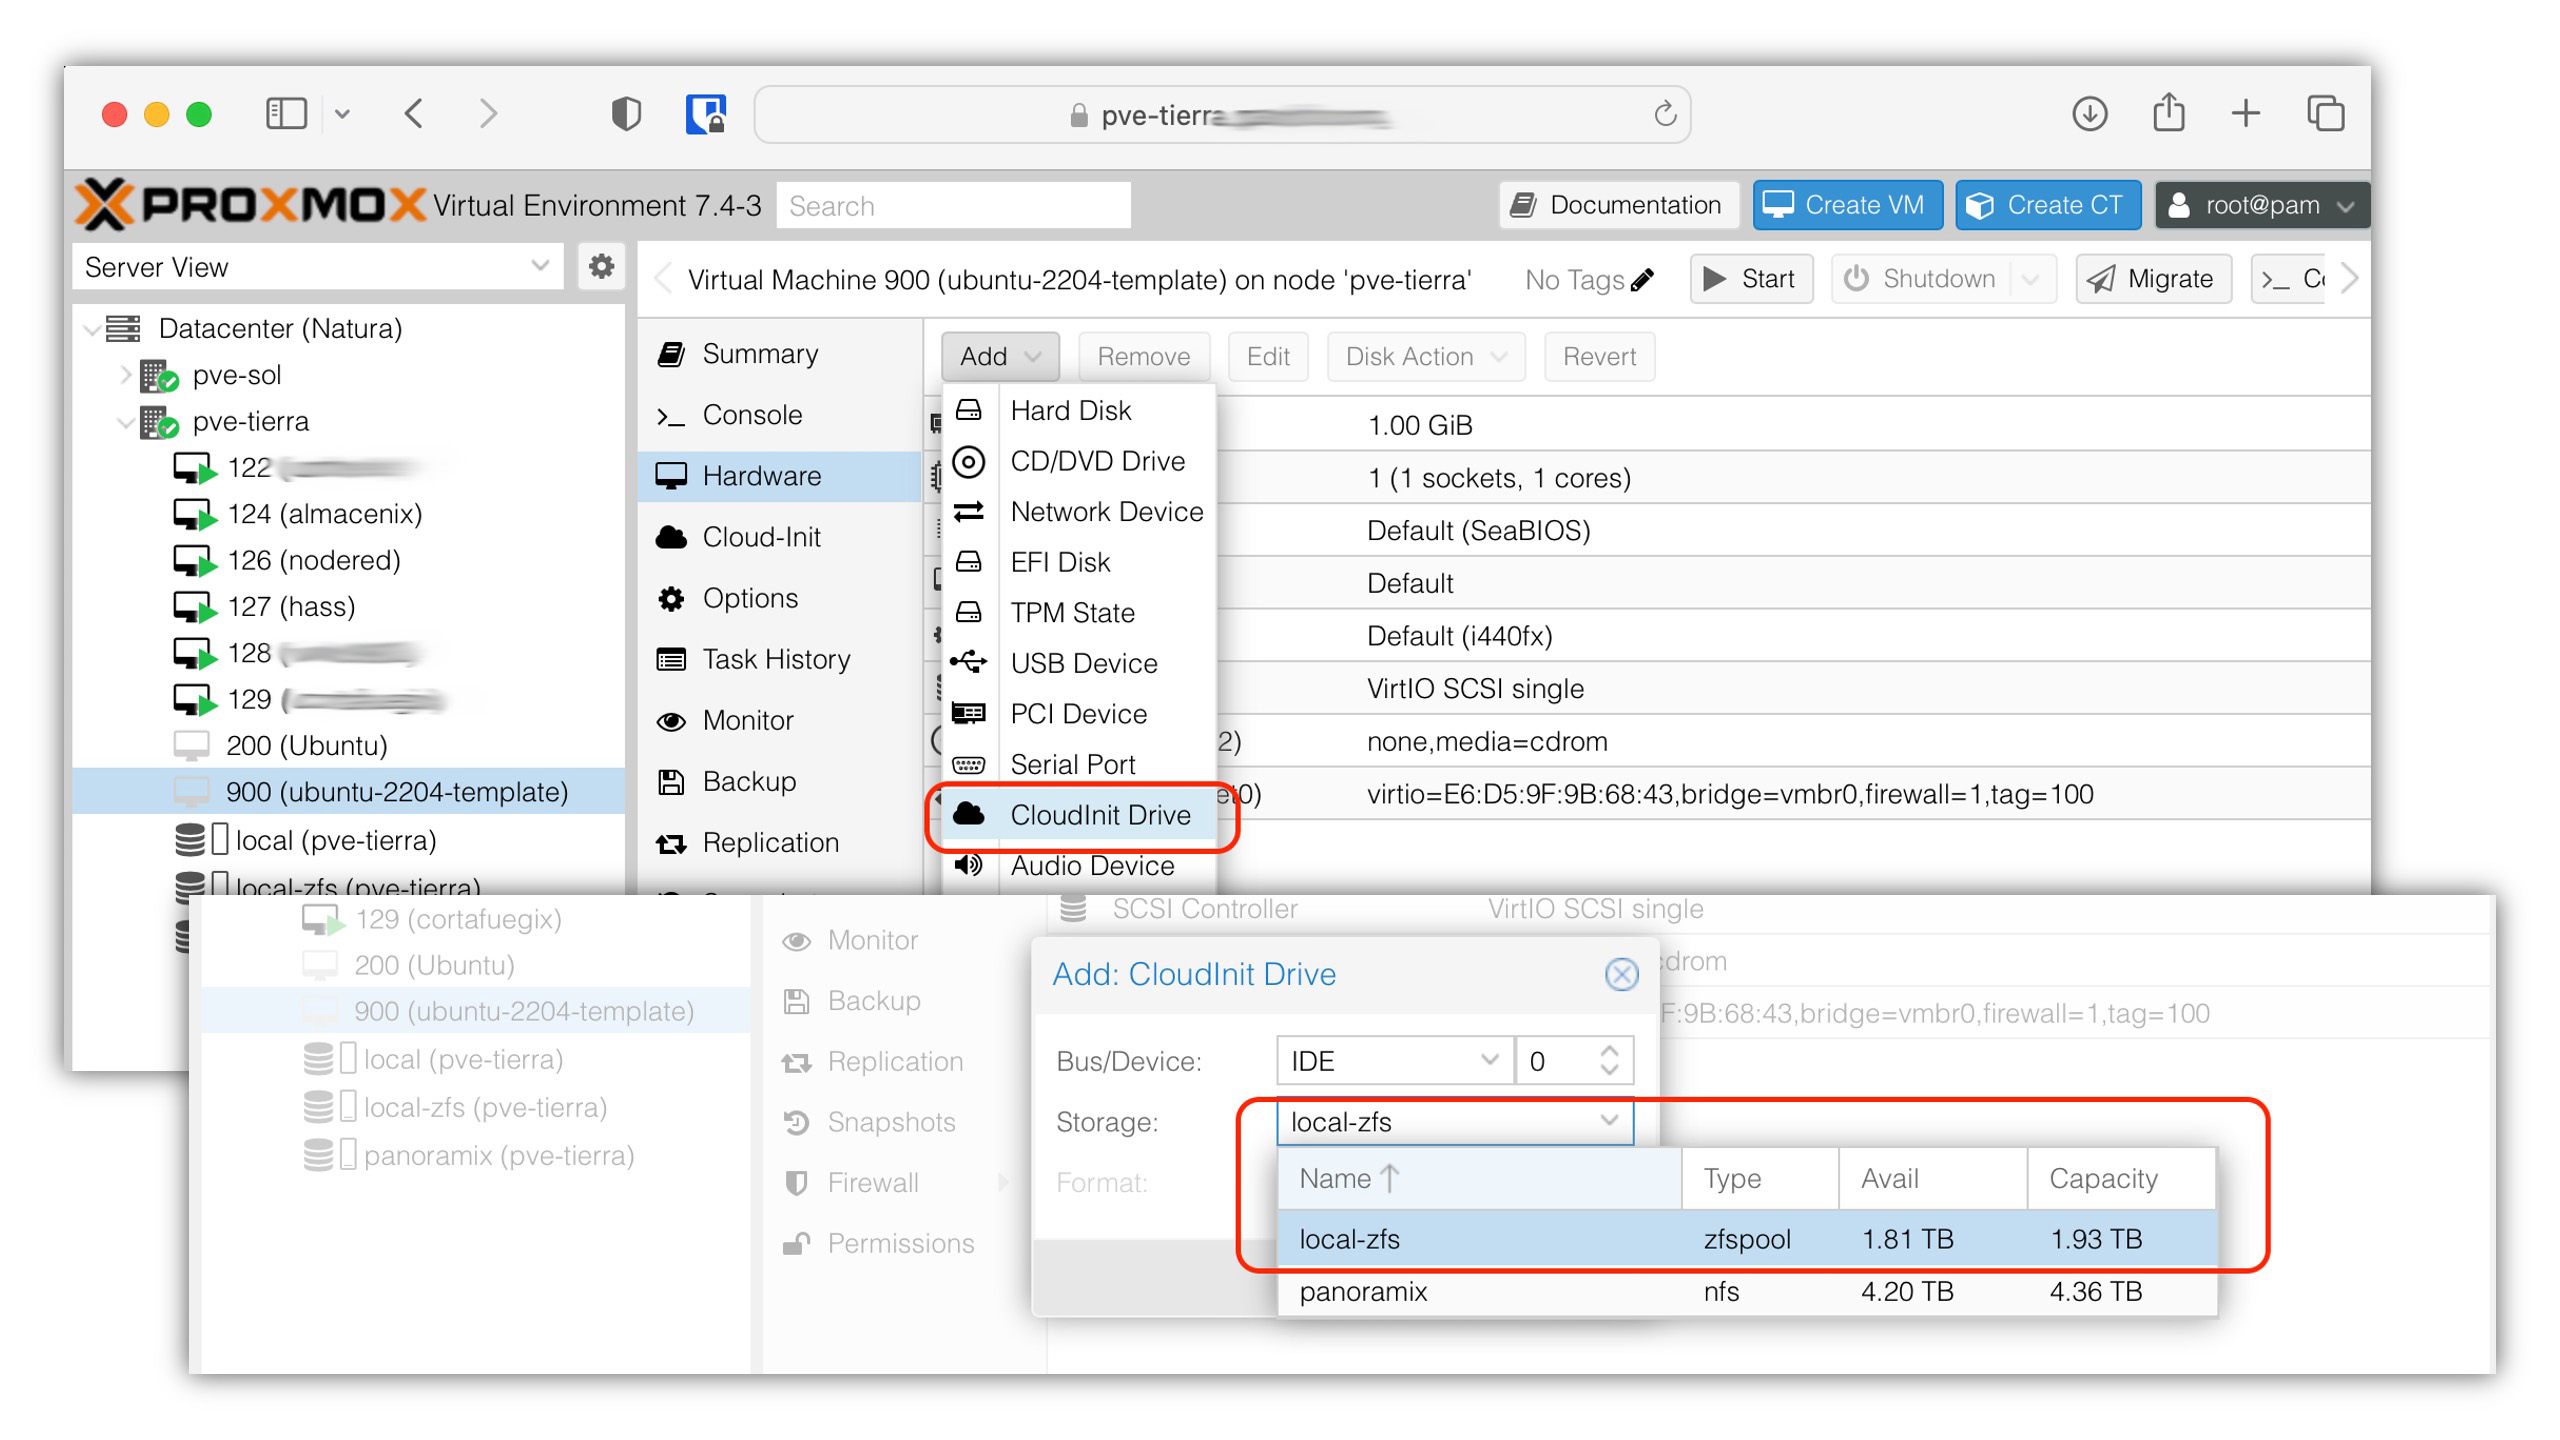
- It’s recommended (by the OpenStack project) that cloud-init finds its parameters on a CD-ROM type device attached to the VM. We have the advantage that Proxmox VE automatically generates an ISO image prepared for this:
Hardware -> Add -> CloudInit Drive (ide0).
- I parameterize cloud-init specifying user, password, DNS parameters, my SSH public key, and very importantly I configure the network in DHCP mode.
![Parameterizing cloud-init and clicking [Regenerate Image]](/img/posts/2023-04-07-proxmox-plantilla-vm-04.jpg)
| Important: Don’t forget to click Regenerate Image. The advantage of cloud-init is that it saves me from configuring several things in future VMs. |
- I continue from the CLI (via SSH) on the node where I created the VM. Important from now on: Use the same VM number (ID) you used during creation (in my case 900).
➜  ~ ssh root@pve-tierra.yourdomain.com
Last login: Sat Apr  8 10:20:18 2023 from 192.168.100.3
root@pve-tierra:~#
- I attach a VGA serial console to be able to see the console from Proxmox.
qm set 900 --serial0 socket --vga serial0
- I find the path of the image to import
 ❯ pvesm list rapid-isos
Volid                            Format  Type            Size VMID
rapid-isos:iso/alpine-3.22.1.img iso     iso        226492416
rapid-isos:iso/debian-13.img     iso     iso       3221225472
rapid-isos:iso/ubuntu-24.04.img  iso     iso        255393792

pvesm path rapid-isos:iso/ubuntu-24.04.img
/mnt/rapid/isos/template/iso/ubuntu-24.04.img

pvesm path rapid-isos:iso/debian-13.img
/mnt/rapid/isos/template/iso/debian-13.img

pvesm path rapid-isos:iso/alpine-3.22.1.img
/mnt/rapid/isos/template/iso/alpine-3.22.1.img
- I import the cloud-based image. The following command copies the image to Proxmox storage and configures it as a disk available for the VM.
qm importdisk 900 /mnt/rapid/isos/template/iso/debian-13.img local-lvm
importing disk '/mnt/rapid/isos/template/iso/debian-13.img' to VM 900 ...
:

- I attach this disk to the VM as a SCSI device.
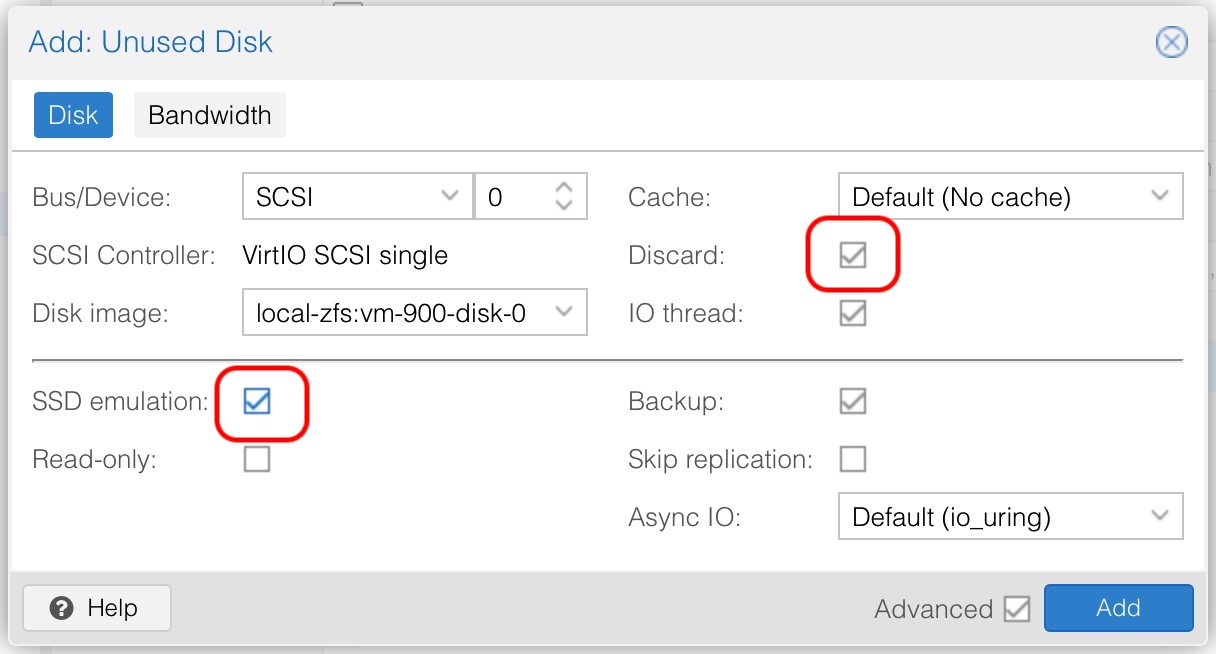
- VERY IMPORTANT The downloaded image won’t allow booting and typically has a small size (2-3GB). We use
qm disk resizeto fix both issues.
qm disk resize 900 scsi0 32G

- I change the boot order and enable booting from this new disk.

- The final step is converting the VM to a Template. This is irreversible, so it’s a good time to review the options. Once converted, notice how its icon changes.

Creating a New Virtual Machine
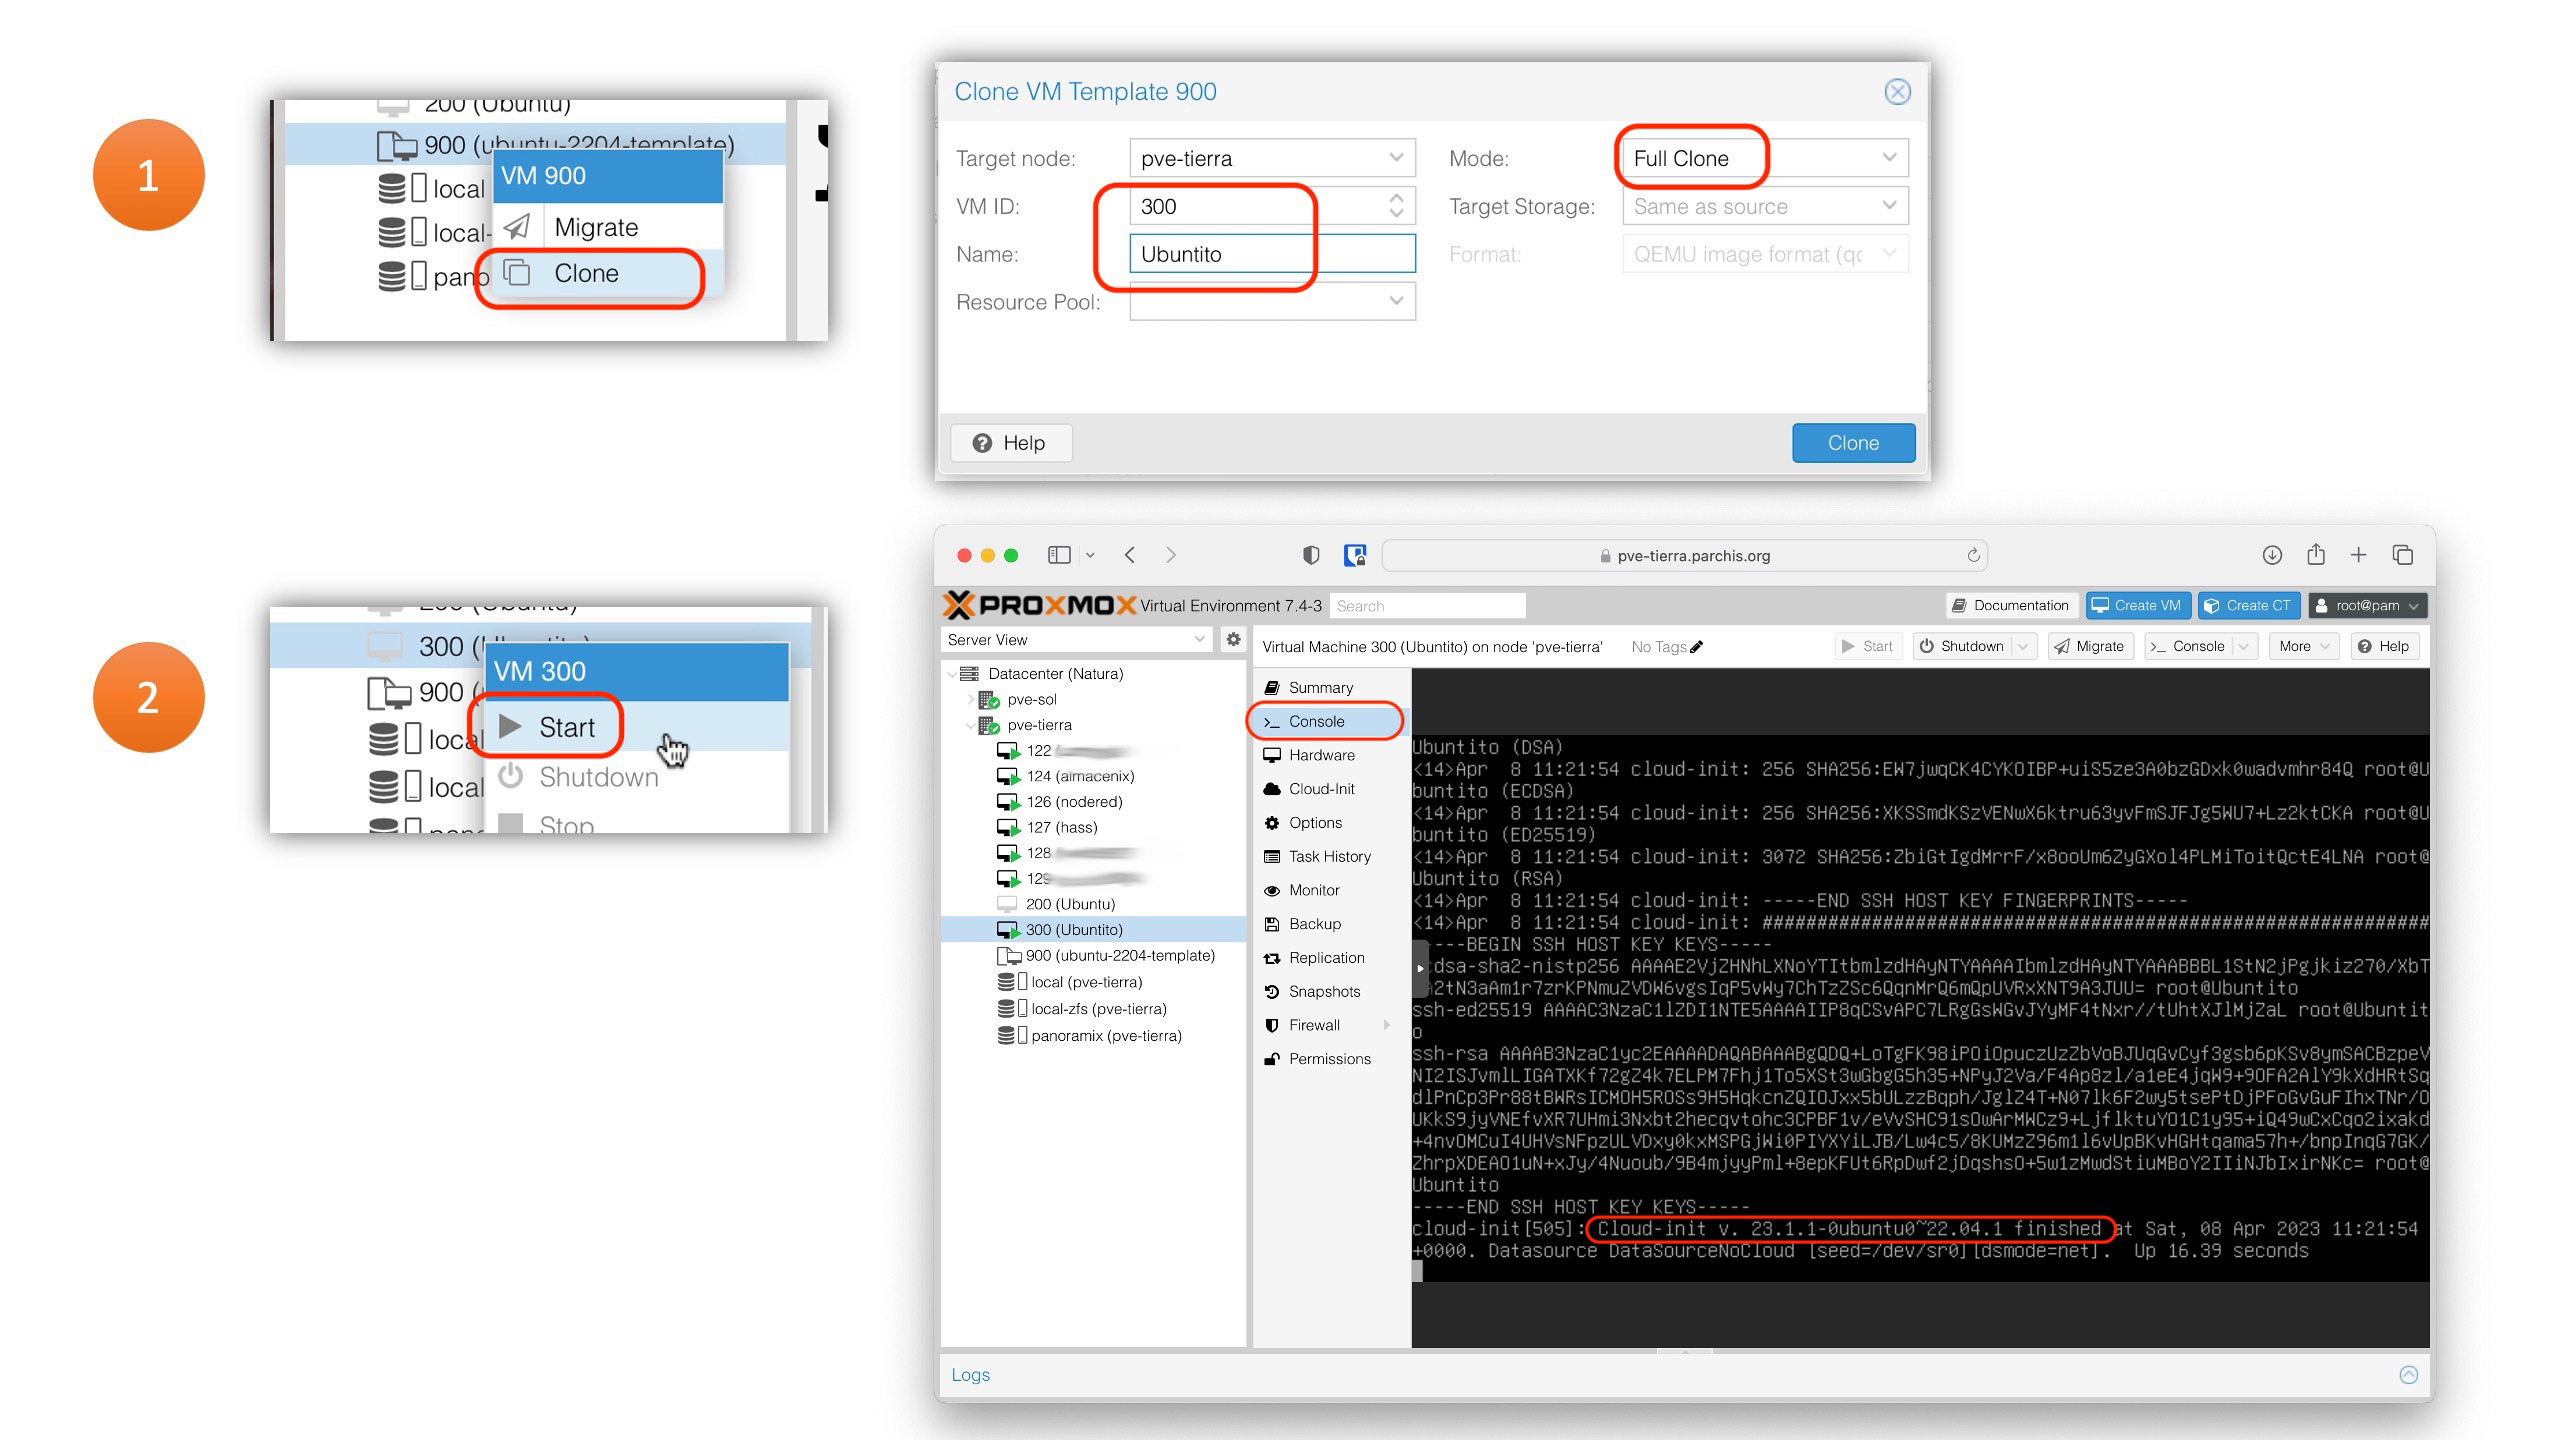
We can now create as many virtual machines as we want from the Template(s). This is done with the Clone function. Let’s see an example with Ubuntu (for Debian or Alpine it’s the same).
- I right-click on the Template, select Clone, assign the VM ID, its name, and the clone mode (I prefer full clones). When finished, I start the VM and click Console to watch the complete boot process. Important: do not touch anything, do not log in until cloud-init finishes running.
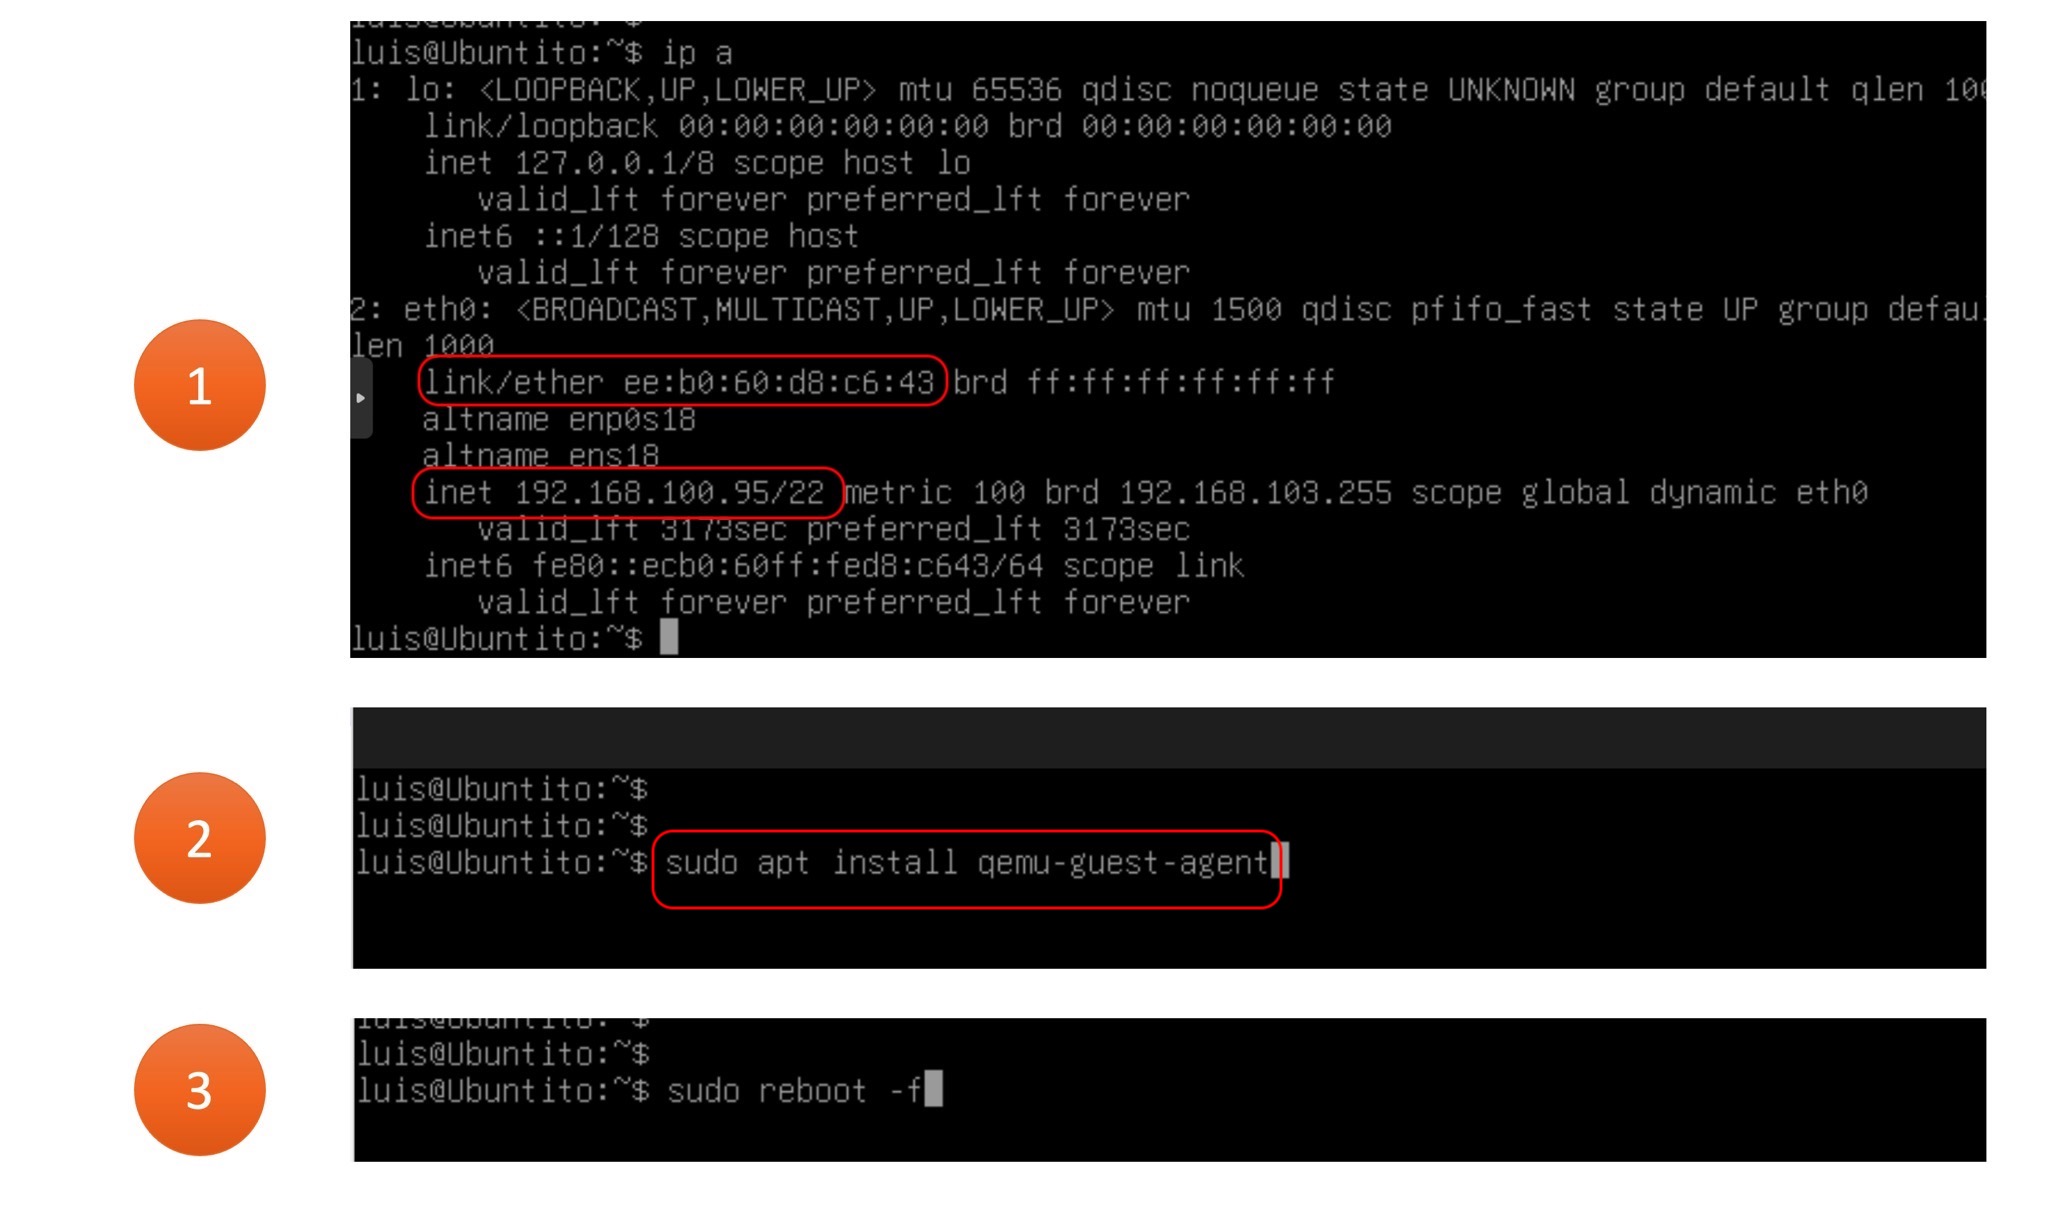
- When
cloud-initfinishes, I log in with my user (luis), find out what IP I received (for future SSH connections), installqemu-guest-agent(for better VM control from Proxmox), and reboot the VM.ip asudo apt install qemu-guest-agentsudo reboot -f
- We now have a new Ubuntu, Debian, or Alpine instance. If it’s going to be used long-term, I recommend assigning a static IP address. In my case, I always do this by assigning IPs to MACs statically from my DHCP Server.