I’m sharing my home networking setup with the option to knock on the door for on-demand access from the Internet. Today’s home networks end up supporting multiple services, and with the rise of home automation things get complicated, so I’ve decided to document it to keep track of everything in the future.
The number of devices grows and maintaining the network of a smart and automated home becomes a priority. I dedicate this post to those Geeks or Techies who, like me, have been deep into the complexity of networking in a home automation network for a long time.
Starting Point
The goal is for the design to support many miscellaneous devices, via LAN/WiFi, enable https certificates, allow access by knocking on the door from the internet, and ideally, keep home automation working even if the internet or WiFi goes down (maintaining some minimums).
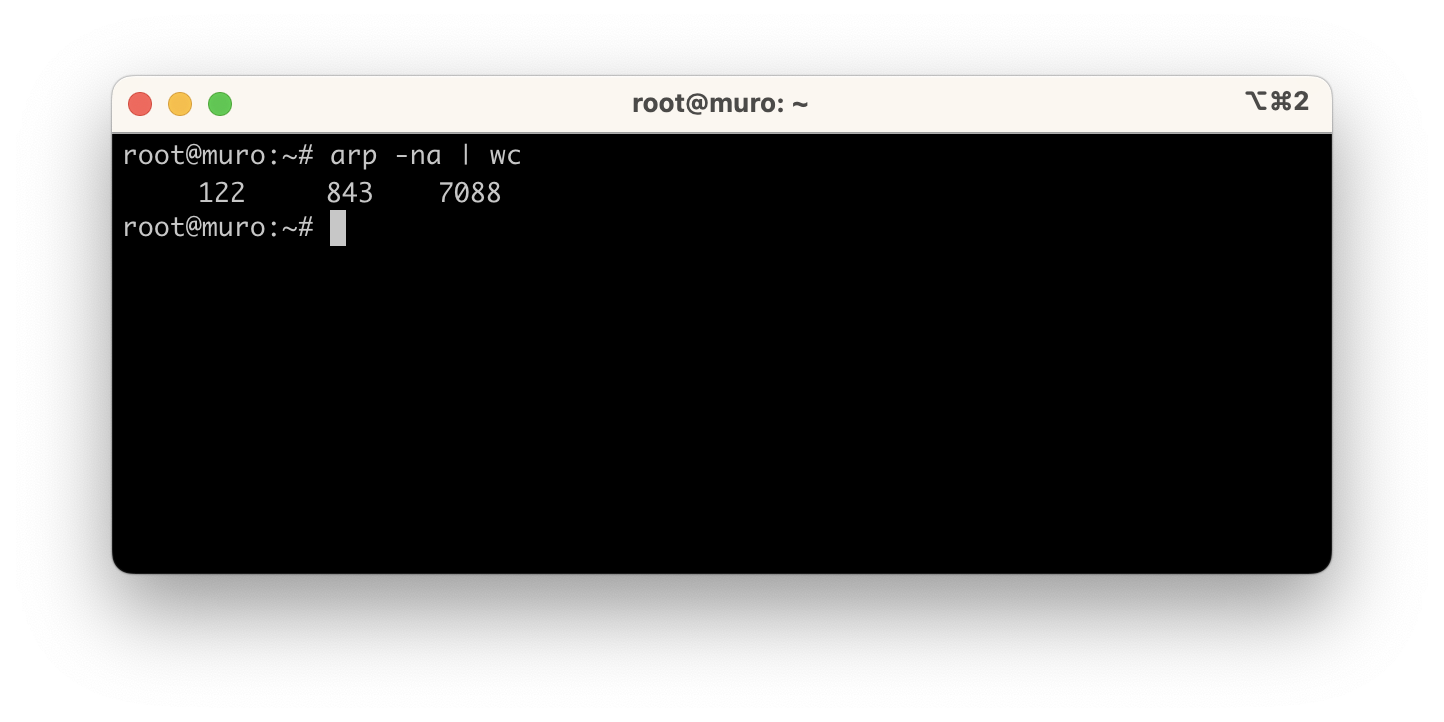
How much can your network grow? Well, without realizing it, adding switches, APs, physical servers, virtual machines, sensors, relays, actuators, clients, etc., the other day I saw 122 unique IPs in my Linux router.
Internet
I’ll start from the top describing:
- What I use as a router/firewall for Internet access.
- How to set up a dynamic domain, to connect by name from the Internet.
- How to knock on the door to open ports on demand.
- How to use SSH, OpenVPN, etc. to access from the Internet.
99% of homes use the ISP’s router and hang everything below it, they come with several ports and an embedded access point – sounds good.
When you have routing and switching knowledge, my recommendation is to place your own router + switch(es) + AP(s) behind it and disable the ISP’s WiFi. The main benefit is total control, and it even allows extras: for example, port knocking to open ports on demand, setting up IPSec tunnels, silencing pings (only if connected directly to the ONT), identifying attack attempts, VoIP and IPTV traffic control, and more.
Starting from this premise, I have three options.

- Standard: I connect my Router to the ISP’s and receive a private IP (
192.168.1.0/24).- Disadvantages: You need to do Port Forwarding twice. You lose control of VoIP/IPTV (if contracted). The ISP’s router may cause performance or crash issues. If you NAT on “MyRouter” you’re doing double NAT which isn’t ideal. If you don’t NAT on “MyRouter” then you need to add intranet routes on the ISP’s router, which I don’t like.
- Advantages: You don’t touch the ISP’s service which is usually stable enough. Support works and no explanations needed.
- Bridge Mode: It behaves like an ONT, you receive all VLANs. I’ve never configured this but I understand its pros and cons are the same as the next option (ONT).
- ONT: I connect my Router to the Optical Network Termination, to its ETH1 port, which presents the 3 VLANs: 6 for Data, 2 for IPTV, and 3 for VoIP.
- Disadvantages: If you don’t have routing/switching experience you’ll have many problems.
- Advantages: Definitely total control, including IPTV/VoIP traffic, plus avoiding double port-forwarding and double NAT.
Which do I recommend?
If you have the ONT, it’s the best option. I’ve been using it for years, back when Movistar installed it alongside the router. Unfortunately, it can no longer be requested for new installations.
Bridge mode - if you can and your router supports it, this would be my second choice. Beware though – some routers (e.g., GPT-2841GX4X5) don’t support this mode.
Standard mode - this would be my last resort. Beware – it works for everything I explain in this post but I’m uncomfortable with double port forwarding, potential double NAT or having to add static routes for my intranet, having to open too many ports, and losing total control of VoIP and IPTV.
Router
In my case I have an ONT and use Linux on a virtual machine, with its native routing and iptables. I deny all inbound traffic and Masquerade on outbound. You have easier options, like using OpenWrt, IPFire, or pfSense (Intel only). You can also go with dedicated hardware like Mikrotik or a neutral router. By the way, if you like OpenWrt or IPFire there’s a cheap option with Raspberry Pi 4B with 1GB.

Back to my installation (the right one in the figure). The hardware I use for my virtual machine is an Intel NUC Host. You’ll always need a Switch (minimum 8xGbE with VLAN and IGMP support) and APs with Roaming support for WiFi.
The diagram shows what the physical connection would look like in “Standard” mode (not my case). If you connect this way, I’d put the ISP’s Router on an Access port of my switch and the Host with my Router on a TRUNK port. I’d create an exclusive VLAN for the ISP’s router and mine to see each other (e.g., VLAN 192) with subnet 192.168.1/24 and keep VLAN 100 for my home with my own subnet 192.168.100/24. Masquerading isn’t mandatory in Standard mode, but I prefer it (even with double NAT on outbound) because I don’t want to add all the static routes on the ISP’s router.

In my case (connecting directly to the ONT), at the physical level both my Host and the ONT connect to TRUNK ports on the Switch (ONT port vlans 2,3,6 and Host port vlans 2,3,6,100). I’ll speak PPPoE over vlan6 and use VLAN 100 for my home with subnet 192.168.100/24.
As the Linux distribution I’ve chosen Ubuntu 22.04 LTS, robust and easy to maintain. I installed it using the Proxmox VM Template (I’ll explain what Proxmox is later). I grant access to vlans 2,3,6,100. Once my Linux is active I finish its installation with some tools, removing cloud-init and preparing the netplan file.
root@muro:~# apt install qemu-guest-agent
root@muro:~# apt install nano net-tools iputils-ping tcpdump ppp
:
root@muro:~# rm -fr /etc/cloud
root@muro:~# apt purge -y cloud-init
root@muro:~# rm /etc/netplan/50-cloud-init.yaml
Netplan for network configuration.
root@muro:~# cat /etc/netplan/50-muro.yaml
#
# Example netplan file for Ubuntu Linux as a VM
# on a Host connected to a TRUNK port on the Switch.
#
# I receive my eth0 interface in TRUNK mode and enable the
# vlans I need to act as a Router with Movistar
#
# In this example I DON'T configure vlans 2 and 3 (VoIP/IPTV)
#
network:
  ethernets:
      eth0:
        dhcp4: no
  vlans:
      vlan6:                             <== VLAN with the ONT (PPPoE will go here)
        id: 6
        link: eth0
        macaddress: "52:54:12:34:56:78"
        dhcp4: no
      vlan100:                           <== Main VLAN
        id: 100
        link: eth0
        macaddress: "52:54:12:12:12:12"  <== Must match the Proxmox VM config
        addresses:
        - 192.168.100.1/22               <== My intranet IP
        nameservers:
          addresses:
          - 192.168.100.224              <== The DNS/DHCP server
          search:
          - yourdomain.com
      vlan33:                            <== An example of an extra VLAN
        id: 33
        link: eth0
        macaddress: "52:54:AB:CD:EF:33"
        addresses:
        - 192.168.33.1/24
  version: 2
Important: In the Host’s virtualization software (in my case Proxmox: muro -> hardware -> network device) I configure the VM’s network card with the same MAC address I put in netplan (52:54:12:12:12:12).
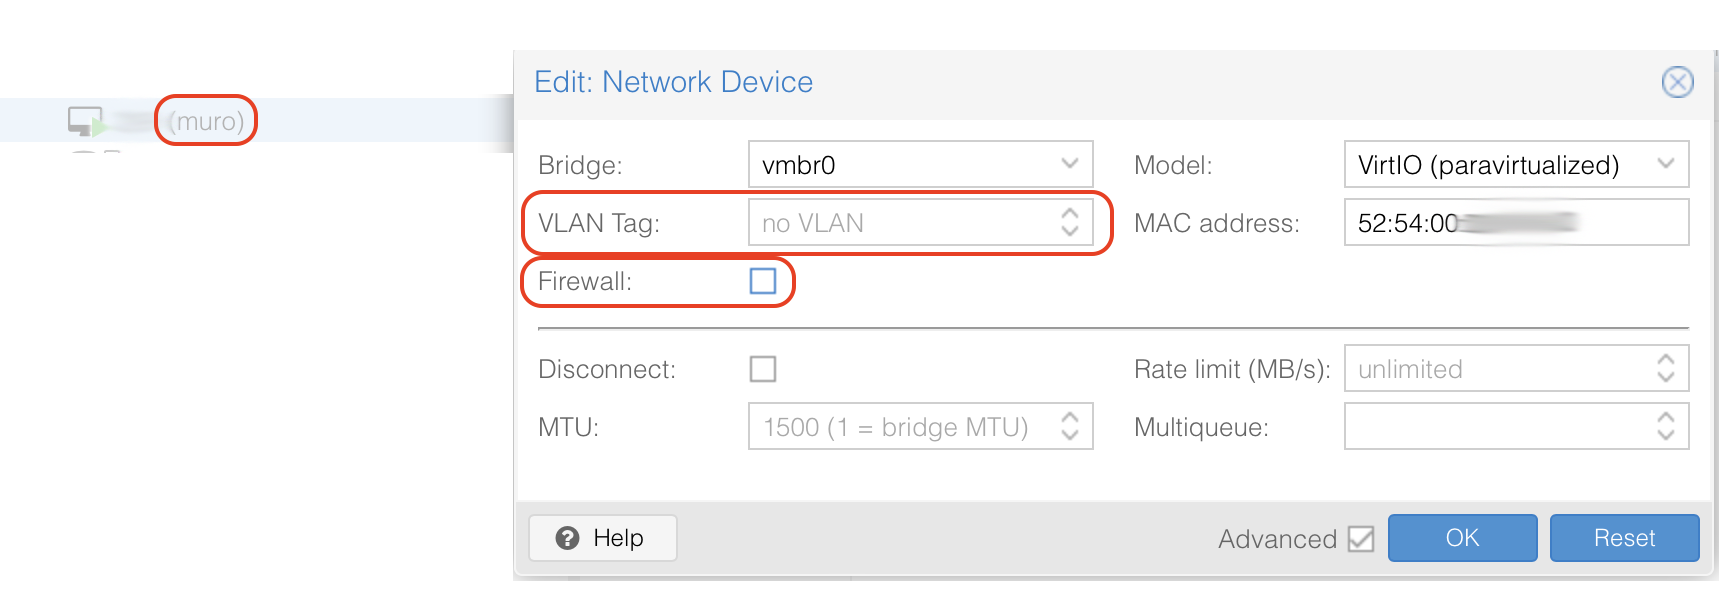
I verify that the Linux router receives the Trunk. In the case of Proxmox, just leave the VLAN Tag field empty. Also I recommend unchecking the Firewall option in the settings. I’m not sure why, but it gave me problems with IGMP multicast despite having it disabled globally.

Files I configure around PPP, NAT, and iptables. Remember these are just a reference and you should review them to adapt to your installation.
- /etc/systemd/system/internet_wait.service
- /etc/systemd/system/firewall_1_pre_network.service
- /etc/systemd/system/firewall_2_post_network.service
- /etc/default/netSetupVars
- /root/firewall/firewall_clean.sh
- /root/firewall/firewall_1_pre_network.sh
- /root/firewall/firewall_2_post_network.sh
- /root/firewall/firewall_verifica.sh
- /etc/ppp/pap-secrets
- /etc/ppp/options
- /etc/ppp/peers/movistar
- /etc/systemd/system/ppp_wait@.service
- /etc/systemd/system/ppp_nowait@.service
Remember to enable them. I also left units for starting PPPoE, one that waits for the session to be established and one that doesn’t. In my case I use the waiting one (ppp_wait@movistar.service).
# chmod 755 /root/firewall/*.sh
# systemctl enable internet_wait.service
# systemctl enable firewall_1_pre_network.service
# systemctl enable firewall_2_post_network.service
# systemctl enable ppp_wait@movistar.service
Dynamic Domain
Your ISP can change the IP it assigns you via PPPoE on each boot or reconnection. If I want to have a fixed name (e.g., myserver.yourdomain.com) to know where to connect from the Internet, I need to have my own domain and my DNS provider must support some form of “Dynamic Domain”.
It’s a service that allows updating my new IP in my domain on the Internet. There are dynamic DNS providers like DynDNS, No-IP, DuckDNS. Your DNS provider probably supports it too, as mine does.
I have my domain hosted at cdmon.es and they support this feature (documentation for IP update). As an example, here are the systemd services and a small script I use on my Linux router.
- /etc/systemd/system/cdmon_update.service
- /etc/systemd/system/cdmon_update.timer
- /usr/bin/cdmon_update.sh
# chmod 755 /usr/bin/cdmon_update.sh
# systemctl enable cdmon_update.timer
Every 5 minutes it checks if the IP has changed and if so, updates it. I have several 'A' records resolving to the same public IP of my home:
- Home Assistant ->
ha.yourdomain.com, - SSH ->
ssh.yourdomain.com, - :
Name resolution from the internet:

We’ll see later how I do it on my Intranet. I’ll tell you in advance that I have an internal DNS server that serves the same domain (yourdomain.com) locally, delivering private home IPs. Wherever I am (internet or intranet), apps always know how to reach home services.
Port Knocking
For years I’ve used various techniques to protect against attacks, and for some time I’ve opted to not open any ports. My router drops all packets arriving from the internet, always. Well, almost always. There are a couple of services I’d like to access from the Internet: set up an ssh or ipsec tunnel for occasional administration and access to my Home Assistant server for home automation.
I discovered the Port Knocking technique and really liked it. It’s an app that sends 3 or 4 special packets to the Router/Firewall so it recognizes you’re “knocking on the door” and if you knock the right way, it temporarily opens (only to the IP you’re calling from) the port of the service you want to use.
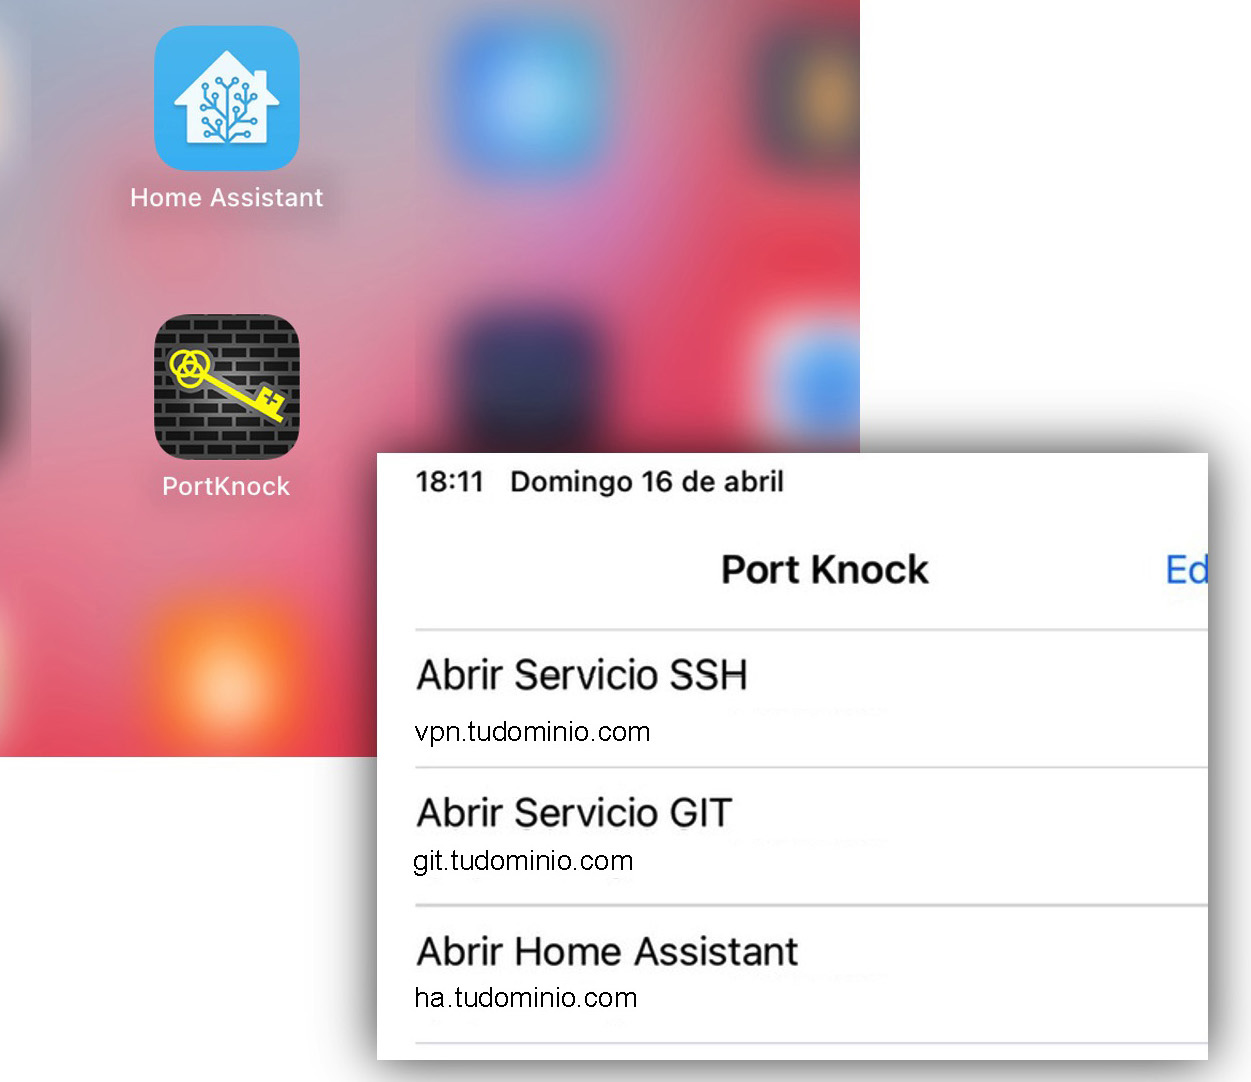
I use PortKnock (smartphone app): it sends the request (1) Open the port for Home Assistant access (sends a series of packets with a specific cadence), the router/firewall acknowledges and opens port e.g. 28123 for a while. (2) Home Assistant can be accessed.

We can configure how many knocks are given and to which ports. They must match on server and client. For example, three knocks one second apart would be: Send a SYN to port #1, wait one second, a SYN to port #2, wait another second, and send a final SYN to port #3. At that moment our knockd daemon executes whatever we want, which typically is iptables to open the port (28123 in this example).
We’ll see that Home Assistant always connects to ha.yourdomain.com:28123, whether at home or on the internet. If I’m at home my DNS Server resolves to the correct private IP. This way I don’t have to change its configuration.
Installation and activation
root@muro:~# apt install knockd
:
root@muro:~# systemctl enable knockd
Here’s an example configuration file – review it to adapt to your installation.
OpenVPN
For an IPSec Access Server I use OpenVPN which remains the best solution – reliable, fast, and secure. As a client I use Passepartout.
- If you opt to always leave a port open, this is what would go in the firewall_1_pre_network.sh file.
## EXTERNAL ACCESS to my Services
## IPSec as Server:  XXXXXX (Change to the port where you listen on ipsec)
#  I stopped using this option in favor of knockd.
#iptables -N CH_OPENPORTS
#iptables -A INPUT -p udp -m udp  -m multiport  --dports XXXXXX -m conntrack --ctstate NEW  -j CH_OPENPORTS  # OpenVPN on UDP
#if [ "${LOGSERVICIOS}" = "yes" ] || [ "${LOGALL}" = "yes" ]; then
#   iptables -A CH_OPENPORTS -j $LOGGING "CH_OPENPORTS -- OK "
#fi
#iptables -A CH_OPENPORTS -j ACCEPT
- I prefer to open a port with the Port Knocking method. I knock on the door (/etc/knockd.conf), the OpenVPN port opens, and I start my Passepartout client.

Here’s a reference configuration example – I recommend reviewing it.
Here are a couple of posts (somewhat old but still valid) as reference for OpenVPN installation.
- Ethernet Bridge about extending my home network to a remote location through the internet, where I install and configure OpenVPN
- OpenVPN Server where I describe how to set up a home VPN server on Linux Gentoo.
Intranet
Moving down through the house to the Intranet, here are things I’ve set up and some humble advice after many negative experiences:
Physical network: Two main switches, 24 and 10 port 1GbE, then small switches in the rooms. It took years of taking advantage of renovations to run cables. I strongly recommend wiring as much as possible. Don’t trust the range and power of WiFi APs – a load-bearing wall or certain materials can destroy your coverage in an instant.
I also strongly advise against WiFi MESH. That day the video “pixelates”, home automation (WiFi) fails, your phones disassociate, HomeKit, Alexa, or Google goes down – you’ll remember the cable! I know there are many cases where we can’t run cable (or aren’t allowed to), but I mention it because I’ve suffered through it.
If you’re fortunate enough to have a new home or renovation, don’t hesitate – cable to “all” spaces in the house with at least CAT6. Also to ceilings or walls where APs will go (better to power them with PoE).
Also watch out for WiFi equipment that’s too smart, creating private networks on WiFi and forcing you to do NAT. These are consumer devices I advise against; I tend to avoid technologies that don’t let you configure them transparently as you wish.
Network Services: I have a DNS/DHCP Server on PiHole, a controller for the APs, a Reverse Proxy, and I’ve tried some (optional) monitoring tools like Gatus, Uptime Kuma, LibreNMS, Netdisco. Everything as VMs/LXCs on my Host(s).
Home automation services: The home network provides connectivity to Home Assistant, Node-RED, Zigbee2MQTT, Mosquitto, Grafana, and InfluxDB, as VMs/LXCs on my Host(s). They allow controlling and automating different devices in the home, such as lighting, climate systems, sensors, lights, plugs, relays, locks, and appliances. The vast majority use WiFi and some Zigbee (I don’t cover this network in this post).
Hardware for VMs/LXC
As I mentioned earlier, I use a mix of virtual machines and/or containers (Docker or LXC). For years I used a Linux Host with KVM/QEMU and recently switched to Proxmox VE.
Putting all your eggs in one basket isn’t advisable and us Techies know it well. In fact, when my “host” with VMs went down I was left without a house and got an earful. I recently evolved to a Proxmox VE Cluster with 2xNUCs + 1xPi3B to host virtual machines, LXC containers, or Docker with services. The Pi is the cheapest thing I had so the Cluster can properly “negotiate” fault tolerance – it has no services.

DNS and DHCP
I use Pi-hole as DNS and DHCP server. For DHCP I use a dynamic range and many fixed IPs (by MAC). My internal domain is exactly the same as the external one: yourdomain.com.

When a name under yourdomain.com is requested from the Internet, my public IP (dynamically updated) is returned. When a DNS query is made from the Intranet, it always goes to PiHole – if it’s a name under yourdomain.com it returns a private IP directly, if it’s any other name it goes to the next level (Movistar’s DNS Servers for example).
I recommend checking this post about Home Pi-hole to better understand how it works. At home I use a very simple CMDB in an Excel file to track MAC->private IP and update a couple of PiHole files when there are changes.
Reverse Proxy
A reverse proxy is a server that acts as an intermediary between users and the web servers behind it. When a website is requested, instead of sending the request directly, it’s sent to the reverse proxy which in turn forwards it to the web server. It allows the browser to use https with the reverse proxy while the proxy uses http with the original web server.
I can use https with valid certificates generated with Let’s Encrypt, with a certificate for each web server name I want to reach. All my https sessions are centralized through it.
DNS Configuration
Let’s look at the configuration with examples. I have the services git, grafana, and home assistant. I want to reach all three via https and also ssh to the git server.
- On the Internet I maintain an
Arecord for each one and they all resolve to my same public IP (w.x.y.z), which I update dynamically.
    git.yourdomain.com            w.x.y.z
    grafana.yourdomain.com        w.x.y.z
    ha.yourdomain.com             w.x.y.z
- On the Intranet those same names resolve to the Reverse Proxy’s IP. I also have names for the actual hosts of my virtual machines where the services run.
git.yourdomain.com          192.168.100.243  <- My Reverse Proxy VM (NPM)
grafana.yourdomain.com      192.168.100.243  <- My Reverse Proxy VM (NPM)
ha.yourdomain.com           192.168.100.243  <- My Reverse Proxy VM (NPM)
    :
vm-git.yourdomain.com       192.168.100.XXX  <- Gitea server VM
vm-grafana.yourdomain.com   192.168.100.YYY  <- Grafana and InfluxDB server VM
vm-ha.yourdomain.com        192.168.100.ZZZ  <- HASS (Home Assistant) VM
The final picture looks like this:

Reverse Proxy Configuration:
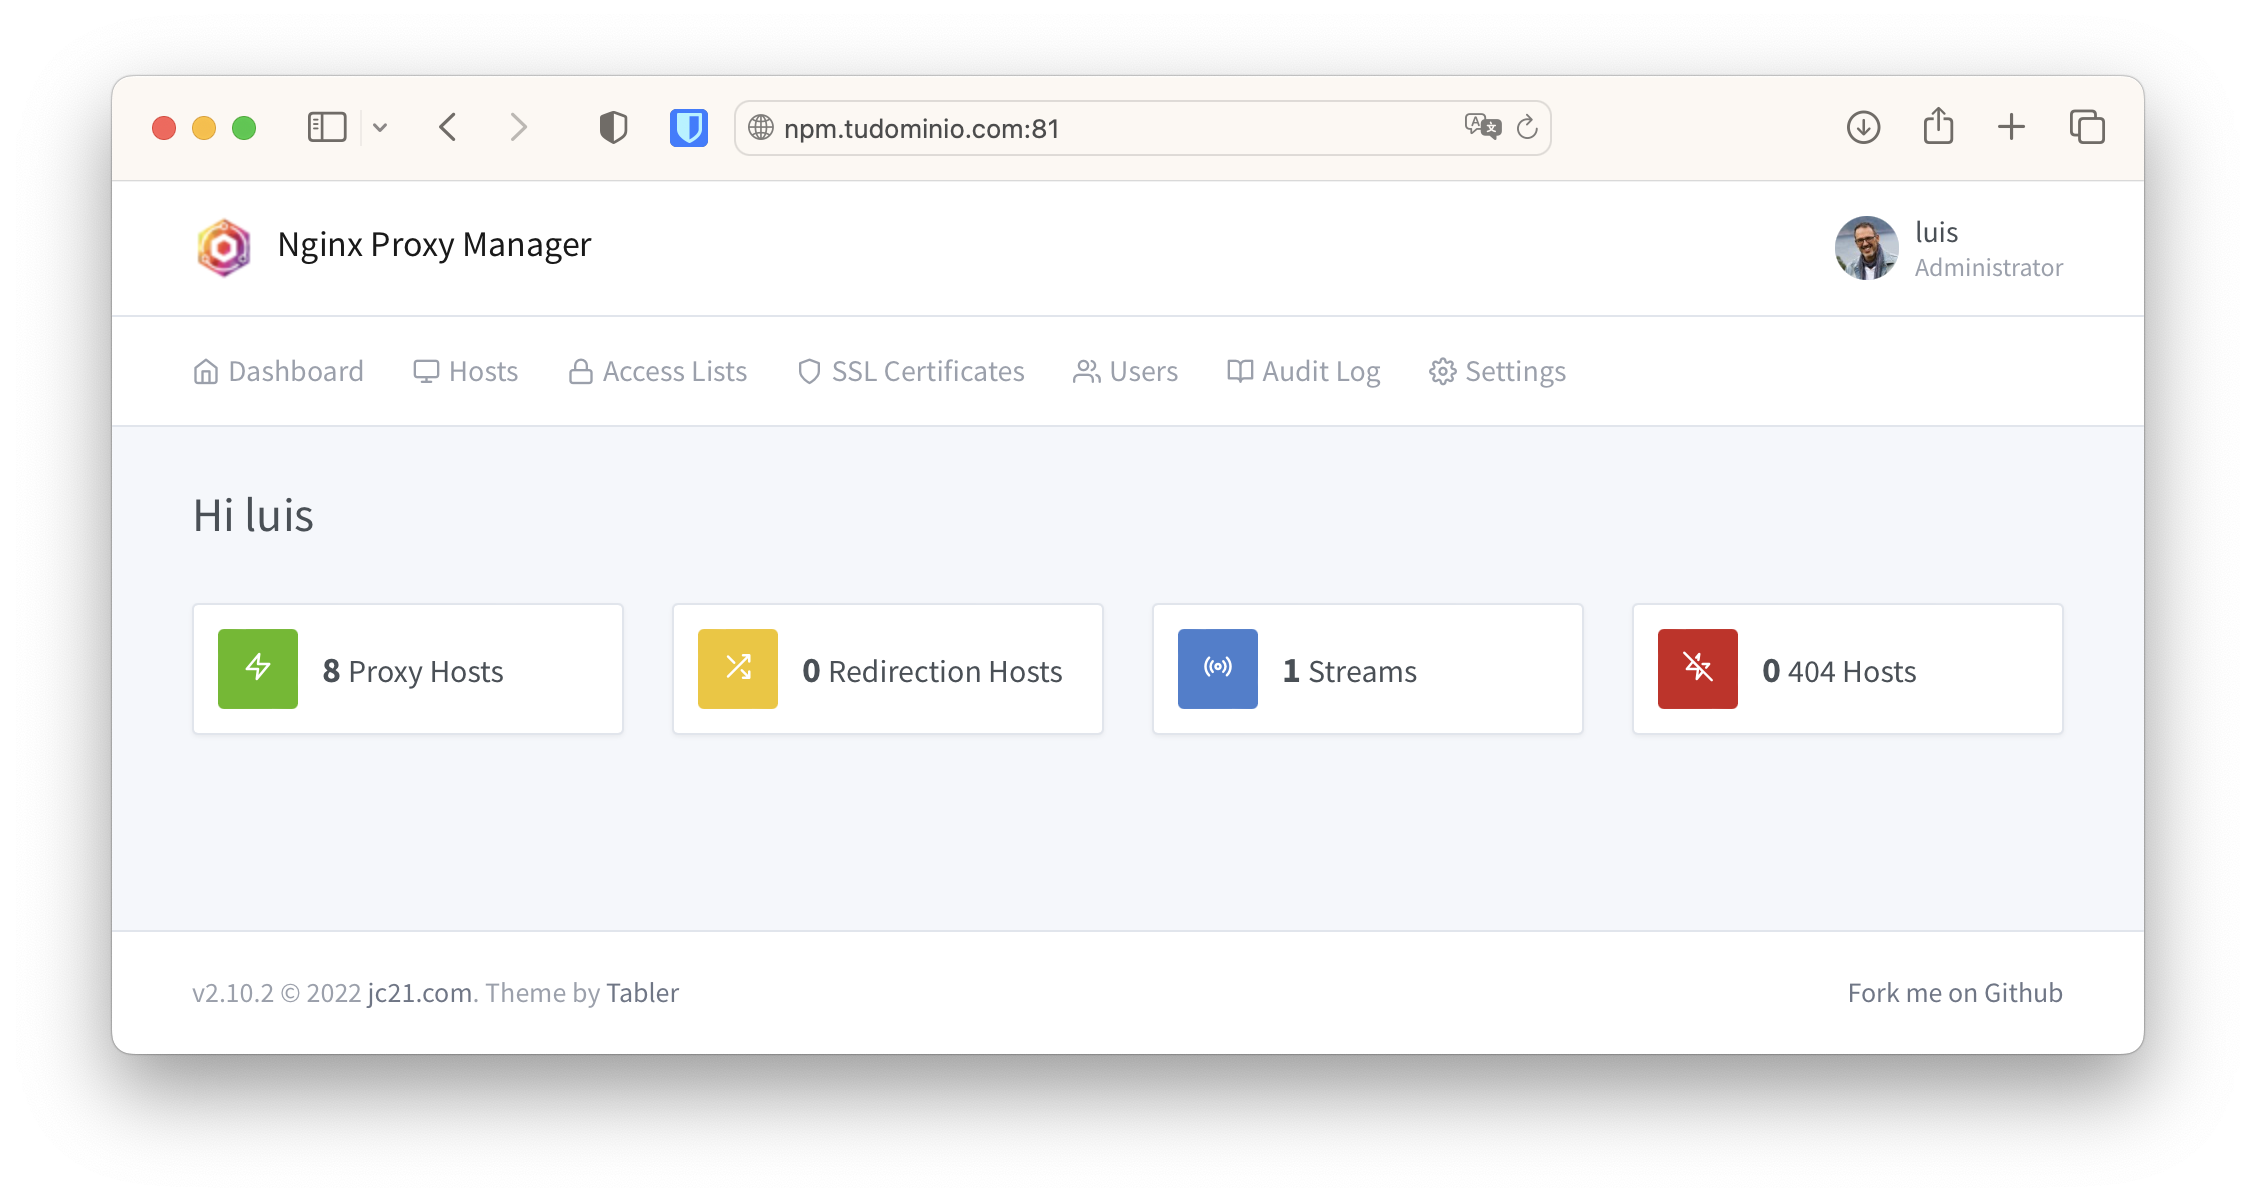
I use Nginx Proxy Manager (NPM) as the Reverse Proxy because it’s fast, lightweight, and supports what I need: https with SSL Certificate management via Let’s Encrypt and Port Forwarding (it calls them Streams).
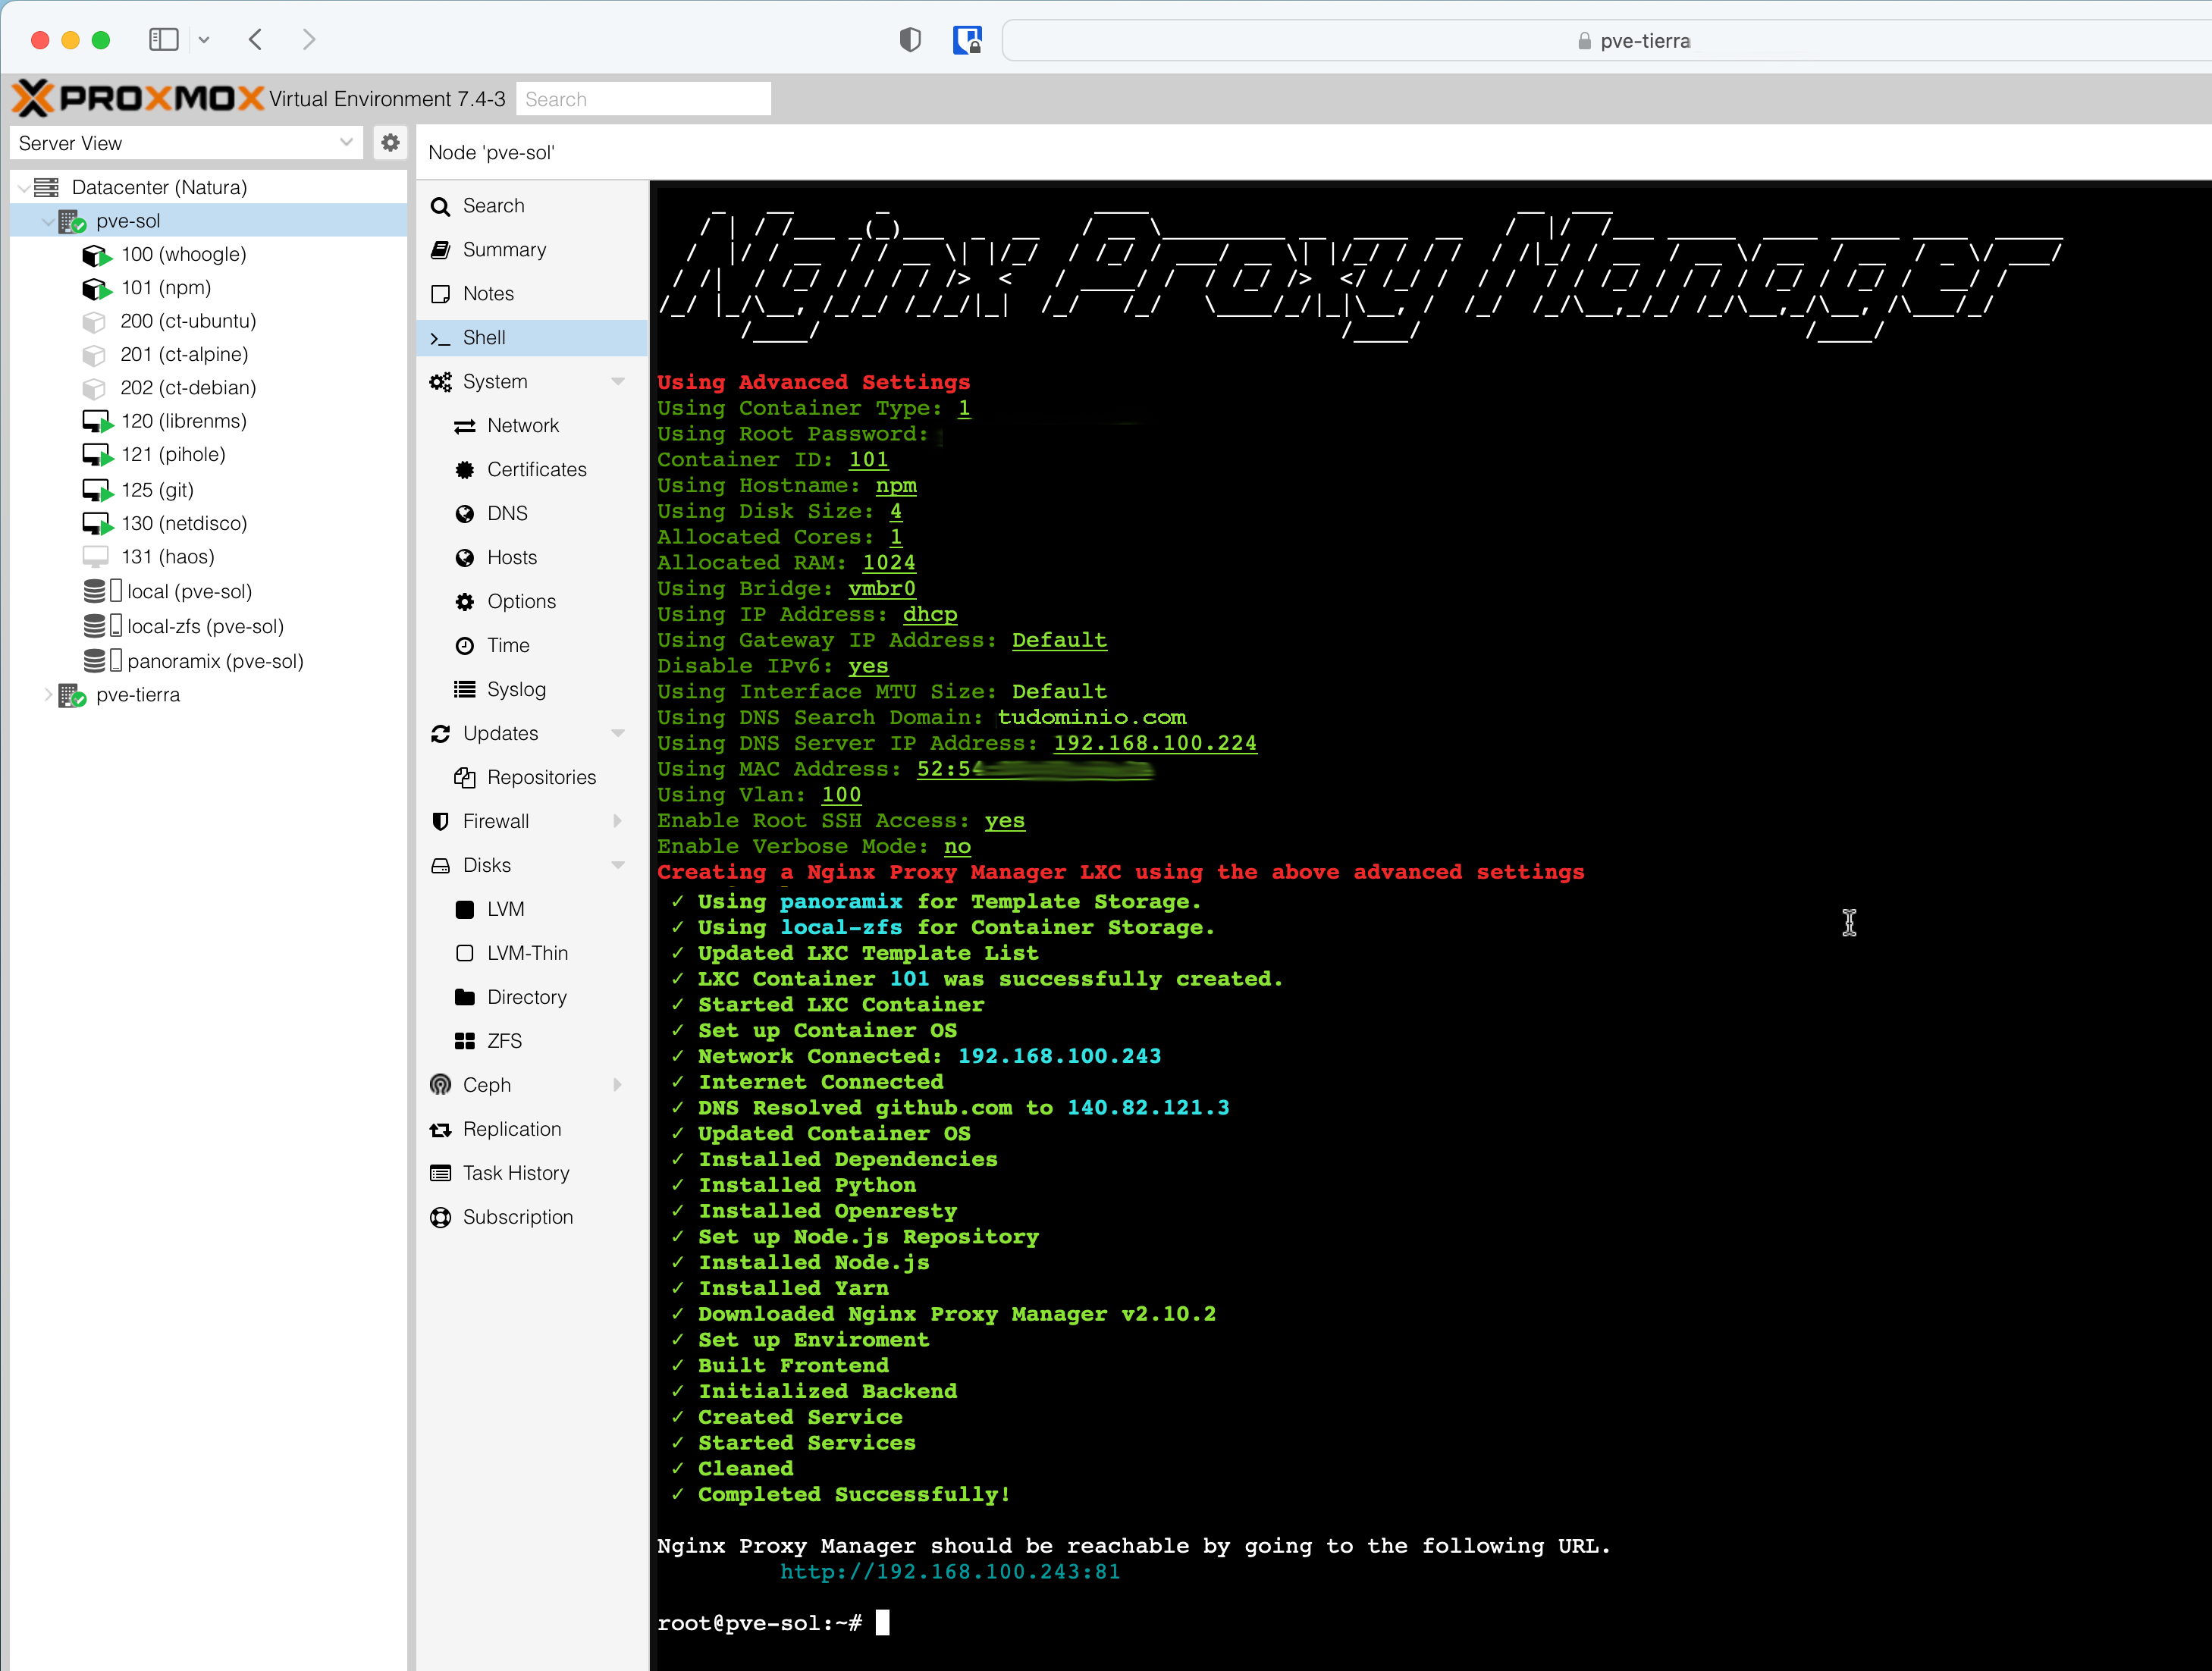
I install it as an LXC Container in Proxmox VE. I connect with Proxmox VE Helper-Scripts > Webservers & Proxies. It uses little memory and starts ultra-fast.
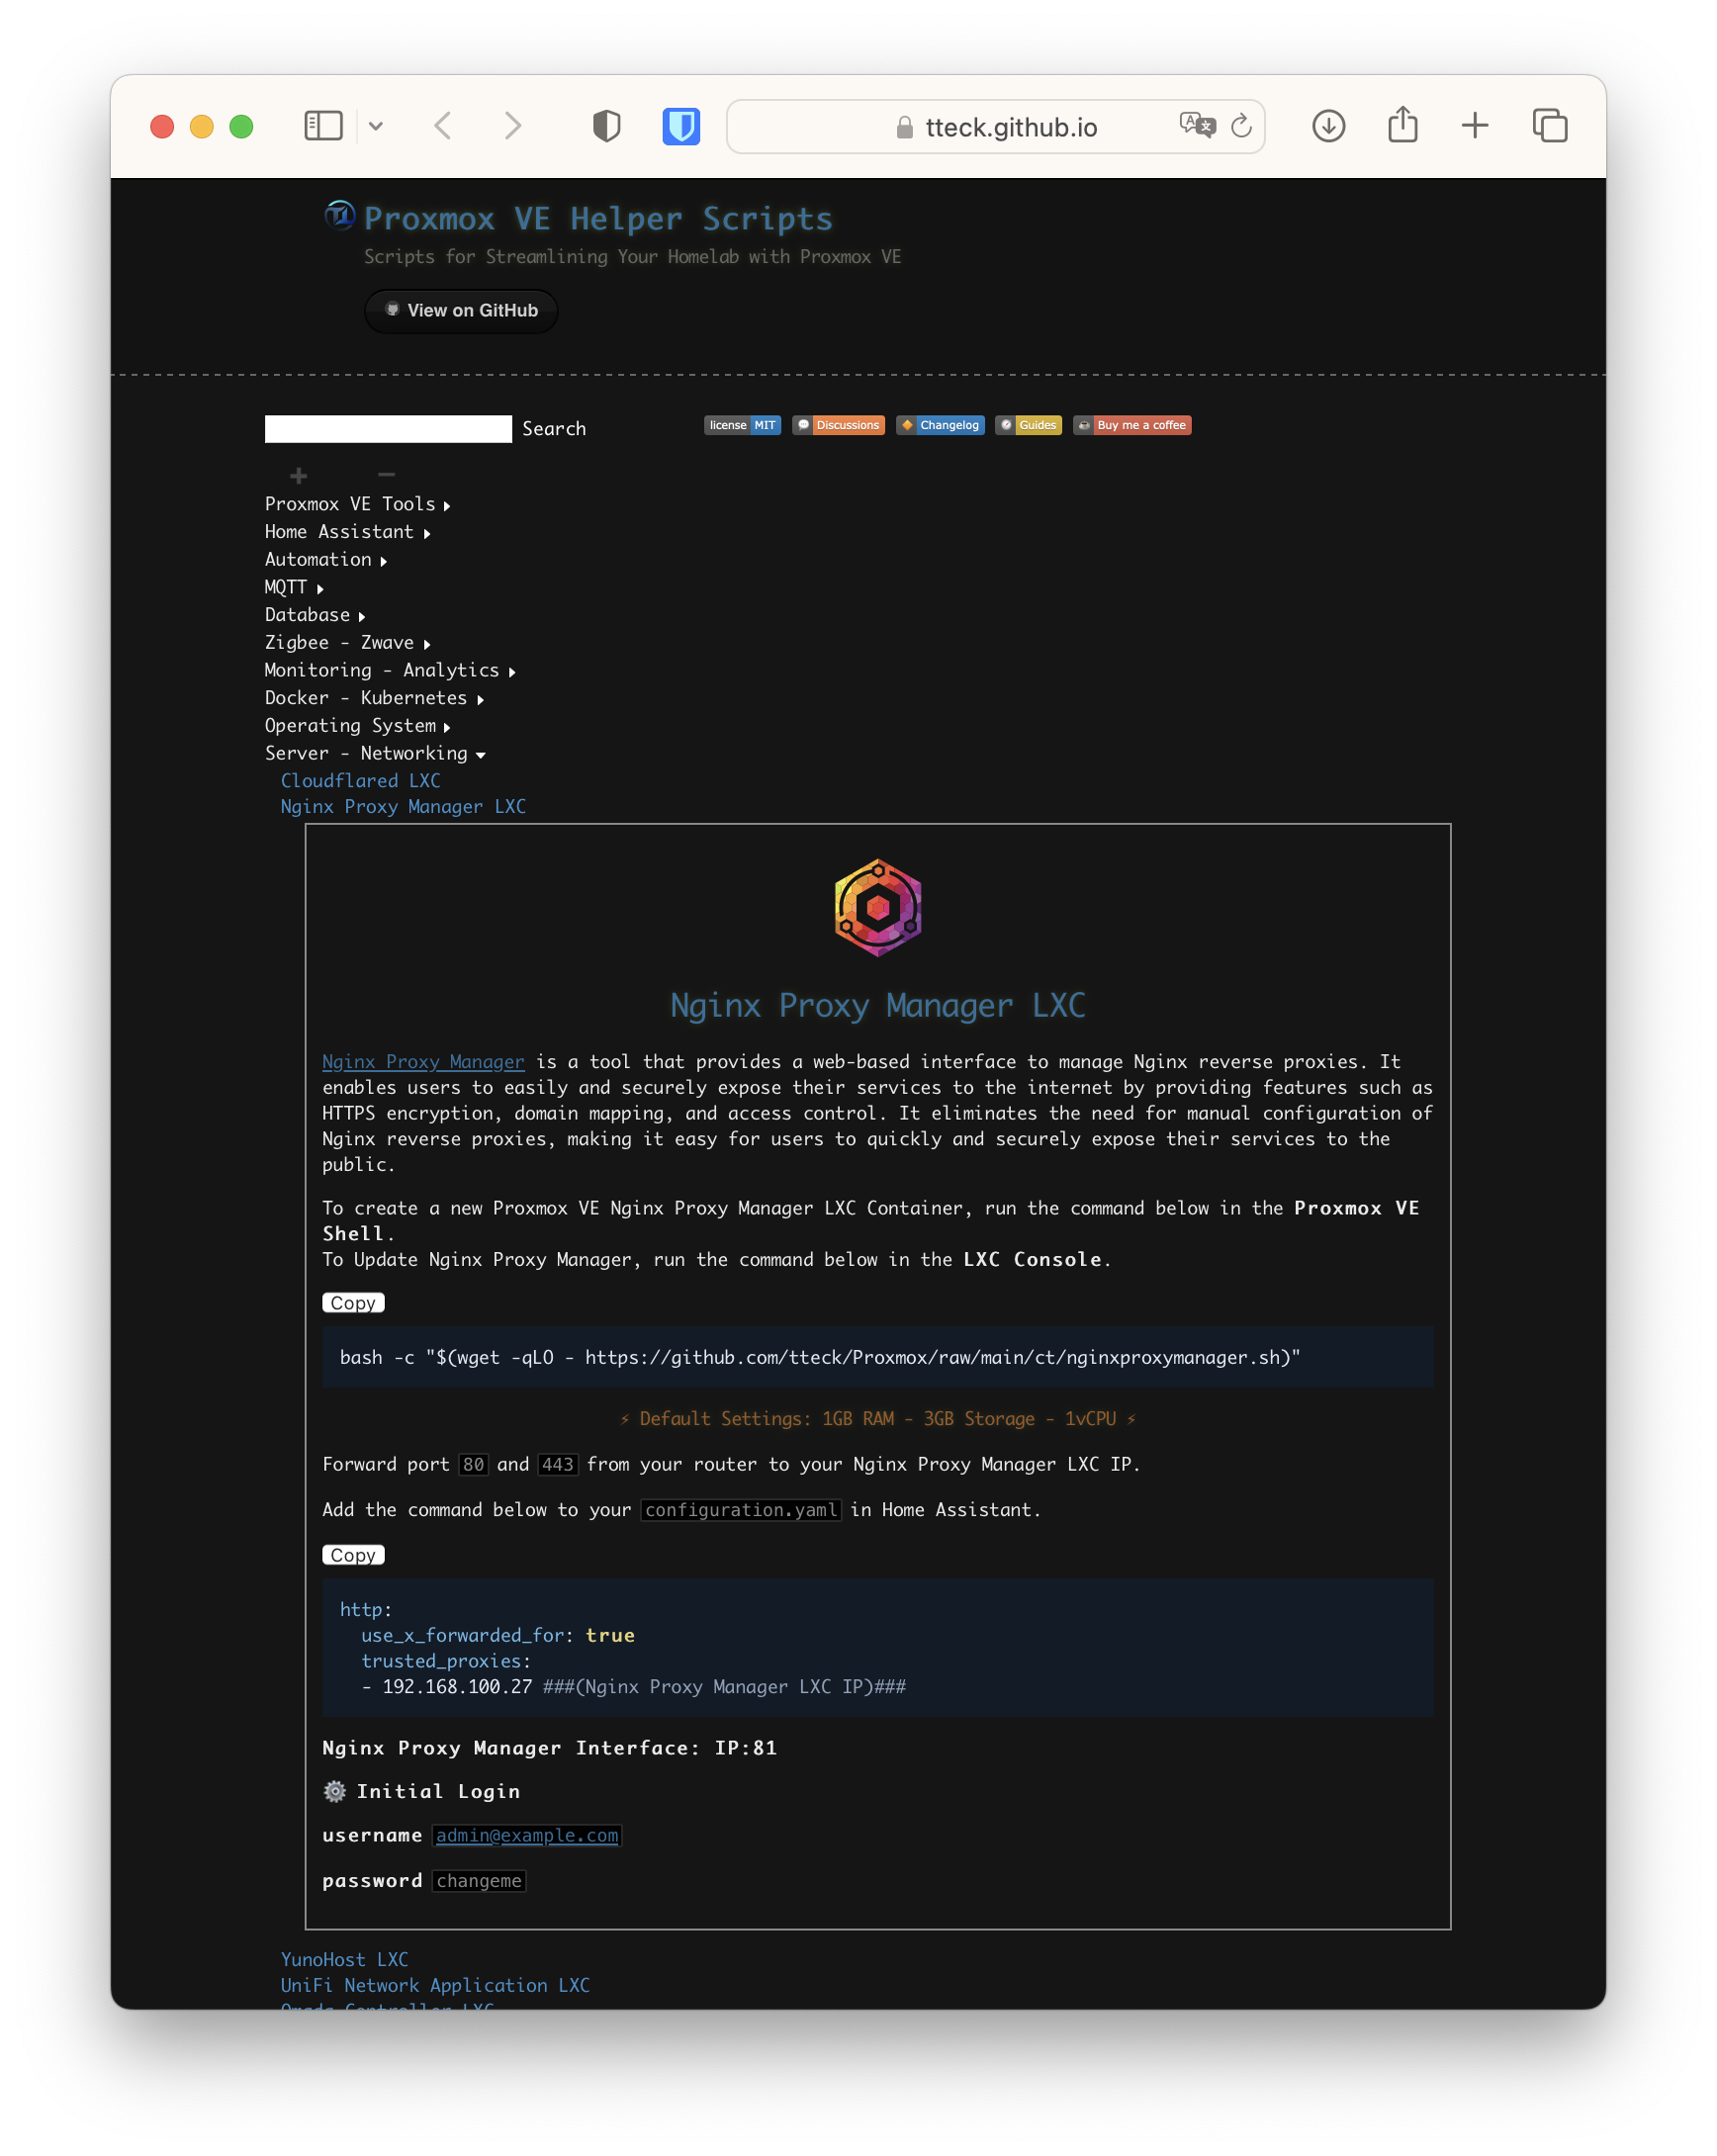
The installation is done from one of my Host’s consoles:
root@pve-sol:~# LANG=C bash -c "$(wget -qLO - https://github.com/tteck/Proxmox/raw/main/ct/nginxproxymanager.sh)"
Proxy Host Configuration
Proxy Hosts created through its Web interface.
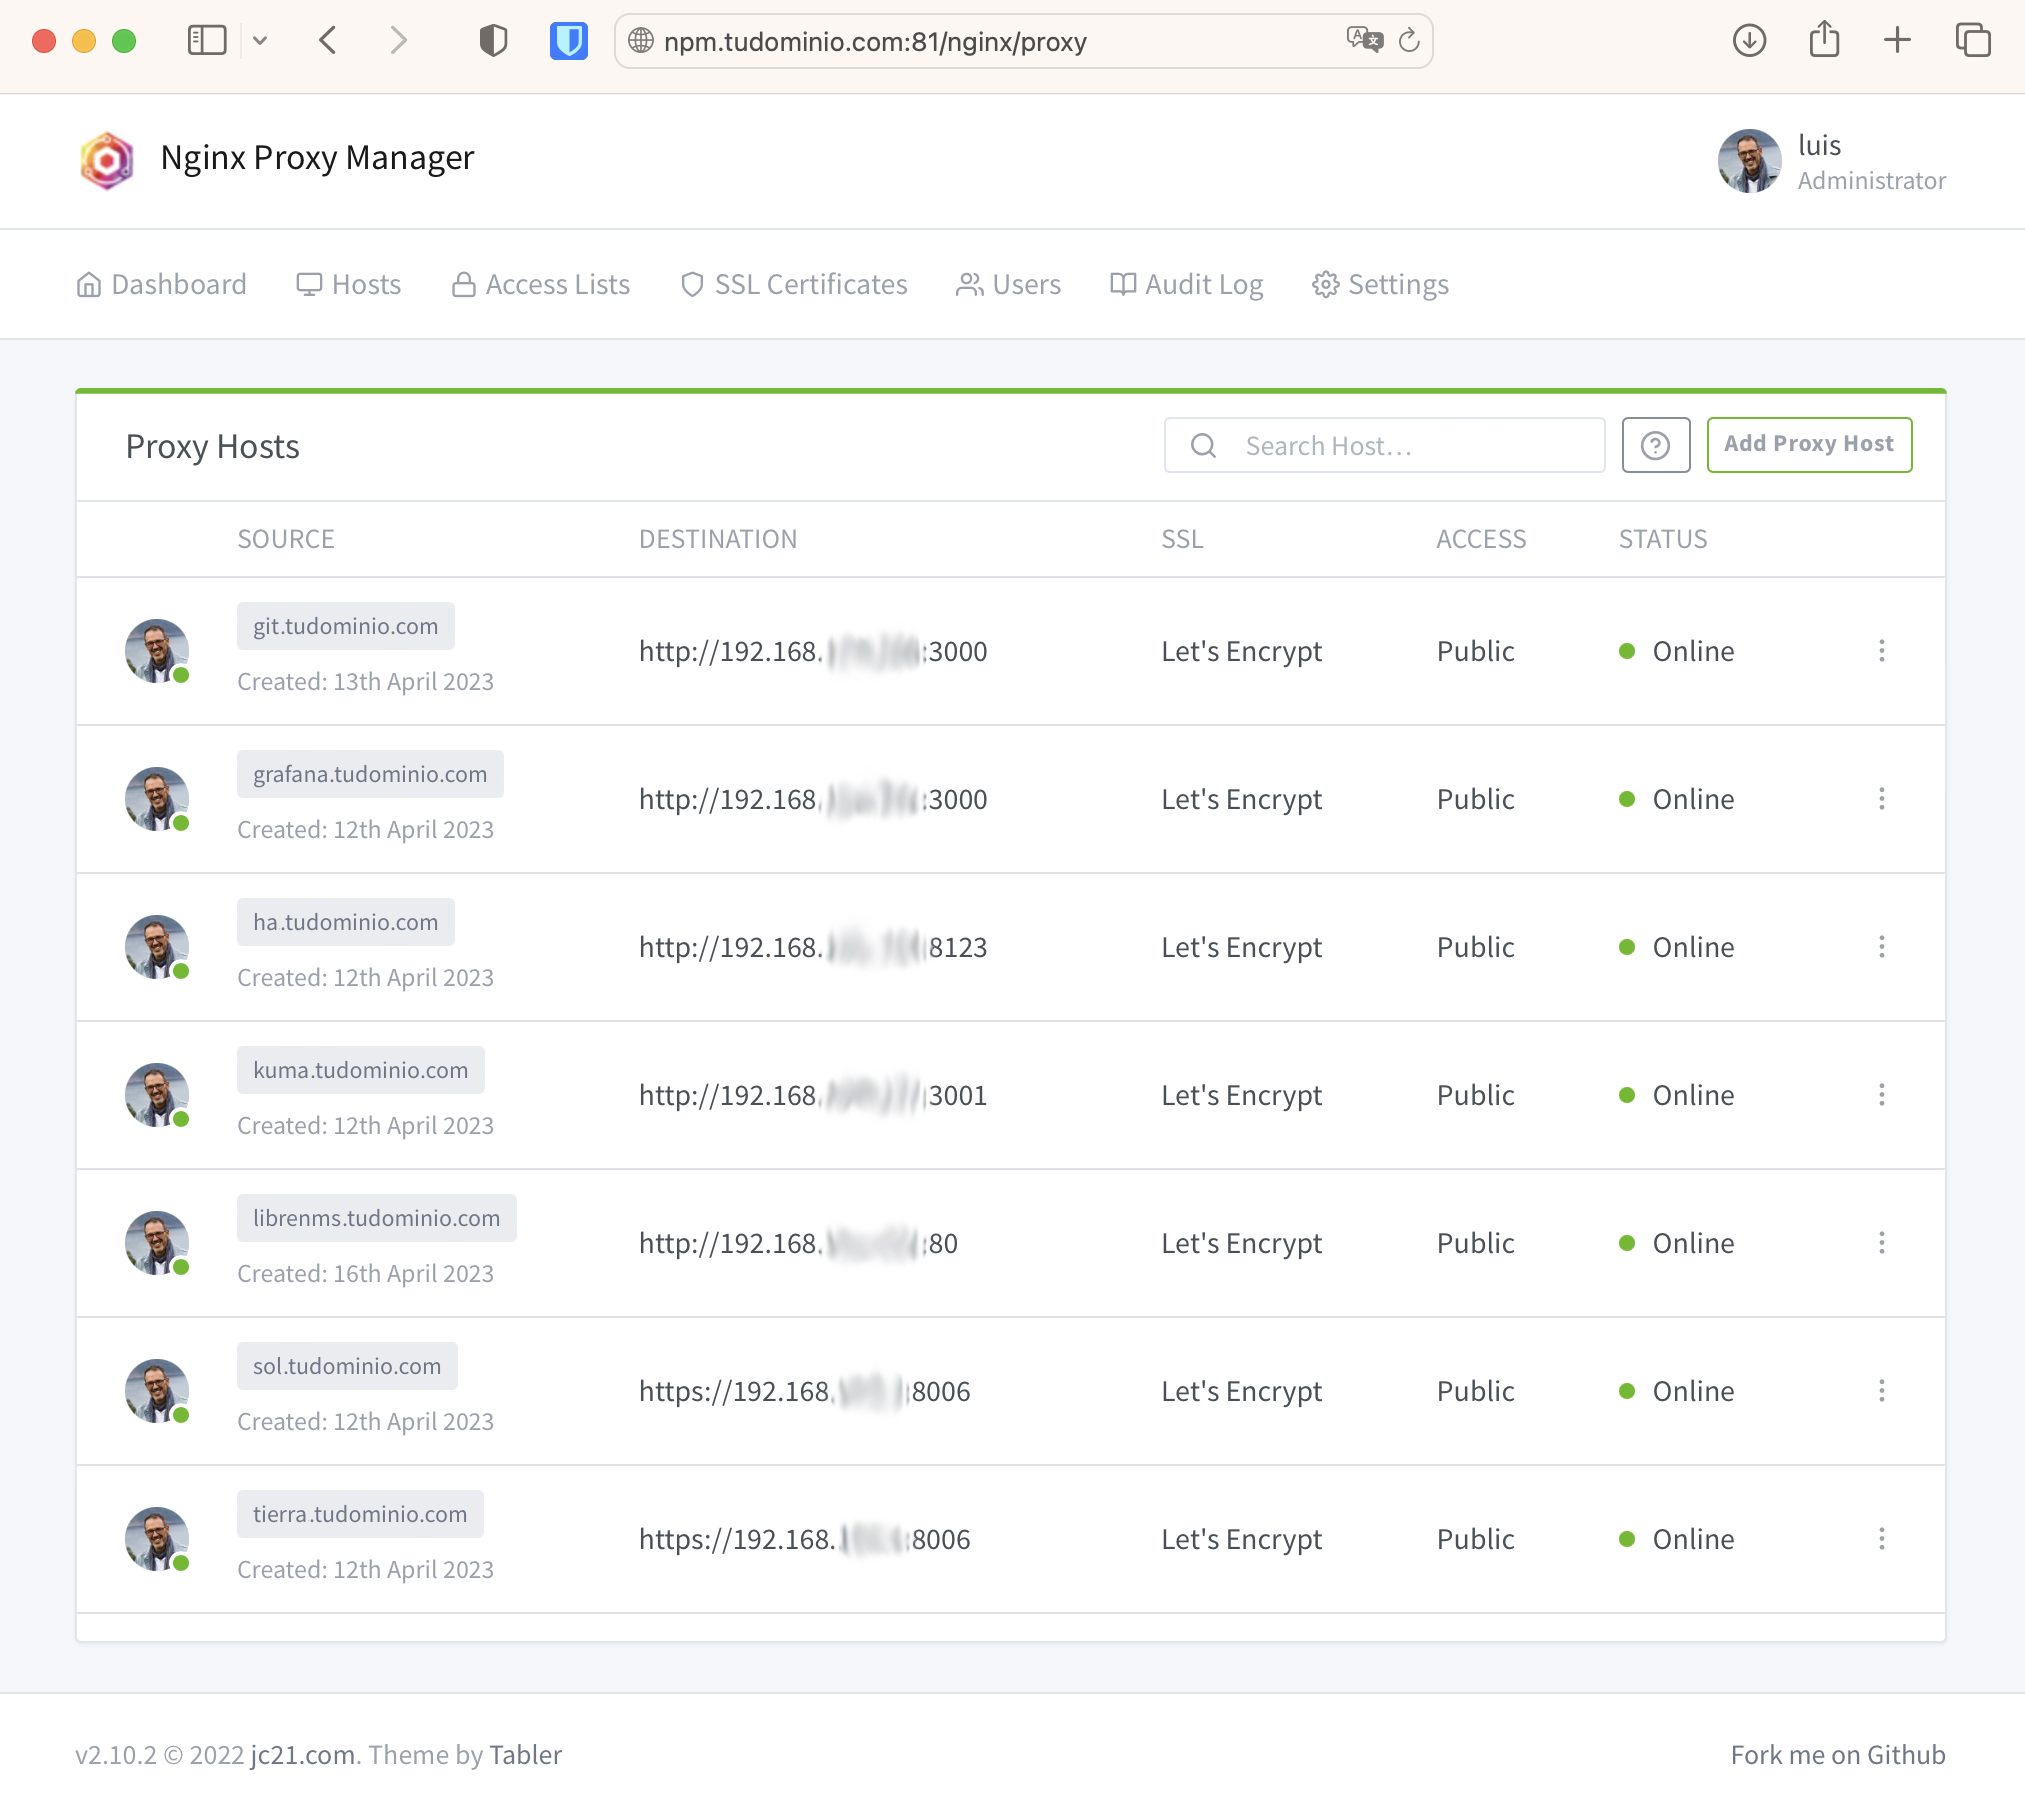
Example of a Home Assistant Proxy Host.
| Domain Name | Name used to access the service via https, e.g., ha.yourdomain.com. By default the listening port is the standard: 443 (except Grafana, see Advanced Parameters). This refers to the connection between the Browser and NPM |
| Scheme | How to reach the web server behind it, typically http. This is the connection between NPM and the Web Server |
| Forward Hostname/IP | Name of the web server behind it or its IP, e.g., vm-ha.yourdomain.com or its IP 192.168.100.ZZZ (I use the IP) |
| Forward Port | Port number the web server behind it listens on, e.g., 8123 |
| Websockets Support | I always enable it. I usually don’t enable Cache Assets or Block Common Exploits |
| Custom Locations | I don’t add anything |
| SSL | Here I’ll add the certificate for ha.yourdomain.com later, when I request it from Let’s Encrypt in the next step. I always enable the Force SSL option |
| Advanced | I don’t add anything, except for Home Assistant and Grafana, see Advanced Parameters below |
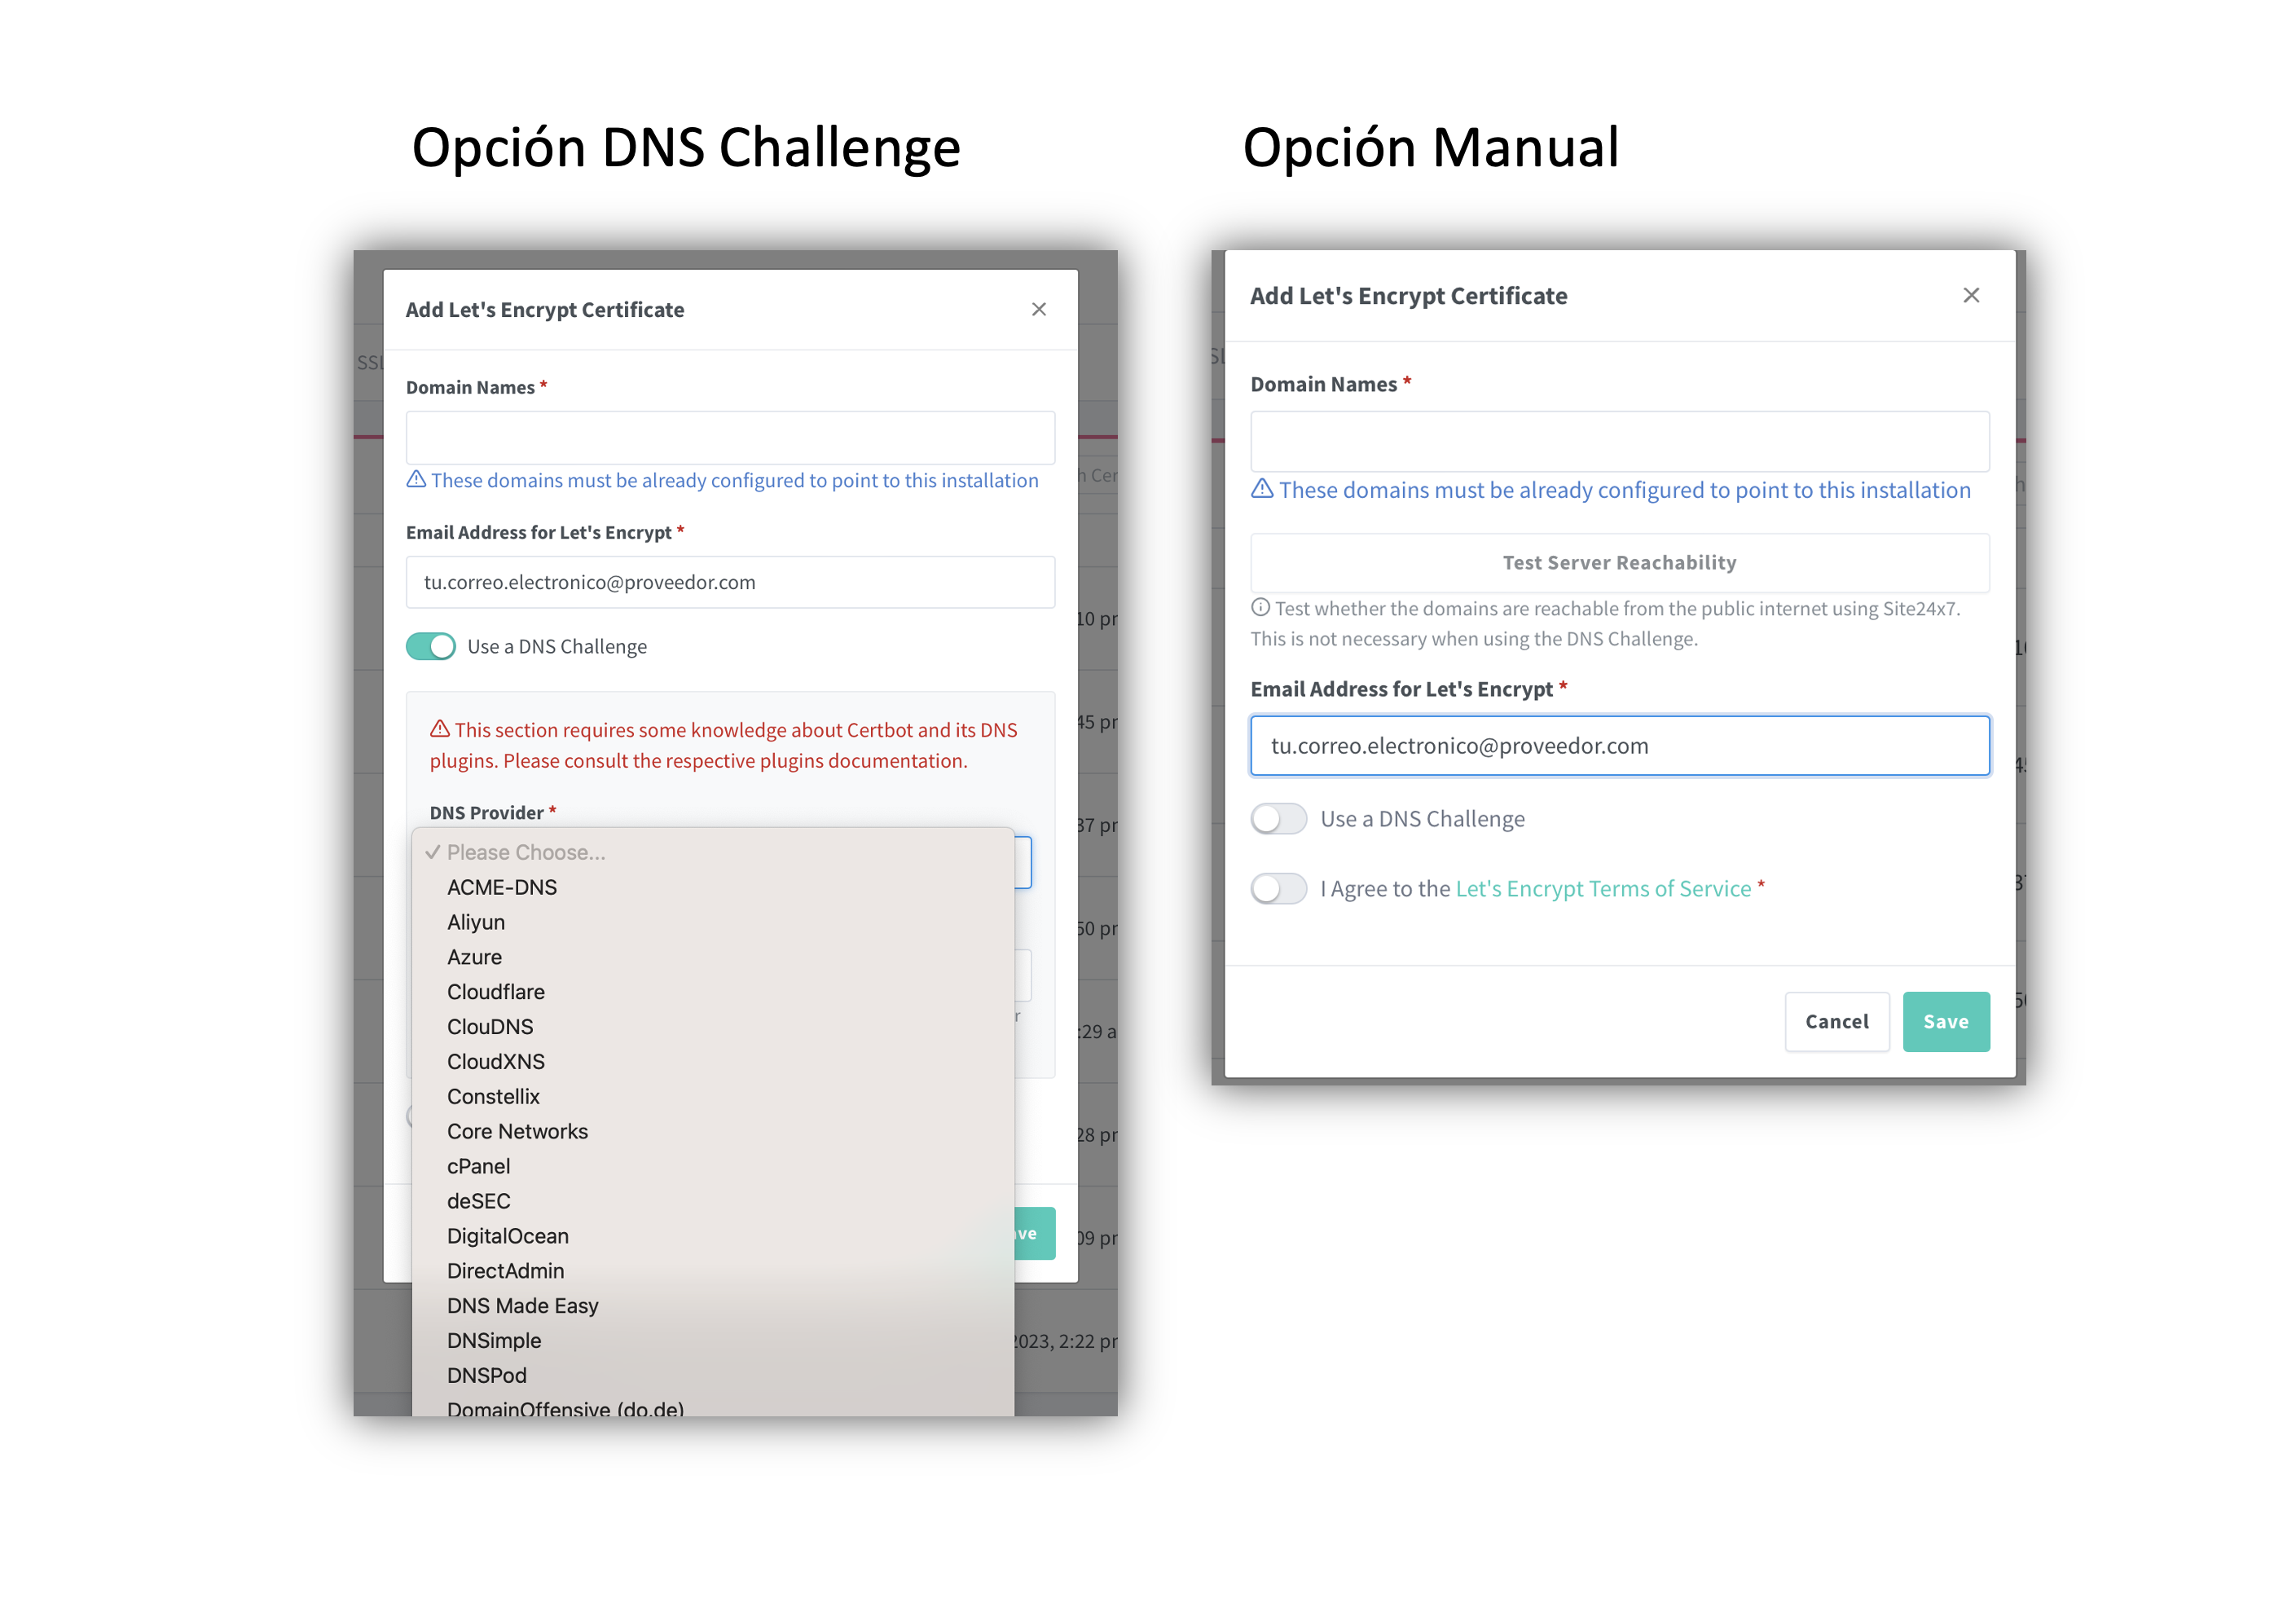
Here’s the Let’s Encrypt certificate configuration. To create and renew certificates, Let’s Encrypt needs to validate that you are who you say you are. First, your DNS provider must correctly resolve the subdomain for which you’re requesting the certificate (in this Home Assistant example it would be ha.yourdomain.com). Second and most importantly, confirm it with one of the following two methods.
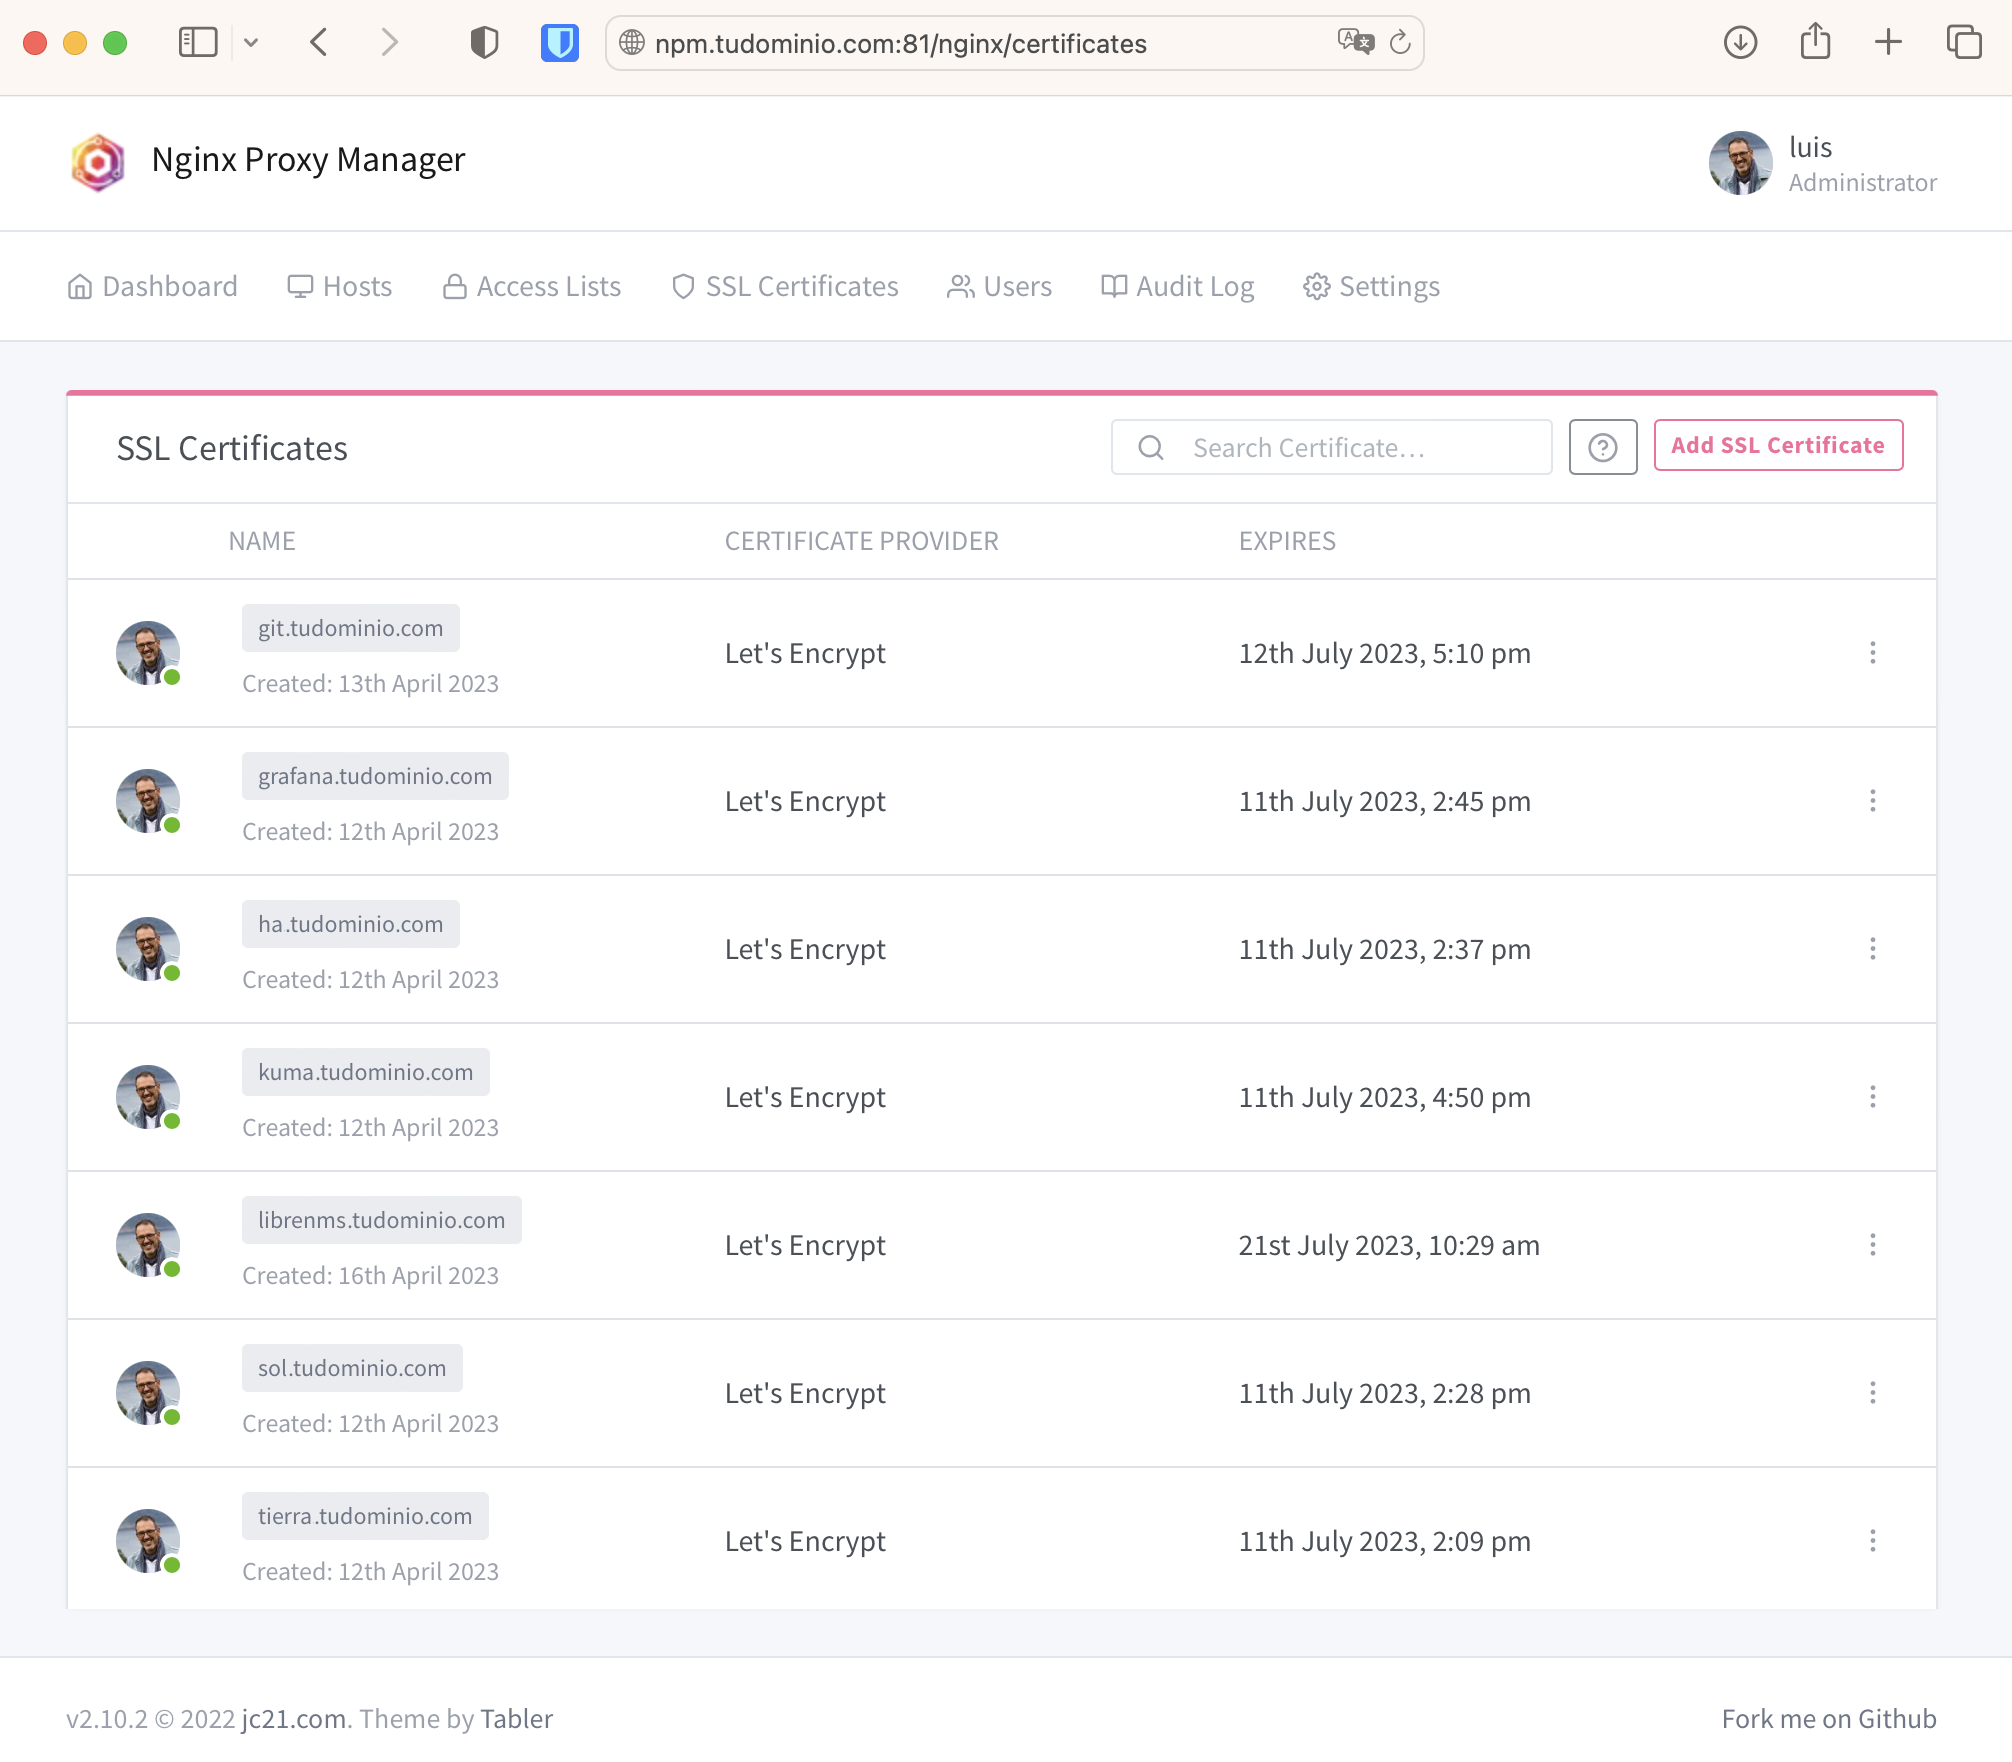
DNS Challenge method: This is the best – you don’t need to open any port on your router. Your DNS provider must be in the list of those supported by Let’s Encrypt. If it’s not and you can’t create dynamic TXT records either, you’ll have to use the manual method.
Manual method: Forces me to temporarily open port 80. Let’s Encrypt needs to communicate through that port (and no other) with a temporary web server that NPM spins up.
I use the manual method with a couple of scripts, open-npm-letsencrypt.sh to open port 80 before requesting or renewing the certificate, and when done I close it again with close-npm-letsencrypt.sh.
Advanced Parameters
- Home Assistant
On the NPM VM: Proxy Hosts > Home Assistant > Advanced > Custom Nginx Configuration.
# For Visual Studio Server to work correctly.
location / {
  proxy_set_header Upgrade $http_upgrade;
  proxy_set_header Connection $http_connection;
  proxy_http_version 1.1;
  proxy_set_header X-Forwarded-Host $http_host;
  include /etc/nginx/conf.d/include/proxy.conf;
}
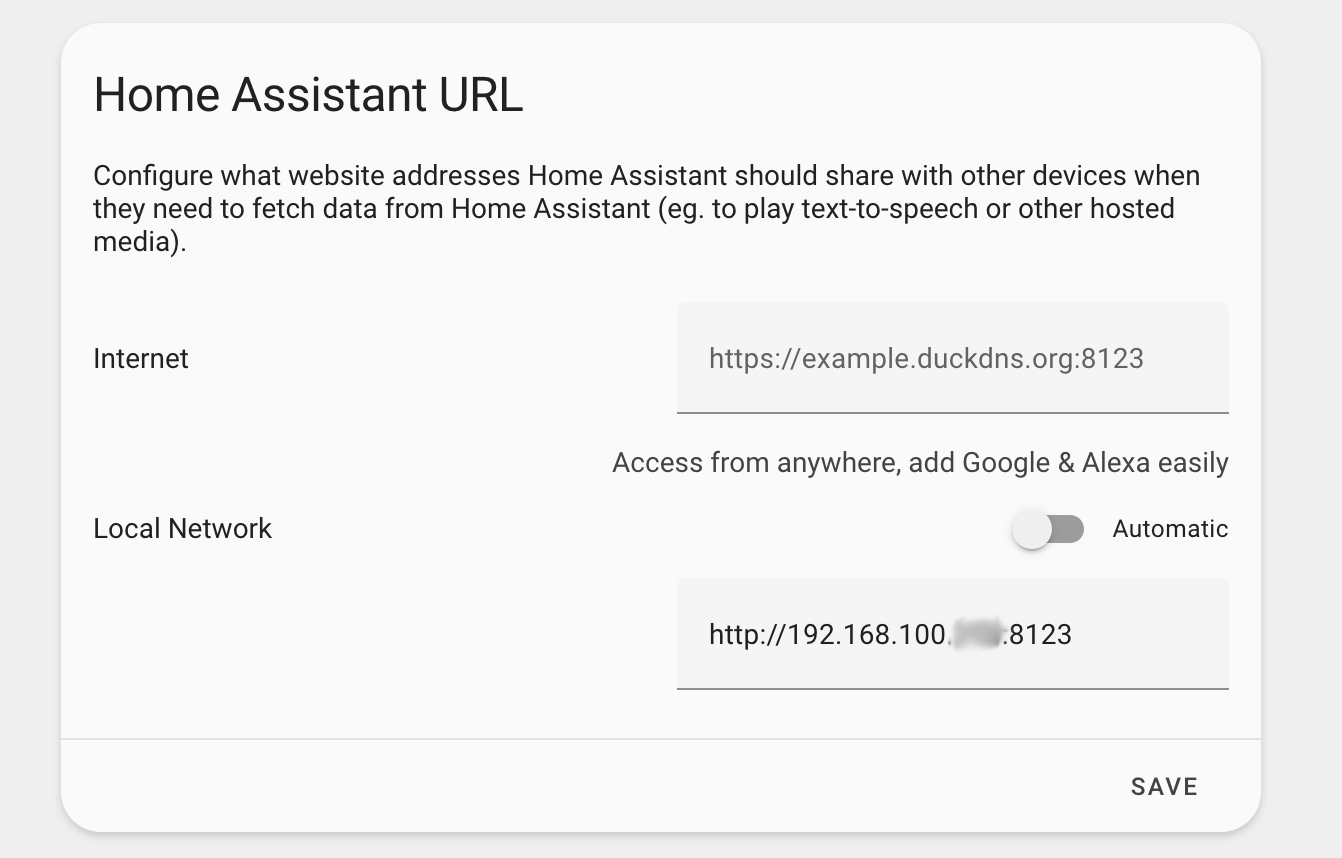
On Home Assistant: Settings > System > Network: http://192.168.100.ZZZ:8123
And in its configuration.yaml to accept requests from a reverse proxy:
## Section in the Home Assistant configuration.yaml
## for it to work properly through a Reverse Proxy
http:
  use_x_forwarded_for: true
  trusted_proxies:
  - 192.168.100.243 ### Nginx Proxy Manager LXC IP ###
- Grafana
On the NPM VM: Proxy Hosts > Grafana > Advanced > Custom Nginx Configuration.
# For NPM to also listen on port `48123` in addition to `443` for grafana
listen 48123 ssl http2;
On the Grafana VM: File /etc/grafana/grafana.ini
[server]
protocol = http
http_port = 3000
Stream Configuration (Port Forwarding)
To clarify the terminology, I’ve seen that NPM calls Stream what is essentially Port Forwarding. It allows forwarding everything received on a port to another machine on the same or another port. I do Port Forwarding of port 22 to my GIT server on the Intranet.
| VERY IMPORTANT!!! Before doing Port Forwarding of port ssh (22) on the Nginx Proxy Manager, it’s critical to change the port its own sshd daemon listens on to an alternative one, or you’d lose ssh access to the NPM. I’ve documented in the post Socketed SSH how to do this (on an LXC Container with Ubuntu, where I’ve set up my NPM). |
Why do I want to do Port Forwarding to my Git server? Because I want to use ssh as the communication method to connect to git@git.yourdomain.com:... (commits, push, pull, etc.) and also use the same DNS name I use to administer my Git server via https: https://git.yourdomain.com.
Since Git uses the (fixed) port 22 when I use the notation git@git.yourdomain.com, I have no choice but to use some trick to redirect that port on my NPM.
Since I had already set up a Proxy Host for the https part, I just need to add the Stream to forward port 22 traffic to my Git server on the intranet.
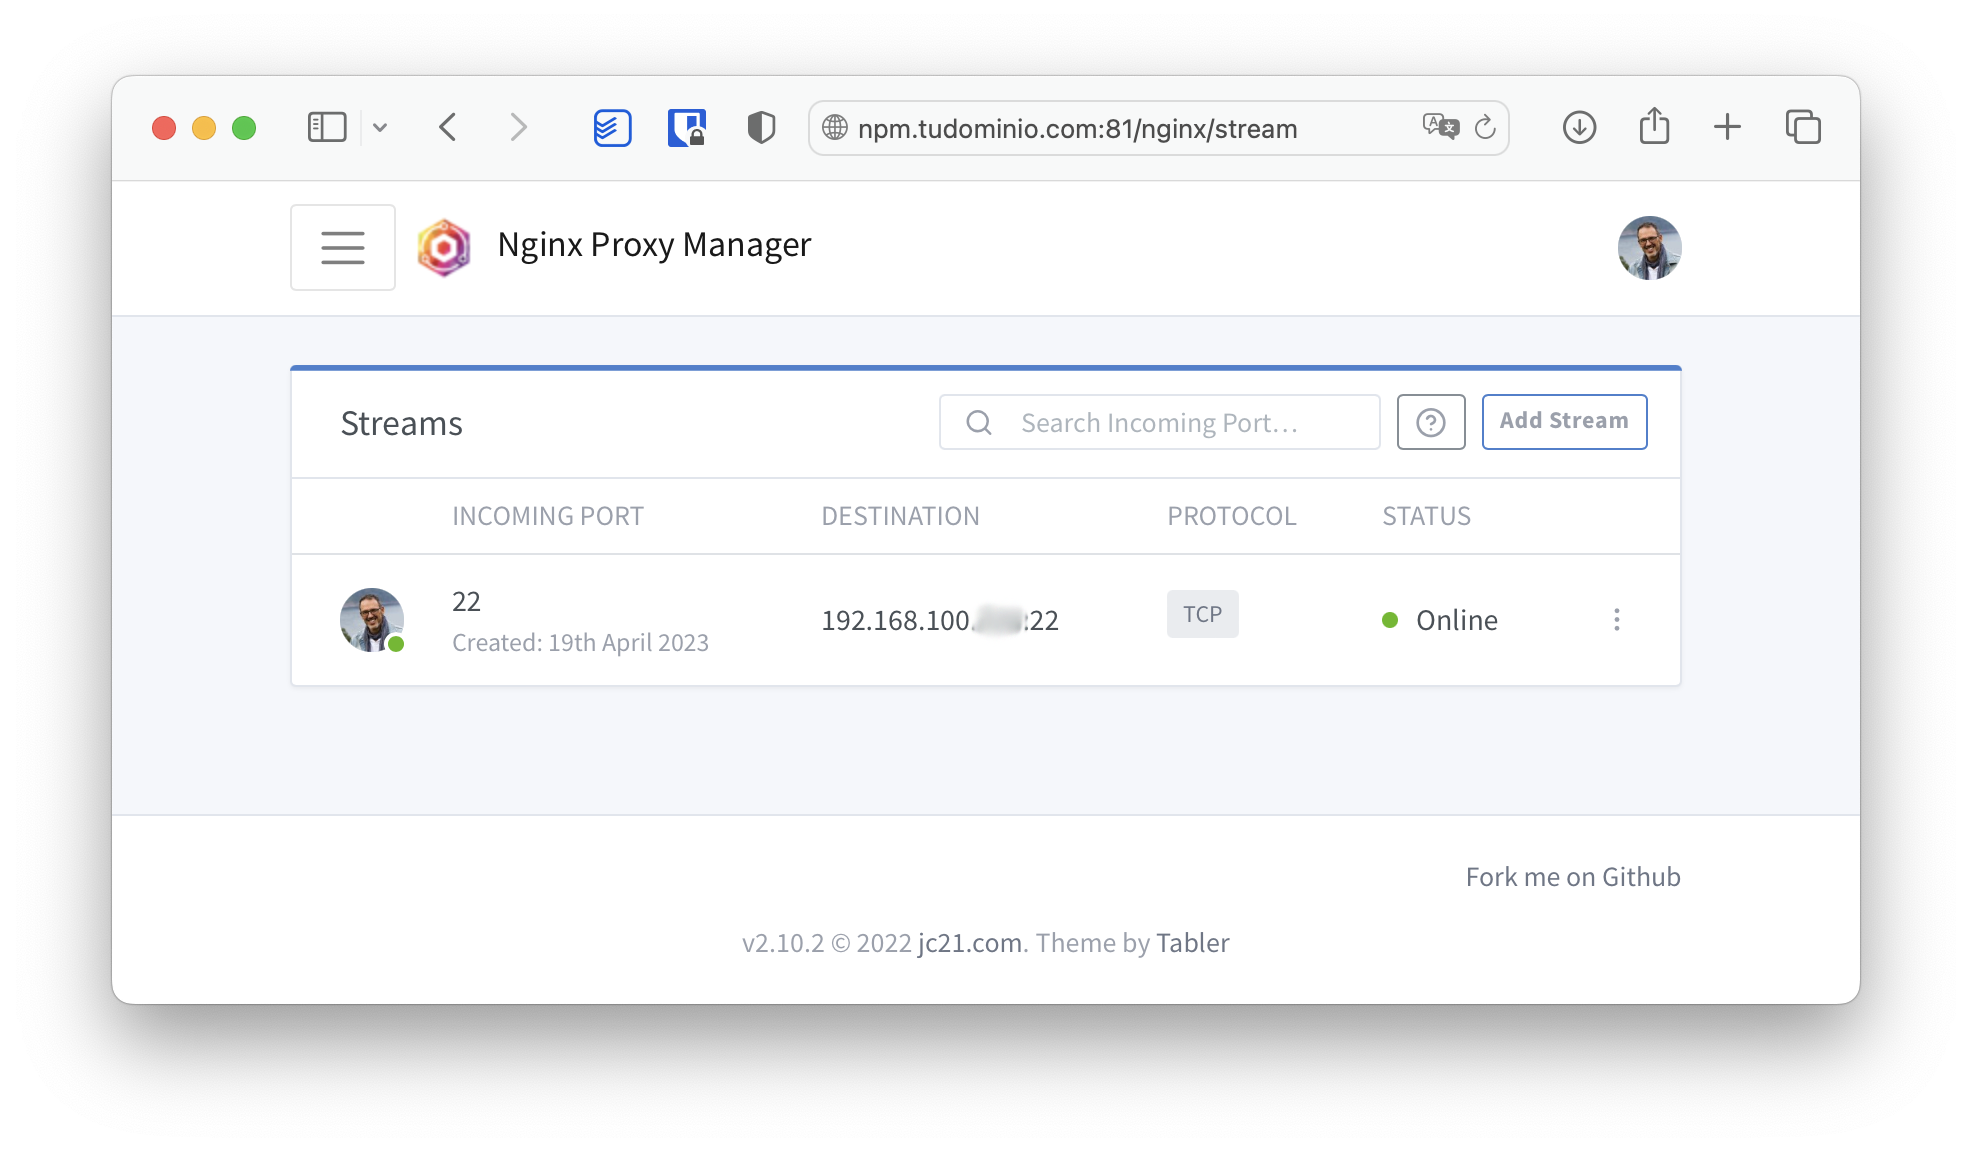
Now I have https://git.yourdomain.com (port 443) available for administration and git@git.yourdomain.com:repository.git (port 22) for working with my private Git server. The best part is that it’s also compatible with access from the internet, after knock, knock.