In this post I explain how I manage my data on a Mac. My goal is to work at full speed from anywhere with the most frequently used data, have extra storage for less accessed data, and of course have multiple backups.
The source data lives on the Mac’s internal SSD and a couple of external drives. The replicas and backups are on iCloud, a remote Linux server, and Google Drive. Multiple locations, different technologies, speeds, and needs. The rclone tool is perfect for helping me maintain multiple synchronized backups.
Introduction
Rclone is a powerful command-line tool for managing and syncing files and directories. It’s very versatile – it helps you manage your data effectively, back up to cloud services, to local and remote external drives, and keep them synchronized across all of them.
- Source data
My data lives in two places: priv and Baul. The priv folder is hosted in iCloud and synced (100% downloaded) to the Mac’s local hard drive. It’s where I keep my main data (accessible from the Apple ecosystem: iPhone, iPad, etc.). Baul is a very fast external SSD drive (Thunderbolt 4) where I have the storage I only need to access occasionally from a single machine (the Mac); it reminds me of the classic D:\ drive from another era.

- Backups
From the Mac: I want to back up everything, so I use TimeMachine for a complete backup of the Mac’s main drive to an external USB drive (USB 3.0, mechanical). I configure it and the operating system takes care of everything.
From priv and Baul: These are my two original sources, so I copy them to several locations using rclone: the Trastero external drive, a remote Linux server, and Google Drive. Having it on Google Drive gives me a couple of benefits: a “last resort” copy if everything fails and access from any operating system to any data from anywhere.
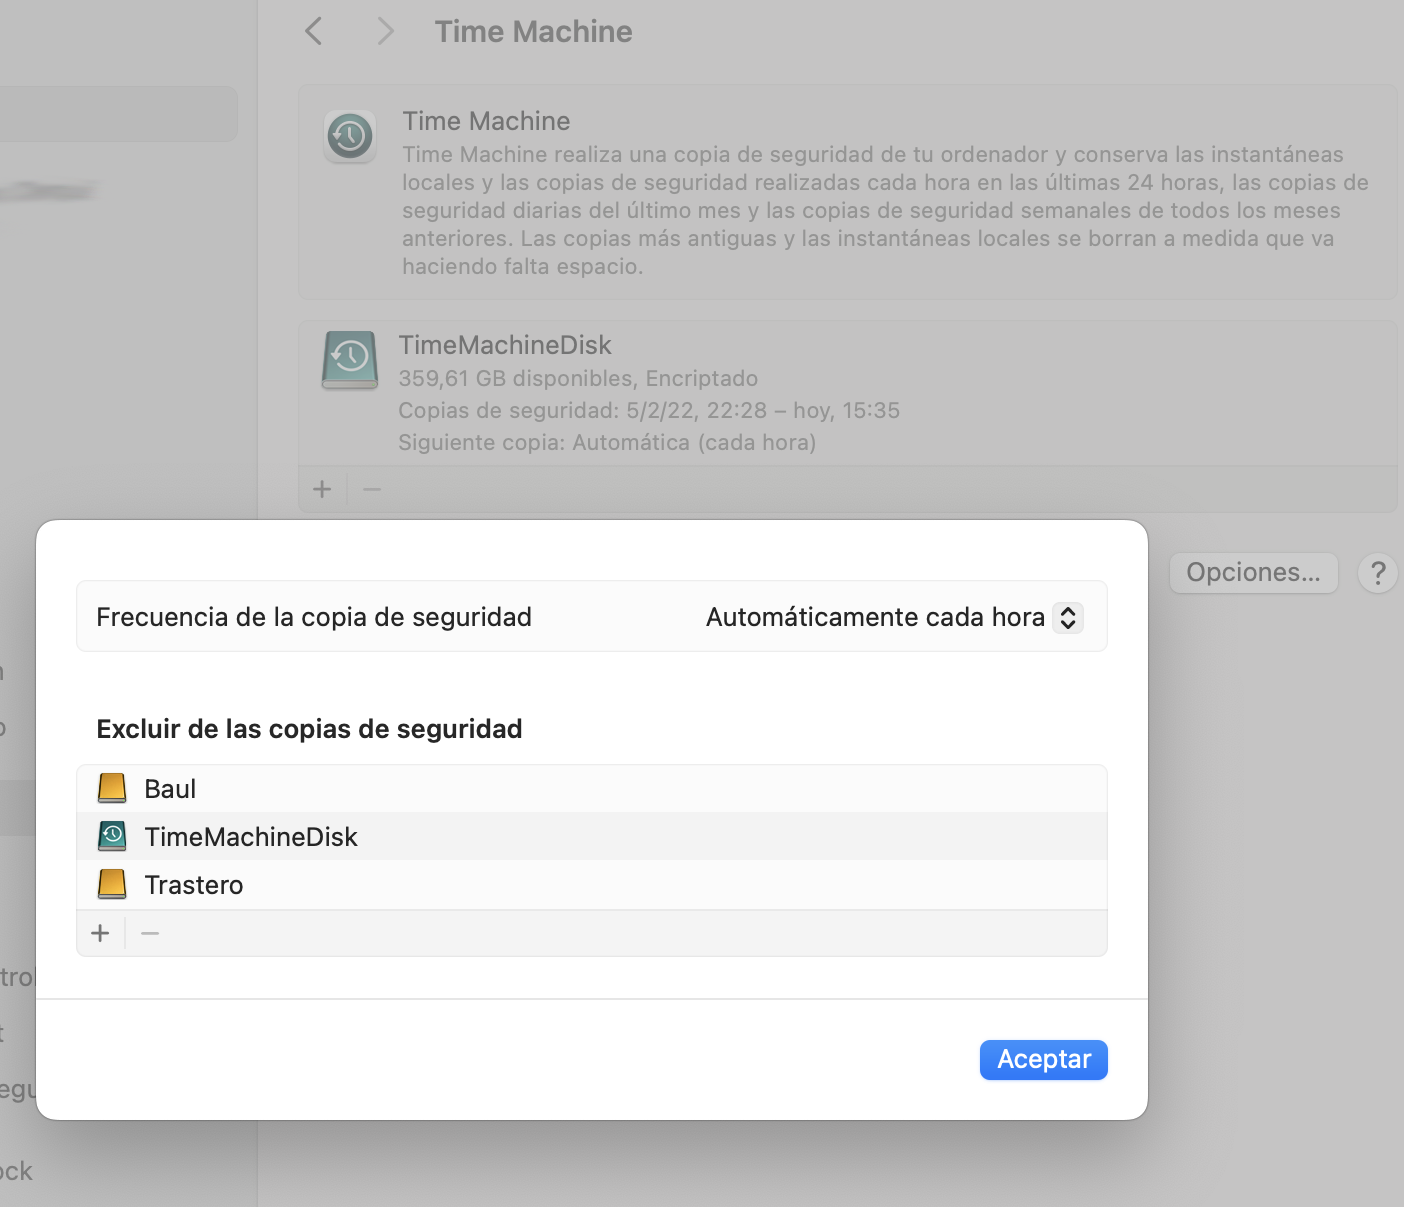
Backups: Time Machine
To set up Time Machine on a Mac, first connect an external hard drive and open it in “System Preferences”, then select “Time Machine” and enable the feature, choose the external drive as the destination, configure the backup options if needed, and finally start Time Machine so it performs automatic backups of your system to the external drive, making sure to keep it connected to keep backups up to date.
In my case I’ve configured an external USB 3.0 (Seagate Portable Drive) 5TB drive that’s quite affordable with a good balance between reliability (2.5-inch mechanical) and speed (120 MB/s).
Backups: rclone
- These are the steps to install rclone on macOS:
Open Terminal on your Mac.
Install Homebrew if you don’t have it yet.
Run the following command to install rclone:
brew install rclone
:
=> Caveats
Homebrew's installation does not include the `mount` subcommand on MacOS.
zsh completions have been installed to:
/opt/homebrew/share/zsh/site-functions
Verify that rclone was installed correctly:
rclone version
- These are the steps to install rclone on Linux
Installing rclone on Linux is equally simple. Here are the general steps:
Open a Terminal on your Linux distribution.
You can use your distribution’s package manager to install rclone. For example, on Ubuntu, you can run:
sudo apt-get install rcloneOn other distributions like Fedora, CentOS, or Debian, you can use the corresponding package manager.
Verify the installation by running:
rclone version
My Use Case
As I mentioned, the main internal Mac drive “Macintosh HD” (HD from now on) has the operating system, applications, and my user’s HOME (/Users/luis) with the priv folder. The external SSD Thunderbolt 4 (1000MB/s) Baul drive has the extra data space I mentioned at the beginning.
| Data | Source | Where it’s backed up |
|---|---|---|
| HD | Internal drive | TimeMachine external USB drive |
priv | iCloud (Main data) | 1) via iCloud <> Local sync and 2) Backups on Trastero (rclone), on Linux (rclone), and future Dropbox/Google (rclone) |
Baul | External drive (1000MB/s) | Backups on Trastero (rclone) and on remote Linux (rclone) |
Trastero | External drive | This external SSD (500MB/s) drive I use exclusively as a backup destination. Why so fast? Because I also store some extra things and if Baul breaks it can serve well while I look for a replacement |
Google Drive | Cloud drive | I use it to have an extra copy in case everything fails, but also to access my data from anywhere and any operating system (e.g., Linux) |
Rclone Configuration
Let’s see how to configure the destinations (includes local folders or drives plus remote locations):
| Note: All configuration resides in ~/.config/rclone/rclone.conf |
Run the following command to start rclone configuration:
rclone configYou can follow the configuration wizard instructions to add new remote storage. You can choose from a wide range of cloud services and local file systems.
Provide the required information, such as access credentials, and assign a name to the remote storage for future reference.
Once the remote storage is configured, you can use rclone to sync your directories with it.
This is how my rclone.conf file looked after my initial configuration, where I set up the local folders and drives (Luis, Baul, Trastero) and the priv directory under iCloud.
[Luis]
type = alias
remote = /Users/luis

[Baul]
type = alias
remote = /Volumes/Baul

[Trastero]
type = alias
remote = /Volumes/Trastero

[iCloud]
type = alias
remote = /Users/luis/Library/Mobile Documents/com~apple~CloudDocs
| IMPORTANT: My priv folder actually resides in iCloud. For ALL the content of that folder to always be fully synced on the local internal drive so I can copy them elsewhere with rclone, it’s important to tell macOS to download them locally. How? From Finder > iCloud > find and right-click on priv > “Download Now”. It will download a complete copy that permanently syncs with iCloud from that point on. |
Google Drive Configuration
Before adding Google Drive as a destination in the rclone configuration, let’s prepare our Google account.
- Create a
client_idin Google (source)
Go to the Google API Console
I create a new project:
Rclone LuisPa, left Organization asNo Organizationand “Select Project”.Under “APIs and Services” > Enable APIs and Services > search for
Drive, click on “Google Drive API” and “ENABLE” on the screen shown.
Click on “Credentials” in the left panel (not on “Create Credentials” which would open a wizard) If you’ve already configured the “OAuth Consent Screen”, skip to the next step
Click on the “CONFIGURE CONSENT SCREEN” button > “External” > CREATE
  Application name: rclone
  User Support Email: your.email.here@gmail.com
  Developer Contact Email: your.email.here@gmail.com
  SAVE AND CONTINUE
Click on ADD OR REMOVE PERMISSIONS.
  I grant permissions to .../auth/docs, .../auth/drive, .../auth/drive.metadata.readonly
  UPDATE
  SAVE AND CONTINUE
Add yourself as a “Test User”,
  I add my user with my email
  SAVE AND CONTINUE
Click on “Credentials” again in the left panel.
- Click on “+ CREATE CREDENTIALS” and select “OAuth client ID”.
I choose application type “Desktop App” and name it “Desktop Client”, CREATE
It shows the client ID and a client secret. SAVE THEM in a safe place :-)
Click on “OAuth consent screen” in the left panel, click on “Publish App” and confirm. I ignore the need for “Verification”.
| Note: Theoretically you’re expected to “submit your application for verification” and then wait weeks for a response; in practice, you can go ahead and use the client ID and client secret with rclone. The only issue will be a very scary confirmation screen shown when you connect through your browser so rclone can obtain its token-id (but since this only happens during remote configuration, it’s not too much of a problem). |
- Add the Google Drive destination
$ rclone config

:
n) New remote
e/n/d/r/c/s/q> n

name> Drive
Storage> drive
client_id> 1111111111111-el_client_id_que_cree_en_el_paso_anterior.apps.googleusercontent.com
client_secret> ELSECRETO-CreadoEnElPaso-Anterior
scope> 1   (Full access all files..)
service_account_file> (Press Enter, leave empty)
Edit advanced config?
y/n> n
Use web browser to automatically authenticate rclone with remote?
y/n> Y
:
Opens the browser and I authorize!!
2023/12/13 11:48:22 NOTICE: Log in and authorize rclone for access
2023/12/13 11:48:22 NOTICE: Waiting for code...
2023/12/13 11:48:33 NOTICE: Got code
Configure this as a Shared Drive (Team Drive)?
y/n> n
Configuration complete.
Options:
- type: drive
- client_id: 1111111111111-el_client_id_que_cree_en_el_paso_anterior.apps.googleusercontent.com
- client_secret: ELSECRETO-CreadoEnElPaso-Anterior
- scope: drive
- token: {"access_token":"ya29.token-largísimo","token_type":"Bearer","refresh_token":"1//token-mas-largo-todavía","expiry":"2023-12-13T12:48:32.418859+01:00"}
- team_drive:
Keep this "Drive" remote?
y/e/d> y
q) Quit config
e/n/d/r/c/s/q> q
I now have a new Google Cloud destination available for use with rclone.
Running rclone
- Example of directory synchronization between two local drives
Let’s look at the typical example of syncing directories between two local drives. Imagine we want to back up several directories to Trastero. Remember to prepare the backup destination folders.
mkdir -p /Volumes/Trastero/Baul
mkdir -p /Volumes/Trastero/iCloud
mkdir -p /Volumes/Trastero/priv
mkdir -p /Volumes/Trastero/Other
Here are some examples:
rclone sync --progress --copy-links --skip-links --exclude="*.socket" --exclude=".DS_Store*" Baul:fotos Trastero:Baul/fotos
rclone sync --progress --copy-links --skip-links --exclude="*.socket" --exclude=".DS_Store*" Baul:gestión Trastero:Baul/gestión
rclone sync --progress --copy-links --skip-links --exclude="*.socket" --exclude=".DS_Store*" iCloud:priv Trastero:iCloud/priv
rclone sync --progress --copy-links --skip-links --exclude="*.socket" --exclude=".DS_Store*" Luis:Pictures/Lightroom Trastero:Other/Lightroom
I recommend using --dry-run or check to test first. Another option is to create a filter file where I specify what to exclude and include. For example, for the Baul directories, I create the file filter-from-Baul.txt
- .DS_Store
- _gsdata_
- .DocumentRevisions-V100
- .Spotlight-V100
- .TemporaryItems
- .Trashes
- .fseventsd
+ /fotos**
+ /gestión**
- *
- First I do a
checkand then thesync:
rclone check --progress --copy-links --filter-from ~/.config/rclone/filter-from-Baul.txt Baul: Trastero:
rclone sync --progress --copy-links --filter-from ~/.config/rclone/filter-from-Baul.txt Baul: Trastero:
- Example of syncing with Google Drive
To sync a directory with Google Drive, I would use the following example command:
rclone sync --progress --copy-links --skip-links --exclude="*.socket" --exclude=".DS_Store*" iCloud:0_priv Drive:0_priv
Syncing with a Remote Computer
To sync your directories with a remote computer running rclone server, you can use the following example command:
rclone sync /path/to/priv RemoteComputer:/path/on/server/priv
rclone sync /path/to/work RemoteComputer:/path/on/server/work
rclone sync /path/to/Negativos RemoteComputer:/path/on/server/Negativos
rclone sync /path/to/Baul RemoteComputer:/path/on/server/Baul
Replace /path/to/priv, /path/to/work, /path/to/Negativos, /path/to/Baul, RemoteComputer, and /path/on/server with the correct paths and server names.
With these commands, you can keep your directories synced both in the cloud and on a remote server. Rclone provides an effective way to manage your data on macOS and Linux, allowing you to back them up and keep them updated across multiple locations.
In summary, rclone is an essential tool for any user who needs to sync and back up data on macOS and Linux. Its versatility and ease of use make it a solid choice for cloud file management and cross-device synchronization.
Working in GUI Mode
We have a couple of options. I don’t use them because once you start playing with the CLI version it’s actually very convenient to put all the commands in a script and you go much faster.
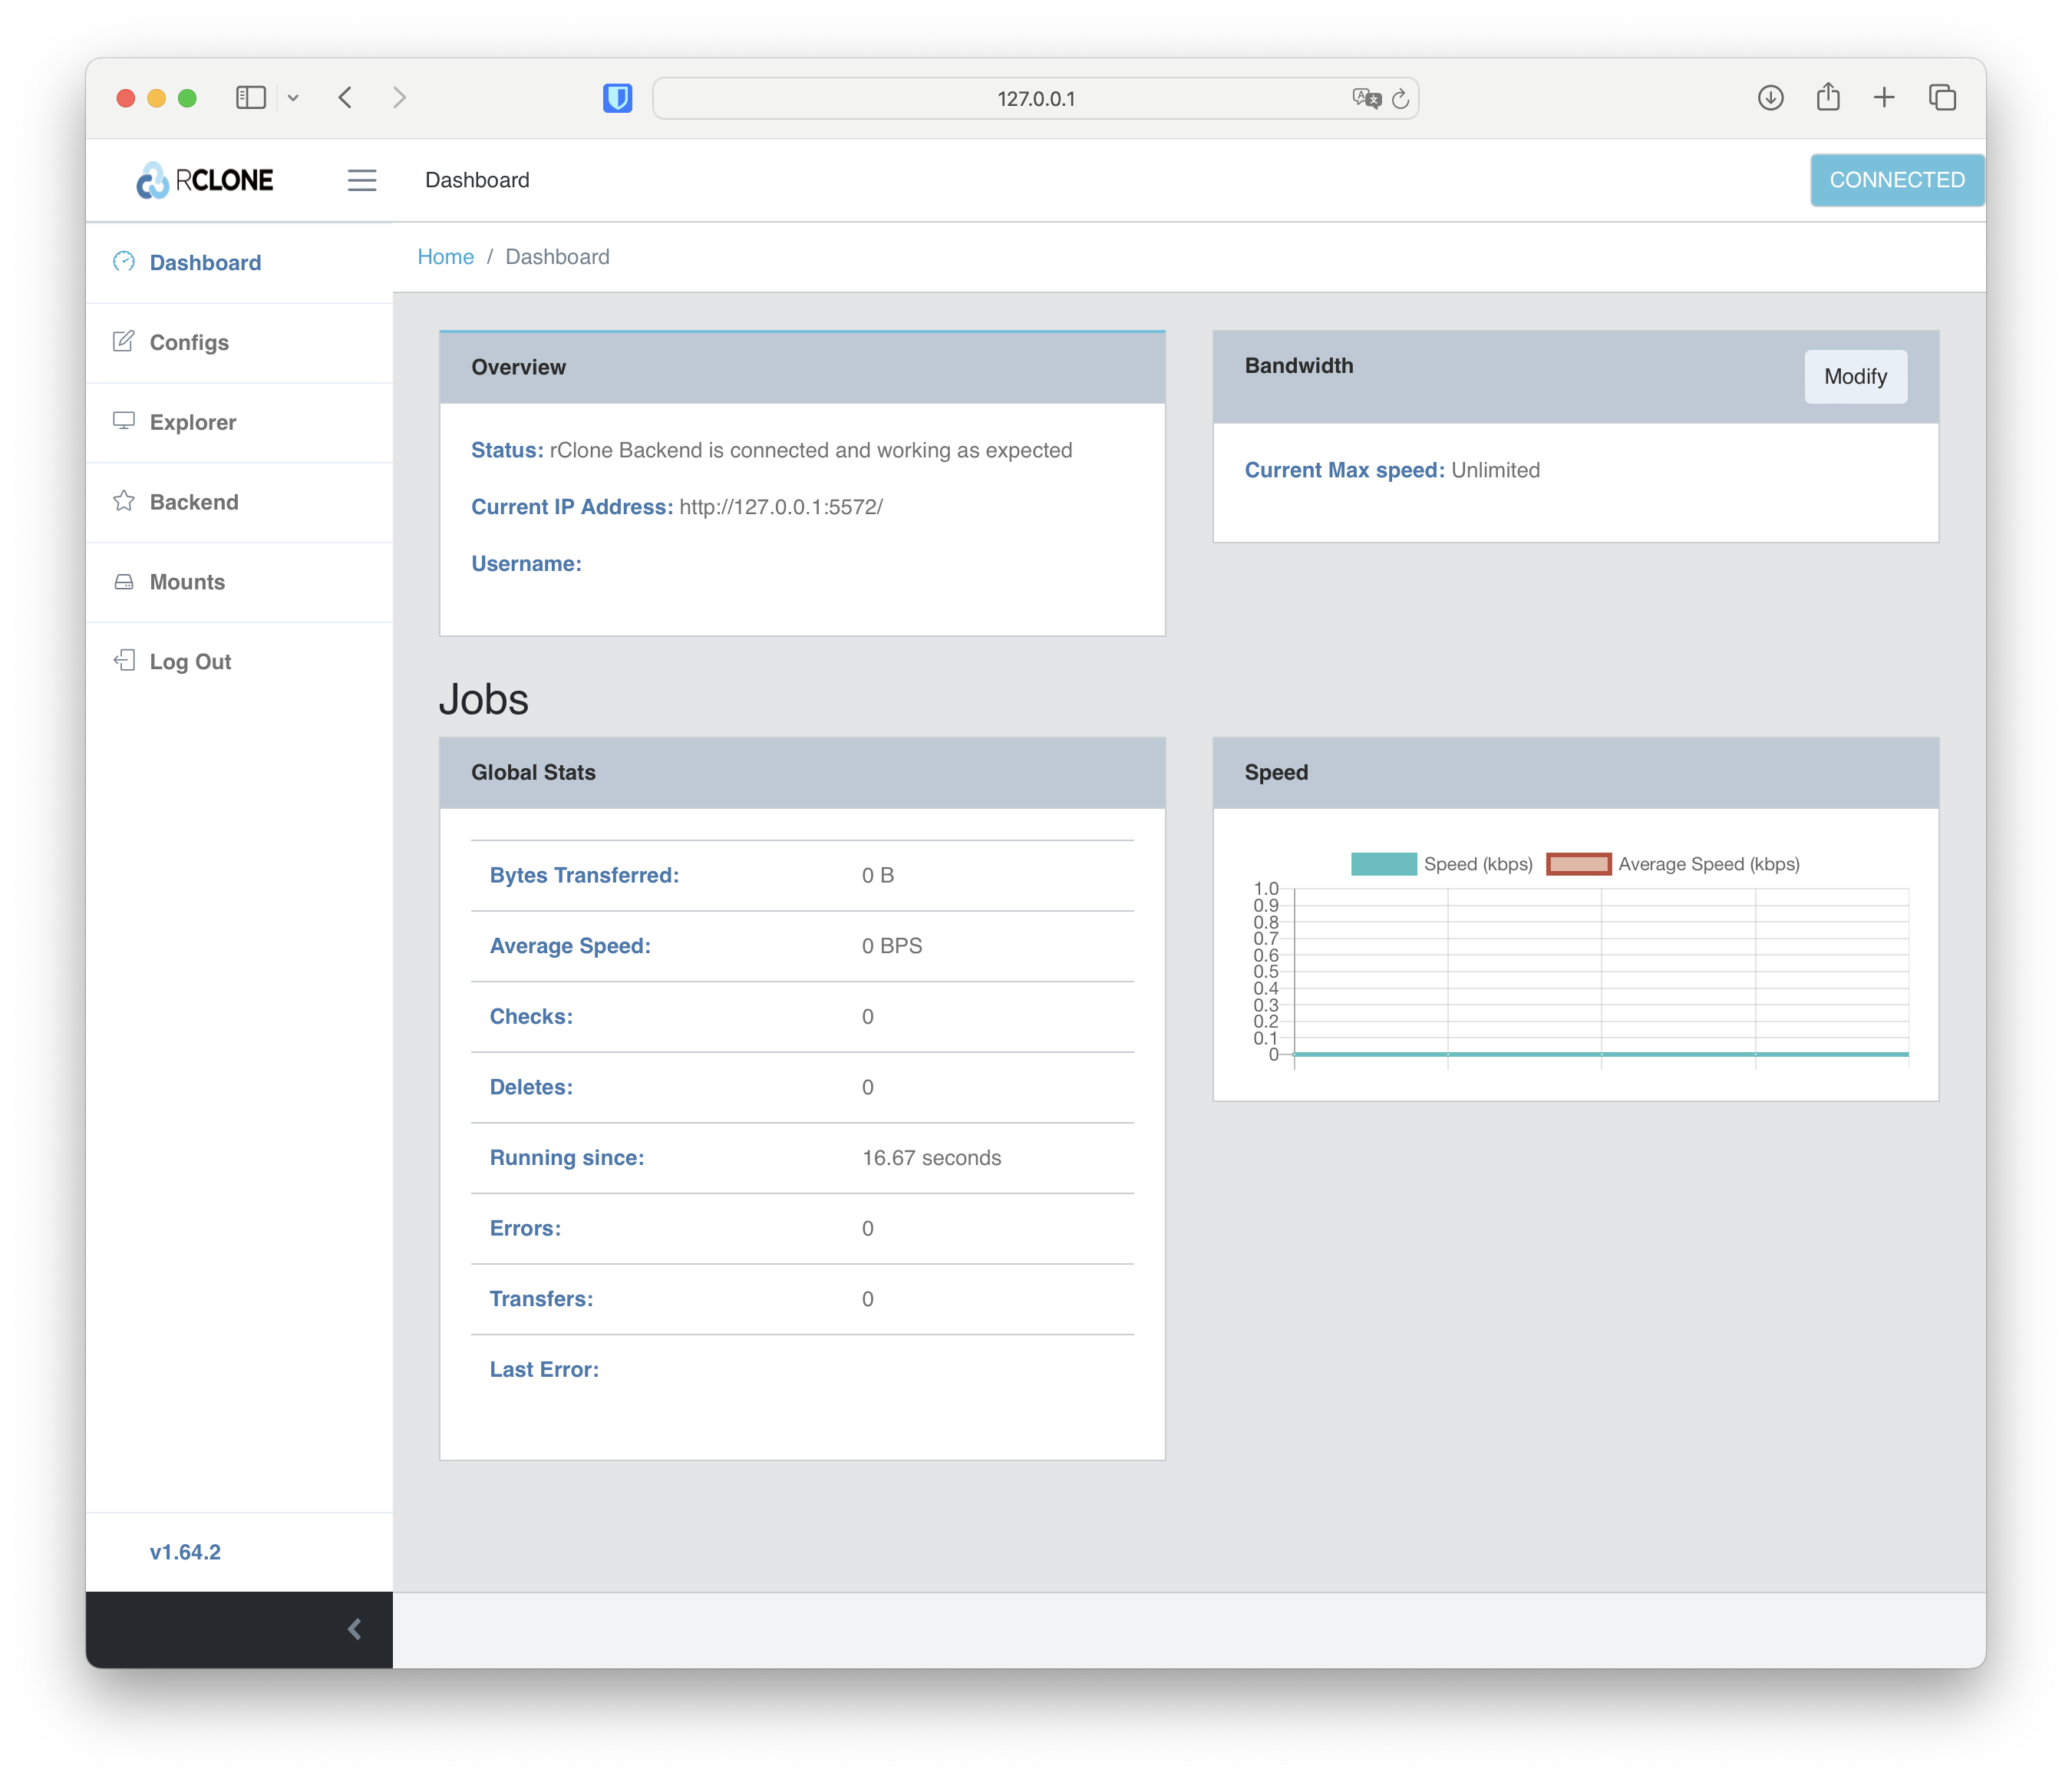
Experimental Embedded GUI in rclone
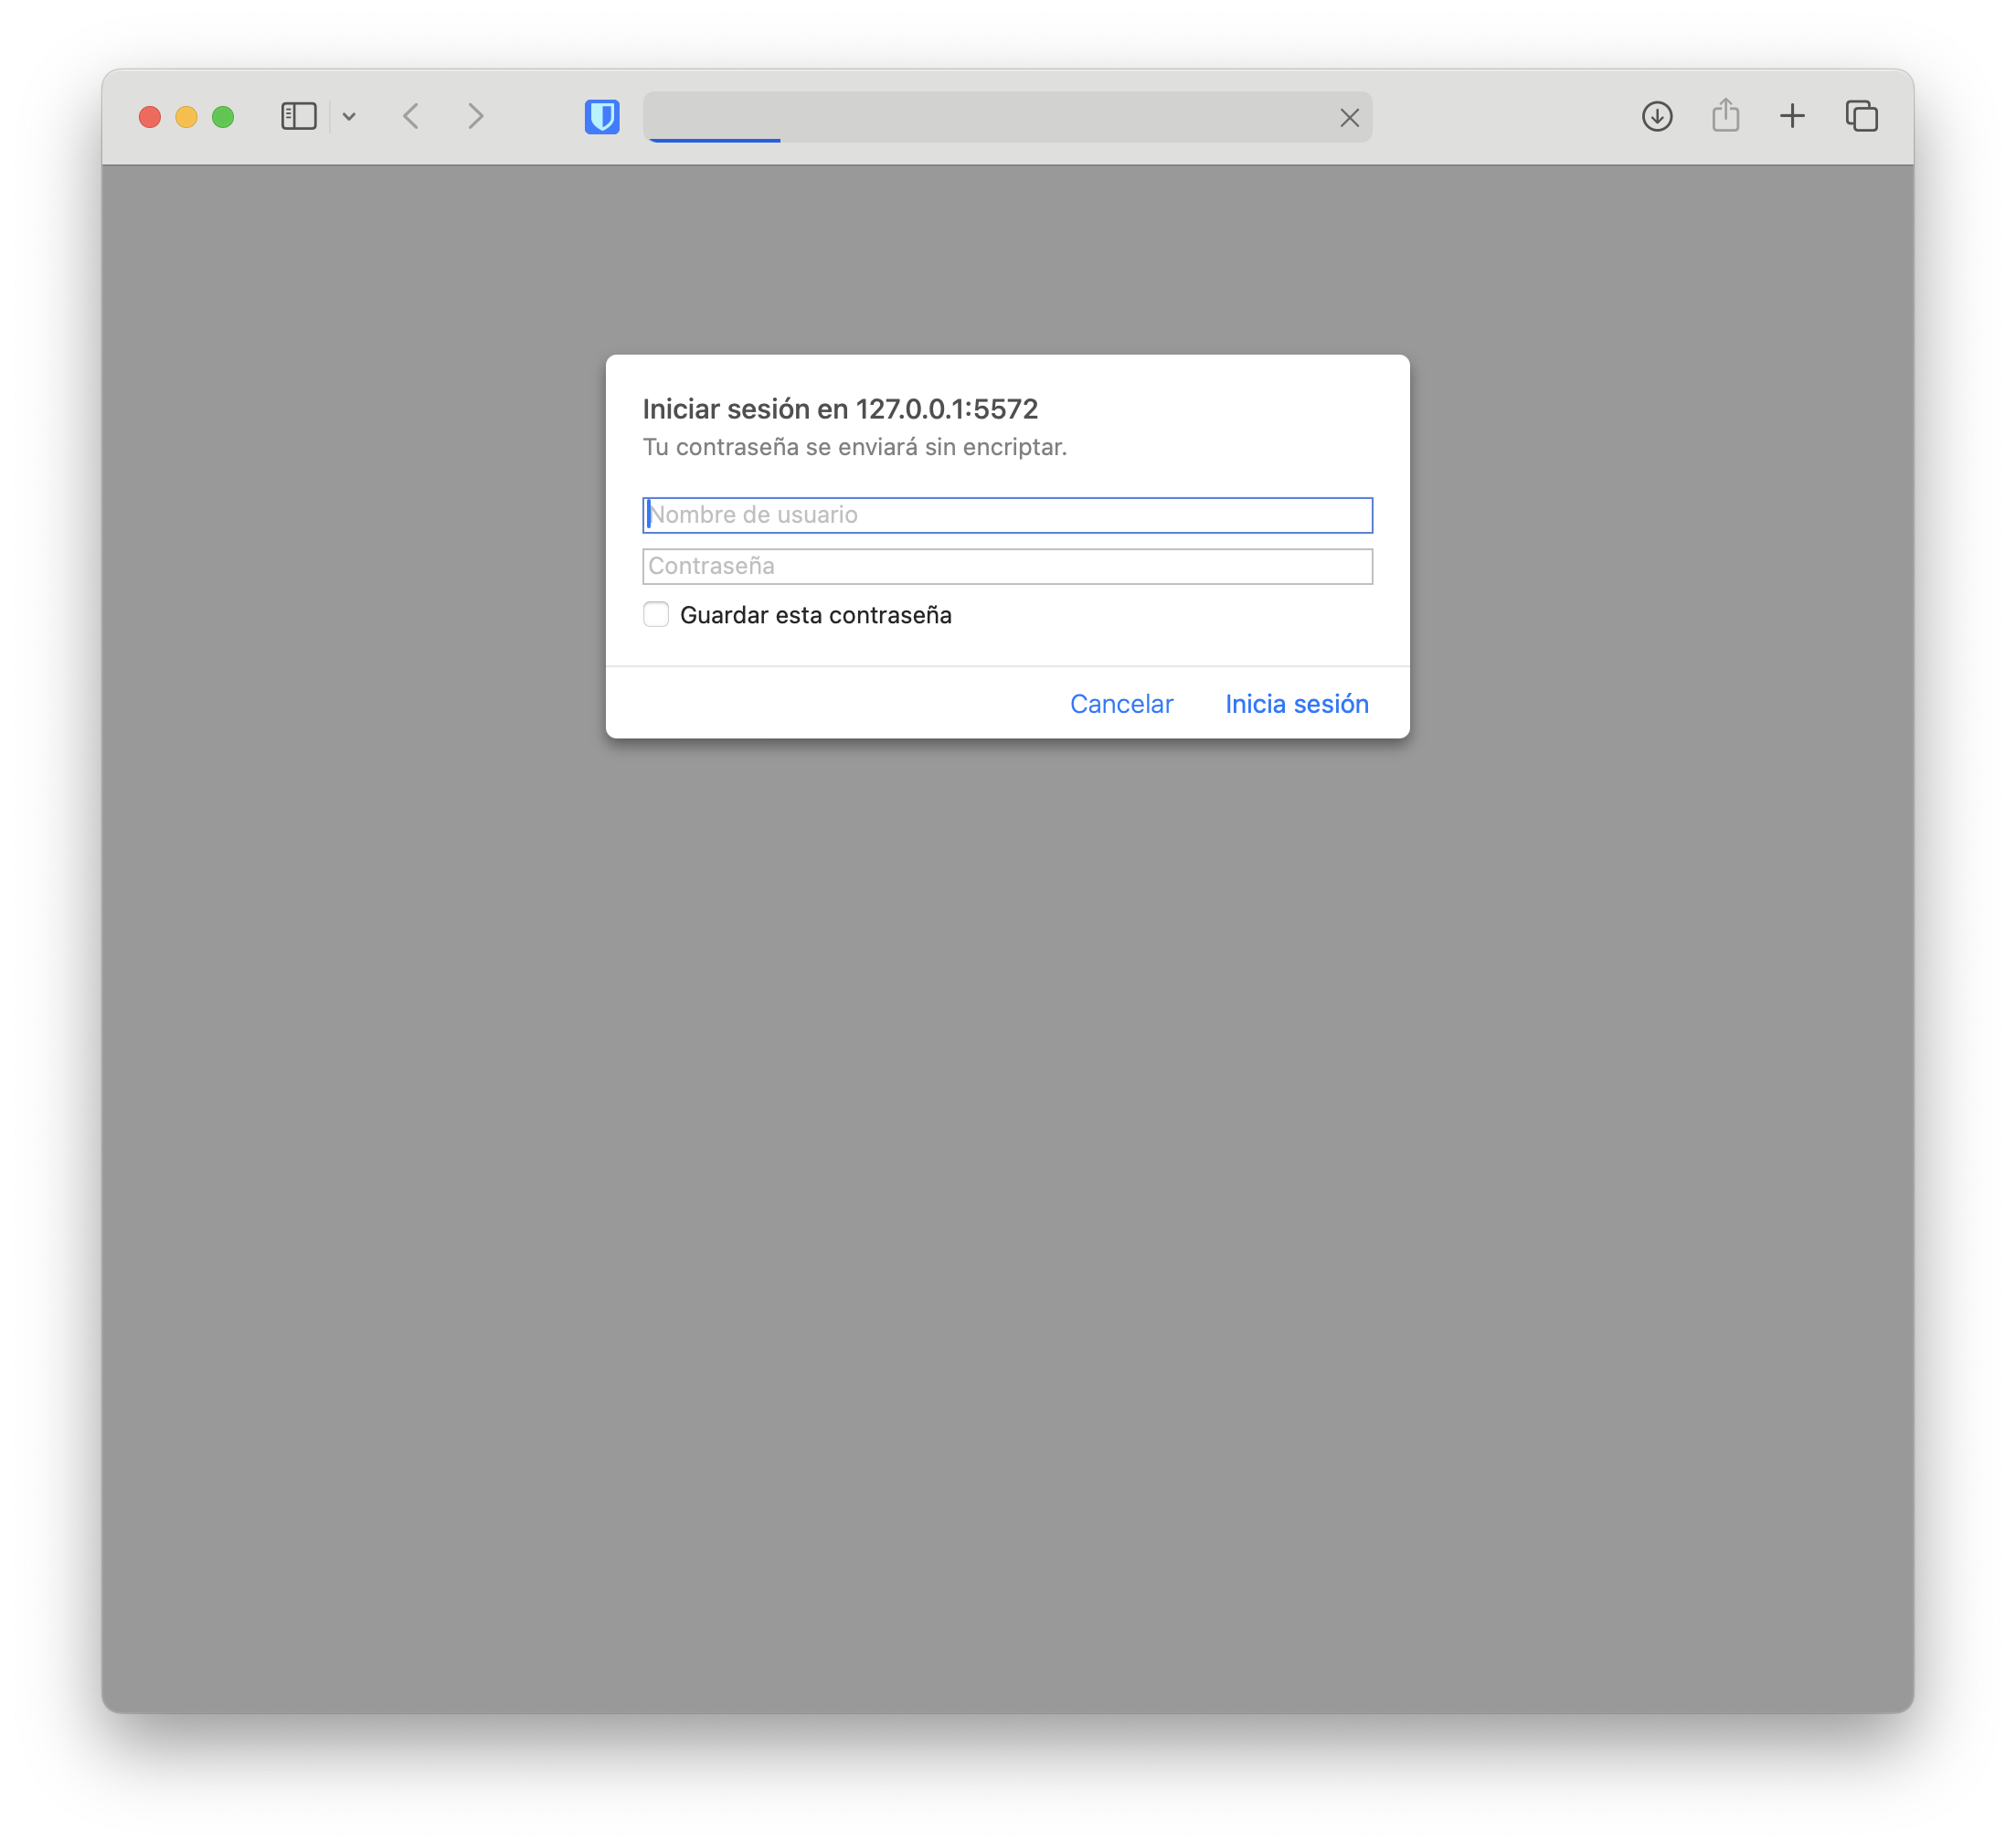
There’s an experimental GUI that you can install to work in graphical mode. Just run the following command, which will download everything needed and start a local web server. It launches a browser and connects (you can prevent this with --rc-web-gui-no-open-browser).
In this example I request a specific user/password and verbose mode – change the username and password to whatever you want. It can also work without authentication using --rc-no-auth
rclone rcd --rc-web-gui --rc-user luis --rc-pass mipase -vv
:
2023/11/18 12:38:47 DEBUG : rclone: Version "v1.64.2" starting with parameters ["rclone" "rcd" "--rc-web-gui" "--rc-user" "luis" "--rc-pass" "mipase" "-vv"]
2023/11/18 12:38:47 DEBUG : Current tag: v2.0.5, Release tag: v2.0.5
2023/11/18 12:38:47 NOTICE: Web GUI exists. Update skipped.
2023/11/18 12:38:47 NOTICE: Serving Web GUI
2023/11/18 12:38:47 INFO  : Using --user luis --pass XXXX as authenticated user
2023/11/18 12:38:47 NOTICE: Serving remote control on http://127.0.0.1:5572/
2023/11/18 12:38:47 DEBUG : login_token "bHVp12343535hc2U="
2023/11/18 12:38:47 INFO  : /: 127.0.0.1:59654: Unauthorized request from
:
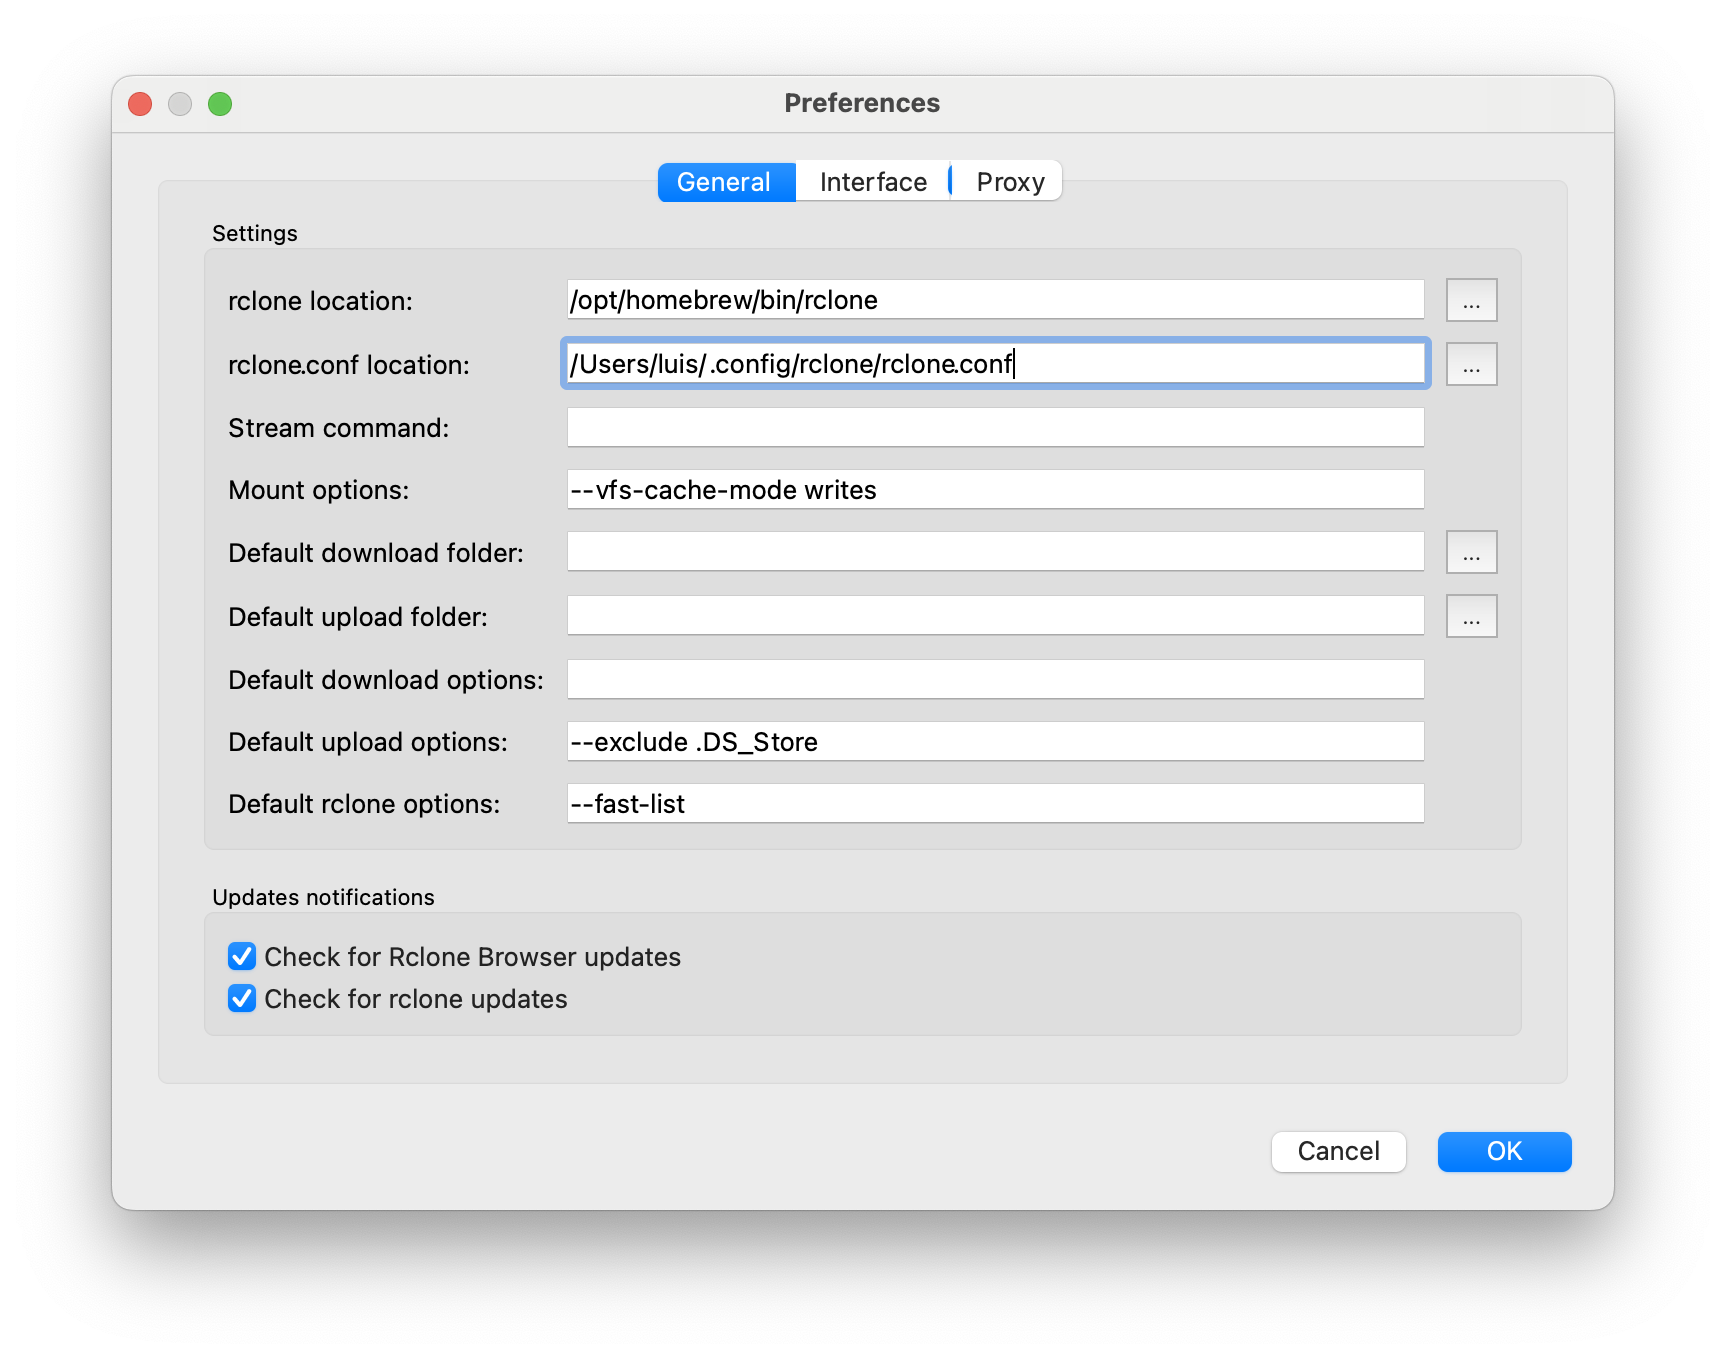
RcloneBrowser
Another option, if you want a stable version, is RcloneBrowser, a cross-platform GUI that supports macOS, GNU/Linux, the BSD family, and Windows.

To install it on macOS, follow these steps:
Download the latest version from releases. At the time of publishing I used
rclone-browser-1.8.0-a0b66c6-macos.dmgWhen running it, I configure the path to the executable and the location of the configuration file
Updating
To keep it updated to the latest version, you can use the following command:
- On macOS
brew update
brew upgrade
- On Linux
apt update && apt upgrade -y
- To update the experimental GUI:
rclone rcd --rc-web-gui --rc-web-gui-update
# If the GUI is broken you can force the update with `--rc-web-gui-force-update`