In this post I describe the steps to set up a Windows 11 machine as a development workstation for a cross-platform environment — Linux, macOS, and Windows. This is not oriented towards Microsoft/Windows-only software development, but rather for those who like to develop on and for multiple platforms and environments.
I start from a clean Windows installation (in English), with nothing installed. I took advantage of needing to set up a dual boot and configured the operating system in a lightweight manner. The post starts with the CLI and WSL2, and in the second part I cover the tools and programming languages.
Windows notes series
- Set up a PC for Dualboot Linux / Windows and install Windows 11 Pro.
- Configure a decent Windows 11 by removing bloatware.
- Set up Windows for software development, CLI, WSL2 and tools.
- Install VMWare Workstation Pro on Windows 11 with a Windows 11 Pro VM.
- Install a Windows 11 VM on Proxmox to have Windows 11 Pro on a Proxmox host.
Note: My posts on setting up each OS for software development: macOS, Linux and Windows.
First Steps
Like all my posts, this is my installation logbook — I execute and document as I go, to have a reference for the future.
PATH: On Linux and macOS it’s straightforward, but on Windows modifying the PATH is different — there’s a User PATH and a System PATH, which combined give you the complete PATH. Throughout this post you’ll see me mention modifying the PATH. Here’s how:
- To modify both:
Start>Settings > System > About > Advance System Settings- or
Search> “Advance System Settings” or “Environment Variables”
- Modify in
System variablesand/orUser variables - Here’s an example of my final PATH in a Gist.
CLI
Talking about working from the command line is essential — whether you’re used to it or not, cross-platform developers value it greatly. I install everything:
- CMD (
cmd.exe): The traditional Windows command line, its scripts are the famous*.BAT, *.CMD. - PowerShell: Advanced scripting environment and command line developed by Microsoft.
- Git for Windows: because in addition to
git.exeit includes Git Bash, a Bash terminal emulator for Windows that provides native executables for “linux” commands under/c/Program Files/Git/usr/bin - Windows Terminal: A modern application that allows multiple tabs with different consoles, such as
CMD,PowerShell,WSL,Git Bash, etc. It’s highly customizable and supports advanced features like themes and font configurations. I’ll go into detail later. - Windows Subsystem for Linux (WSL 2): allows running a native Linux environment on Windows without needing a virtual machine. You can install Linux distributions (like Ubuntu, Debian, etc.) and use the Unix Shell (
zsh or bash) and existing open source Linux command-line tools (ls, cd, mkdir, cp, tar, sed, awk, nano, vi, etc.). It’s fully integrated with the Windows File System (except for permissions).

PowerShell
It is more powerful than CMD, allowing the use of more complex commands, scripts, and access to the .NET framework. Scripts end in *.PS1. Very useful for developers who work exclusively with .NET, C#, in Microsoft-only environments, for automation, and for the DevOps CI world in Windows/Azure environments.
There are two executables:
Windows 11 comes with PowerShell 5.x - (powershell.exe), known as “Desktop”. Works exclusively on Windows.
- Based on the PowerShell 5.1 engine.
- Fully integrated with Windows, supporting all Windows-specific features, modules, and cmdlets.
- Runs on the .NET Framework.
- Ideal for managing Windows environments, including Active Directory, Exchange, and other Windows-specific services.
PowerShell 7: (pwsh.exe), known as “Core”. Cross-platform (Windows, macOS, Linux).
- Based on the PowerShell 6.0+ engine.
- Designed to be more modular and lightweight, but may lack some Windows-specific features and modules.
- Runs on .NET Core (now .NET 5+).
- Suitable for managing diverse environments, including cloud services and non-Windows systems.
Install PowerShell 7 > “Downloads” > latest .msi version. In the future it will notify you if an update exists — download, install, and it will update.
luis@kymeraw:~ ❯ $PSVersionTable

Name                           Value
----                           -----
PSVersion                      7.5.1
PSEdition                      Core
:
PowerShell profiles on startup ($PROFILE):
PowerShell loads up to four profile files in this order, unless the -NoProfile parameter is used:
| Order | Scope | Host type | Path |
|---|---|---|---|
| 1 | Global | All hosts | $PSHOME\Microsoft.PowerShell_profile.ps1 |
| 2 | Current user | All hosts | $HOME\Documents\PowerShell\profile.ps1 |
| 3 | Current user | Specific host | $HOME\Documents\PowerShell\Microsoft.PowerShell_profile.ps1 (o VSCode_profile.ps1, ConsoleHost_profile.ps1, etc.) |
| 4 | Global | Specific host | $PSHOME\Microsoft.PowerShell_profile.ps1(host-specific variant) |
$PROFILEes una variable automática que apunta al perfil actual del usuario y del host ($HOME\Documents\PowerShell\Microsoft.PowerShell_profile.ps1). Puedes ver todas las rutas con:$PROFILE | Format-List *
I use a single file, which I always place at $PROFILE. Here is a link to the devcli project on GitHub where you can find my latest version of this file and edit yours with code $PROFILE:
Terminal mejorado
Windows Terminal
Instala Windows Terminal, podrás tener múltiples pestañas para CMD, PowerShell, WSL, [Git Bash](https://git-scm.com/install/windows), o cualquier terminal que encuentres por ahi. Personalizable y soporta características avanzadas como temas y configuraciones de fuentes.
- Microsoft Store,
Start> busco por “Store” > Busco por “Windows Terminal”. Instalo o Actualizo Startbusco “Terminal”. Accedo a la configuración > ‘flecha abajo’ >SettingsoCtrl + ,- Configurar perfiles de consola:
- En el panel izquierdo, veo perfiles como
Windows PowerShell,CMD,Ubuntu, etc. Aquí puedo personalizar cada uno de ellos. - Cambiar el shell predeterminado: Si deseas que siempre se abra un perfil específico al iniciar Windows Terminal, selecciona el perfil en el menú “Startup” bajo “Default profile”.
- En el panel izquierdo, veo perfiles como
- Personalizar apariencia:
- Puedes cambiar el tema, fuente, esquema de colores y más para cada perfil.
- Agregar nuevas consolas (opcional)
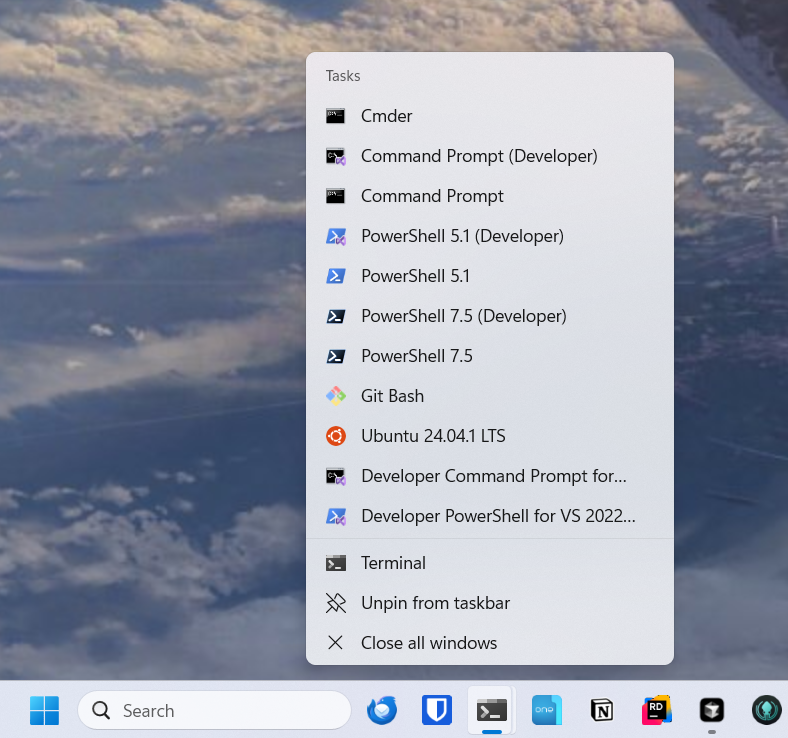
Anclar Windows Terminal al Taskbar: Tras ejecutarlo, clic derecho en su icono, “Pin to taskbar” (Anclar al taskbar).
Usar múltiples pestañas en Windows Terminal:
- Abrir nuevas pestañas: ícono
+o atajoCtrl + Shift + T. - Cambiar entre pestañas:
Ctrl + Tab - Cerrar pestañas: ícono
XoCtrl + Shift + W. - Sacar las pestañas como ventanas independientes: Botón derecho sobre la pestaña
Empiezo a trabajar de manera más eficiente y organizada. Tengo la posibilidad de abrir la consola que necesite, he cambiado los colores ligeramente para diferenciar dónde estoy y en el caso de cmd.exe he puesto otro tipo de fuente de letra.
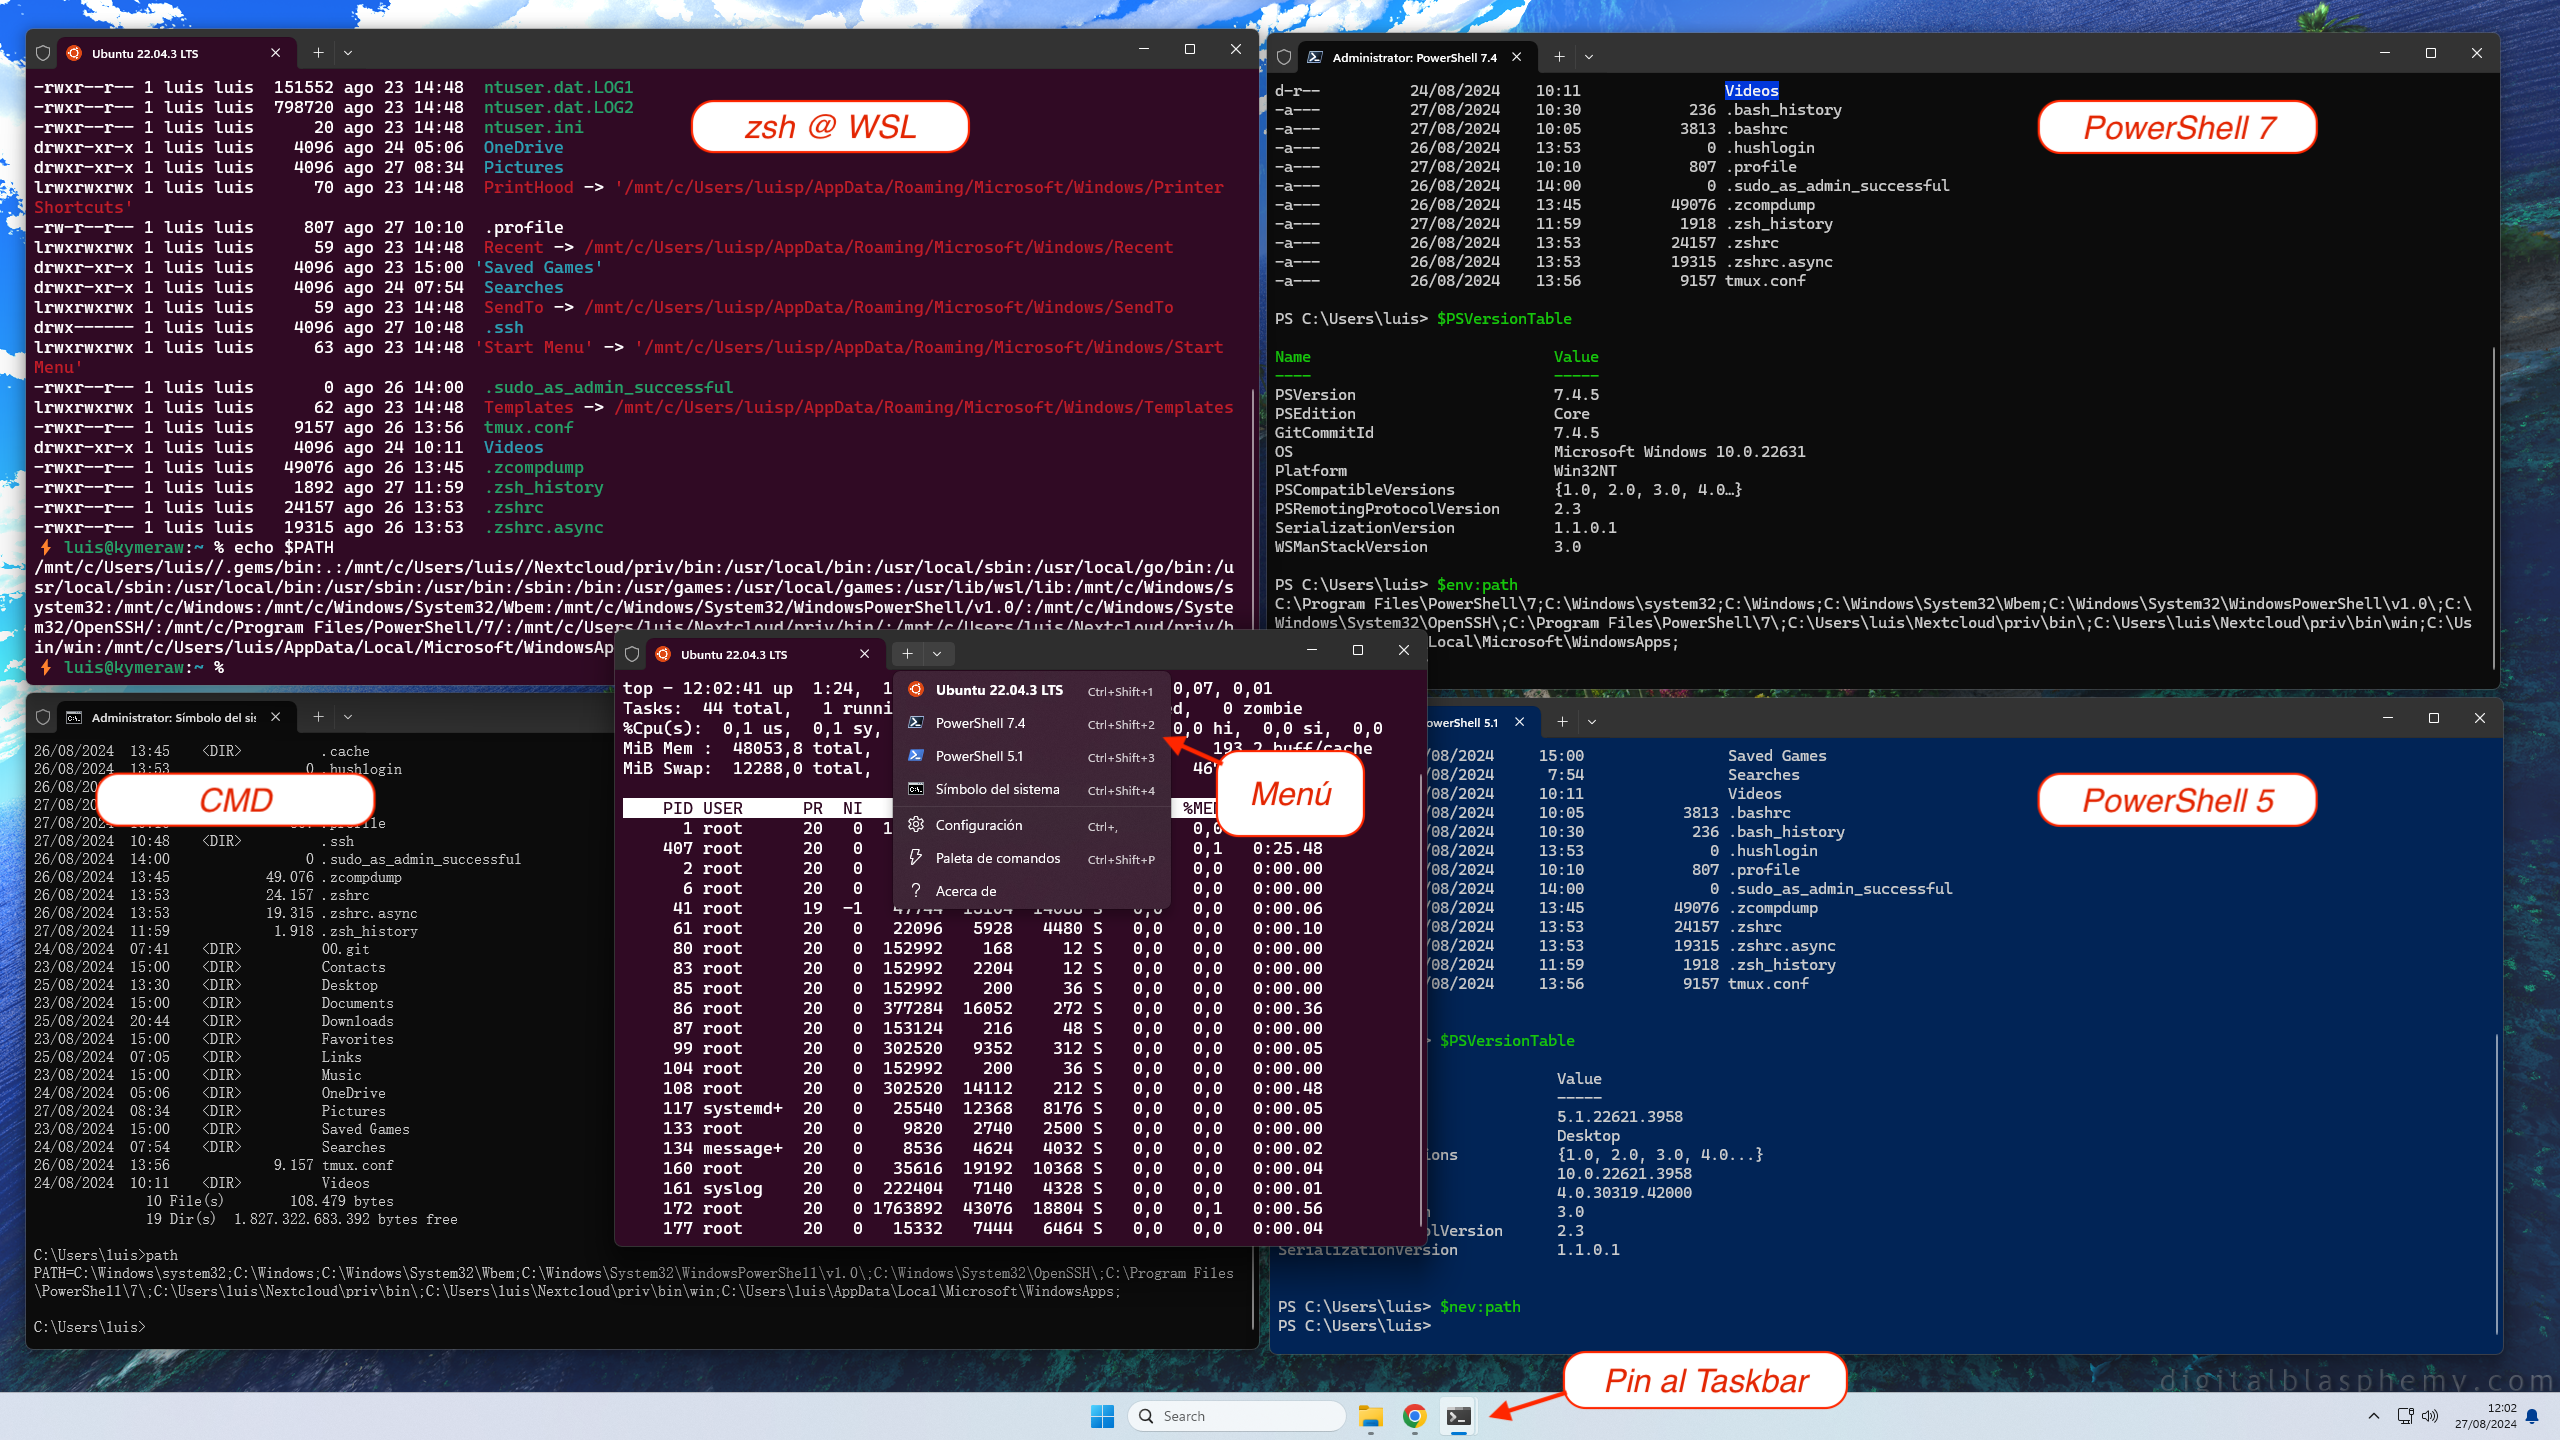
Configuración settings.json y state.json: Gran parte de esta personalización de Windows Terminal se gestiona a través de dos archivos clave: settings.json (nucleo de la personalización, puedes editarlo desde el propio menú) y state.json (estado actual del Terminal).
Aquí tienes el mi fichero de configuración settings.json que utilizo en mi ordenador. Nota: los uuid del mismo serán distintos en tu caso. No lo copies/pegues tal cual o no te funcionará.
Nerd Fonts
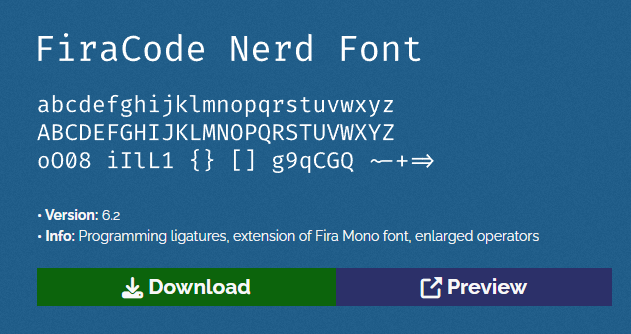
I install a Nerd Font, essential when working with the command line. From their official repository > Fonts Downloads. I like FiraCode. I download it, unzip the file, select all .ttf files > right-click > Install.
I configure it as the default font in Windows Terminal, Settings -> Profiles -> Defaults -> Appearance -> Font Face FiraCode.
Oh My Posh
I install Oh My Posh, the ultimate prompt, the one that works best with large Git repositories, even under WSL2. It’s a prompt theme engine for any shell. I install it on all operating systems and CLIs I work with. Follow the instructions on their site for installation:
- Windows Powershell -
winget install JanDeDobbeleer.OhMyPosh -s winget - Windows CMD - No trae soporte nativo, pero sí cuando se usa junto con Clink, lo explico en el siguiente punto.
- For WSL2 I use devcli - Automatic script to configure the CLI environment on Unix-based systems: Linux, macOS, and WSL2.
Oh-My-Posh uses themes, here’s a copy of mine: ~/.oh-my-posh.yaml
For my theme to work properly I need to do this followed by a reboot. I use that variable in my theme.
setx OMP_OS_ICON "🪟"
Note: If you ever need to delete that variable, do it like this:
Remove-ItemProperty -Path "HKCU:\Environment" -Name "OMP_OS_ICON"
Clink
Clink adds to CMD everything it’s missing — readline (from Linux), colors, history, Scriptable Prompt; and it also integrates with Oh-My-Posh
Follow the instructions to configure it properly and especially to inject it into CMD, so it starts automatically when launching cmd.exe.
  Computer\HKEY_CURRENT_USER\Software\Microsoft\Command Processor
    |
    +--> AutoRun   "C:\Program Files (x86)\clink\clink.bat" inject --autorun
Although Clink supports Scriptable Prompt, I use Oh-My-Posh together with Clink.
I edit C:\Users\luis\AppData\Local\clink\oh-my-posh.lua, exit and re-enter CMD.
load(io.popen('oh-my-posh init cmd'):read("*a"))()
I exit and re-enter CMD and run the following:
clink config prompt use oh-my-posh
clink set ohmyposh.theme c:\Users\luis\.oh-my-posh.yaml
LSDeluxe
LSDeluxe is a modern and stylish version of the classic Unix/Linux ls command. Rewritten in Rust, lsd offers a much richer and more visual experience, with support for colors, icons, tree view, and multiple formatting options. It’s designed as a drop-in replacement for ls, but with a modern approach that significantly improves file listing readability.
The project is inspired by tools like colorls, but goes further by leveraging Rust’s performance and safety. It offers Nerd Fonts integration to display representative icons for files and directories, support for custom themes, and compatibility with multiple platforms (Linux, macOS, and Windows). Ideal for users who frequently work in the terminal and value both aesthetics and clarity in their workflows.
Installation:
winget install lsdAlias for PowerShell. See above in the Terminal section for my
$PROFILE.
# Añadido al .\Documents\PowerShell\Microsoft.PowerShell_profile.ps1
# Cambio el alias interno de ls a lsd https://github.com/lsd-rs/lsd
#
if (Get-Alias ls -ErrorAction SilentlyContinue) {
    Remove-Item Alias:ls -Force
}
function ls {
    lsd --group-directories-first @args
}
- Alias for CMD: I create
C:\Users\luis\cmd_aliases.cmdand then edit mycmd.exeshortcut (in Terminal) and change the target line:%SystemRoot%\System32\cmd.exe /k "C:\Users\Luis\cmd_aliases.cmd"
REM Fichero C:\Users\Luis\cmd_aliases.cmd
@echo off
doskey ls=lsd --group-directories-first $
Colors: To customize lsd colors on Windows, it’s done through the LS_COLORS variable. It took me a while to find this — turns out it’s done with the setx command. Here’s what I did (my colors).
setx LS_COLORS "fi=00:mi=00:mh=00:ln=01;94:or=01;31:di=01;36:ow=04;01;34:st=34:tw=04;34:pi=01;33:so=01;33:do=01;33:bd=01;33:cd=01;33:su=01;35:sg=01;35:ca=01;35:ex=01;32:*.cmd=00;32:*.exe=01;32:*.com=01;32:*.bat=01;32:*.btm=01;32:*.dll=01;32:*.tar=00;31:*.tbz=00;31:*.tgz=00;31:*.rpm=00;31:*.deb=00;31:*.arj=00;31:*.taz=00;31:*.lzh=00;31:*.lzma=00;31:*.zip=00;31:*.zoo=00;31:*.z=00;31:*.Z=00;31:*.gz=00;31:*.bz2=00;31:*.tb2=00;31:*.tz2=00;31:*.tbz2=00;31:*.avi=01;35:*.bmp=01;35:*.fli=01;35:*.gif=01;35:*.jpg=01;35:*.jpeg=01;35:*.mng=01;35:*.mov=01;35:*.mpg=01;35:*.pcx=01;35:*.pbm=01;35:*.pgm=01;35:*.png=01;35:*.ppm=01;35:*.tga=01;35:*.tif=01;35:*.xbm=01;35:*.xpm=01;35:*.dl=01;35:*.gl=01;35:*.wmv=01;35"
Then you need to reboot Windows (yes, you read that right).
I install lsd on all operating systems — Windows, Mac, and Linux, including WSL2. For Windows I follow
Git for Windows
Git for Windows brings git.exe and Git Bash, a tool that provides a Bash emulator for Windows. Yet another terminal, somewhat similar to what you see in a WSL2 Ubuntu terminal, but using a terminal emulator and native Windows executables. We’ll see it.
The main goal is to have access to git.exe from native CMD, PowerShell consoles, and third-party applications. It gets installed in C:\Program Files\Git.
Note: it includes the executable
C:\Program Files\Git\bin\bash.exepero verás que hay otro en el sistemaC:\Windows\System32\bash.exe, so keep this VERY much in mind regarding the PATH order. The second one is what WSL2 uses to launch a shell inside whichever Linux you installed.
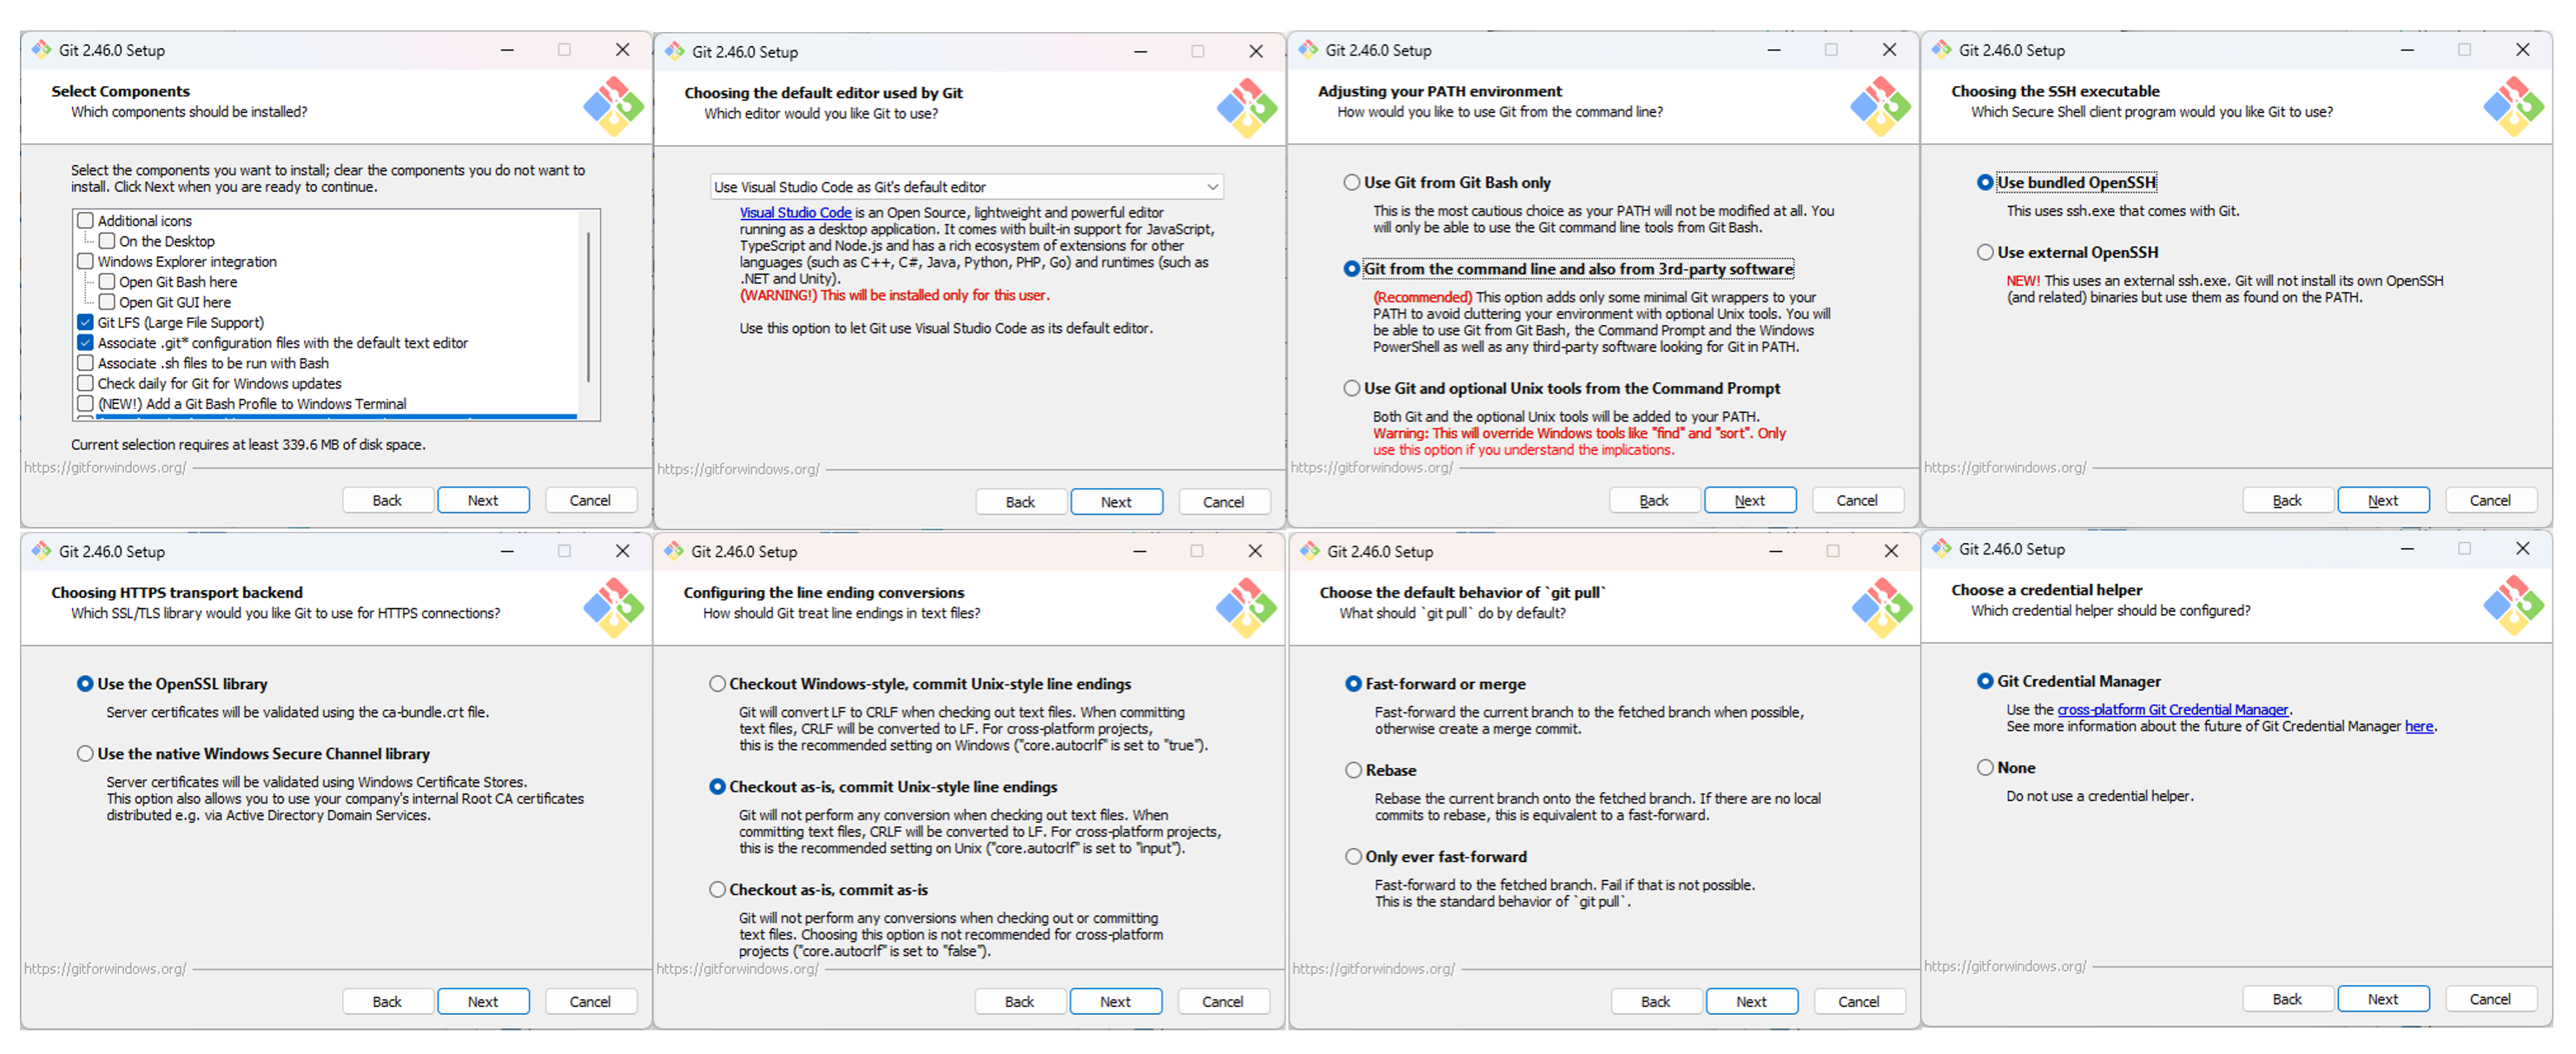
Decisions I made during installation:
- Bundled
ssh&openssl: I select Use the bundled OpenSSH (voids W11 issue) and bundle OpenSSL. When I prepared this post, the Windows 11 SSH version had issues with large Git repositories. - Handling of CRLF: I always select Checkout as-is, commit Unix-style line endings. See the section on CRLF.
- PATH (related to Git Bash): I select Git from the command line and also from 3rd-party software and then manually add that PATH to the system.
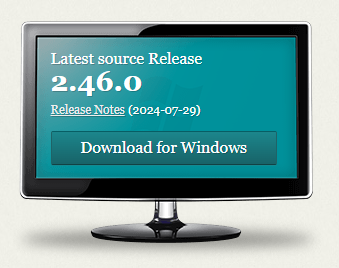
I used version Git-2.46.0-64-bit.exe:
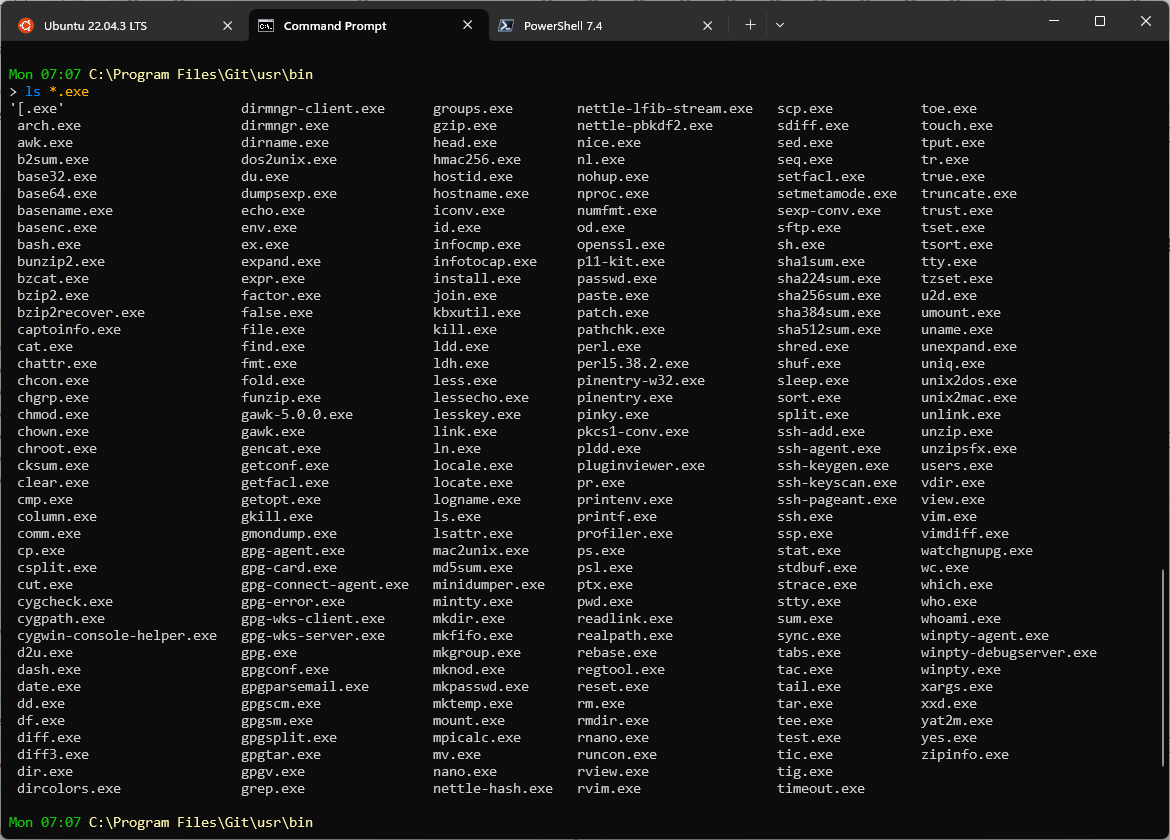
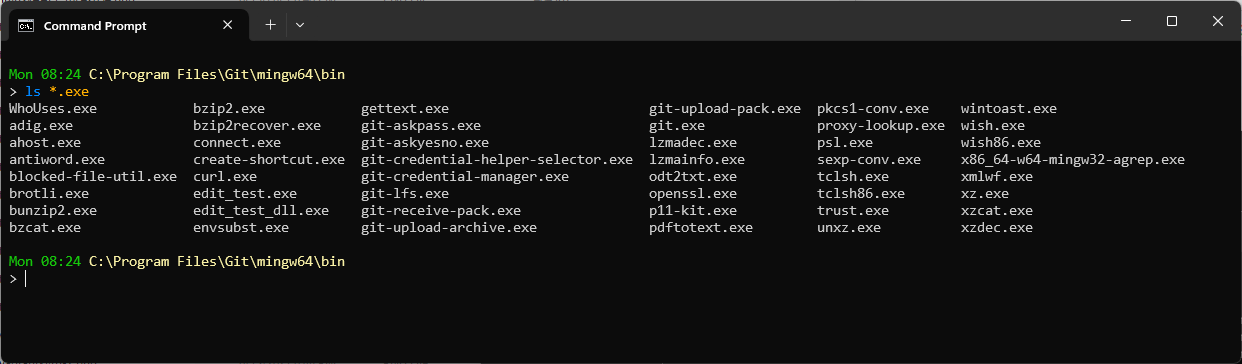
I said no Git Bash, but I do take advantage of everything it brings — it’s amazing, I have a ton of “linux-style” executables available in CMD/PowerShell, so I manually add a couple of directories to the PATH, C:\Program Files\Git\mingw64\bin y C:\Program Files\Git\usr\bin, to the system PATH to have access to these goodies:
Git for Windows also installs MinGW-w64, a fork of MinGW (Minimalist GNU for Windows) that provides a set of tools and a development environment for compiling and running open source applications, mainly in C and C++, on Windows systems. It’s crucial if you compile applications for Windows using traditional GNU/Linux tools and environments.
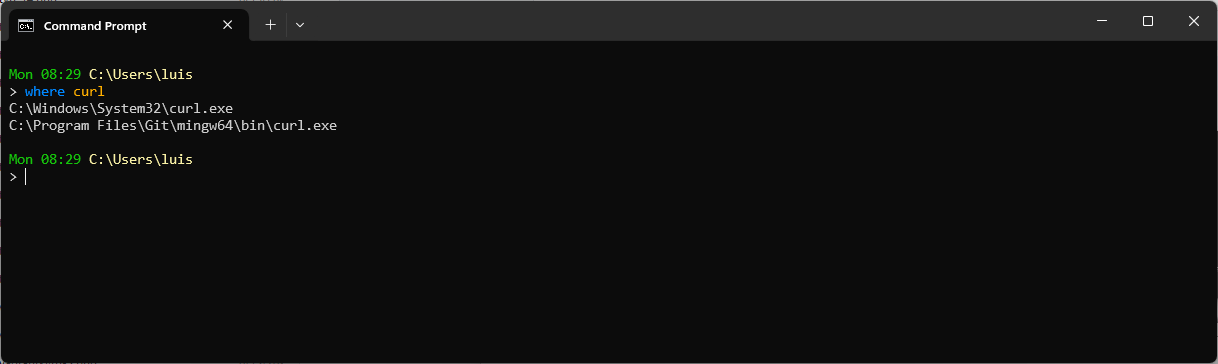
By the way, when you don’t know where the executable is…
Other Tools
Cmder: For reference, a very powerful console that includes the ConEmu emulator (terminal emulator) and also Clink (which I mentioned before). If you’ve installed Git for Windows, it integrates perfectly, with PATH access to all the tools.
I installed it to try it out, but honestly I’m not using it — too many options.
startship.rs: Another alternative, I really liked it when I tried it, but in the end I stick with Oh My Posh. starship Markets itself as “a Prompt for any Shell, minimal, blazingly fast, and highly customizable”. Starship uses special symbols and characters not present in default fonts. For the prompt to display correctly, you need to install a Nerd Font.
The next step is to install the latest version with:
winget install starshipI add the startup script to the Shell
- PowerShell: I add the following to the end of
C:\Program Files\PowerShell\7\Microsoft.PowerShell_profile.ps1(PS7)Invoke-Expression (&starship init powershell)
- CMD: I need Clink installed and operational
- I create the file
C:\Users\luis\AppData\Local\clink\starship.luawith this content load(io.popen('starship init cmd'):read("*a"))()- I delete the file I created in the previous step (Clink):
C:\Users\luis\AppData\Local\clink\prompt_filters.lua
- I create the file
- PowerShell: I add the following to the end of
Fuzzy Finder: The ultimate “fuzzy” finder for the command line. It’s fantastic, and if you combine it with tools like BAT, fd, ripgrep, you reach another level. Here’s how I installed it on Windows. It’s so configurable it deserves its own post — check the link and study it, it’s worth it.
luis@kymeraw:~ ❯ winget install fzf
Found fzf [junegunn.fzf] Version 0.59.0
This application is licensed to you by its owner.
Microsoft is not responsible for, nor does it grant any licenses to, third-party packages.
Downloading https://github.com/junegunn/fzf/releases/download/v0.59.0/fzf-0.59.0-windows_amd64.zip
  ██████████████████████████████  1.73 MB / 1.73 MB
:
Command line alias added: "fzf"
Successfully installed
WSL 2
It deserves its own section — Windows Subsystem for Linux (WSL 2) allows running a Linux environment directly on Windows without needing a virtual machine. You can install Linux distributions (like Ubuntu, Debian, etc.) and use whatever shell you want natively, with extremely high performance, fully integrated with the Windows file system (except for permissions).
luis@kymeraw:/mnt/c/Users/luis$ ls -al
WSL2 uses a lightweight virtual machine with a real, complete Linux kernel, has extremely high performance, is deeply integrated with Windows, allows Linux files and scripts to run from Windows Explorer and vice versa; and very importantly, it has Docker compatibility — in fact WSL2 is the preferred backend for Docker Desktop on Windows (which I’ll install later).
Warning: I’ve found one drawback with WSL2 — when accessing
/mnt/c (C:), if you work in a directory with hundreds or thousands of files, like a large Git repository, it will be very slow. In those cases, which has only happened to me with Git, it’s better to work from CMD or PowerShell.
My WSL2 use cases:
- Have Shell + Tools with native access to
C:\(via/mnt/c). - Have a Linux distro with access to all open source tools available on Linux.
- Match what I use on MacOS o Linux for software development.
- Be able to install Docker Desktop on Windows
- Be able to develop “Server” applications on Linux directly (e.g., things made in Go) on my Windows
Installation process:
- Abrir “Características de Windows” - Win + R,
optionalfeatures. Check the options:- Virtual Machine Platform
- Windows Subsystem for Linux
- Hyper-V (recommended for Docker with WSL2).
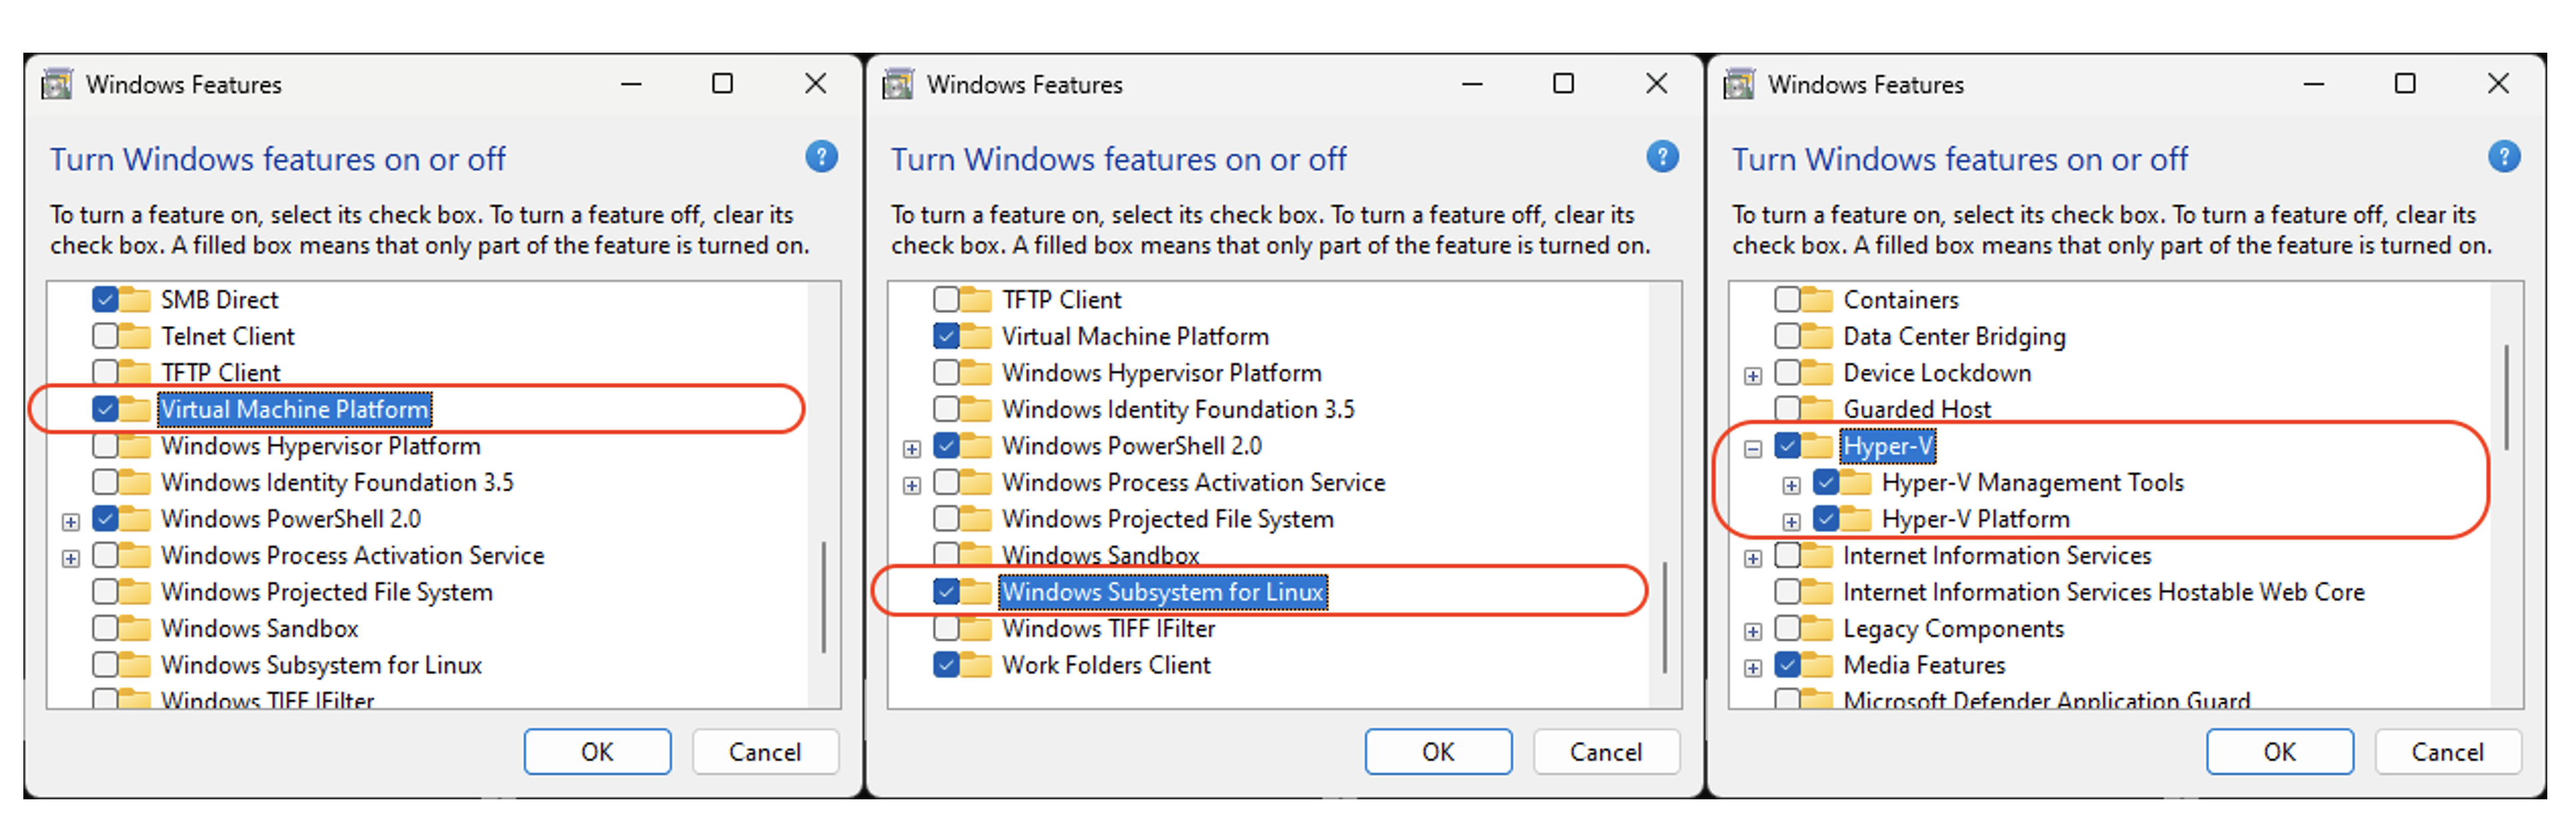
Reboot
Install WSL, from PowerShell as administrator
wsl --installCheck available distributions
wsl --list --onlineInstall a distribution, in my case Ubuntu 24.04 (you could install another like Debian, Kali-Linux, Suse, …). Open PowerShell as Administrator
wsl --install -d Ubuntu-24.04During installation it required updating the Linux kernel:
- I downloaded the WSL 2 Linux kernel update package for x64 machines
- I ran it and rebooted, then had to relaunch the distribution installation, created the Linux user (
luis) and set a password.
wsl --install -d Ubuntu-24.04When it finishes it launches the console with the
bashCLI. I exit withexit, we’ll come back.
Open PowerShell as Administrator, show what I have and make sure it’s always version 2 (in my case not needed, only if you have another version)
wsl --list --verbose
wsl --set-default-version 2
Update
wsl --update
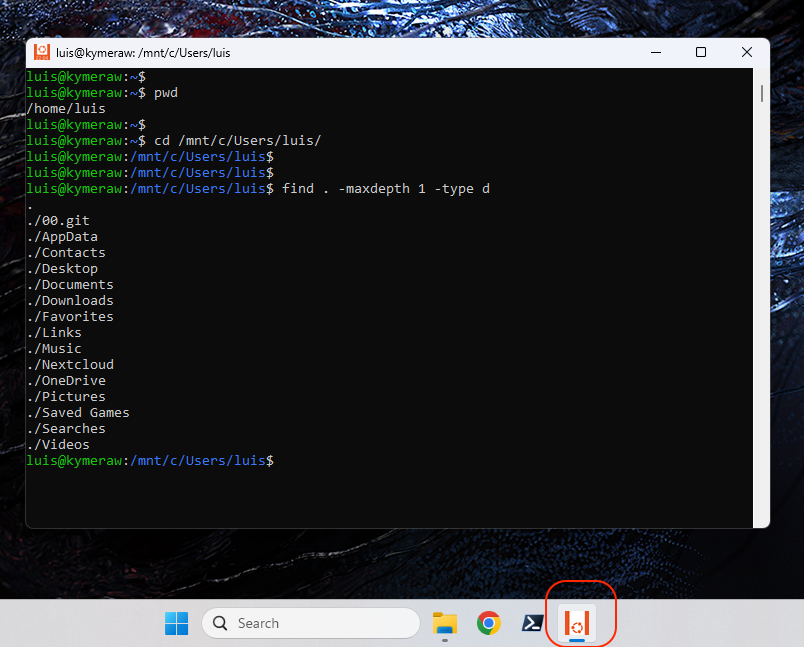
Optionally I can add an Ubuntu icon to the Taskbar. I search in the installed applications list: Start > All > "Ubuntu 24.04" and right-click to Pin to taskbar for quick access to my bash (Ubuntu 24.04 on WSL2). Note: I later removed it, once I installed “Windows Terminal”.
Indeed we’re on a virtual machine with Ubuntu, so I can install any tool I want. The next important thing to do is update it.
luis@kymeraw:~$ sudo apt update && sudo apt upgrade -y
- Change HOME to /mnt/c/Users: I don’t recommend it, but here’s how it’s done.
The only purpose for which you might be interested is so that running “cd” takes you to /mnt/c/Users/
In my case I created an alias to quickly go to the Windows HOME that I put in .bashrc or .zshrc: alias c="cd /mnt/c/Users/<usuario>.
In any case, if you need to change it, here’s how:
- From PowerShell, I ask WSL to start as
root:
PS C:\Users\luis> ubuntu2404.exe config --default-user root
- I open a new shell and change the HOME of
luis
C:\Users\luis> ubuntu2404.exe
root@kymeraw:~# usermod --home /mnt/c/Users/luis/ luis
- I set the default login back to
luis
PS C:\Users\luis> ubuntu2404.exe config --default-user luis
WSL 2 - Fichero /etc/wsl.conf
I mention it in several parts of this post, here’s the final copy I use on my computer — it must be edited in WSL2 as root.
[boot]
systemd=true
[automount]
options = "metadata,uid=1000,gid=1000,umask=022,fmask=11,case=off"
[interop]
enabled=true
appendWindowsPath=false
Important: When you modify this file you need to exit WSL and stop it, wait until it says nothing is running, and start it again. Let’s see an example, where I’m in a WSL2 session in the shell as root.
root@kymeraw:~# exit
logout
luis@kymeraw:~$ exit
logout
PS C:\Users\luis> wsl --shutdown
:
PS C:\Users\luis> wsl --list --running
There are no running distributions.
The options line under [automount] is used to properly set file permissions. Keep in mind that Linux file permissions created on NTFS disk are interpreted in a very specific way. Files/directories created on the NTFS disk (under /mnt/c/Users/<user>) get 777 permissions.
I don’t like that. I want WSL to be consistent, plus there are programs that don’t like such open permissions — SSH is one example. The OpenSSH client needs the directory and files under ~/.ssh to have specific permissions.
The solution is to enable metadata in the WSL advanced configuration, in the /etc/wsl.conf file under the [automount] section.
When I re-enter the shell I make sure my files belong to me (if you changed distributions it could happen that they belong to another user, e.g., ubuntu:lxd).
PS C:\Users\luis>  ubuntu2404.exe
luis@kymeraw:~$ pwd
/mnt/c/Users/luis
luis@kymeraw:~$ sudo chown -R luis:luis /mnt/c/Users/luis
[sudo] password for luis:
WSL 2 - Fichero USERPROFILE/.wslconfig
This is optional, but I always do it. I find the NAT situation in WSL2 annoying. I optimize the WSL 2 network stack by enabling Mirrored mode, which removes the traditional NAT architecture so the Linux instance directly shares the Windows host’s network interface and IP identity, allowing applications running in WSL to be accessible from the LAN without port forwarding. Additionally, it enables dnsTunneling to improve DNS resolution stability (especially useful under VPNs) and activates firewall synchronization, ensuring Windows Firewall security rules automatically apply to the Linux instance’s traffic for integrated protection.
I create the file C:\Users\luis\.wslconfig in the root of my Windows user directory.
[wsl2]
networkingMode=mirrored
dnsTunneling=true
firewall=true
Important: exit WSL2 completely and shut it down before reopening it.
root@kymeraw:~# exit
logout
PS C:\Users\luis> wsl --shutdown
PS C:\Users\luis> net stop wslservice
PS C:\Users\luis> net start wslservice
If you get any errors when reopening the WSL2 session, reboot the machine — that usually fixes it.
WSL 2 - Cambio a ZSH
The default shell in Ubuntu for WSL2 is bash but as I explained in ¡Adiós Bash, hola Zsh!, I switch to zsh (an interesting post). I also install “tmux”, an extremely powerful optional terminal multiplexer.
First zsh
luis@kymeraw:~$ sudo apt update && sudo apt upgrade -y
luis@kymeraw:~$ sudo apt install zsh
I check available shells
luis@kymeraw:~$ cat /etc/shells
:
/bin/zsh
/usr/bin/zsh
I change the default shell
luis@kymeraw:~$ chsh -s $(which zsh)
Password:
I exit and re-enter. The first time you enter with zsh it offers help to create the .zshrc file. In my case I already have one because I use the same one for macOS, Linux, and now Windows. I download ~/.zshrc and copy it to the HOME /mnt/c/Users/luis.
I install tmux, which I regularly use:
sudo apt install tmux
Here’s my ~/.tmux.conf, which I also copy to the HOME (/mnt/c/Users/luis).
WSL 2 - Scripts
I install my scripts that I regularly use on all Linux/macOS,
- Script /usr/bin/e
- Fichero /etc/nanorc customized for
nano- *Creo los directorios de backup (
sudo mkdir /root/.nanoymkdir ~/.nano
- *Creo los directorios de backup (
- Script /usr/bin/confcat, a cat without comment lines
- Script /usr/bin/s to switch to root much faster
- *I add my user to sudoers
- *
echo 'luis ALL=(ALL) NOPASSWD:ALL' > /etc/sudoers.d/90-mi-usuario
- Change permissions:
- *
sudo chmod 755 /usr/bin/e /usr/bin/confcat /usr/bin/s
- *
- Create the directory
mkdir ~/.nanofor both root and my user
WSL 2 - Cliente SSH
To be able to connect from the WSL2 console to remote machines.
- I verify that the OpenSSH client is installed (this PowerShell session as Administrator)
Get-WindowsCapability -Online | ? Name -like 'OpenSSH*'
- I create the public/private key pair in the Windows HOME directory. The reason is that I normally use the Windows SSH client.
PowerShell 7.4.5
C:\Users\luis> ssh-keygen.exe -t ed25519 -a 200 -C "luis@kymeraw" -f $env:USERPROFILE\.ssh\id_ed25519_luispa

PowerShell 7.4.5
C:\Users\luis> ssh-keygen.exe -t ed25519 -a 200 -C "luis@kymeraw" -f %USERPROFILE%\.ssh\id_ed25519_luispa

WSL2
C:\Users\luis> ssh-keygen -t ed25519 -a 200 -C "luis@kymeraw" -f /mnt/c/Users/luis/.ssh/id_ed25519_luispa
Here’s a link to another very interesting post, Git multicuenta, where I cover SSH as an alternative.
WSL 2 - Servidor SSH
Let’s see the SSH server activation process. First I verify if OpenSSH is installed. Then I add the OpenSSH Server:
Get-WindowsCapability -Online | ? Name -like 'OpenSSH*'
:
Add-WindowsCapability -Online -Name OpenSSH.Server~~~~0.0.1.0
I start the service, check it, and configure it to always start at boot
Start-Service sshd
Get-Service sshd
Set-Service -Name sshd -StartupType 'Automatic'
The SSH Server runs on Windows (not in WSL2/Ubuntu), therefore the credentials are Windows ones — my LOCAL user luis (I don’t use Microsoft Account) and its password is the Windows one. The sshd_config file is located at C:\ProgramData\ssh\sshd_config.
In my case I disable using the administrators_authorized_keys file because I prefer it to use the one in my user luis’s HOME at C:\Users\luis\.ssh\authorized_keys
AuthorizedKeysFile .ssh/authorized_keys
AcceptEnv LANG LC_*
Subsystem sftp sftp-server.exe
#Match Group administrators
# AuthorizedKeysFile __PROGRAMDATA__/ssh/administrators_authorized_keys
I edit it and restart the service
notepad C:\ProgramData\ssh\sshd_config
Restart-Service sshd
I edit the accepted keys in authorized_keys
notepad C:\ProgramData\ssh\administrators_authorized_keys
I check if port 22 is open. If you need to check, here’s a script VerificarPuertoFirewall.ps1. In my case it was already open; if you need to open the port in the firewall use the following command.
New-NetFirewallRule -DisplayName "Allow SSH Port 22" -Direction Inbound -Protocol TCP -LocalPort 22 -Action Allow
From now on I can connect to my Windows perfectly from any other machine on the network. If you notice, I connect directly to WSL2 — keep reading…

Optional: By default, if we activate the SSH Server on Windows, when we connect it will redirect us to a cmd.exe session, but you can change it so clients access the WSL2 shell directly. Important: never use the WSL executables that are also under C:\Users\luis\AppData\Local\Microsoft\WindowsApps or it will take many seconds to show the prompt. I run from PowerShell as administrator.
New-ItemProperty -Path "HKLM:\SOFTWARE\OpenSSH" -Name DefaultShell -Value "C:\Windows\System32\wsl.exe" -PropertyType String -Force
WSL 2 - CRLF vs LF
When working in software development, one of the most subtle yet crucial aspects to keep in mind is the difference between line endings in text files between Windows and Linux.
In this post CRLF vs LF you can find how I handle this topic.
WSL 2 - Oh-My-Posh
I talked about Oh-My-Posh in the Improved Terminal section. Check that section.
WSL 2 - Cambiar UID/GID
During installation I had a problem, the first time it installed Ubuntu22.04 and assigned my user luis UID/GID 1000:1000, I enabled metadata as I mentioned before for permission management and everything under /mnt/c became owned by 1000:1000. So far so good.
The problem came when installing Ubuntu24.04 and removing 22.04. I noticed it creates by default the user ubuntu and group lxc with UID/GID 1000, and assigned 1002 to user luis. That caused a huge permissions mess.
Here’s what I did to fix it:
PS > wsl --install Ubuntu24-04
PS > ubuntu2404.exe config --default-user root
PS > wsl --shutdown
PS > ubuntu2404.exe

nano /etc/group cambié los gid
lxc 1000 -> 1001
ubuntu 1001 -> 1002
luis 1002 -> 1000

nano /etc/passwd cambié los uid
ubuntu 1000 -> 1002
luis 1002 -> 1000

cd /home
chown -R luis:luis luis
chown -R ubuntu:ubuntu ubuntu
I review the configuration file. Here’s a copy: /etc/wsl.conf.
PS > ubuntu2404.exe config --default-user luis
PS > wsl --shutdown
PS > ubuntu2404.exe
Note: To search for permissions without it taking forever going into /mnt/c, I use the following command:
cd /
find . -not \( -path "./mnt*" -type d -prune \) -user ubuntu
Modifying the PATH
Windows PATH (for CMD, PowerShell):
See the note about PATH I put at the beginning of this post.
WSL2:
In my case I prefer WSL2 not to add all Windows PATH entries to the Linux one, I modify /etc/wsl.conf and add the section:
[interop]
appendWindowsPath=false
Here’s a copy: /etc/wsl.conf.
- I exit WSL, shut it down (
wsl --shutdown), re-enter and edit~/.bashrcor.zshrc. Here’s an example of how it looks (I’m selective about what I want from the Windows PATH in my WSL2 session).
⚡ luis@kymeraw:~ % echo $PATH
/mnt/c/Users/luis/.gems/bin:.:/mnt/c/Users/luis/Nextcloud/priv/bin:/usr/local/bin:/usr/local/sbin:/usr/local/go/bin:/usr/local/sbin:/usr/local/bin:/usr/sbin:/usr/bin:/sbin:/bin:/usr/games:/usr/local/games:/usr/lib/wsl/lib:/mnt/c/Windows/System32:/mnt/c/Windows:/mnt/c/Windows/System32/wbem:/mnt/c/Windows/System32/WindowsPowerShell/v1.0:/mnt/c/Program Files/PowerShell/7
From here starts the second part of the post — installing tools and programming languages.
A note regarding .NET — I leave it for the end. I start with cross-platform tools, because I believe they should be installed on every development machine (whether Windows, Linux, or Mac), continue with the languages I’ve chosen for my Windows, and leave .NET and Visual Studio for last.
Cross-Platform Tools
VSCode
I install it from the official Visual Studio Code site. I’d say it’s the most powerful source code editor I’ve ever seen, with support for hundreds of very useful extensions, the ability to open different integrated terminals within the same VS Code window, like CMD, PowerShell, Git Bash, or WSL.
Additionally, it supports a wide variety of programming languages and the ability to work with remote machines.
Settings and Sync: Check out the post VSCode settings y extensiones where I maintain how I manage it and my configuration.
I create a kind of alias — on Linux and Mac I like to create an alias called “e” (for editor) to call my preferred editor. From an Administrator session I edit the script c:\windows\e.cmd. Now I have my alias, valid for cmd and PowerShell
@echo off
"C:\Users\luis\AppData\Local\Programs\Microsoft VS Code\bin\code.cmd" %*
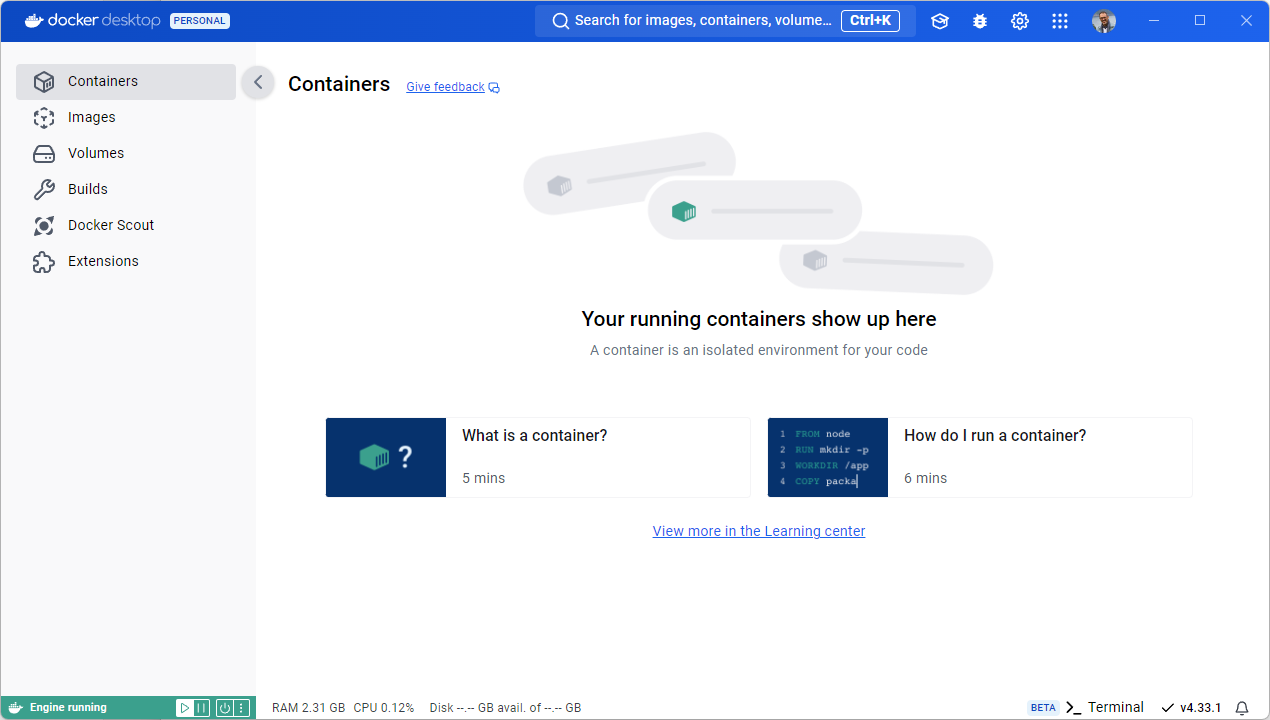
Docker Desktop
It allows the creation and management of containers, which is essential for developing and deploying applications in isolated environments. Very useful when you’re developing services (e.g., in Go, NodeJS).
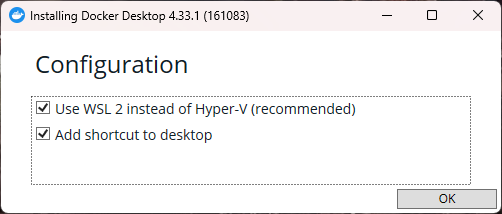
My use cases are various — running containerized processes (e.g., a database), dockerizing developed services (e.g., in Go or NodeJS), CI testing for DevOps, microservices labs, etc. I install from the official Docker site. Its integration with WSL2 is fundamental and having prepared it beforehand helps us have a smooth installation.
During the installation process I select to use WSL2 instead of Hyper-V
WSL2 Integration
The integration with WSL2 is immediate — you don’t have to do anything. Well, almost nothing. There’s an important topic: “The context”.
When entering a WSL2 session it’s important to be in the correct Docker context. If you don’t have the correct one you may encounter the error Failed to initialize: protocol not available.
PS > ubuntu2404.exe

$ docker ps -a
Failed to initialize: protocol not available

$ docker context ls
NAME              DESCRIPTION                               DOCKER ENDPOINT                             ERROR
default           Current DOCKER_HOST based configuration   unix:///var/run/docker.sock
desktop-linux *   Docker Desktop                            npipe:////./pipe/dockerDesktopLinuxEngine
In this case we’re in the context desktop-linux which will cause WSL2 to not communicate correctly with Docker. You can change context with the command docker context use default but it won’t be permanent. The best approach is to edit the file ~/.docker/config.json
notepad.exe C:\Users\<tu-usuario>\.docker\config.json
:
        "currentContext": "default",
:
From this moment on it will work correctly
PS > ubuntu2404.exe

$ docker context ls
NAME            DESCRIPTION                               DOCKER ENDPOINT                             ERROR
default *       Current DOCKER_HOST based configuration   unix:///var/run/docker.sock
desktop-linux   Docker Desktop                            npipe:////./pipe/dockerDesktopLinuxEngine

$ docker ps -a
CONTAINER ID   IMAGE     COMMAND   CREATED   STATUS    PORTS     NAMES
:
CUIDADO!! si has cambiado el HOME de WSL 2 a /mnt/c/Users/<usuario> cada vez que arranques Docker sobreescribe el fichero C:\Users\<usuario>\.docker\config.json por lo que es inútil editarlo. La solución consiste en eñadir docker context use default al final de tu .bashrc/.zshrc |
Postman
You can install from the official Postman site. It’s a well-known tool for testing and documenting APIs. Very useful for developers who work with web services. In my case, I’m keeping it in reserve for now — I might install it later.
HTTPie
Very much in line with Postman, I recently found this other tool — it supports working from both the command line and GUI to make HTTP requests, designed to be simple and easy to use, ideal for testing and debugging APIs quickly and efficiently. I like it more than Postman, especially the command-line part. I install it from the official HTTPie site.
You need to install Chocolatey, a very powerful package manager for Windows. I installed it to install httpie, but for now I’m not using it for anything else — I admit I need to look into it more.
Programming Languages
Python, pip, pipx, venv
python is an interpreted, versatile, and easy-to-learn programming language. What I like most is that it’s very readable and supports multiple paradigms like object-oriented, functional, and imperative programming. Many tools need it and it has many use cases. Although I rarely use it directly, I always install it.
pip is an essential tool for managing Python packages. It’s the system used to install and manage third-party libraries from the Python Package Index (PyPI), Python’s official repository.
pipx is the most recommended option for installing CLI applications you want to use from anywhere. It automatically creates an isolated virtual environment for each application, installs it with its dependencies in that environment, and adds the executable to your PATH.
venv venv is a module included in Python that allows creating virtual environments. A virtual environment is an isolated space on the system where you can install Python packages and libraries independently, without affecting or being affected by other Python installations on the system.
Install directly from python.org. Always install a stable version. I personally prefer to install the one with the most precompiled “wheels”, so you save yourself from having to compile packages (when you pip install ...). For example, when version 3.14 came out, I still use the stable 3.13.
Before running the installer: Important: remove the default aliases Windows 11 has for python.exe or python3.exe. Go to Search > “Manage app execution aliases”. Disable both “python” and “python3” aliases.

During installation I select the following options, to have py.exe, python.exe available from any terminal.
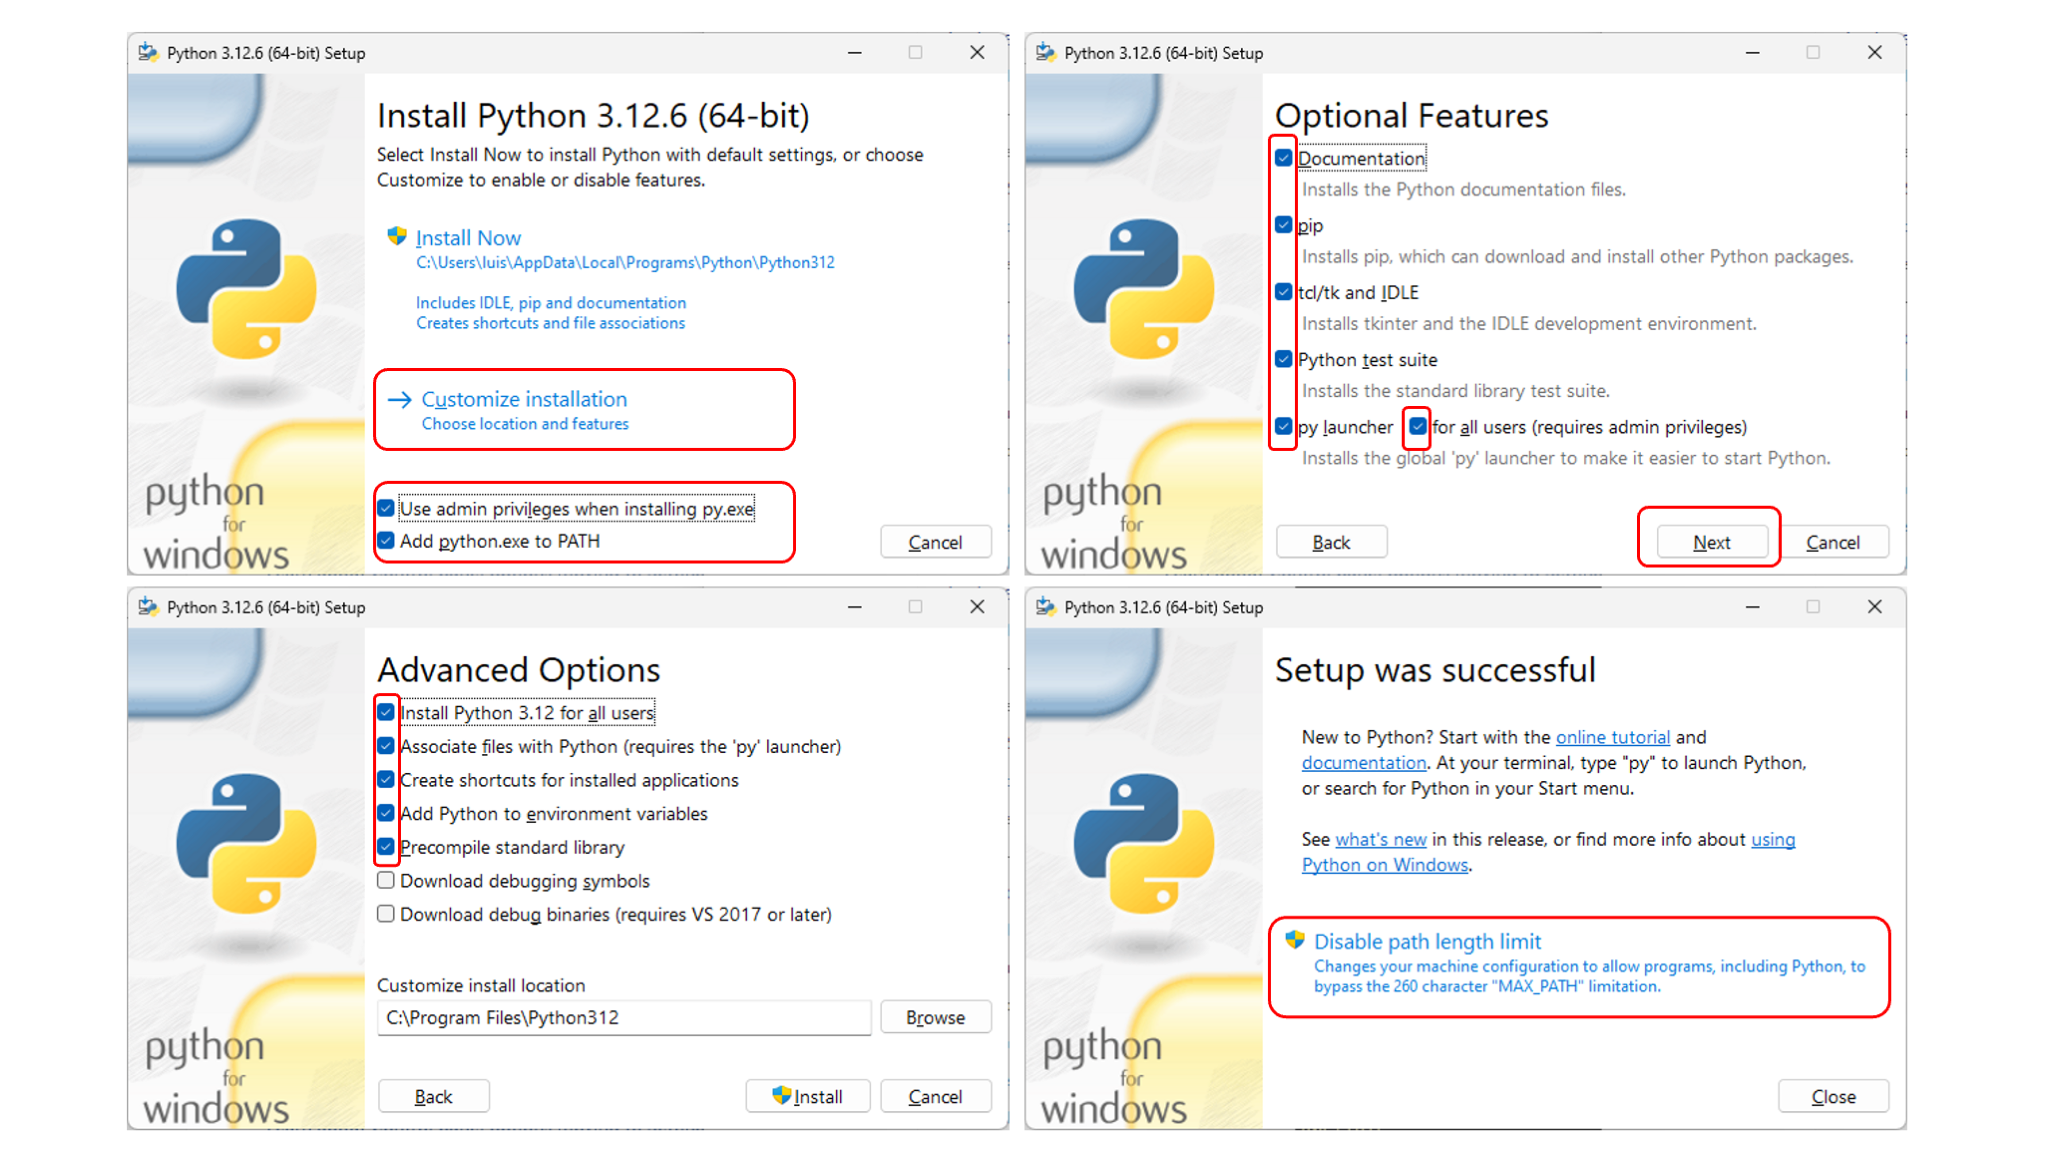
I also create an alias for python3, I create the script c:\windows\python3.cmd.
@echo off
"C:\Program Files\Python312\python.exe" %*
Install pip:
C:> py get-pip.py
Install pipx:
scoop install pipx
pipx ensurepath
Install a global application with pipx:
This is not for development, but for when you need to install a Python CLI application you want to use from anywhere. pipx makes your life easier — it automatically creates an isolated virtual environment, installs the app with its dependencies in that environment, and adds the executable to your PATH.
- Each application has its own isolated dependencies
- No conflicts between different applications
- You can use the application from any terminal without activating any environment
- It’s cleaner and safer than installing globally with
pip
Let’s see an example. I’m going to install the program pdfly on my Windows. By the way, here’s a post about pdfly, la navaja suiza para PDF’s.
What pipx will do is create .local\bin\pdfly.exe, a small wrapper program (technically known as a wrapper or shim) that acts as a bridge. When you run it, it looks for where its virtual environment is (<home>\pipx\venvs), locates the Python interpreter inside that environment and passes the pdfly startup script to be executed.
[🪟] luis@kymeraw:~ ❯ pipx install pdfly

# Añado .local\bin a mi PATH
[🪟] luis@kymeraw:~ ❯ pipx ensurepath

# Salgo y vuelvo a entrar en el terminal
[🪟] luis@kymeraw:~ ❯ where pdfly
c:\Users\luis\.local\bin\pdfly.exe
Working in a virtual environment with venv:
This is what you’ll normally always want to do — as a developer it’s better to have virtual environments for each application.
venv allows creating a virtual environment, but what is it for?
- Dependency isolation: Avoids conflicts between packages installed for different projects. For example, one project may require Django 3.2, while another needs Django 4.0.
- Project management: Each project can have its own environment with the specific package versions it needs.
- Avoids global system issues: Doesn’t modify or depend on the global Python installation or its packages.
Prepare the environment for Python
- Create the environment
python -m venv myenv - Activate the environment:
- *Windows:
.\myenv\Scripts\Activate.ps1o.\myenv\Scripts\Activate.bat - *macOS/Linux:
source myenv/Scripts/activate
- *Windows:
- Install packages:
pip install idna - Create requirements.txt:
pip freeze > requirements.txt - Future installations from requirements.txt:
pip install -r requirements.txt - Deactivate the environment:
- *Windows:
.\myenv\Scripts\deactivate.bat - *macOS/Linux:
myenv/Scripts/deactivate
- *Windows:
An example of the first time on Windows:
python -m venv myenv
.\myenv\Scripts\Activate.ps1
pip install requests idna
pip freeze > requirements.txt
VSCode: I go to a project directory, activate the environment, start VSCode and select the interpreter
.\myenv\Scripts\Activate.ps1
code .
Select the correct interpreter. Command Palette (Ctrl+Shift+P) > Python: Select Interpreter. I select the Global C:\Program Files\Python312\python.exe
Proof of concept: Let’s see a mini project, a single source file called main.py under the virtual environment pipenv, with a single library requests.
luis@kymeraw:tmp ❯ cd prueba
luis@kymeraw:prueba ❯ python -m venv myenv
luis@kymeraw:prueba ❯ .\myenv\Scripts\Activate.ps1
luis@kymeraw:prueba via 🐍 v3.12.8 (myenv) ❯
I create the source with notepad main.py
import requests
response = requests.get('https://httpbin.org/ip')
print('Tu dirección IP es: {0}'.format(response.json()['origin']))
I install dependencies
luis@kymeraw:prueba via 🐍 v3.12.8 (myenv) ❯ notepad main.py
luis@kymeraw:prueba via 🐍 v3.12.8 (myenv) ❯ cat .\main.py
import requests
response = requests.get('https://httpbin.org/ip')
print('Tu dirección IP es: {0}'.format(response.json()['origin']))

luis@kymeraw:prueba via 🐍 v3.12.8 (myenv) ❯ pip install requests
Collecting requests
:
Successfully installed certifi-2024.12.14 charset-normalizer-3.4.1 idna-3.10 requests-2.32.3 urllib3-2.3.0
luis@kymeraw:prueba via 🐍 v3.12.8 (myenv) ❯
I run the proof of concept with python main.py
luis@kymeraw:prueba via 🐍 v3.12.8 (myenv) ❯ python.exe .\main.py
Tu dirección IP es: 12.138.199.230
Updating
To update:
- Python - I download the latest version from python.org and run the installer.
- Pip:
py -m ensurepip --upgrade - Pipx:
scoop update pipx - Programas CLI instalados con
pipx:pipx upgrade-all
C/C++
Since this is a cross-platform post, for C/C++ work I choose the Clang compiler, it belongs to the LLVM (Low-Level Virtual Machine) project. It’s a C, C++, and Objective-C compiler. It’s modular, fast, and definitely cross-platform.
In the C++ Support in Clang table you can see which version of the ISO C++ standard Clang supports and more importantly, the implementation status of the language standard (C++98, C++11, …, C++2x).
If you want to see an example of a cross-platform project with Clang, check out git-repo-eol-analyzer, it works on Windows, Linux, and macOS.
To install, download and install LLVM X.X.X from the official Releases. As an example, here’s a direct link to LLVM 64bits 21.1.2 para Windows).
CMake
Closely linked to C/C++, CMake is an open source tool that manages the configuration and generation of build scripts for cross-platform projects. It allows abstracting platform-specific configurations, simplifying the creation of build files (Makefiles, Visual Studio projects, etc.). In C++ projects on Windows, CMake integrates perfectly with VSCode, allows automatic project generation, etc.
To install on Windows: from the official site, I download the Windows x64 Installer. I also recommend installing Ninja (Generator) from its official repository and saving it in a directory already in your PATH.
The basic CMake process consists of two steps:
Configure: Analyzes the
CMakeLists.txtfile, creates all specific scripts and files so the system can then generate (compile) the code. The configuration result is placed in the ./build subdirectory.Build: From the previous step, CMake compiles for the development environment and system we’re on, for example a project with a
Makefileor more complex setups.
CMake follows a declarative approach — you define what the project needs (sources, libraries, dependencies) in the CMakeLists.txt file. Check out the one I created in the project mentioned above: git-repo-eol-analyzer.
Golang
Golang is a language that combines the simplicity and efficiency of older languages like C with the modern features needed for concurrent and high-performance software development. It’s especially popular in developing distributed systems, cloud services, and network tools, thanks to its focus on concurrency and scalability.
- To install on Windows, go to the Go downloads page, I download the latest MSI version for windows-amd64, it installs by default to
C:\Program Files\Go\binwhich it adds to the PATH. - To integrate with VSCode I install the extension
golang.go.
Some critical variables for an efficient Go development environment:
$GOROOT: Installation path (por defectoC:\Program Files\Go).$GOPATH: Default working directoryC:\Users\<usuario>\go.- The installation adds to PATH
$GOROOT\biny$GOPATH\bin.
Starting from Go 1.11, the Go Modules system was introduced to manage dependencies more efficiently. I enable it with go env -w GO111MODULE=on and create a small program to verify everything is working.
I initialize the project module:
go mod init hola
I create the main.go file:
package main

import "fmt"

func main() {
    fmt.Println("Hola, mundo")
}
I compile and run, then compile the binary hola.exe
go run main.go

go build
.NET
Talking about .NET gets a bit confusing unless you’ve lived through and experienced its entire evolution. As of today we have:
.NET Framework: Only available on Windows. Its last version, where it stopped, is 4.8, mainly to ensure compatibility with existing applications that require .NET Framework.
- *It’s exclusive to Windows. It installs files and dependencies in OS-specific directories (como
C:\Windows\Microsoft.NET\Framework). It uses the Global Assembly Cache (GAC) to manage shared libraries.
- *It’s exclusive to Windows. It installs files and dependencies in OS-specific directories (como
.NET 5+: The future — it unifies the .NET Core, .NET Framework, and Xamarin platforms, has better performance, new features, and is cross-platform: Windows, Linux, and macOS. In November 2024, version 9 was released!!!
.NET Framework
.NET Framework is a development platform created by Microsoft designed specifically for building and running Windows applications. It includes an extensive set of class libraries and support for technologies like desktop applications (Windows Forms, WPF), web services, or web applications through “ASP.NET”.
Its popularity lies in being the foundation for countless enterprise and consumer applications developed over the last two decades. However, its active lifecycle ends with version 4.8.
Why install .NET Framework 4.8?
Compatibility: Many applications developed for Windows still depend on this version, even modern tools (like HTTPie) require the runtime to be present.
Support: Even if you don’t plan to run older applications that depend on versions like .NET 2.0 or 3.5, version 4.8 ensures you can use current and compatible software.
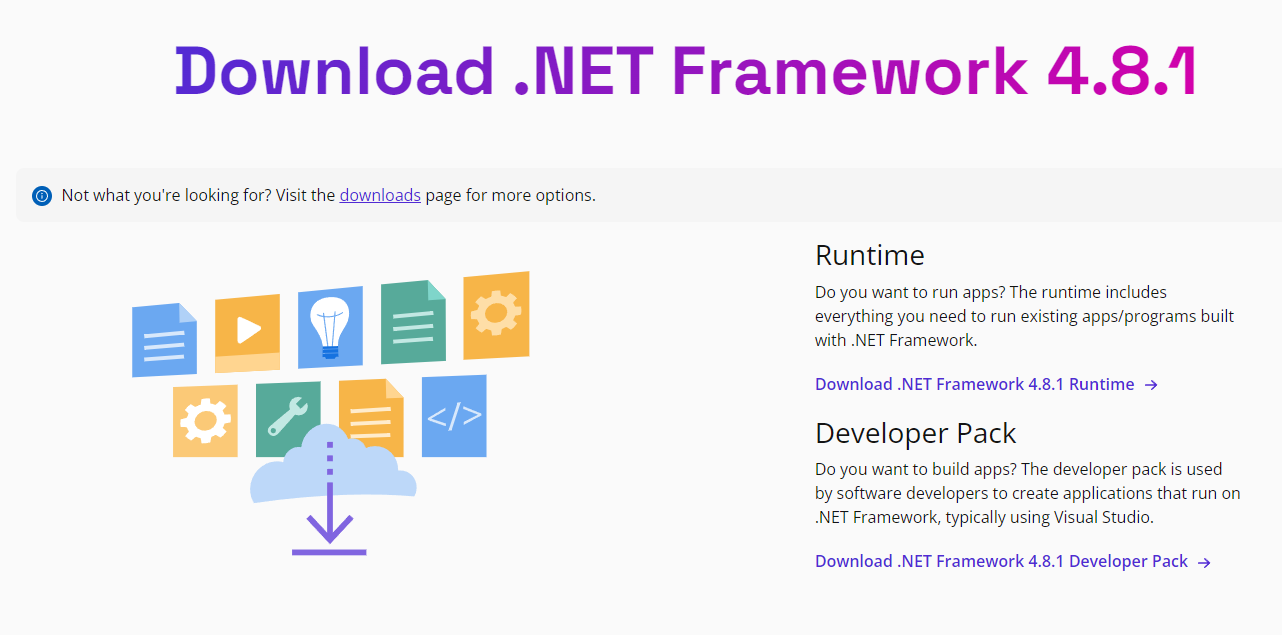
Development requirements: If you’re developing or maintaining .NET Framework-based applications, you’ll need the Developer Pack (which includes the runtime).
In summary, although .NET Framework will no longer evolve beyond version 4.8, it remains crucial for ensuring compatibility with the current Windows ecosystem.
To install .NET Framework 4.8, go to Programs and Features in the control panel or from the Microsoft website. If using the first method, I first check what I have and then install.
- Abro Control Panel > Programs > Programs and Features > Turn Windows features on or off.
- Here you can see the installed .NET Framework versions.
- In the features list, look for available .NET Framework versions (por ejemplo, .NET Framework 3.5 o .NET Framework 4.8).
- Check the box next to the version you want to install.
- Click OK and wait for Windows to complete the installation.
If the version is not in the list, I can go to the Microsoft website, (ejemplo para la 4.8.1). If you’re going to do development, install the Developer Pack.
You can check which version you have installed and the number shown on the .NET Framework versions and dependencies:
Get-ChildItem 'HKLM:\SOFTWARE\Microsoft\NET Framework Setup\NDP\v4\Full' | Get-ItemPropertyValue -Name Release
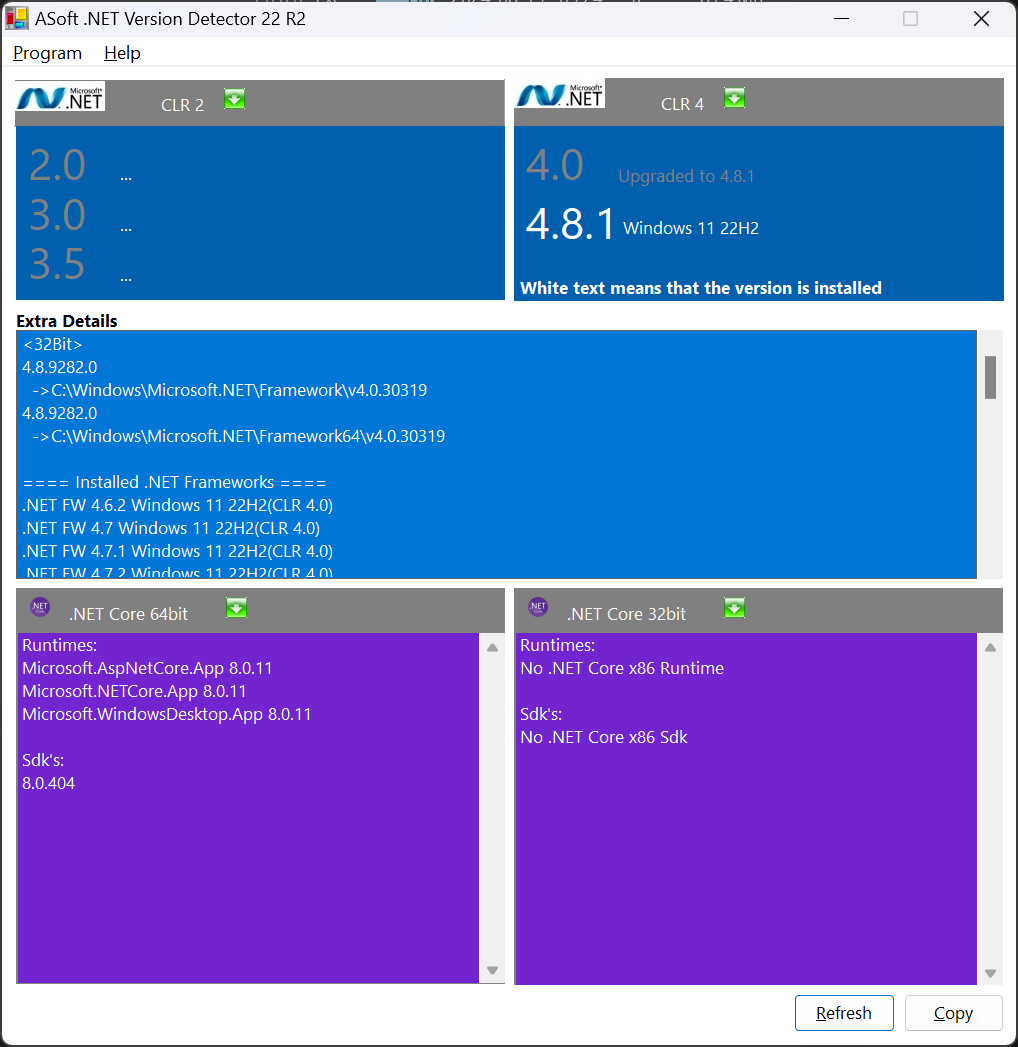
You can use the tool .NET Version Detector, a lightweight tool that provides information about the different versions of Microsoft .NET and .NET Core installed on a machine.
dotnetver.exe
.NET 5+
The natural evolution and unification of .NET Core, .NET Framework, and Xamarin, consolidating them into a single modern cross-platform platform.
- .NET Core: It focused on being a modern cross-platform platform, but coexisted with .NET Framework (without including all its APIs) and Xamarin, creating some fragmentation in the ecosystem. “.NET” Core terminó oficialmente con su versión 3.1LTS.
- .NET Framework: We’ve already seen this in the previous section.
- Xamarin: Allows creating native applications for Android, iOS, and macOS using C# and platform-specific user interfaces
.NET 5+ unifies the capabilities of .NET Core, .NET Framework, and Xamarin under a single name and development model. It simplifies life for developers by providing a single platform to build desktop, mobile, web, cloud services, IoT applications, and more. The name Core disappears and the numbering jumps from 3.1 to 5 to avoid confusion with .NET Framework and mark a new beginning.
These are the steps to install the latest .NET version on Windows (versiones 5+, que en Abril de 2025 ya iba por la 9.0.4). Before starting, beware because it collects usage data. More info here on how to opt out.
- My first step is to stop that telemetry (even before installing it):
- *
Start>Settings > System > About > Advance System Settings - *o bien
Search> “Advance System Settings” o “Environment Variables”
- *
- Modify in
System variablesadding the variableDOTNET_CLI_TELEMETRY_OPTOUTcon valor1otrue
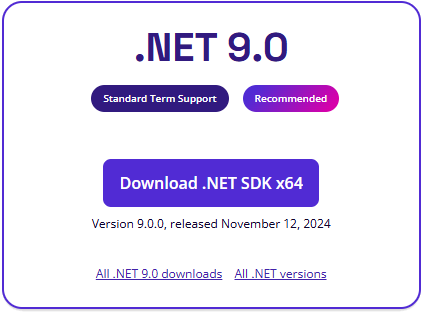
I download the latest version and start the installation:
From the official downloads page:
- dotnet.microsoft.com/download.
- Select the .NET version you want to install (Runtime or SDK). In my case SDK because I’m going to develop applications.
Download the installer:
- Choose the option for your operating system (Windows x64 for most users).
Run the installer:
- Follow the on-screen instructions to complete the installation. If updating, I choose “Repair”.
- In my case the following products were installed (April ‘25 update):
- SDK de .NET 9.0.203
- .NET Runtime 9.0.4
- ASP.NET Core Runtime 9.0.4
- .NET Windows Desktop Runtime 9.0.4
Resource Links
- Documentación de .NET https://aka.ms/dotnet-docs
- Documentación de SDK https://aka.ms/dotnet-sdk-docs
- Notas de la versión https://aka.ms/dotnet9-release-notes
- Tutoriales https://aka.ms/dotnet-tutorials
I verify the installation, which by the way installs to C:\Program Files\dotnet
luis@kymeraw:~ ❯ dotnet --version
9.0.203
With .NET installed, you can easily create your first C# program using the .NET CLI.
- Open a terminal (CMD, PowerShell, or terminal in your code editor).
- Navigate to the directory where you want to create the project:
luis@kymeraw:tmp ❯ dotnet new console -n HolaMundo
The template "Console App" was created successfully.

Processing post-creation actions...
Restoring C:\Users\luis\tmp\HolaMundo\HolaMundo.csproj:
Restore succeeded.
luis@kymeraw:tmp ❯ cd .\HolaMundo\
This is the program it generates
// See https://aka.ms/new-console-template for more information
Console.WriteLine("Hello, World!");
luis@kymeraw:HolaMundo ❯ dotnet run
Hello, World!
To create an executable
luis@kymeraw:HolaMundo ❯ dotnet build
Restore complete (0,1s)
  HolaMundo succeeded (0,1s) → bin\Debug\net9.0\HolaMundo.dll

Build succeeded in 0,5s
luis@kymeraw:HolaMundo ❯ .\bin\Debug\net9.0\HolaMundo.exe
Hello, World!
Remove SDK/Runtime Versions
When working with .NET on Windows, especially in active development environments, it’s common to accumulate multiple SDK and runtime versions. Here I show you how to see which versions you have installed and how to uninstall the ones you no longer need. From the terminal, to see the SDKs and Runtimes:
luis@kymeraw:~ ❯ dotnet --list-sdks
8.0.408 [C:\Program Files\dotnet\sdk]
9.0.105 [C:\Program Files\dotnet\sdk]
9.0.203 [C:\Program Files\dotnet\sdk]

luis@kymeraw:~ ❯ dotnet --list-runtimes
Microsoft.AspNetCore.App 8.0.15 [C:\Program Files\dotnet\shared\Microsoft.AspNetCore.App]
Microsoft.AspNetCore.App 9.0.4 [C:\Program Files\dotnet\shared\Microsoft.AspNetCore.App]
Microsoft.NETCore.App 8.0.15 [C:\Program Files\dotnet\shared\Microsoft.NETCore.App]
Microsoft.NETCore.App 9.0.4 [C:\Program Files\dotnet\shared\Microsoft.NETCore.App]
Microsoft.WindowsDesktop.App 8.0.15 [C:\Program Files\dotnet\shared\Microsoft.WindowsDesktop.App]
Microsoft.WindowsDesktop.App 9.0.4 [C:\Program Files\dotnet\shared\Microsoft.WindowsDesktop.App]
Unlike other environments, .NET doesn’t have a command to uninstall versions from the CLI. You must uninstall them manually from the Control Panel or the new Settings interface:
- Win + I para abrir Configuración.
- Applications → Aplicaciones instaladas.
- In the search bar, type .NET.
- I look for entries like:
- Microsoft .NET SDK 8.0.408
- Microsoft .NET SDK 9.0.105
- Microsoft .NET Runtime 8.0.15
From the three dots (⋮) -> Desinstalar.
You can also use winget if they were installed with that system:
luis@kymeraw:~ ❯ winget list "Microsoft .NET"
Name                                              Id                                                Version     Source
-----------------------------------------------------------------------------------------------------------------------
:
Microsoft Windows Desktop Runtime - 8.0.15 (x64)  Microsoft.DotNet.DesktopRuntime.8                 8.0.15      winget
:
luis@kymeraw:~ ❯ winget uninstall "Microsoft.DotNet.DesktopRuntime.8"
Found Microsoft Windows Desktop Runtime - 8.0.15 (x64) [Microsoft.DotNet.DesktopRuntime.8]
Starting package uninstall...
Successfully uninstalled
Ruby
Windows doesn’t come with Ruby, so I’m going to install it. It’s not that I program with it, but I need it to run Bundler and Jekyll to work on my blog locally (más info aquí). Ruby is an interpreted, reflective, object-oriented programming language, created by Japanese programmer Yukihiro “Matz” Matsumoto, who began working on Ruby in 1993 and presented it publicly in 1995.
Installation: I follow the Jekyll documentation
Node.js
Node.js is a server-side JavaScript runtime environment that allows creating fast, scalable, and asynchronous server applications. I use it for backend projects, microservices, or command-line tools written in JS/TS.
- I download from https://nodejs.org
- I install the LTS (Long Term Support) version for greater stability.
- The installer automatically includes
npm, Node’s package manager.
I verify the installation:
node -v
npm -v
npm install -g yarn            # Alternativa a npm
npm install -g typescript      # Compilador TS
npm install -g eslint          # Linter
npm install -g http-server     # Servidor estático
I use npx to run binaries without needing a global installation.
npx create-react-app myapp
VSCode automatically detects node and npm. I install the recommended extensions: ESLint, Prettier, JavaScript / TypeScript Snippets
JDK de Java
Although I don’t program in Java, I need it to run some tools (like Android SDKs or third-party tools that require JVM). In those cases I install the JDK from Adoptium (Temurin), an open source version without telemetry. Alternatively you can use the JDK oficial desde Oracle.
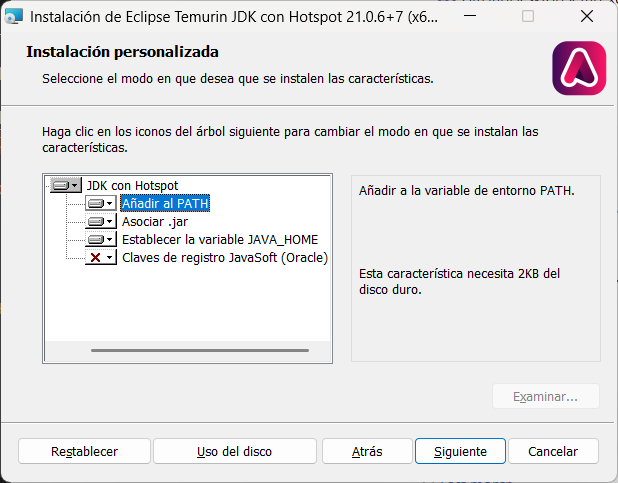
In my case I downloaded the latest Adoptium version, (OpenJDK21U-jdk_x64_windows_hotspot_21.0.6_7.msi) and ran the installation process
During installation I made sure that:
- Añadiese
JAVA_HOME\binalPATH - Configurase la variable de entorno
JAVA_HOME
Once it finishes,
PowerShell 7.5.0
C:\Users\luis>
luis@kymeraw:~ ❯ echo $env:JAVA_HOME
C:\Program Files\Eclipse Adoptium\jdk-21.0.6.7-hotspot\
luis@kymeraw:~ ❯
luis@kymeraw:~ ❯ java --version
openjdk 21.0.6 2025-01-21 LTS
OpenJDK Runtime Environment Temurin-21.0.6+7 (build 21.0.6+7-LTS)
OpenJDK 64-Bit Server VM Temurin-21.0.6+7 (build 21.0.6+7-LTS, mixed mode, sharing)
luis@kymeraw:~ ❯
luis@kymeraw:~ ❯
Optionally I can also install Maven or Gradle depending on the project.
winget install Apache.Maven
winget install Gradle.Gradle
When working on medium or large Java projects, managing dependencies and the build process manually is unfeasible. That’s what tools like Maven and Gradle are for: they automate compilation, testing, packaging, and third-party library management.
Apache Maven is a project management and software build tool based on the concept of a central configuration file (pom.xml). It defines dependencies, plugins, lifecycle phases, etc.
Key features:
- XML as configuration system (
pom.xml) - Convention over configuration
- Large library repository (Maven Central)
- Widely used in enterprise projects
<project>
  <modelVersion>4.0.0</modelVersion>
  <groupId>com.miempresa</groupId>
  <artifactId>miproyecto</artifactId>
  <version>1.0.0</version>
</project>
Gradle is a more modern and flexible tool than Maven, based on a declarative and imperative approach. Usa un DSL en Groovy o Kotlin (build.gradle o build.gradle.kts).
Key features:
- Faster (build cache, parallel execution)
- Cleaner and more expressive syntax
- Compatible with Maven and other systems
- Widely used in Android projects
plugins {
    id 'java'
}

group 'com.miempresa'
version '1.0.0'

repositories {
    mavenCentral()
}

dependencies {
    implementation 'com.google.guava:guava:32.1.2-jre'
    testImplementation 'junit:junit:4.13.2'
}
Local Databases
I like having several databases available locally for testing or development without depending on external servers. I manage them via Docker or direct installation.
MySQL / MariaDB:
- I install Docker Desktop
- I start a container:
docker run --name mysql-dev -e MYSQL_ROOT_PASSWORD=admin -p 3306:3306 -d mysql:8
Recommended GUI client: DBeaver
PostgreSQL:
docker run --name pg-dev -e POSTGRES_PASSWORD=admin -p 5432:5432 -d postgres
Cliente gráfico: DBeaver o pgAdmin
SQLite:
Doesn’t need a server. I use SQLite for scripts, small projects, or tests.
- I install from https://sqlite.org
- Also available via
winget install SQLite.sqlite - I can query from the command line:
sqlite3 database.db
VSCode has extensions for browsing .db files
Updates
Operating system updates work relatively well.
- Operating system
- *
Start>Settings > Windows Update > Check for updates
- *
Application updates are a different story — it depends on each developer/application owner. Although it has improved, it’s a hassle because you have to stay on top of it.
Applications
- *Manual: Entras en cada una de tus aplicaciones, compruebas la versión y sus opciones de actualización.
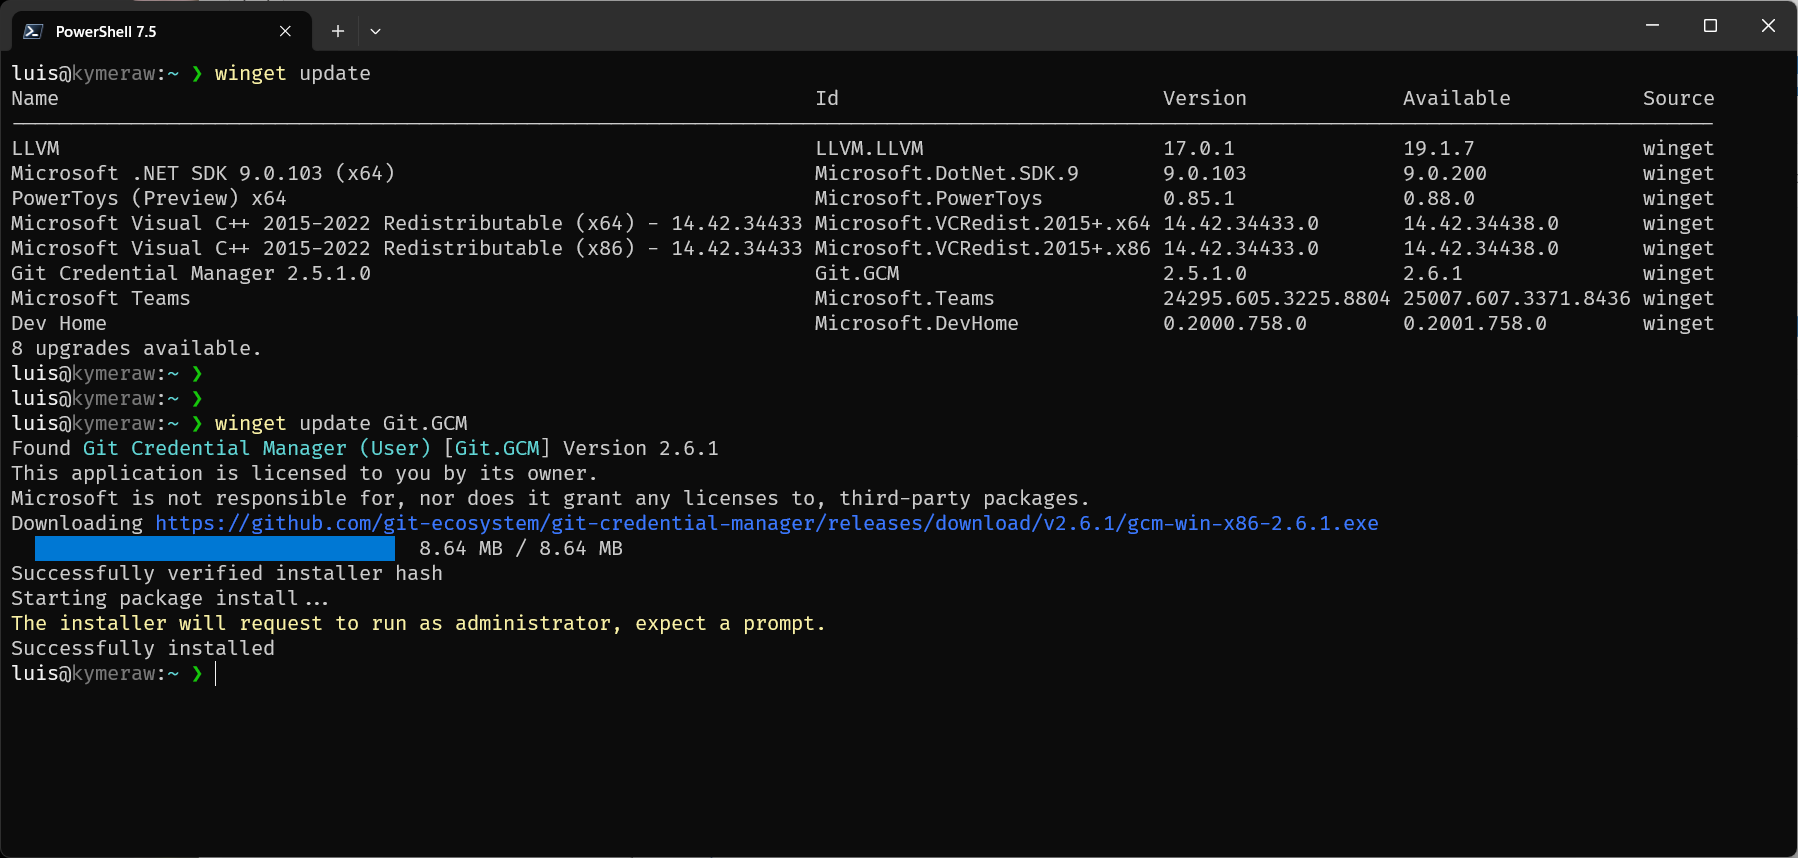
- Instaladas con winget
- *
winget update <Id>to update a specific one - *
winget update --allto update everything. At first I didn’t trust it, but now I use it regularly and it works.
- *
- Instaladas con scoop
- *
scoop updateupdates itself - *
scoop update *updates all apps installed with scoop
- *
Continuous Learning
To finish, I want to insist a bit more about Shell and Linux. If you’re coming from Windows, I recommend learning to use the Shell — it’s a fundamental skill for any software developer. The Shell allows automating tasks, executing commands, and managing the system more efficiently and quickly than through graphical interfaces. There are many resources available for learning to use the Shell, both in bash and zsh — here are some references
- Curso en Español: Curso de Introducción a la Terminal y Comandos Básicos
- Curso en Inglés: Command Line Basics (Udemy)
- Comandos Bash: GNU Bash Reference Manual
- Comandos Zsh: Zsh Users Guide
Además te recomiendo que eches un ojo a algún curso sobre la filosofía de trabajo en Unix, fundamental para comprender Linux. Cómo y por qué los comandos y programas de Unix/Linux están diseñados de la manera en que lo están. La idea principal es que un programa ‘debería hacer una cosa y hacerla bien’. Esta filosofía también abarca conceptos clave como la entrada y salida, el sistema de archivos, la estructura de directorios y la idea de que ‘todo es un fichero’ en Unix. Te dejo algunos cursos cortos y didácticos que cubren estos temas:
- Curso en Español: Introducción a Unix y Linux - Filosofía y Conceptos Básicos, donde se abordan la estructura de directorios, la gestión de ficheros, y la filosofía Unix de diseño de programas.
- Curso en Inglés: The Unix Workbench (Coursera), un curso introductorio que explica la filosofía de Unix, incluyendo la entrada y salida, y cómo interactuar con el sistema de archivos.
- Curso en Inglés: Linux Command Line Basics - Learn the Shell, Philosophy, and More (Udemy), un curso que cubre tanto los comandos esenciales como los principios filosóficos de Unix/Linux.
- Curso en Inglés: Understanding the Unix Philosophy (LinkedIn Learning), un curso corto que ofrece una visión general sobre la filosofía de Unix y su aplicación práctica.
Finally, I’ve selected 50 commands (there are many more) you should know as a cross-platform software developer. They’re essential for file system navigation, process management, text manipulation, and other common software development tasks. Each command includes a link to its respective manpage in Ubuntu 24.04.
| Command | Description | Command | Description |
|---|---|---|---|
| ls | Lists files and directories in the current directory. | alias | Creates an alias for a command or a series of commands. |
| cd | Changes the current working directory. | unalias | Removes a previously defined alias. |
| pwd | Shows the current working directory. | history | Shows the history of commands used. |
| cp | Copies files and directories. | env | Shows or modifies environment variables. |
| mv | Moves or renames files and directories. | export | Defines environment variables for child processes. |
| rm | Removes files and directories. | source | Executes commands from a file in the current shell context. |
| mkdir | Creates new directories. | uname | Shows information about the operating system. |
| rmdir | Removes empty directories. | uptime | Shows how long the system has been running. |
| touch | Changes file timestamps or creates empty files. | whoami | Shows the current user name. |
| echo | Displays a line of text or variable. | which | Locates a command and shows its full path. |
| cat | Concatenate and display file contents. | head | Shows the first lines of a file. |
| grep | Searches for patterns in file contents. | tail | Shows the last lines of a file. |
| find | Searches for files and directories in a directory hierarchy. | sort | Sorts lines of text in a file or input. |
| chmod | Changes file access permissions. | uniq | Shows or filters consecutive repeated lines in a file. |
| chown | Changes the owner of files and directories. | diff | Compares files line by line. |
| ps | Shows the status of current processes. | tee | Reads from standard input and writes to standard output and files. |
| kill | Sends signals to processes, such as stopping them. | xargs | Builds and executes command lines from standard input. |
| top | Shows running processes and resource usage. | jobs | Shows the status of background jobs. |
| df | Shows disk space usage of file systems. | bg | Resumes a suspended job in the background. |
| du | Estimates disk space usage by files and directories. | fg | Brings a suspended job to the foreground. |
| tar | Manipulates tar archives. | alias | Creates an alias for a command or a series of commands. |
| zip | Compresses files in ZIP format. | unalias | Removes a previously defined alias. |
| unzip | Decompresses files in ZIP format. | history | Shows the history of commands used. |
| ssh | Connects to remote servers securely via SSH. | env | Shows or modifies environment variables. |
| scp | Copies files between servers securely. | export | Defines environment variables for child processes. |
| wget | Downloads files from the web. | source | Executes commands from a file in the current shell context. |
| curl | Transfers data from or to a server. | uname | Shows information about the operating system. |
| nano | Simple text editor for the terminal. | uptime | Shows how long the system has been running. |
| vim | Advanced text editor in the terminal. | whoami | Shows the current user name. |
| man | Shows the user manual for any command. | which | Locates a command and shows its full path. |