A couple of months ago I moved the DHCP and DNS services to my home Linux router and left the Pi-Hole 5 service on a separate virtual machine. Despite everything working perfectly, I hit a snag: troubleshooting from PiHole is complicated because all DNS queries are resolved by the router and PiHole sees nothing. So I decided to redesign the setup.
In this post I describe how I install Pi-Hole 6 on my Linux router so it provides DNS, DHCP (with dnsmasq) and ad sinkholing. This involves undoing the native dnsmasq installation.
Introduction
In my previous setup I had the DHCP and DNS Server with dnsmasq on my router and a Pi-Hole 5 on a virtual machine as the ad sinkhole. In this post I evolve to a different design: I install Pi-Hole 6 on the router, replacing dnsmasq, and migrate the entire previous configuration, so that from now on Pi-Hole 6 does everything: DNS, DHCP and ad sinkholing:

Evolving to PiHole 6
The process is delicate – cortafuegix is in production. I need to prevent dnsmasq from conflicting with the instance that Pi-hole ships built-in, migrate the configurations, and avoid the router itself having resolution issues during the process. Here are the steps I followed:
- Save the entire
dnsmasqconfiguration - Back up
cortafuegix - Change Netplan on
cortafuegixso its queries go to the externalpiholeduring the installation process - Stop
dnsmasqoncortafuegix(note: the house loses DNS/DHCP) - Re-enable
systemd-resolvedto bind to port 53 - Install Pi-Hole 6
- Configure Pi-Hole 6 and adapt it to use the old
dnsmasqconfiguration files - Change Netplan back to point to itself and re-enable
systemd-resolved - Uninstall dnsmasq
- Shut down the old Pi-Hole 5 virtual machine
Saving the configuration
I save the important dnsmasq files for later use. I copy my three files from /etc/dnsmasq.d to my user’s home directory.
ls -al /home/luis/*.conf
-rw-r--r-- 1 root root  3620 mar  9 09:30 /home/luis/000-dnsmasq.conf
-rw-r--r-- 1 root root 15609 mar  9 09:30 /home/luis/100-vlan.conf
-rw-r--r-- 1 root root  3671 mar  9 09:30 /home/luis/205-vlan.conf
Backup
In my case I clone the cortafuegix router. It’s a virtual machine on my Proxmox server.
Netplan
I change netplan so that cortafuegix resolves everything via 192.168.100.224 (the old Pi-Hole 5) during the migration.
# e /etc/netplan/netplan.yaml
:
      # Main Vlan
      vlan100:
        :
        nameservers:
          addresses:
          - 192.168.100.224  <-- External pihole IP, previously had 127.0.0.1
:
# netplan apply
# resolvectl
:
Link 6 (vlan100)
Current Scopes: DNS
     Protocols: +DefaultRoute +LLMNR -mDNS -DNSOverTLS DNSSEC=no/unsupported
   DNS Servers: 192.168.100.224
    DNS Domain: parchis.org
Stopping dnsmasq
Pi-hole uses its own version of dnsmasq built into FTL (an optimized fork of dnsmasq). To avoid conflicts, I stop the one installed on Ubuntu. I’ll uninstall it later.
# systemctl stop dnsmasq
# systemctl disable dnsmasq
Re-enabling systemd-resolved
So it binds to port 53 – I restore it to its default state. I had previously disabled it because when you have dnsmasq serving DNS, it’s not needed.
# e /etc/systemd/resolved.conf
[Resolve]
#DNSStubListener=yes   <== Previously had this uncommented with value "no"

# systemctl restart systemd-resolved
# netstat -tulpn |grep 53
tcp        0      0 127.0.0.53:53           0.0.0.0:*               LISTEN      86520/systemd-resol
udp        0      0 127.0.0.53:53           0.0.0.0:*                           86520/systemd-resol
udp        0      0 0.0.0.0:161             0.0.0.0:*                           1253/snmpd
# resolvectl
Global
         Protocols: -LLMNR -mDNS -DNSOverTLS DNSSEC=no/unsupported
  resolv.conf mode: foreign
Current DNS Server: 192.168.100.1
       DNS Servers: 192.168.100.1
        DNS Domain: parchis.org
:
Link 6 (vlan100)
Current Scopes: DNS
     Protocols: +DefaultRoute +LLMNR -mDNS -DNSOverTLS DNSSEC=no/unsupported
   DNS Servers: 192.168.100.224
    DNS Domain: parchis.org
The current state is:
cortafuegixcan resolve via the activepihole(.224) and reaches the internet without issues.- The rest of the house is blind (no DNS or DHCP server)
Installation
I download and install Pi-hole 6 with:
curl -sSL https://install.pi-hole.net | bash
I follow the standard installation process. Once it finishes, it offers to connect to the admin panel at my machine’s IP http://192.168.100.1/admin with a default password shown at the end of the installation, which I change immediately after logging in.
Configuration
Pi-Hole 6’s configuration has been moved – everything is now in a single file /etc/pihole/pihole.toml. You “should” configure everything from the web interface, although if you want to edit it manually, don’t forget to stop the service with systemctl stop pihole-FTL.service.
- Here’s a copy of my /etc/pihole/pihole.toml file
/etc/pihole/dnsmasq.confis created automatically from the above – no need to edit it.
I’ve configured Pi-Hole to use an external file where I keep my static DHCP configuration. The first one is the file /etc/dnsmasq.d/100-vlan.conf; here are some sample entries:
$ cat /etc/dnsmasq.d/100-vlan.conf
:
#### Example for Access Points
#### Note: any string can be used as TAG, here I use "capwap"
dhcp-option=set:capwap,option:router,192.168.100.1
dhcp-option=set:capwap,option:dns-server,192.168.100.1
dhcp-option=set:capwap,option:netmask,255.255.252.0
dhcp-option=set:capwap,43,192.168.252.238
dhcp-host=set:capwap,12:34:56:78:16:10,ap-paso.parchis.org,192.168.100.220
dhcp-host=set:capwap,12:34:56:78:57:48,ap-buhardilla.parchis.org,192.168.100.221
dhcp-host=set:capwap,12:34:56:78:35:F8,ap-cuartos.parchis.org,192.168.100.222

#### Example of static assignments
dhcp-host=set:vlan100,12:34:56:77:0E:A1,192.168.100.2,panoramix.parchis.org
dhcp-host=set:vlan100,12:34:56:70:49:ED,192.168.100.3,idefix.parchis.org
dhcp-host=set:vlan100,12:34:56:75:0d:20,192.168.100.4,idefix-wifi.parchis.org
dhcp-host=set:vlan100,12:34:56:75:df:41,192.168.100.5,kymera.parchis.org
:
Changing netplan and disabling systemd-resolved
I no longer need it, so I change it to stop binding to port 53. In principle it’s not necessary (since it listens on 127.0.0.53), but this avoids cortafuegix making double queries to 127.0.0.53:53 and 127.0.0.1:53 when it needs to resolve.
# cat /etc/systemd/resolved.conf
[Resolve]
DNSStubListener=no

# systemctl restart systemd-resolved
I set netplan so that cortafuegix queries itself:
# e /etc/netplan/netplan.yaml
:
      # Main Vlan
      vlan100:
        :
        nameservers:
          addresses:
          - 127.0.0.1
:
# netplan apply
Finishing the migration
Once everything is configured and running, I verify it’s listening on the right ports and properly configured:
# resolvectl
Global
         Protocols: -LLMNR -mDNS -DNSOverTLS DNSSEC=no/unsupported
  resolv.conf mode: foreign
Current DNS Server: 192.168.100.1
       DNS Servers: 192.168.100.1 127.0.0.1
        DNS Domain: parchis.org
:
Link 5 (vlan100)
Current Scopes: DNS
     Protocols: +DefaultRoute +LLMNR -mDNS -DNSOverTLS DNSSEC=no/unsupported
   DNS Servers: 127.0.0.1
    DNS Domain: parchis.org

# netstat -tulpn |grep 53
tcp        0      0 0.0.0.0:53              0.0.0.0:*               LISTEN      2128/pihole-FTL
tcp6       0      0 :::53                   :::*                    LISTEN      2128/pihole-FTL
udp        0      0 0.0.0.0:53              0.0.0.0:*                           2128/pihole-FTL
udp6       0      0 :::53                   :::*                                2128/pihole-FTL
Its own queries will go to itself, and any other queries will be forwarded to its upstream forwarder.
# nslookup ibm.com
Server:         192.168.100.1
Address:        192.168.100.1#53

Non-authoritative answer:
Name:   ibm.com
Address: 104.85.45.187
Name:   ibm.com
Address: 2a02:26f0:b80:693::3831
:
I verify from a computer on the network that DNS resolution and reverse lookups are correct. As you can see, I don’t need to append the domain name – it auto-completes. Tested with Windows, Mac, Linux clients and mobile devices.
luis@kymeraw:~ ❯ nslookup.exe panoramix.parchis.org
Server:  pi.hole
Address:  192.168.100.1

Name:    panoramix.parchis.org
Address:  192.168.100.2

luis@kymeraw:~ ❯ nslookup.exe 192.168.100.2
Server:  pi.hole
Address:  192.168.100.1

Name:    panoramix.parchis.org
Address:  192.168.100.2
Uninstalling dnsmasq
Now that Pi-Hole is handling DNS/DHCP, I no longer need the Ubuntu dnsmasq package. I also remove a custom systemd unit I had created.
# apt remove dnsmasq-logrotate dnsmasq
# apt autoremove -y --purge
# rm /etc/systemd/system/dnsmasq.service
Proof of concept
Very important – once everything is running, I’m going to shut down the old PiHole 5 virtual machine and reboot the router. I don’t want any surprises if a reboot happens and DNS/DHCP stops working, which usually means chaos.
# reboot -f
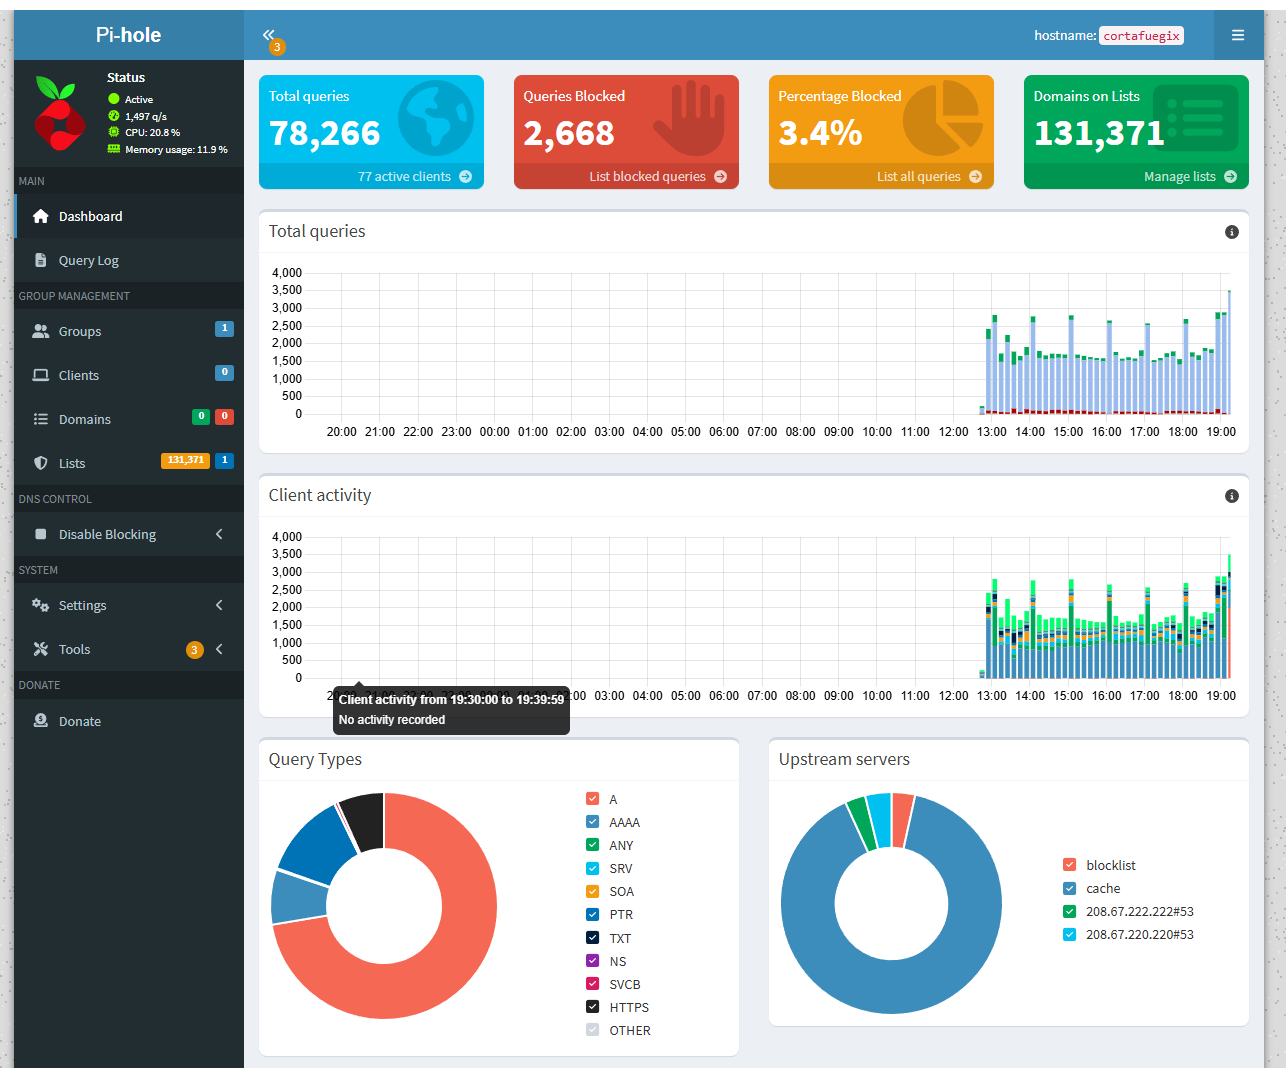
I verify everything works and I can access the admin console at http://192.168.100.1/admin
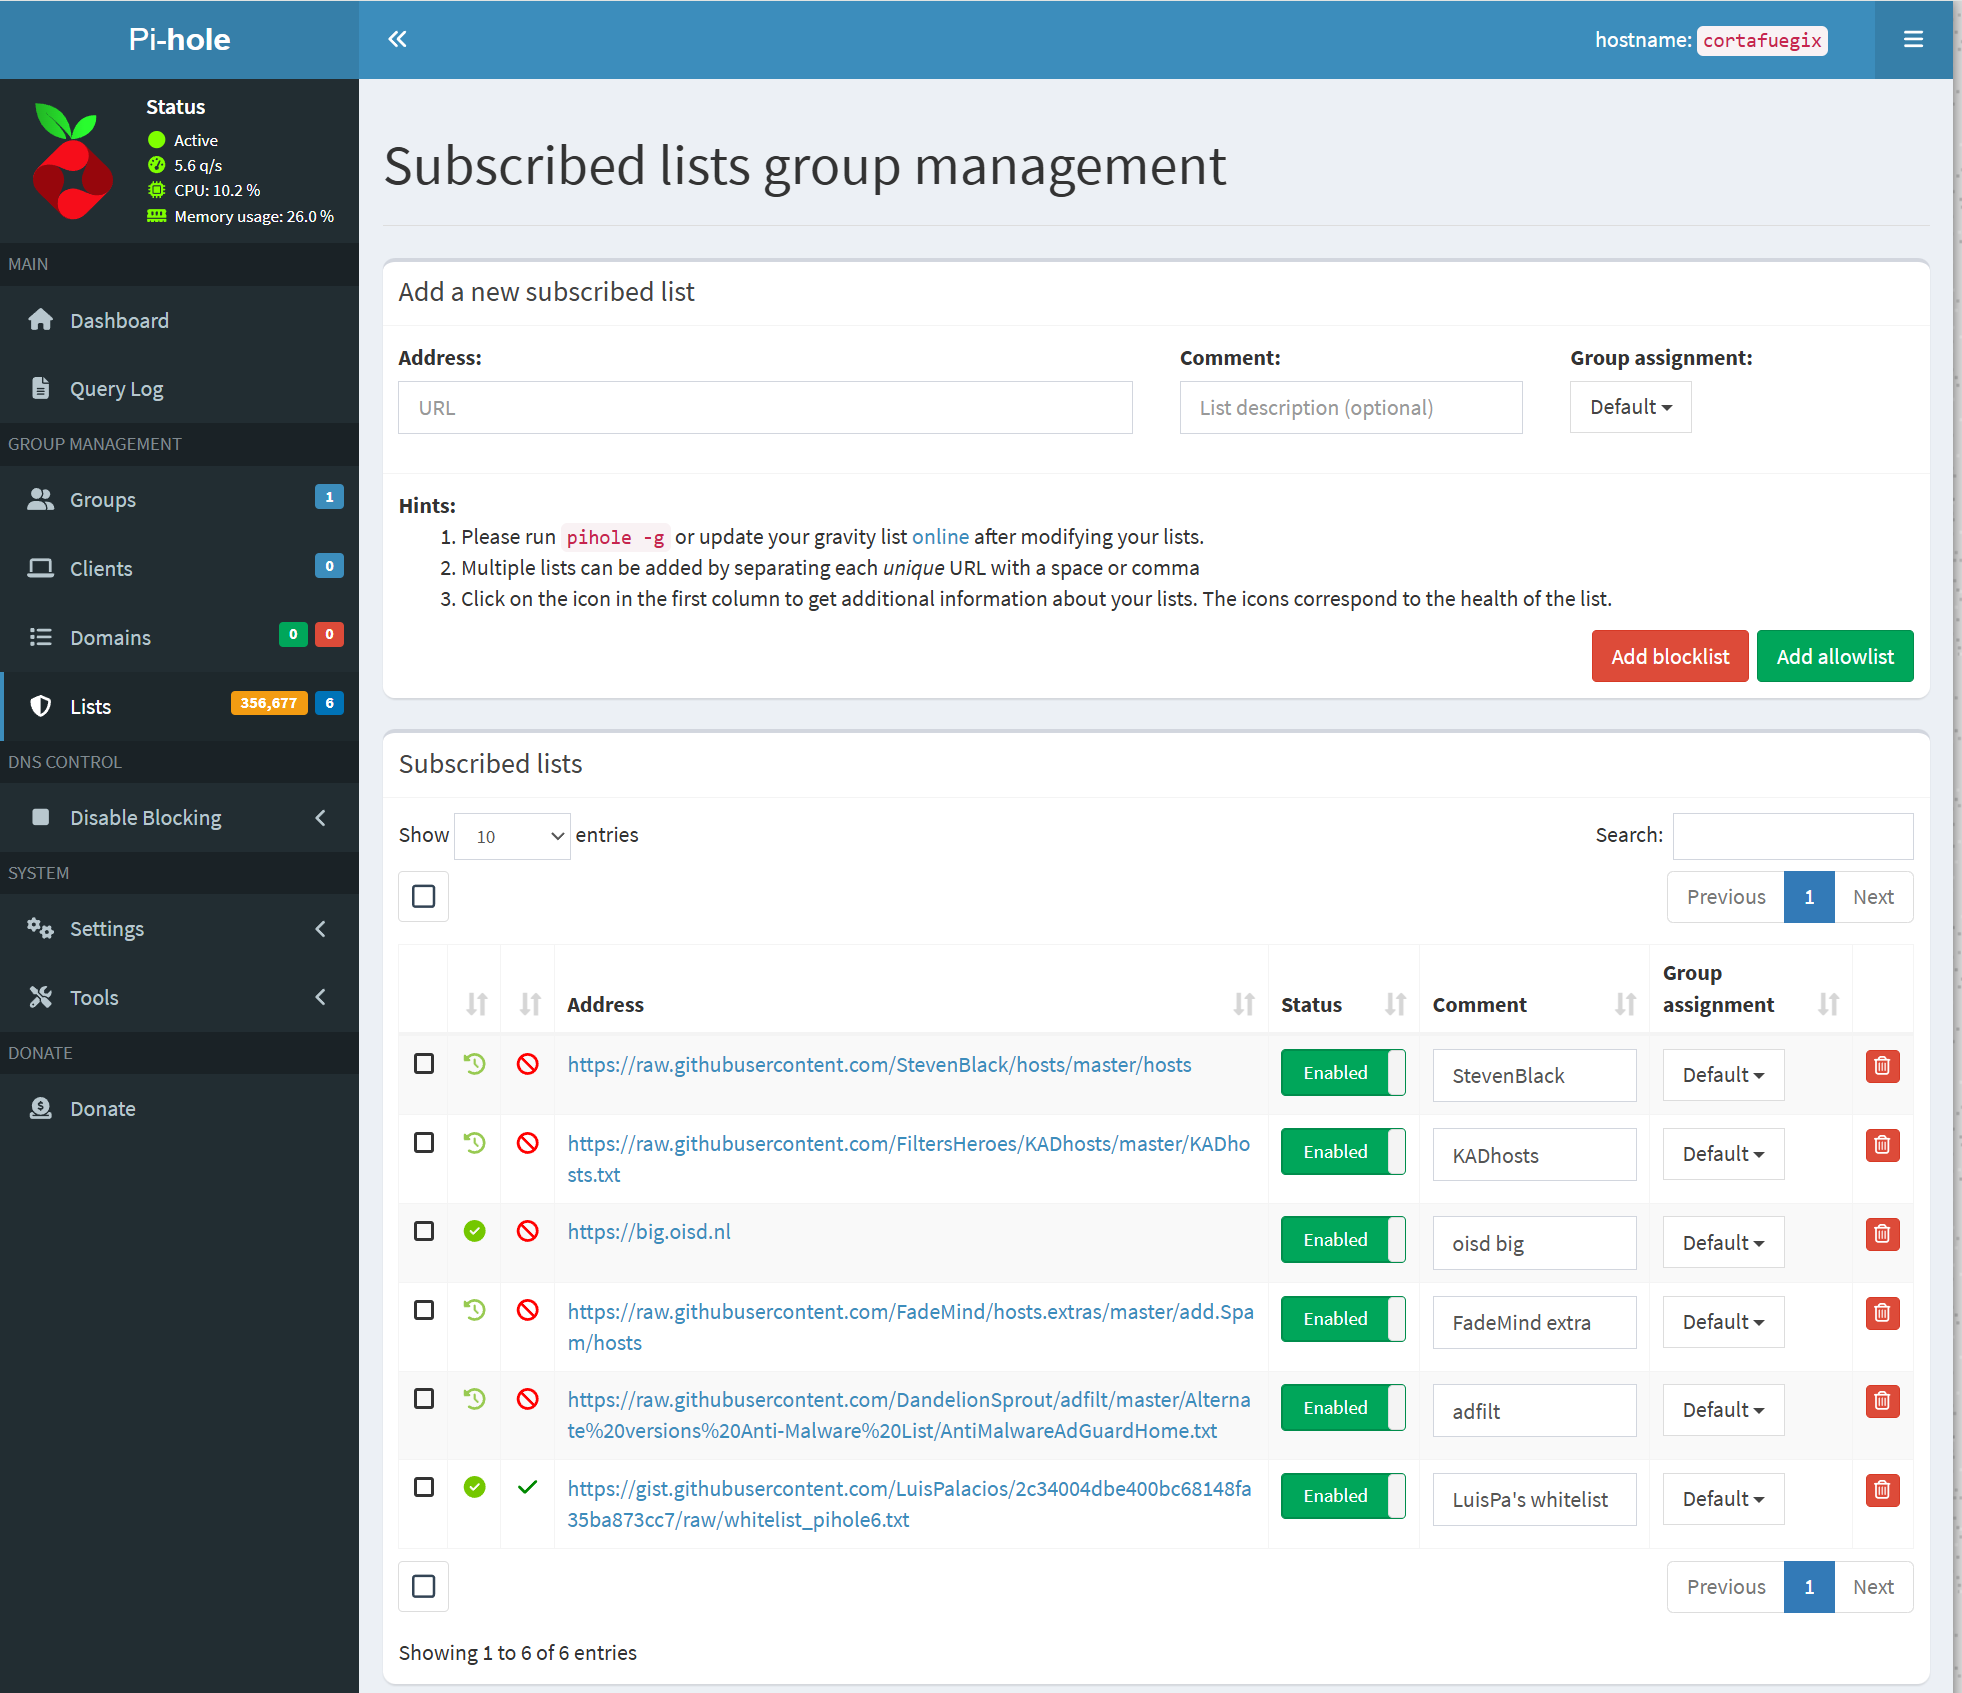
Allow and block lists
I’ve configured PiHole to subscribe to 5 blocklists and 1 allowlist. The subscription updates weekly and in my case results in a database of over 350,000 entries.
To understand how lists work, here are some links to interesting projects:
- StevenBlack - Consolidates host addresses from several well-curated sources
- FadeMind extrahosts - Extra rules for the StevenBlack hosts project
- FadeMind whitelists - Whitelist collections
- Adfilt - Web filter lists for countless different topics
- oisd - Blocks unwanted or harmful domains. Reduces ads, lowers malware risk and improves privacy.
- oisd big - Blocks ads, in-app ads (mobile), phishing, malvertising, malware, spyware, ransomware, cryptojacking… Telemetry/Analytics/Tracking (when not necessary for proper functionality)
- oisd small - Focuses mainly on blocking ads
Blocklists
- Go to
Lists > Subscribed listsand add the following as Blocklist
https://raw.githubusercontent.com/StevenBlack/hosts/master/hosts
https://raw.githubusercontent.com/FiltersHeroes/KADhosts/master/KADhosts.txt
https://big.oisd.nl
https://raw.githubusercontent.com/FadeMind/hosts.extras/master/add.Spam/hosts
https://raw.githubusercontent.com/DandelionSprout/adfilt/master/Alternate%20versions%20Anti-Malware%20List/AntiMalwareAdGuardHome.txt
Allowlists (Whitelists)
Go to
Lists > Subscribed listsand add the following as Allowlists. This is my own list of allowed sites, compiled from various sources, which lets me browse without too many issues.