Having a battery backup system (UPS) is essential for home servers hosting multiple services. But it’s not enough for the UPS to supply power for a few minutes: the critical part is that, in case of a prolonged outage, the entire system shuts down in a controlled and orderly manner. In this article I document how I deployed a solution based on NUT on Proxmox to achieve this.
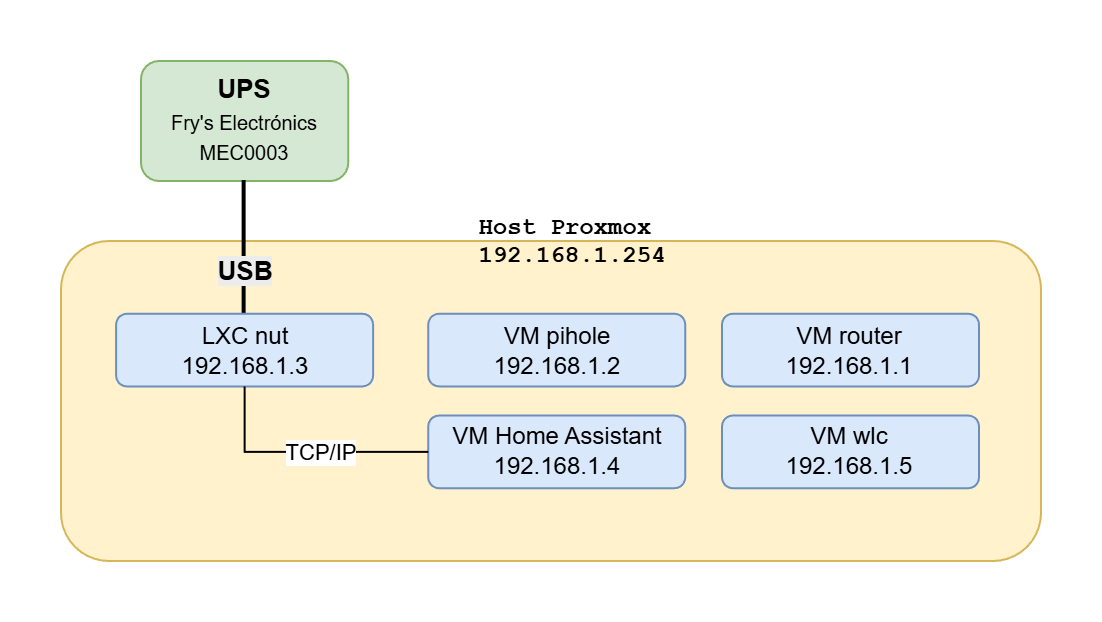
In this example you’ll see that my NUC server is connected via USB cable to the UPS. Some of the services to shut down are critical (one is a VM running my Linux router to the internet, the other provides DNS/DHCP services). What I do is create a dedicated LXC container for NUT (Network UPS Tools), pass the USB device to it, and it takes care of everything, including shutting down its own Proxmox host…
Introduction
I create and configure the new LXC called nut with the following goals:
- Monitor the status of a USB-connected UPS.
- Expose the status to Home Assistant (hass), for UPS monitoring.
- Execute a graceful shutdown of everything running on the NUC (proxmox) in case of prolonged power failure.
Proxmox Server
First thing I do is create an LXC container for nut. You can do this from the UI; I downloaded the Debian 12 template. If you prefer the command line:
pct create 123 local:vztmpl/debian-12-standard_12.0-1_amd64.tar.zst \
  -hostname nut \
  -memory 512 \
  -net0 name=eth0,bridge=vmbr0,ip=192.168.1.3/24,gw=192.168.1.1 \
  -rootfs local-lvm:8 \
  -features nesting=1 \
  -unprivileged 1
pct start 123
pct exec 123 -- bash
We find out where the UPS is.
root@proxmox:~# lsusb
:
Bus 001 Device 002: ID 051d:0002 Fry's Electronics MEC0003
------------------     ---------
      |                    |
      |                    +---> We'll use this in /etc/udev/rules.d/50-ups.rules
      |
      +------------------------> We use this in /etc/pve/lxc/123.conf
:
/etc/pve/lxc/123.conf
This file belongs to the LXC container nuc (note that in your case you may have assigned a different number). We need to add the following at the end, assigning the same bus/device IDs (twice) under /dev
lxc.cgroup2.devices.allow: c 189:* rwm
lxc.mount.entry: /dev/bus/usb/001/002 dev/bus/usb/001/002 none bind,optional,create=file
/etc/udev/rules.d/50-ups.rules
We create this file to change the USB permissions to 0666.
The nut container is unprivileged, so its nut user cannot write to the USB port. The trick is to give it write permissions from the host. This is done on the host (proxmox), not in the container, because the container is borrowing hardware from the host. Note the device ID from the lsusb command above: ID 051d:0002.
SUBSYSTEM=="usb", ATTR{idVendor}=="051d", ATTR{idProduct}=="0002", MODE="0666"
I reload the udev rules on Proxmox so they take effect immediately
udevadm control --reload-rules && udevadm trigger
LXC Container nut
I start the new container, log in as root and first update it.
apt update && apt full-upgrade -y
I install nut
apt update && apt full-upgrade -y
apt install nut nut-client -y
I modify /etc/nut/nut.conf:
MODE=standalone
I modify /etc/nut/ups.conf
[ups]
  driver = blazer_usb
  port = auto
  desc = "Fry's Electronics MEC0003"
I modify /etc/nut/upsd.conf
LISTEN 127.0.0.1 3493
LISTEN 192.168.1.3 3493
I modify /etc/nut/upsd.users
[homeassistant]
  password = upspass
  upsmon master
  instcmds = all
I modify /etc/nut/upsmon.conf
MONITOR ups@localhost 1 homeassistant upspass master
MINSUPPLIES 1
SHUTDOWNCMD "/usr/local/sbin/nut-shutdown-master.sh"
POLLFREQ 5
POLLFREQALERT 5
HOSTSYNC 15
DEADTIME 15
POWERDOWNFLAG /etc/killpower
RBWARNTIME 43200
NOCOMMWARNTIME 300
FINALDELAY 5
Permissions in nut
As I mentioned, in unprivileged containers (like this one) running as user nut, both the NUT driver (blazer_usb) and the daemon cannot access the USB device (/dev/bus/usb/...) or the /run directory. To fix this I changed the device permissions to 0666 (on the host) and I’ll create a script to resolve the /run issue.
I create a script, for example: nano /etc/rc.local
#!/bin/sh
# /etc/rc.local file that I'll call from systemd
mkdir -p /run/nut
chown nut:nut /run/nut
# I used to use this but stopped because the port can change
# so I solved it in proxmox with udev rules
#chown nut:nut /dev/bus/usb/001/002
exit 0
I create a custom systemd service to call it at boot: /etc/systemd/system/rc-local.service
# Mini service that runs /etc/rc.local during boot
[Unit]
Description=Run /etc/rc.local
ConditionPathExists=/etc/rc.local
After=network.target

[Service]
Type=forking
ExecStart=/etc/rc.local
TimeoutSec=0
RemainAfterExit=yes
GuessMainPID=no

[Install]
WantedBy=multi-user.target
I set it to start automatically
systemctl daemon-reload
systemctl enable rc-local.service
Starting and testing services
systemctl daemon-reload
systemctl enable nut-server
systemctl enable nut-monitor
systemctl start nut-server
systemctl start nut-monitor
Verify everything works properly
systemctl status nut-server
systemctl status nut-monitor
upsc ups@localhost
Shutdown script in nut
This is the script that nut will execute when it detects a prolonged power failure:
- Remote shutdown of pihole and router via SSH.
- Shutdown of hass and wlc VMs from Proxmox (issuing commands via SSH).
- Shutdown of the Proxmox host.
- Shutdown of the nut container (poweroff).
Note that nut is the one in charge, it uses IPs to avoid DNS dependency and this script triggers automatically on critical power failure.
View script /usr/local/sbin/nut-shutdown-master.sh
Home Assistant Integration
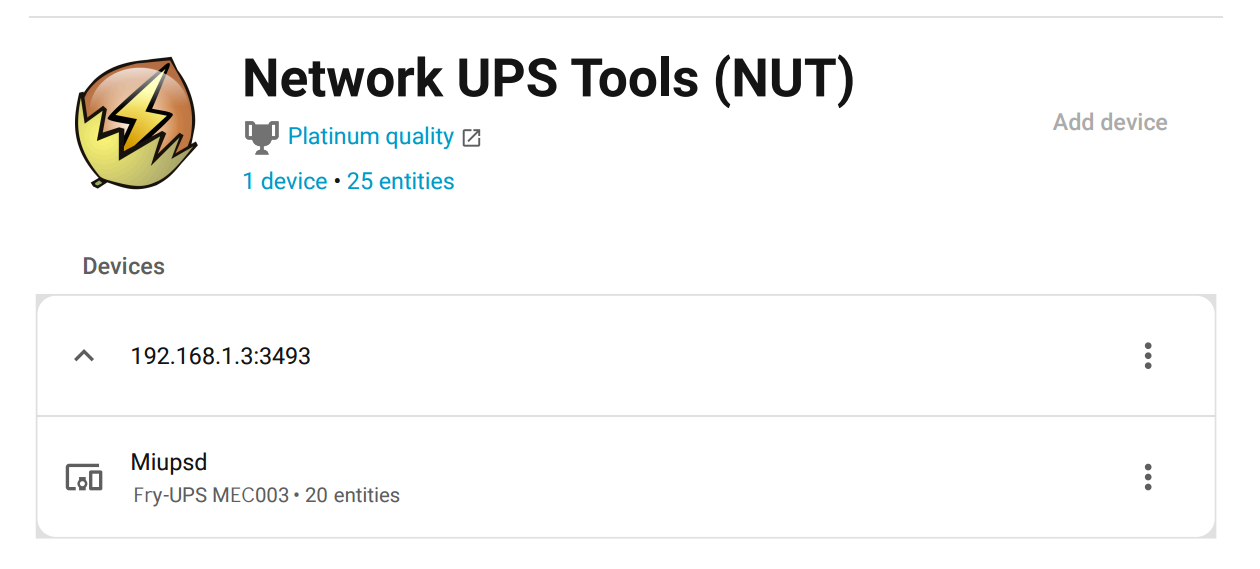
We connect to the HASS web administration UI
- Settings > Devices & Services > “Network UPS Tool (NUT)”.
- I configure the name, IP address of the
nutLXC (192.168.1.3), userhomeassistantand passwordupspass
- I configure the name, IP address of the
SSH Configuration:
For nut to access proxmox, router, pihole without a password, I need to properly set up SSH keys. They must trust “nut” to allow it to execute root-level commands (for the graceful shutdown).
On nut:
ssh-keygen -t ed25519 -f /root/.ssh/nut_shutdown_key
Then add the contents of the public key (nut_shutdown_key.pub) to the following files:
- router (192.168.1.1) ->
/root/.ssh/authorized_keys - pihole (192.168.1.2) ->
/root/.ssh/authorized_keys - proxmox (192.168.1.254) ->
/etc/pve/priv/authorized_keys
Verify that all three have /etc/ssh/sshd_config properly configured to accept public key authentication. Example (very permissive): allows direct root access, only recommended in trusted environments. In fact, this could be improved by creating users and using sudo; keep in mind this is just an example.
# sshd config that accepts ssh via root.
# first tries public/private key and if it fails asks for password.
Port 22
PubkeyAuthentication yes
PasswordAuthentication yes
PermitRootLogin yes
UsePAM no
AllowAgentForwarding yes
AllowTcpForwarding yes
GatewayPorts yes
X11Forwarding yes
X11DisplayOffset 10
X11UseLocalhost yes
AddressFamily inet
PrintMotd no
PrintLastLog no
Subsystem sftp /usr/lib64/misc/sftp-server
AcceptEnv LANG LC_*
References
- https://networkupstools.org/
- man upsd, man upsmon, man ups.conf