This post is about deflating, removing what I personally believe is unnecessary in Windows 11. In English they call it debloat or bloatware removal. In this post I explain how to do it on a fresh Windows install, but it also works on an existing one.
The point is to remove apps, services and pre-installed junk that aren’t essential, consume resources and worst of all, affect performance and UX.
Windows posts series
- Prepare a PC for Dualboot Linux / Windows and install Windows 11 Pro.
- Configure a decent Windows 11 by removing the bloatware.
- Prepare Windows for software development, CLI, WSL2 and tools.
- Installation of VMWare Workstation Pro on Windows 11 with a Windows 11 Pro VM.
- Installation of Windows 11 VM on Proxmox to run Windows 11 Pro on a Proxmox host.
I have an older version of this post here, left only as a reference.
Introduction
Bloatware in Windows is like junk in the ocean: a mix of unnecessary little fish that get in the way, take up space and distract you from what matters.

My strategy, a hybrid approach:
- Optional: Install Windows unattended and pre-debloated.
- Update and install some essentials (with my own script)
- Activate using MAS
- Heavy debloat with Win11Debloat
- Alternatives:
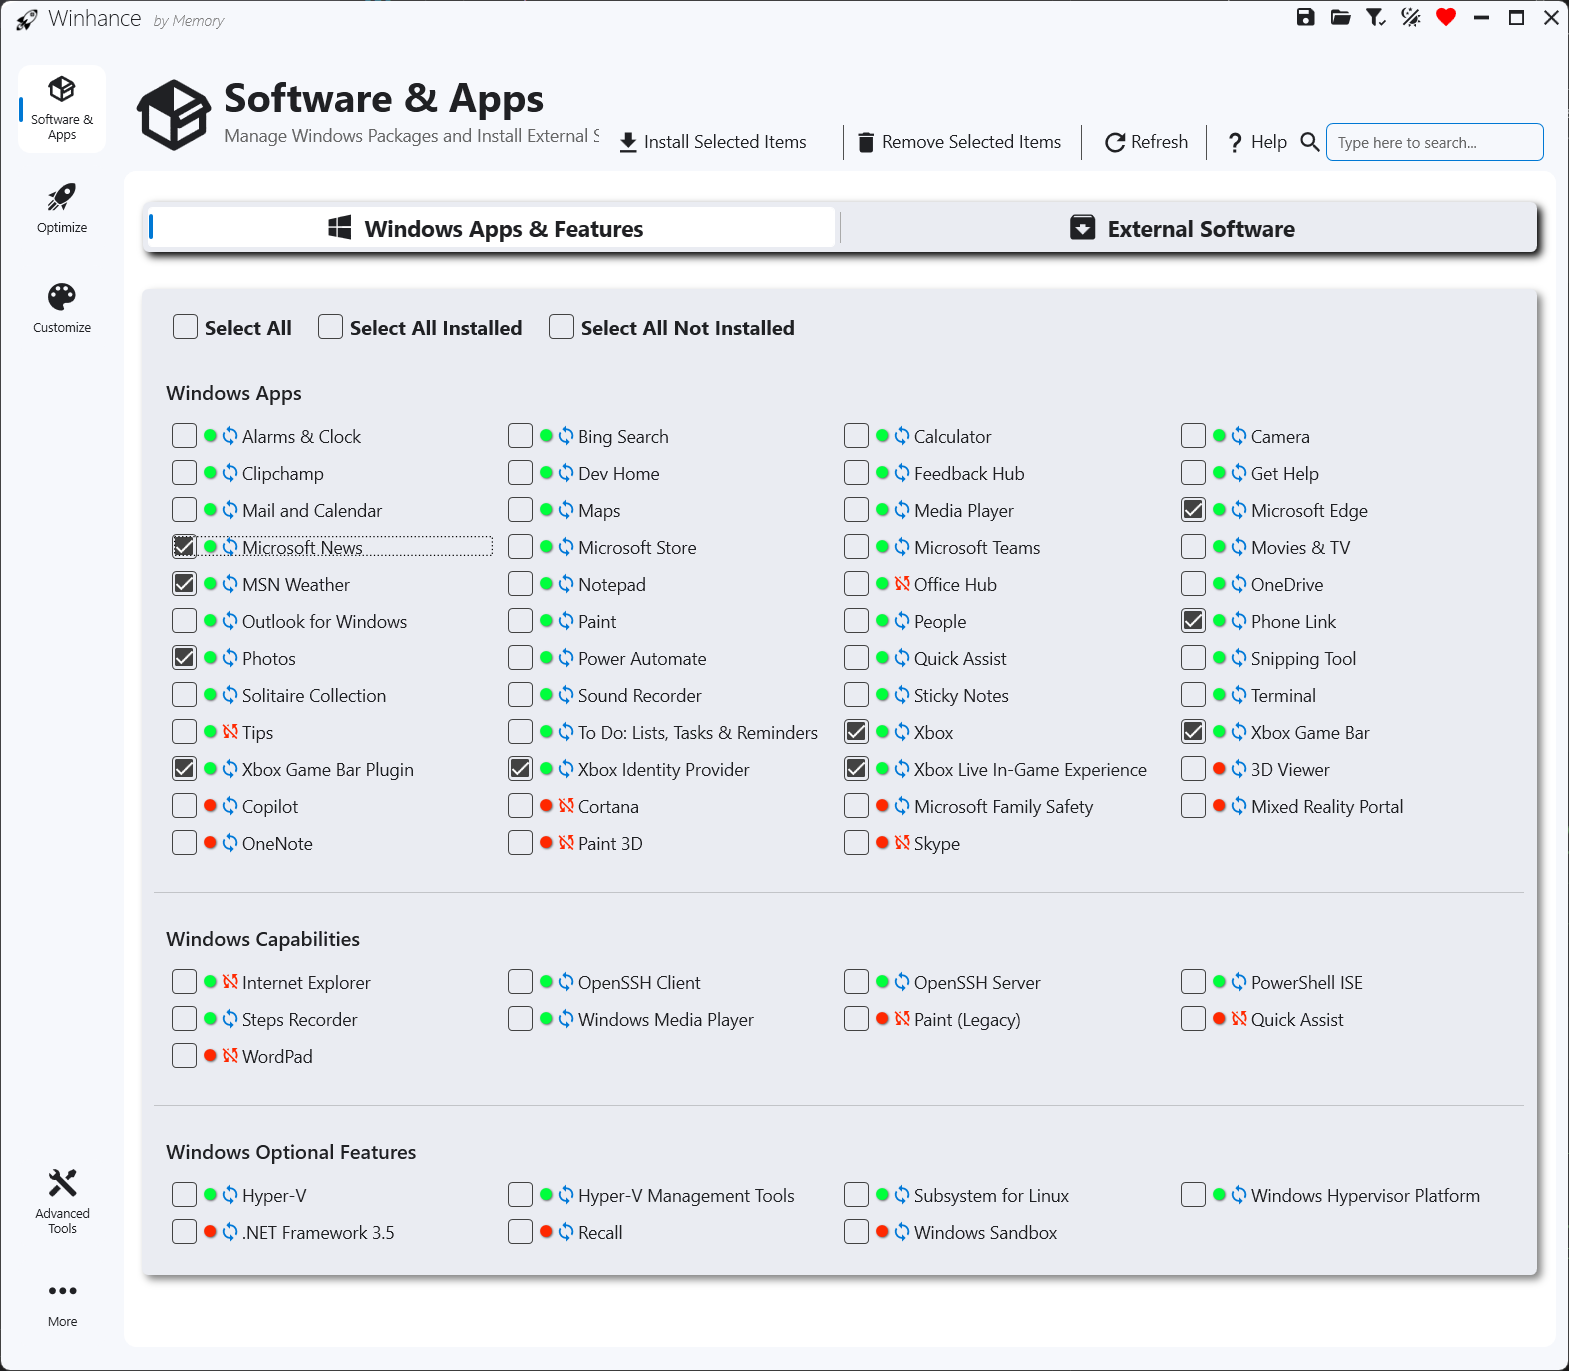
- Winhance - Windows Enhancement Utility
- Debloat Windows 10/11 by Andrew Taylor
- Tiny 11 Builder) but I went with the first one.
- Finish debloating a few things manually.
- Optional: Install my
devclitool
Step 1 - Prepare the OS
First you need a Windows 11 installed. I won’t explain that here, but you can use the normal installation process, from the official Microsoft image, or you could do an Unattended installation which adds an extra layer of simplicity.
Once I have Windows 11 installed, I start by updating it.
Operating system update:
- Start > “Update " > Check for Updates > I do all the updates it asks for (with the corresponding reboots).
Installing my script:
I know this post is about removing stuff, but there are some basics I need: Chrome, 7-Zip, VSCode, PowerShell 7, PowerToys. From PowerShell 5 as administrator, I prepare the environment and run a script from my GitHub repository
- Start/Search > “PowerShell” > right-click > Run as Administrator. Opens a PS5 terminal.
- I enable System Restore and allow script execution
Enable-ComputerRestore -Drive "C:\"
vssadmin resize shadowstorage /for=C: /on=C: /maxsize=10GB
Set-ExecutionPolicy -ExecutionPolicy RemoteSigned -Scope CurrentUser
- I run
wingetand accept the agreement. Just to double confirm I have it installed, which is normal on an updated Windows 11.
winget list
I do a reboot.
I run my script to install: Google Chrome, 7-Zip, Visual Studio Code, PowerShell 7 and PowerToys and download Win11Debloat. If you want to install another browser, do it manually.
Again: Start/Search > “PowerShell” > right-click > Run as Administrator. Opens a PS5 terminal.
iex (Invoke-WebRequest -Uri "https://raw.githubusercontent.com/LuisPalacios/devcli/main/addons/windecente-inicio.ps1" -UseBasicParsing).Content

Note: My script downloads Win11Debloat which we’ll use later.
Windows Activation
I discovered online that for VMs or lab environments there’s a project out there (freely available) called Microsoft Activation Script (MAS). In any case, you have two options:
You can buy a digital copy of Windows 11 Pro retail from an authorized retailer. It’s cheap and affordable, you get an email with the product key. Start > Settings > System Activation > Change product key, add the received key and it’s activated.
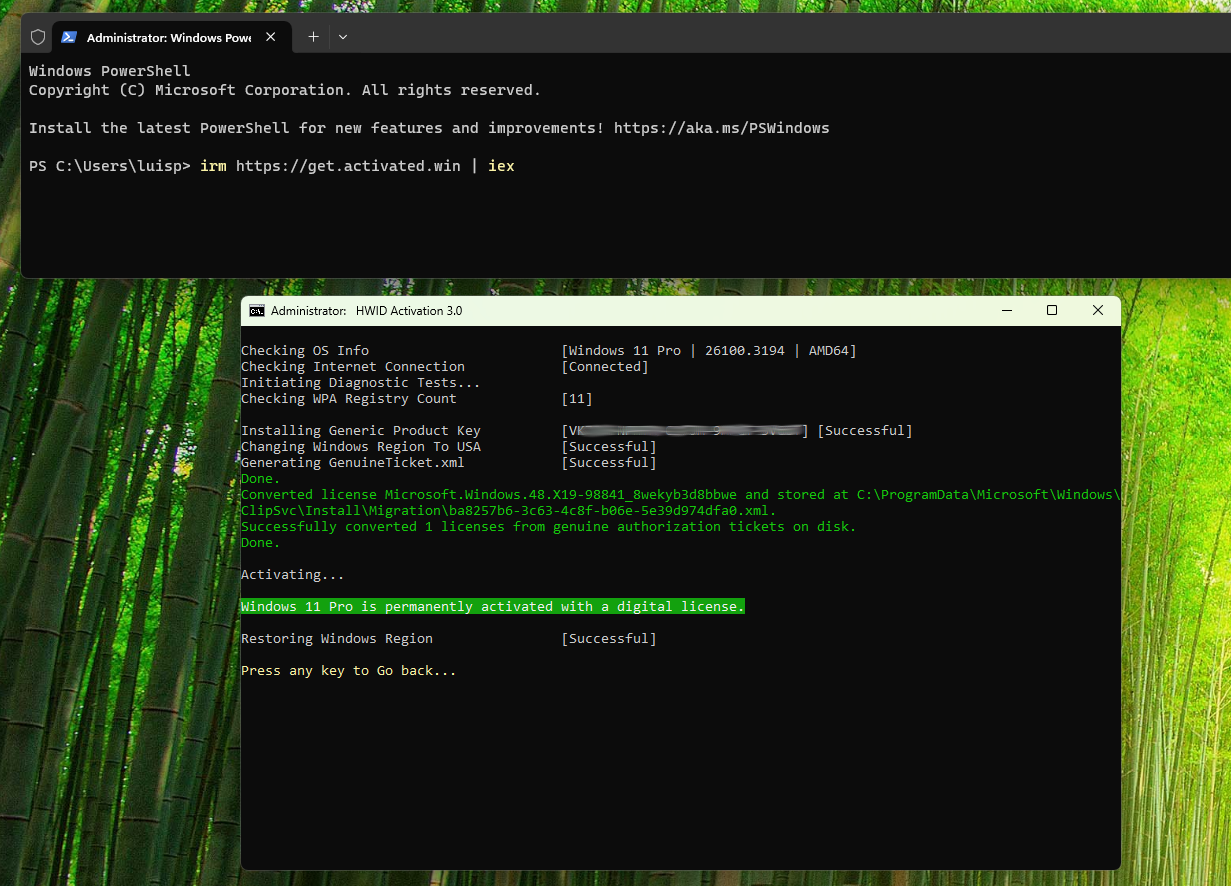
Another option is MAS, Microsoft Activation Script, an open-source activator for Windows and Office 365, 2024, etc… that includes HWID, Ohook, TSforge, KMS38 and Online KMS activation methods. I recommend reading the documentation. The quick shortcut would be like this, with PowerShell 7 which was installed in the previous step.
- Start/Search > PowerShell 7 > right-click > Run as Administrator.
irm https://get.activated.win | iex
- Among the activation options, you select
(1) HWID for Windows activationand it’s activated. - When it finishes you can check the activation status:
Start > Settings > System > Activation
- If you want to download and/or activate Office 365 go to option
(2) Ohook. Check out the documentation.
Step 2 - Win11Debloat for debloating
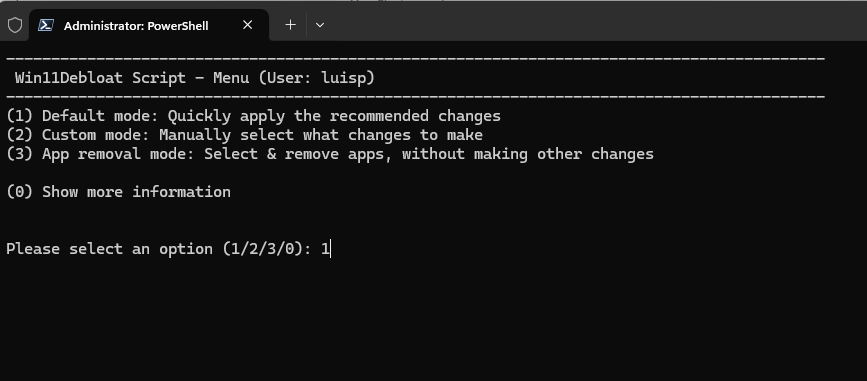
We’re ready for Win11Debloat, easy to use and lightweight. I recommend reading its wiki and its default execution.
My script already downloaded Win11Debloat (C:\Users\[user]\Desktop\Win11Debloat\).
Before running it, I modify the Appslist.txt file with the list of applications to uninstall.
PS C:\Users\luisp> cd Desktop\Win 11Debloat\Raphire-Win11Debloat-70ebe29>
PS C:\Users\luisp\Desktop\Win11Debloat\Raphire-Win11Debloat-70ebe29> notepad.exe Appslist.txt
I use this Appslist.txt. I’ve unchecked a few more than the defaults, except Edge because they recommend not doing it automatically, so I’ll leave that for later (removing Edge).
I run the script and select option 1.
.\Win11Debloat.ps1
Once it finishes I reboot the machine.
Step 3 - Manual debloating
From here on I’ll finish debloating manually.
Direct registry actions: Note: if you did an unattended installation this is already done.
I disable an option in Privacy & Security > General, “Let websites show me locally relevant content by accessing my language list”
reg add "HKEY_CURRENT_USER\Control Panel\International\User Profile" /v "HttpAcceptLanguageOptOut" /t REG_DWORD /d 1 /f
I change “User Account Control settings” to Never notify.
reg.exe add HKLM\SOFTWARE\Microsoft\Windows\CurrentVersion\Policies\System /v EnableLUA /t REG_DWORD /d 1 /f
reg.exe add HKLM\SOFTWARE\Microsoft\Windows\CurrentVersion\Policies\System /v ConsentPromptBehaviorAdmin /t REG_DWORD /d 0 /f
reg.exe add HKLM\SOFTWARE\Microsoft\Windows\CurrentVersion\Policies\System /v PromptOnSecureDesktop /t REG_DWORD /d 0 /f
Uninstall Edge and set Chrome as default:
- Start > Settings > Apps
Installed Apps: I remove Edge (Yes, I get rid of Edge as the machine’s browser. It’s not cross-platform!)
- I launch Google Chrome. I set it as default browser and make sure to review:
Default apps > Google Chrome > I verify everything is set to Chrome
Apps for Websites > everything off
Privacy changes:
- Privacy & Security. Note: if you did an unattended installation this is already done.
- Security > Windows Security >
Open Windows Security: Everything On - Windows Permissions > everything off in all options: General, Speech, etc…
- App permissions >
Location: Everything Off, the rest at default values
- Security > Windows Security >
Changing my user Home: Note: if you did an unattended installation this is already done.
During installation it created the user’s short name with the first 5 characters of the email, so it ended up as luisp and my user HOME at C:\Users\luisp\.
Change the HOME directory name (guide)
- Enable Administrator
net user Administrator /active:yes
- REBOOT and log in with Administrator (no password)
- Find my user (luisp) in the list and note the corresponding SID (S-1-5-21-…..).
- PowerShell:
Get-LocalUser | Select-Object Name, SID regedit->HKLM\SOFTWARE\Microsoft\Windows NT\CurrentVersion\ProfileList\S-1-5-21* -> ProfileImagePath- Explorer -> Rename the HOME
- PowerShell:
New-Item -ItemType SymbolicLink -Path "C:\Users\luisp" -Target "C:\Users\luis"
- Enable Administrator
Compatibility: During the time the old folder existed, programs may have been installed or registered with it, leaving “ghosts” everywhere.
- If for some reason you created a problematic symbolic link or it got recreated (by some ghost the folder), delete it:
rmdir C:\Users\luisp - Create a Junction:
mklink /J C:\Users\luisp C:\Users\luis
- If for some reason you created a problematic symbolic link or it got recreated (by some ghost the folder), delete it:
Remove less important Apps: Note: if you did an unattended installation this is already done.
- Start > Right-click on icons you want to Unpin or “Uninstall”
- For example in my case I removed LinkedIn, …
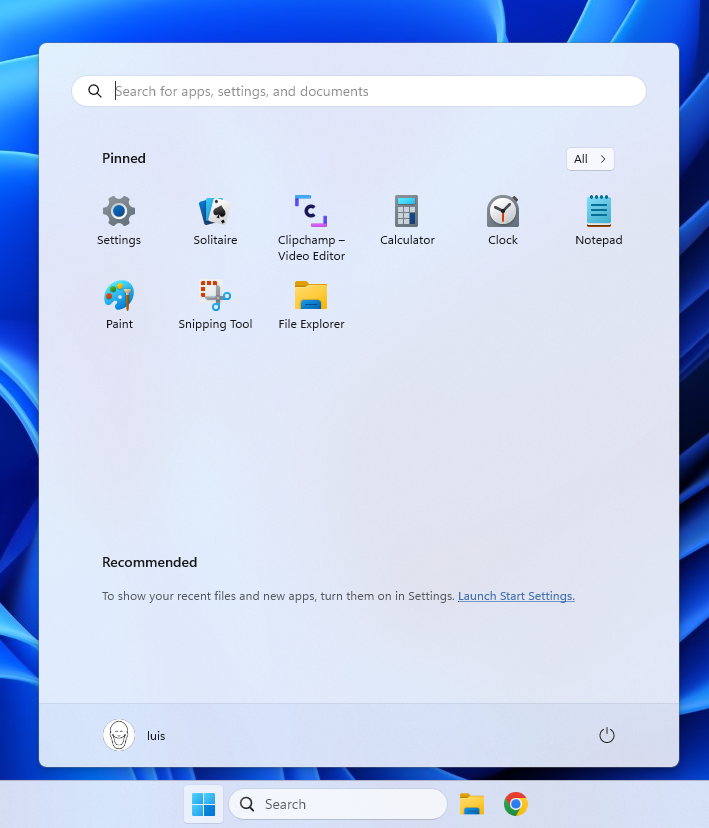
Customize the Taskbar: Note: if you did an unattended installation this is already done.
- Right-click on taskbar icons and one by one remove icons I don’t use.
- Start > type “Start settings” >
- Layout > More pins
- Show recently added apps > Off
- Show recommended files… > Off
- Show account notifications > Off
- Show recently opened > Off
Remove the English keyboard:
- I remove the US keyboard that was installed by default.
- Start > Settings > Time & Language > Language & Region
Preferred Languages > “…” > Options > Keyboards > Remove US (keep only Spanish)
- Start > Settings > Time & Language > Language & Region
File Explorer Show hidden files and directories, file extensions, etc.
- Start > Settings >
System>For developers- Enable developer mode if not already enabled.
- Go to >
File ExplorerShow file extensions: OnShow hidden and system files: OnShow full path in title bar: OnShow empty drives: On
Enable File Sharing Something I’ll need, so I configure it
- Start > Settings >
Network and Internet>Advanced network settingsAdvanced Sharing SettingsFile & Printer sharing: OnPublic folder sharing: On
- Start > Settings > System > About
Advanced System Settings> Computer Name > Change > “Make sure it’s in WORKGROUP”
- Enable SMB1.0
- Start > search “Control Panel”
Programs>Programs and featuresTurn Windows features on or off- Enable SMB 1.0/CIFS File Sharing Support.
Windows Firewall
- I configure it to minimize alerts and notifications. In my case the computer is connected to a private network but by default the installation set it to Public network
- Start > Settings > Network & Internet > Ethernet (and also WiFi)
- Change both to
Private Network
- Change both to
- Start > Settings > Network & Internet > Ethernet (and also WiFi)
- Configure the Windows Firewall to minimize alerts and notifications
- Start > search “Control Panel” > System & Security > Windows Defender Firewall > Advanced Settings”
- I review inbound and outbound rules to block or allow specific applications as needed.
- Start > search “Control Panel” > System & Security > Windows Defender Firewall > Change notification settings"
- Disable notifications, uncheck the “Notify me when Windows Defender Firewall blocks a new app” boxes
- Start > search “Control Panel” > System & Security > Windows Defender Firewall > Advanced Settings”
Disable Cortana
- Search “gpedit.msc” in the Start menu and open the Policy Editor
- Navigate to “Computer Configuration > Administrative Templates > Windows Components > Search”.
- Double-click “Allow Cortana” and select “Disabled”. Apply changes to disable Cortana.
Remove more pre-installed applications
- Remove pre-installed applications (bloatware or crapware) via PowerShell.
- What to uninstall? Depending on your PC manufacturer you can check Should I Remove It? which is decent and gives you guidance.
- You can use PowerShell as administrator. Command to list all installed applications
Get-AppxPackage | Select Name, PackageFullName
- Then, I use this command to uninstall apps I don’t need
Get-AppxPackage *AppName* | Remove-AppxPackage
Disable unnecessary services
- Open
services.mscfrom the Start menu.- Identify services I don’t need (for example, “xbox*”, etc.). Double-click the service, change “Startup type” to “Disabled” and apply changes.
With these additional recommendations, the system will be ready to offer a more direct user experience, without distractions or unnecessary interruptions.
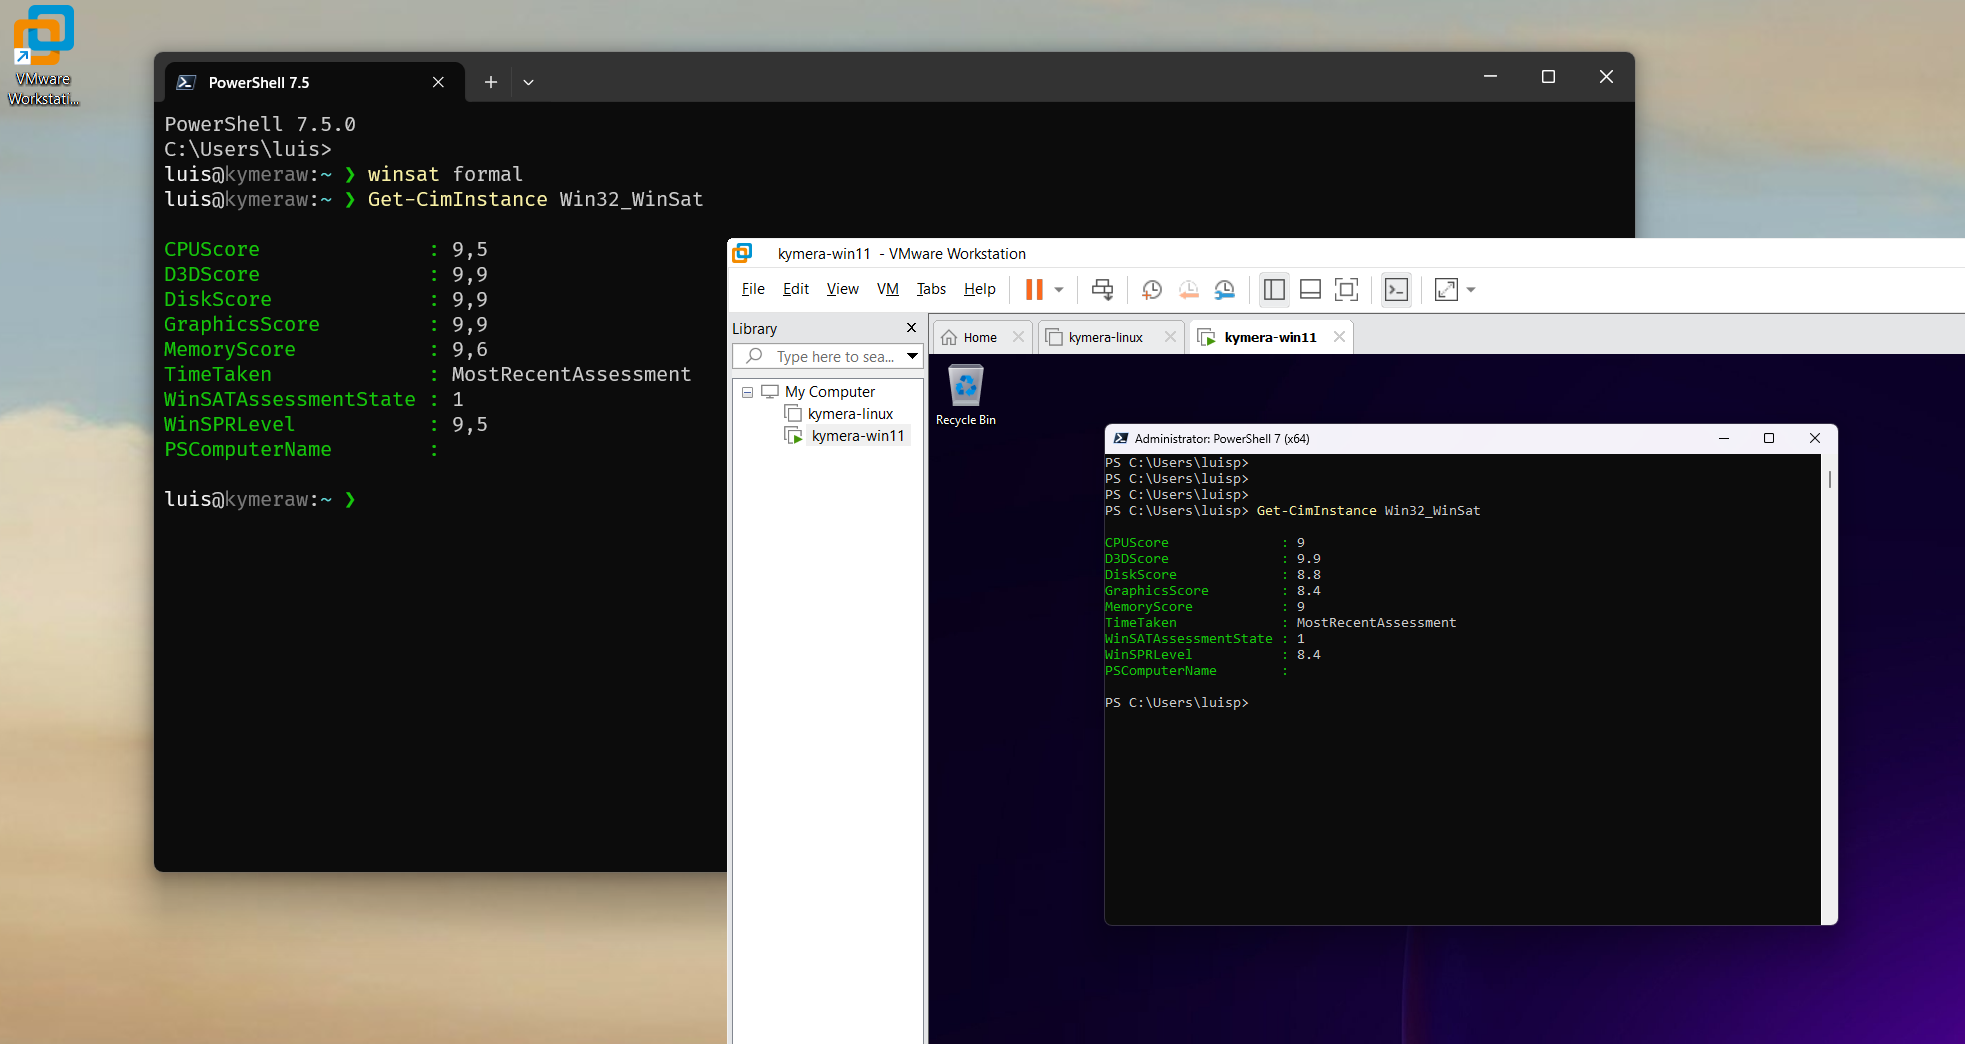
I run the Windows System Assessment Tool (WinSAT) tests used to analyze performance of various system components like CPU, memory, disk and graphics.
C:\Users\luis> winsat formal
C:\Users\luis> Get-CimInstance Win32_WinSat
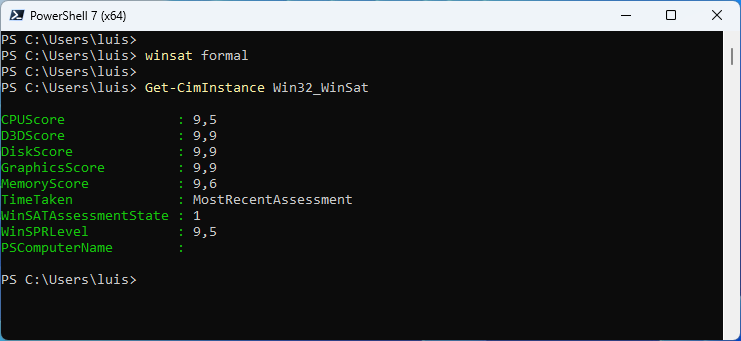
I followed the previous steps to also optimize a Windows virtual machine running on an optimized Windows, as you can see the virtual machine performance is very decent.
Maintenance: Useful commands
Useful commands, which I run as administrator
chkdsk: Checks the hard drive status and displays a report with the necessary information. It also fixes problems and can even recover lost data.sfc /SCANNOW. Scans the integrity of all system files and fixes problems with them. WARNING!!: Microsoft had a known issue that went unresolved for years. If it happens and finds a problem in thebthmodem.sysfile and removes it, you’ll seeCorrupt File: bthmodem.sys. It’s resolved by running the next command.dism /online /cleanup-image /restorehealthto fix the issue. It connects to the Windows Update service to download and replace any important files that are missing or corrupted.
We’re done, we end up with a much cleaner, faster Windows 11 free of distractions.
devcli Tool
If you enjoy working in the CLI, check out the post Windows for software development where I talk about CLI, Terminal, WSL2 and additional tools.
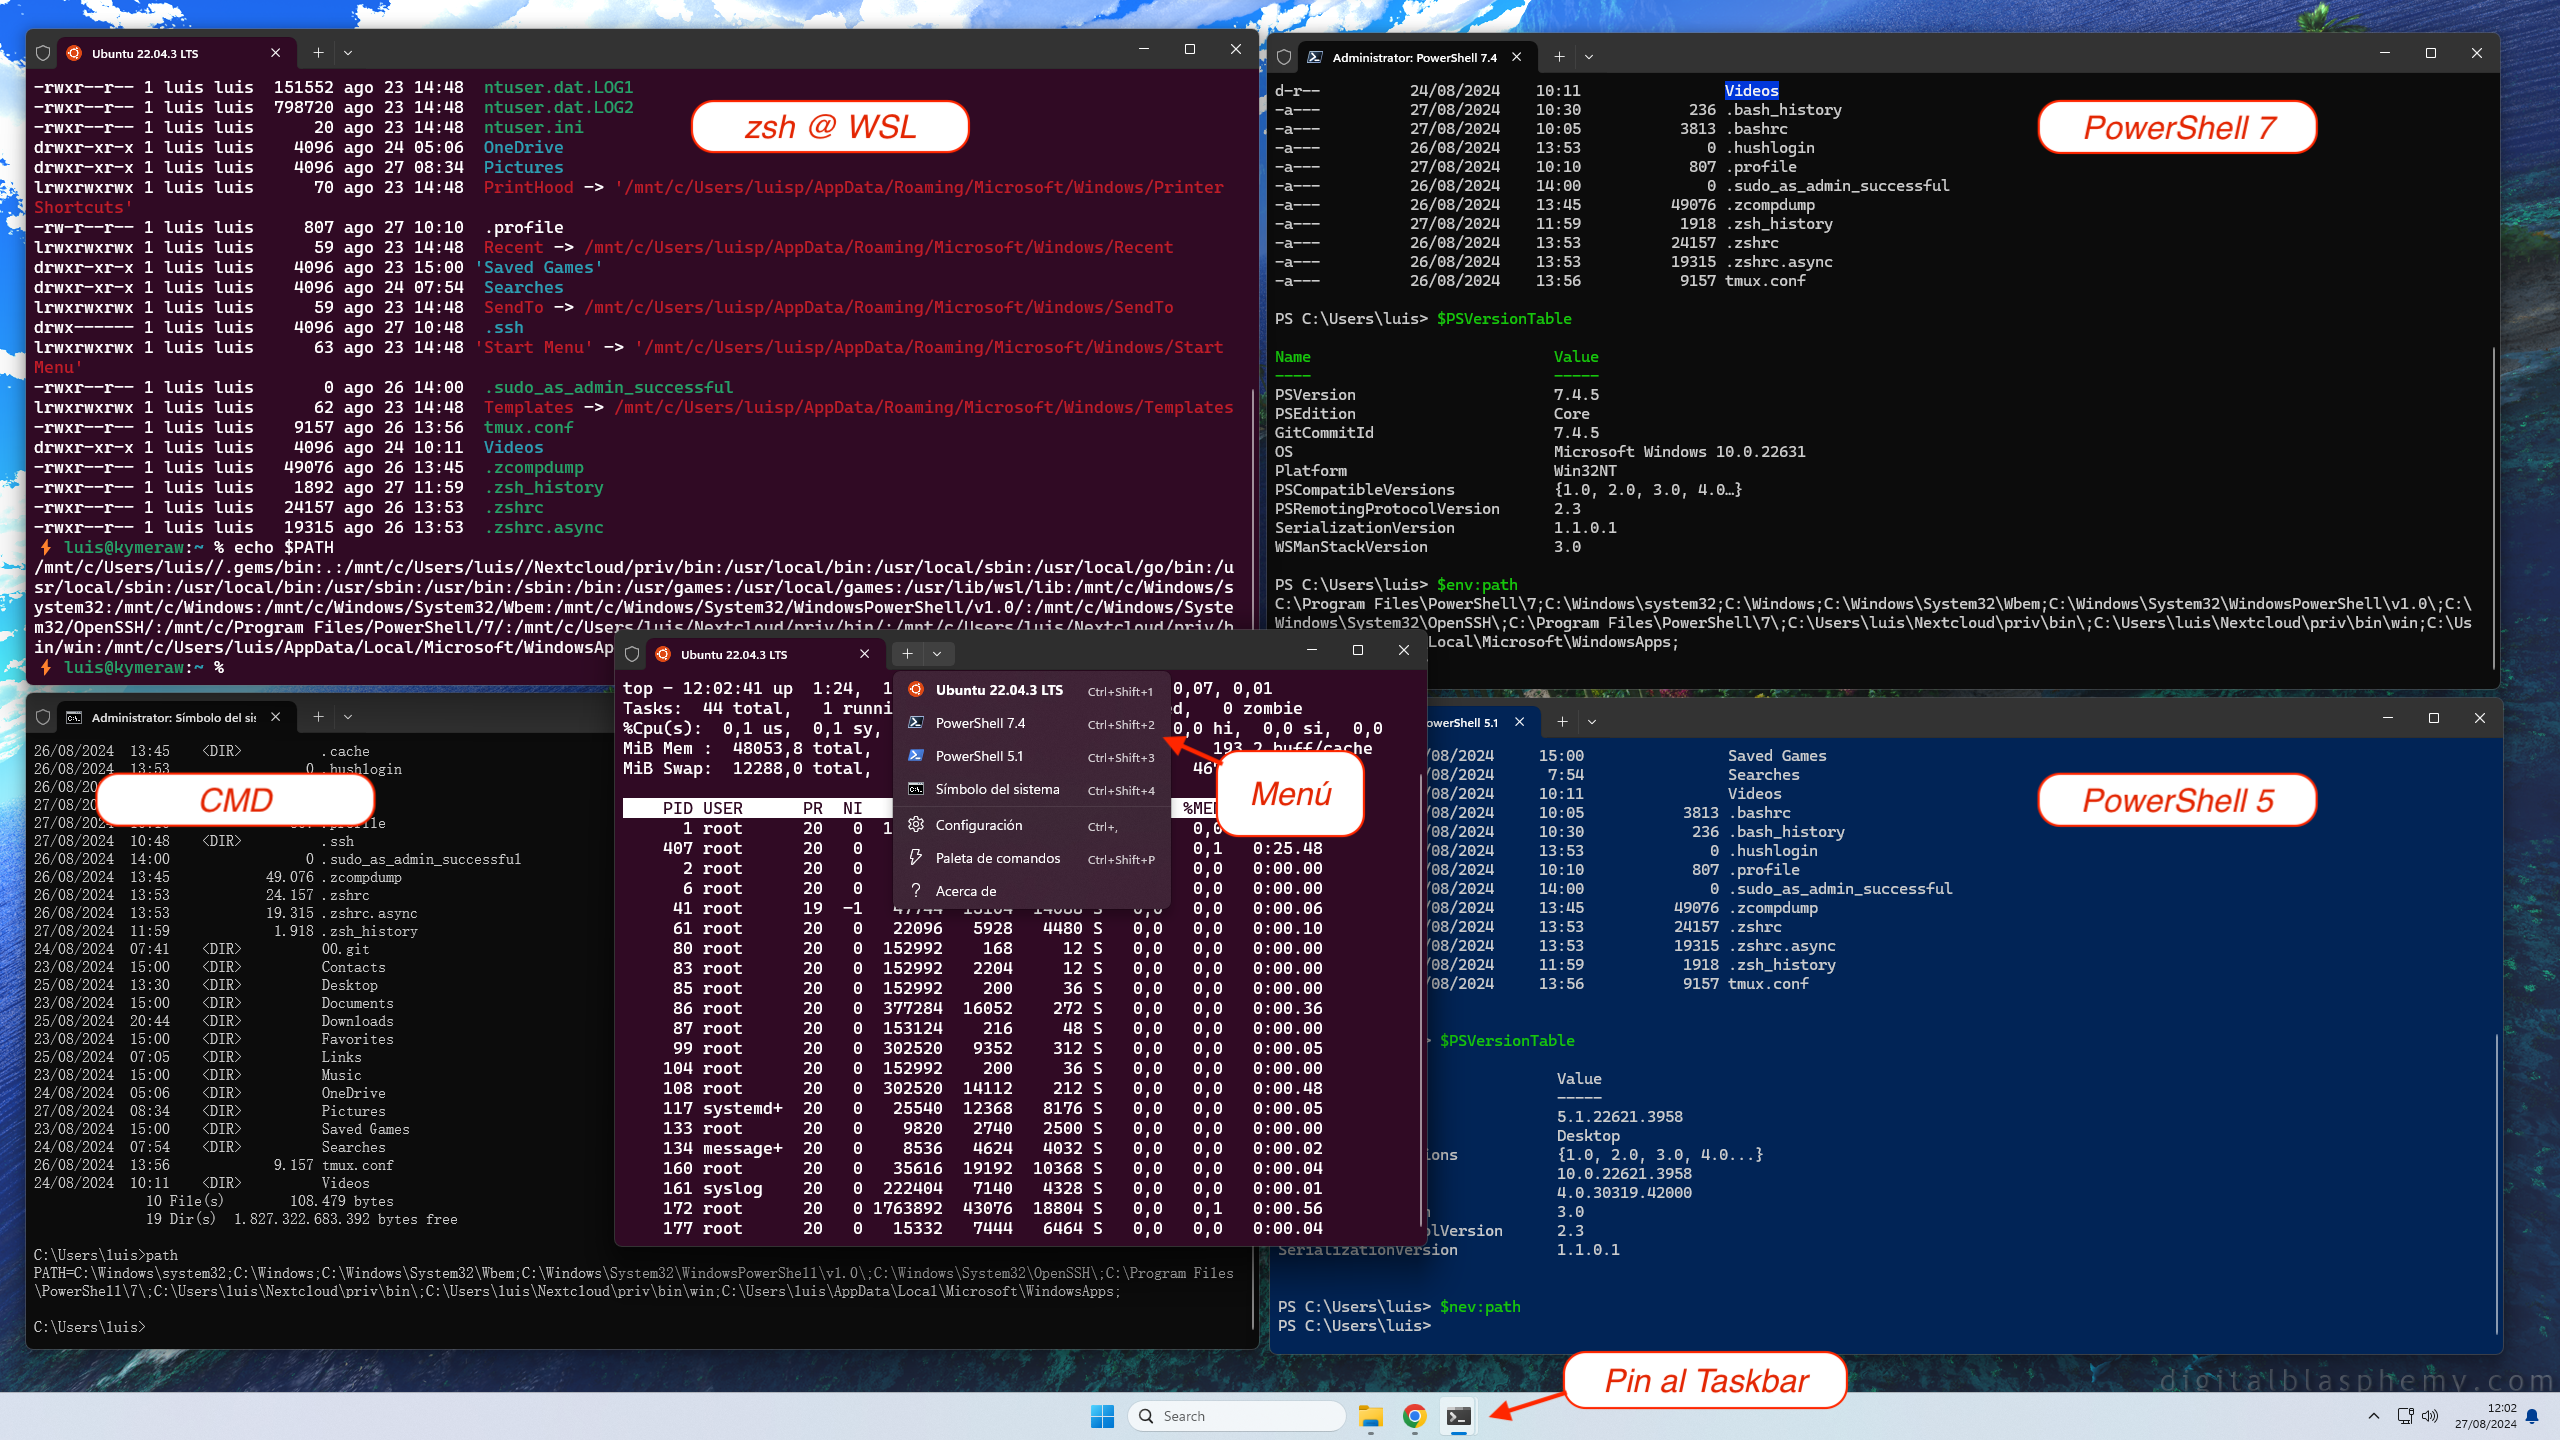
There I mention the devcli project I have on GitHub, which lets you configure the CLI environment on Linux, macOS, WSL2 and Windows. After debloating Windows, it’s a good idea to set up the CLI, especially if you’re a CLI addict or a developer.
- Installs tools like: git, curl, wget, nano, htop, tmux, fzf, bat, fd-find, ripgrep, tree, jq, lsd, zoxide
- Installs Oh-My-Posh, for any Shell, they say it’s the best prompt.
- Sets the LANG variable (defaults to es_ES.UTF-8) on linux, macOS and WSL2
- Copies important configuration files (see the dotfiles subdirectory)
- Copies my git toolbox from gitbox.
- Creates several scripts in ~/bin that I use frequently: e, s, confcat
- Automatically installs FiraCode Nerd Font to support icons in tools like lsd.
Unattended Installation
If you want to try a different installation approach, I studied a couple of projects and tested them: UnattendedWinstall and WIMUtil, for unattended installation. These are the steps I took:
Install ADK:
- On a Windows 11 I installed the official Microsoft tool for customizing images (WindowsADK), to get oscdimg.exe which is used later.
- I download Windows ADK, install it and only choose the Deployment Tools.
- I copy the contents of
cd 'C:\Program Files (x86)\Windows Kits\10\Assessment and Deployment Kit\Deployment Tools\amd64\Oscdimg\'to a directory in my PATH.
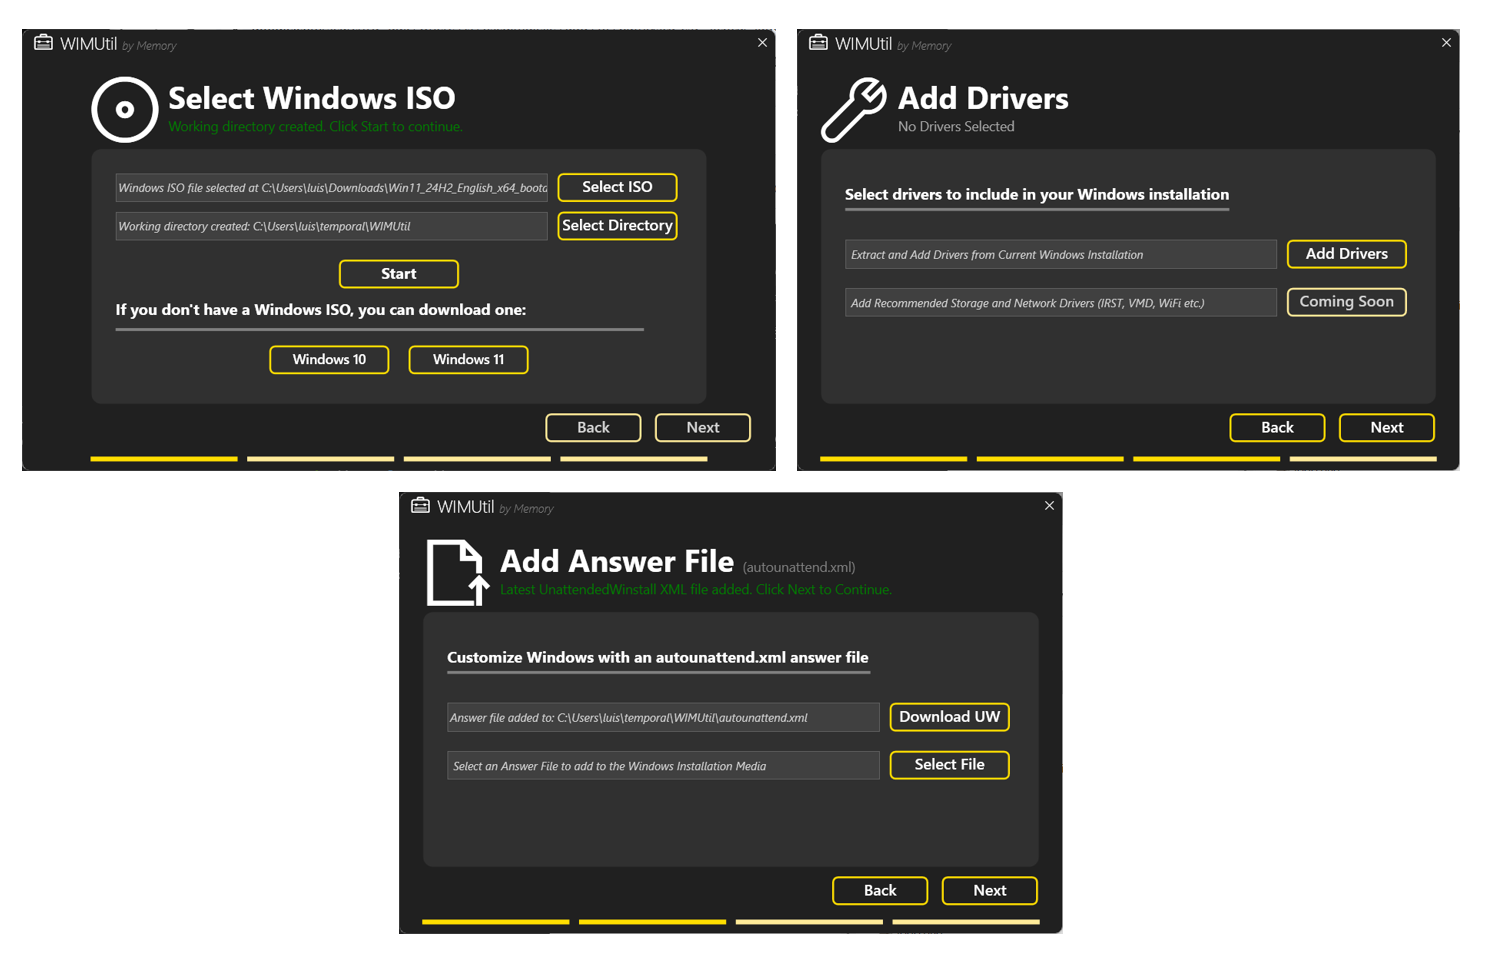
Run WIMUtil:
- I launch PowerShell as administrator and run the following.
irm "https://github.com/memstechtips/WIMUtil/raw/main/src/WIMUtil.ps1" | iex
- This process creates a Custom ISO (using the
autounattend.xmlfrom the UnattendedWinstall project)- I select ISO, temp directory, START.
- Next, customize windows > Download UW (automatically downloads UnattendedWinstall). I don’t add an answer file.
- Next, optionally “Add Drivers” from the Windows you’re running on.
- Next, Select Location >
win11-custom.iso - Create ISO
I create a VM to test it. More about a virtual machine with Windows 11 -> VMWare on Windows.
- W11 VMWare Workstation > New virtual Machine > Typical > Installer disc >
win11-custom.iso. The “few” things it asks are:- VMWare asks: Name, encryption type (“Only the files needed…”), rest as default.
- The installation process: Language, time and currency, keyboard, No product key, Windows 11 Pro, Disk format; Region and keyboard, user and password, security questions.
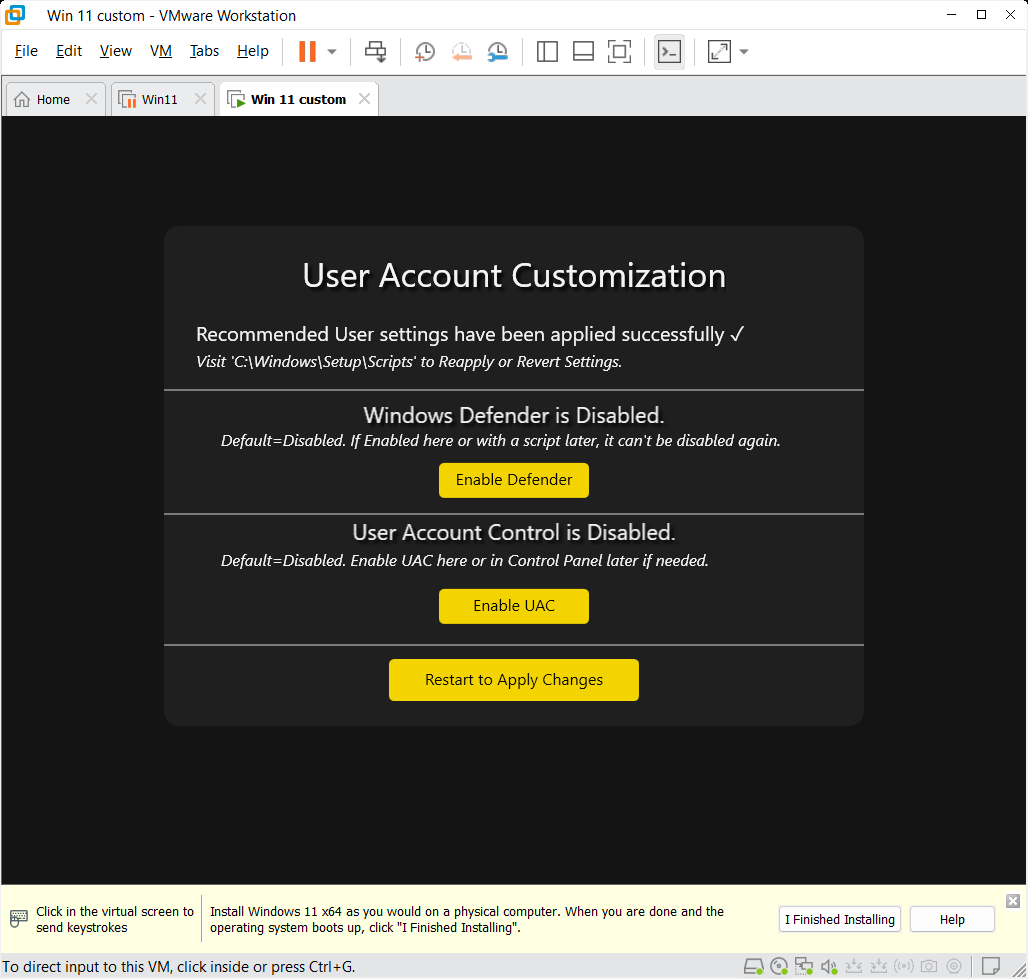
- IMPORTANT: When it finishes, Defender and UAC are disabled. You can re-enable them
- In my case I only enable Defender.
- Click Restart, Install VMWare Tools.
That’s it, quick and simple. I continue with Step 1: Prepare the OS to debloat it even further.
Useful Links
Here are some links I studied and found useful:
- Clink: Greatly enriches CMD (
command.com) with a readline like Linux’s, adds multiple features, colors, history. - Ccleaner Looks very good, though to access the “cool” features you need to buy the Professional license.
- BleachBit An Open Source alternative to CCleaner, which looks great. It lacks the Registry and Performance Optimization parts.
- Before installing the latest version, you need to download the Visual Studio 2919 (VC++ 10.0) redistributable SP1 x86, the x86 version. Even though my system is 64-bit it doesn’t matter because it will use the x86 version dll.
- TCPView A free Microsoft tool (from the Sysinternals suite) that lets you see all active network connections on your Windows system in real time.
- Autoruns A free Microsoft Sysinternals tool that shows you everything that runs automatically when Windows starts. It’s much more powerful and complete than Task Manager or MSConfig.
- Sysinternals Suite If the previous two aren’t enough, you can install the big brother, the Sysinternals Suite, which includes them. These are the set of advanced tools originally created by Mark Russinovich and Bryce Cogswell, now maintained by Microsoft. They’re designed to diagnose, monitor, debug and deeply understand how Windows works.
- Unattended installation: - Generate
autounattend.xmlfor Windows 10/11
Lastly, check out Winhance - Windows Enhancement Utility, after all the cleanup, I ended up installing it and there were still things here and there I could clean up.