Kubernetes (K8s) is an open-source platform for automating the deployment, scaling, and management of containerized applications. It was built to work with Docker and depending on who you talk to, they’ll either say it’s hell or a piece of cake. The truth? If you’ve struggled with infrastructure (servers, networks), logged many hours with Linux, Docker and containers, it might not be that hellish and it’ll depend on how many hours you put in.
Like most of my posts, this is based on documenting my Home Lab, with hours of testing, things that stop working when you least expect it. But the good thing is you learn a ton and, if you’re a bit of a geek, you even have fun. Here’s my experience, with tricks, mistakes and everything I wish I’d known before starting.
Introduction
Why am I getting into Kubernetes at this point? Well, blame my friend Ivan. He told me I was wasting my time and status with Proxmox, that I’d enjoy K8s, and honestly, he got me hooked. He also warned me that there are two ways to approach it: the hard way, starting from the bottom, learning the K8s internals and working up. Or the easy way, grab one of the “simple” distros, install it and start playing; there’ll be time to dig into the low level.
This is the result, my first post in a series about Kubernetes. A quick note: what’s K8s? Well, it’s a numeronym, a numeric abbreviation that comes from counting the letters between “K” and the final “s”: K 8 (u, b, e, r, n, e, t, e) s. Another numeronym example is i18n, for “internationalization”.
Back to the Home Lab topic. I always set a “production” goal, and the current one is nothing less than migrating my Proxmox 9, its VMs and containers to K8s, easier said than done. I’ll start by replicating what I have (10 LXCs, several VMs and 15 docker stacks) to a new “Single-Node” server I’ll call tierra, with Ubuntu and K3s (a super simple K8s distribution). What can stay in Docker will stay there, and what can’t will become a VM (on KVM, thanks to the KubeVirt project that lets you “manage” VMs/KVM from K8s).
Basic concepts:
K8s is a container orchestration platform. If Docker lets you package and run applications in isolated containers, K8s goes a step further: you can manage, scale and coordinate multiple containers distributed across one or more servers as if they were a single unit.
Imagine you have a web application with a database, a backend API and a frontend. With Docker you can create containers for each one, but what happens if you need to scale the backend because there’s more traffic? Or if a container goes down? How do you manage communication between them? The answer is K8s, it solves all these problems automatically.
In K8s the containers that make up an application are grouped into logical units called Pods to facilitate management and container discovery. A Pod is the smallest unit and can contain one or more containers that share network and storage resources. Pods always run on the same node (server).
K8s is built to work at massive scale. It was designed by Google, which runs billions of containers. It can scale without increasing the operations team. Workloads can be simple or super complex, it’s open source, you can run it on-premise, hybrid or in the cloud. Best of all, you can move workloads wherever you want without effort.
Single-Node Cluster
Let’s start with the simplest setup: a single Cluster with a single Node, acting as both Controller (Master) and Worker. Physically it will be a NUC where I install Ubuntu and add k3s.
I start by installing Ubuntu Server, downloading the ISO from Ubuntu 24.04.3 LTS, burning it to a USB and using it for installation.
- Server:
tierra - Static IP:
192.168.103.1 - DNS name in my home lab:
tierra.parchis.org - Packages: I only install
openssh
I log in via SSH with my user and prepare it for remote administration.
- I set up my user
luisto runsudocommands without password (a bit ofsudoers). - I configure
.ssh/authorized_keys, adding the public key from my workstation (passwordless SSH) - On the server I install CLI Setup. Optional but recommended. It’s my “powerful CLI with identical environments and tools” on any Linux, macOS or Windows. Check out the repository.
On my workstation I prepare .ssh/config to reach tierra easily.
# K8s server tierra
Host tierra tierra.parchis.org 192.168.103.1
    HostName 192.168.103.1
    User luis
    Port 22
    IdentityFile ~/.ssh/id_ed25519
    IdentitiesOnly yes
K3s Installation:
Next step, install K3s, one of the lightest K8s versions, oriented to IoT and Edge computing, packaged in a single binary under 70MB that sets up everything needed. Check the official documentation at the link.
Since we’re going the easy route, instead of following the installation process described in its documentation, I use k3sup (pronounced ‘ketchup’). A cross-compiled tool for Windows, Linux, macOS that you install on your workstation and lets you set up K3s remotely in no time. That’s right, you don’t even need to SSH into the server, it does everything remotely.
- I install the latest release of
k3sup. On Windows I downloaded the executable from Releases and copied it to a directory in my PATH. - Since I already had SSH set up, I just ran the following command and it installed everything on
tierra, the K3s binary and the Cluster configuration with a single “Master and Worker” K8s node.
k3sup install --ip 192.168.103.1 --user luis --ssh-key ~/.ssh/id_ed25519 --local-path C:\Users\luis\kubeconfig
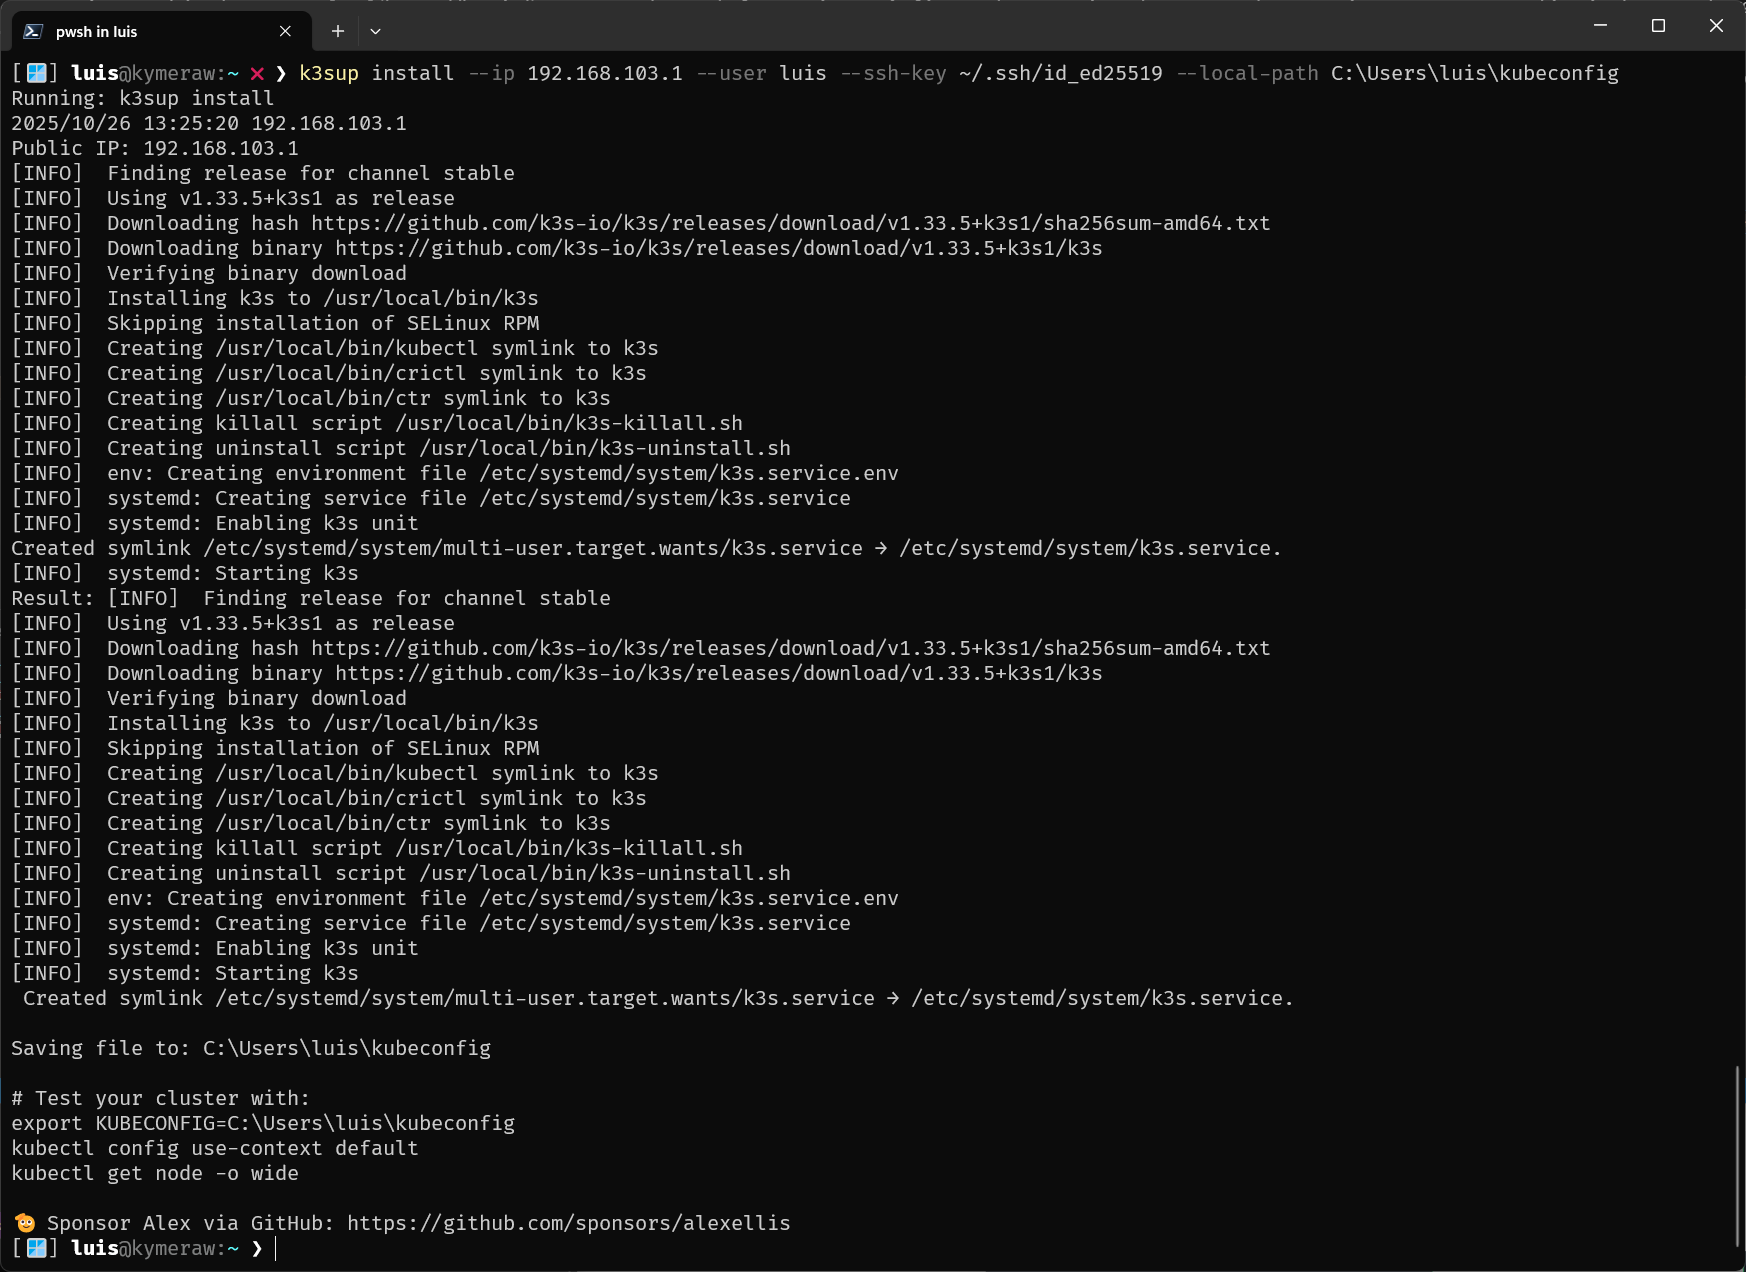
That’s it, K8s is “up & running”. It also leaves me a local file (example on Windows: C:\Users\luis\kubeconfig) that the Client tool will use (later on). So far it’s been super simple. I don’t need to go to the server, but I can’t resist and I connect to check how healthy k3s is (output trimmed).
[🪟] luis@kymeraw:~ ❯ ssh tierra
[🐧]  luis@tierra:~ ❯ sudo k3s check-config

Verifying binaries in /var/lib/rancher/k3s/data/86a616cdaf0fb57fa13670ac5a16f1699f4b2be......
- sha256sum: good
- links: good

System:
- /usr/sbin iptables v1.8.10 (nf_tables): ok
- swap: should be disabled
- routes: ok

Limits:
- /proc/sys/kernel/keys/root_maxkeys: 1000000

modprobe: FATAL: Module configs not found in directory /lib/modules/6.8.0-86-generic
info: reading kernel config from /boot/config-6.8.0-86-generic ...  <==== !!!!!!!!!!!!!!!!!!!

Generally Necessary:
- cgroup hierarchy: cgroups V2 mounted, cpu|cpuset|memory controllers status: good
- /usr/sbin/apparmor_parser
apparmor: enabled and tools installed
- CONFIG_NAMESPACES: enabled
:
- CONFIG_POSIX_MQUEUE: enabled

Optional Features:
- CONFIG_USER_NS: enabled
:
- CONFIG_RT_GROUP_SCHED: missing                  <==== !!!!!!!!!!!!!!!!!!!
:
- Network Drivers:
  - "overlay":
    - CONFIG_VXLAN: enabled (as module)
      Optional (for encrypted networks):
      - CONFIG_CRYPTO: enabled
      :
      - CONFIG_INET_XFRM_MODE_TRANSPORT: missing  <==== !!!!!!!!!!!!!!!!!!!
- Storage Drivers:
  - "overlay":
    - CONFIG_OVERLAY_FS: enabled (as module)

STATUS: pass
Let me explain some of the output…
modprobe: FATAL: Module configs not found.... No action needed, it’s cosmetic.CONFIG_RT_GROUP_SCHED: missing. Missing real-time scheduling support for cgroups. Not needed for standard k3s or K8s operation and since I won’t have real-time workloads, I ignore it.CONFIG_INET_XFRM_MODE_TRANSPORT: missing. Missing ESP transport mode support. This is an optional feature for VXLAN encryption. Since I won’t be using it, I ignore it.
This next one caught my attention.
- swap:
should be disabled. Important, K3s (and K8s in general) recommends disabling swap memory.
I edit the /etc/fstab file, commenting out the following line:
#/swap.img none swap sw 0 0
I reboot the NUC server:
# reboot
Client
kubectl is “The Tool” of K8s. This one you need to learn! With it you can run commands on K8s Clusters, deploy applications, inspect and manage resources and view logs. Everything is done remotely, from your workstation, talking to the K8s API server endpoints. In my case I install it on a couple of workstations with Windows and macOS.
By the way, my CLI Setup tool installs it on any OS, but here are links on how to install it on macOS, Windows or Linux. An example:
# MacOS
brew update
brew install kubectl

# Windows
scoop install kubectl
kubeconfig: To make kubectl’s job easier we have this file, which tells it where your cluster(s) are and much more. It has information about clusters, users, Namespaces and authentication mechanisms. You can select a cluster and communicate with its API server, it stores contexts (URLs and credentials).
In my case k3sup created one already set up to access the tierra cluster.
apiVersion: v1
clusters:
- cluster:
    certificate-authority-data: <---------------key-------------->
    server: https://192.168.103.1:6443
  name: default
contexts:
- context:
    cluster: default
    user: default
  name: default
current-context: default
kind: Config
preferences: {}
users:
- name: default
  user:
    client-certificate-data: <---------------key-------------->
    client-key-data: <---------------key-------------->
To use kubectl I recommend setting up a variable so it knows where to find the file.
# On linux/macOS
export KUBECONFIG="${HOME}/kubeconfig"
# On Windows/PowerShell
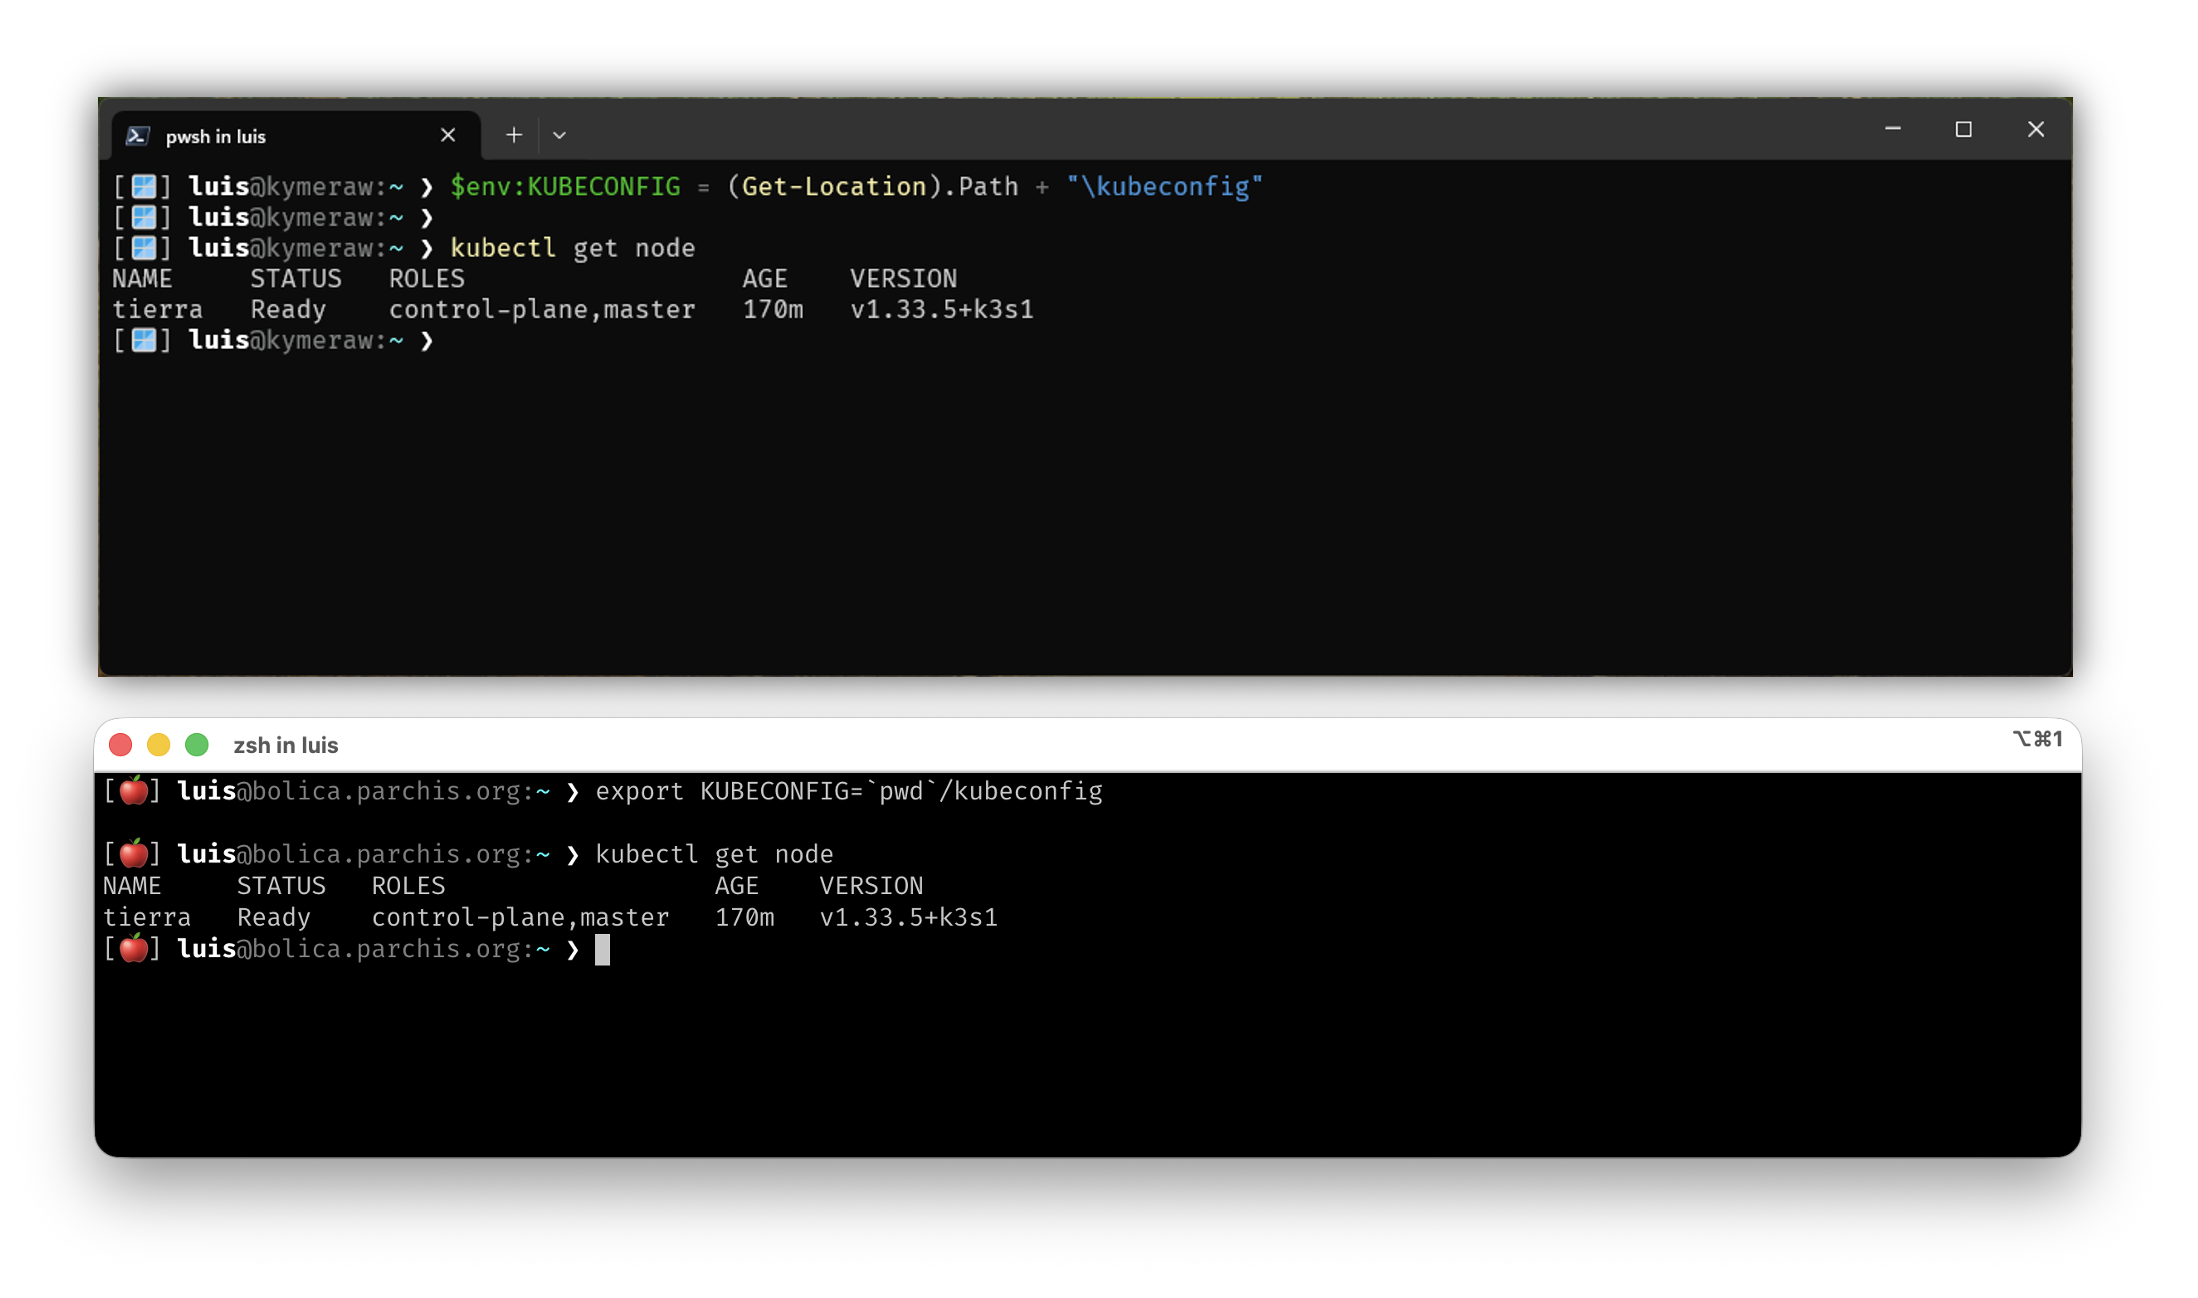
$env:KUBECONFIG = (Get-Location).Path + "\kubeconfig"
# On Windows/CMD
set KUBECONFIG=%CD%\kubeconfig
From now on I can use kubectl to manage my cluster remotely. Below is an example running from a couple of remote workstations (I use the same kubeconfig on both, Windows and macOS).
Components and concepts
Before moving on and sending commands to our Cluster, it’s important to understand some fundamental K8s concepts. I’ve already mentioned some above, but here I explain them more clearly and how they relate to each other:
Cluster: When we deploy K8s, we get a Cluster. It’s the complete set of machines (Nodes) that work together to run our applications. In this post, the cluster is tierra, a single server with K3s.
Node: A Node is a worker machine in K8s. It can be a physical server or a virtual machine. In our single-node Cluster, tierra acts as both the Master Node (control plane) and Worker Node. In production, you’d normally have several separate nodes for high availability.
Pod: I already mentioned this, but it’s the smallest deployable unit of computing in K8s. A Pod groups one or more containers that share network and storage resources, plus a specification on how those containers should run. They always run on the same Node. When you deploy an application, K8s creates Pods to run your containers.
Pods in K8s are ephemeral: they’re designed to be disposable and replaceable. We can’t add a container to a Pod once created. Instead, we normally delete and replace Pods in a controlled way using deployments.
Control Plane: It’s the “brain” of the cluster. It exposes the K8s API (which kubectl uses to communicate), manages the desired state of the cluster, schedules Pods on nodes and coordinates all the orchestration. In K3s, the control plane is embedded and simplified, which is why it’s so lightweight.
In summary, a K8s cluster is made up of Worker Nodes that run containerized applications (inside Pods), and a Control Plane that manages and orchestrates everything. In our case, with K3s and a single-node cluster, tierra does both: it’s the control plane and the worker at the same time.
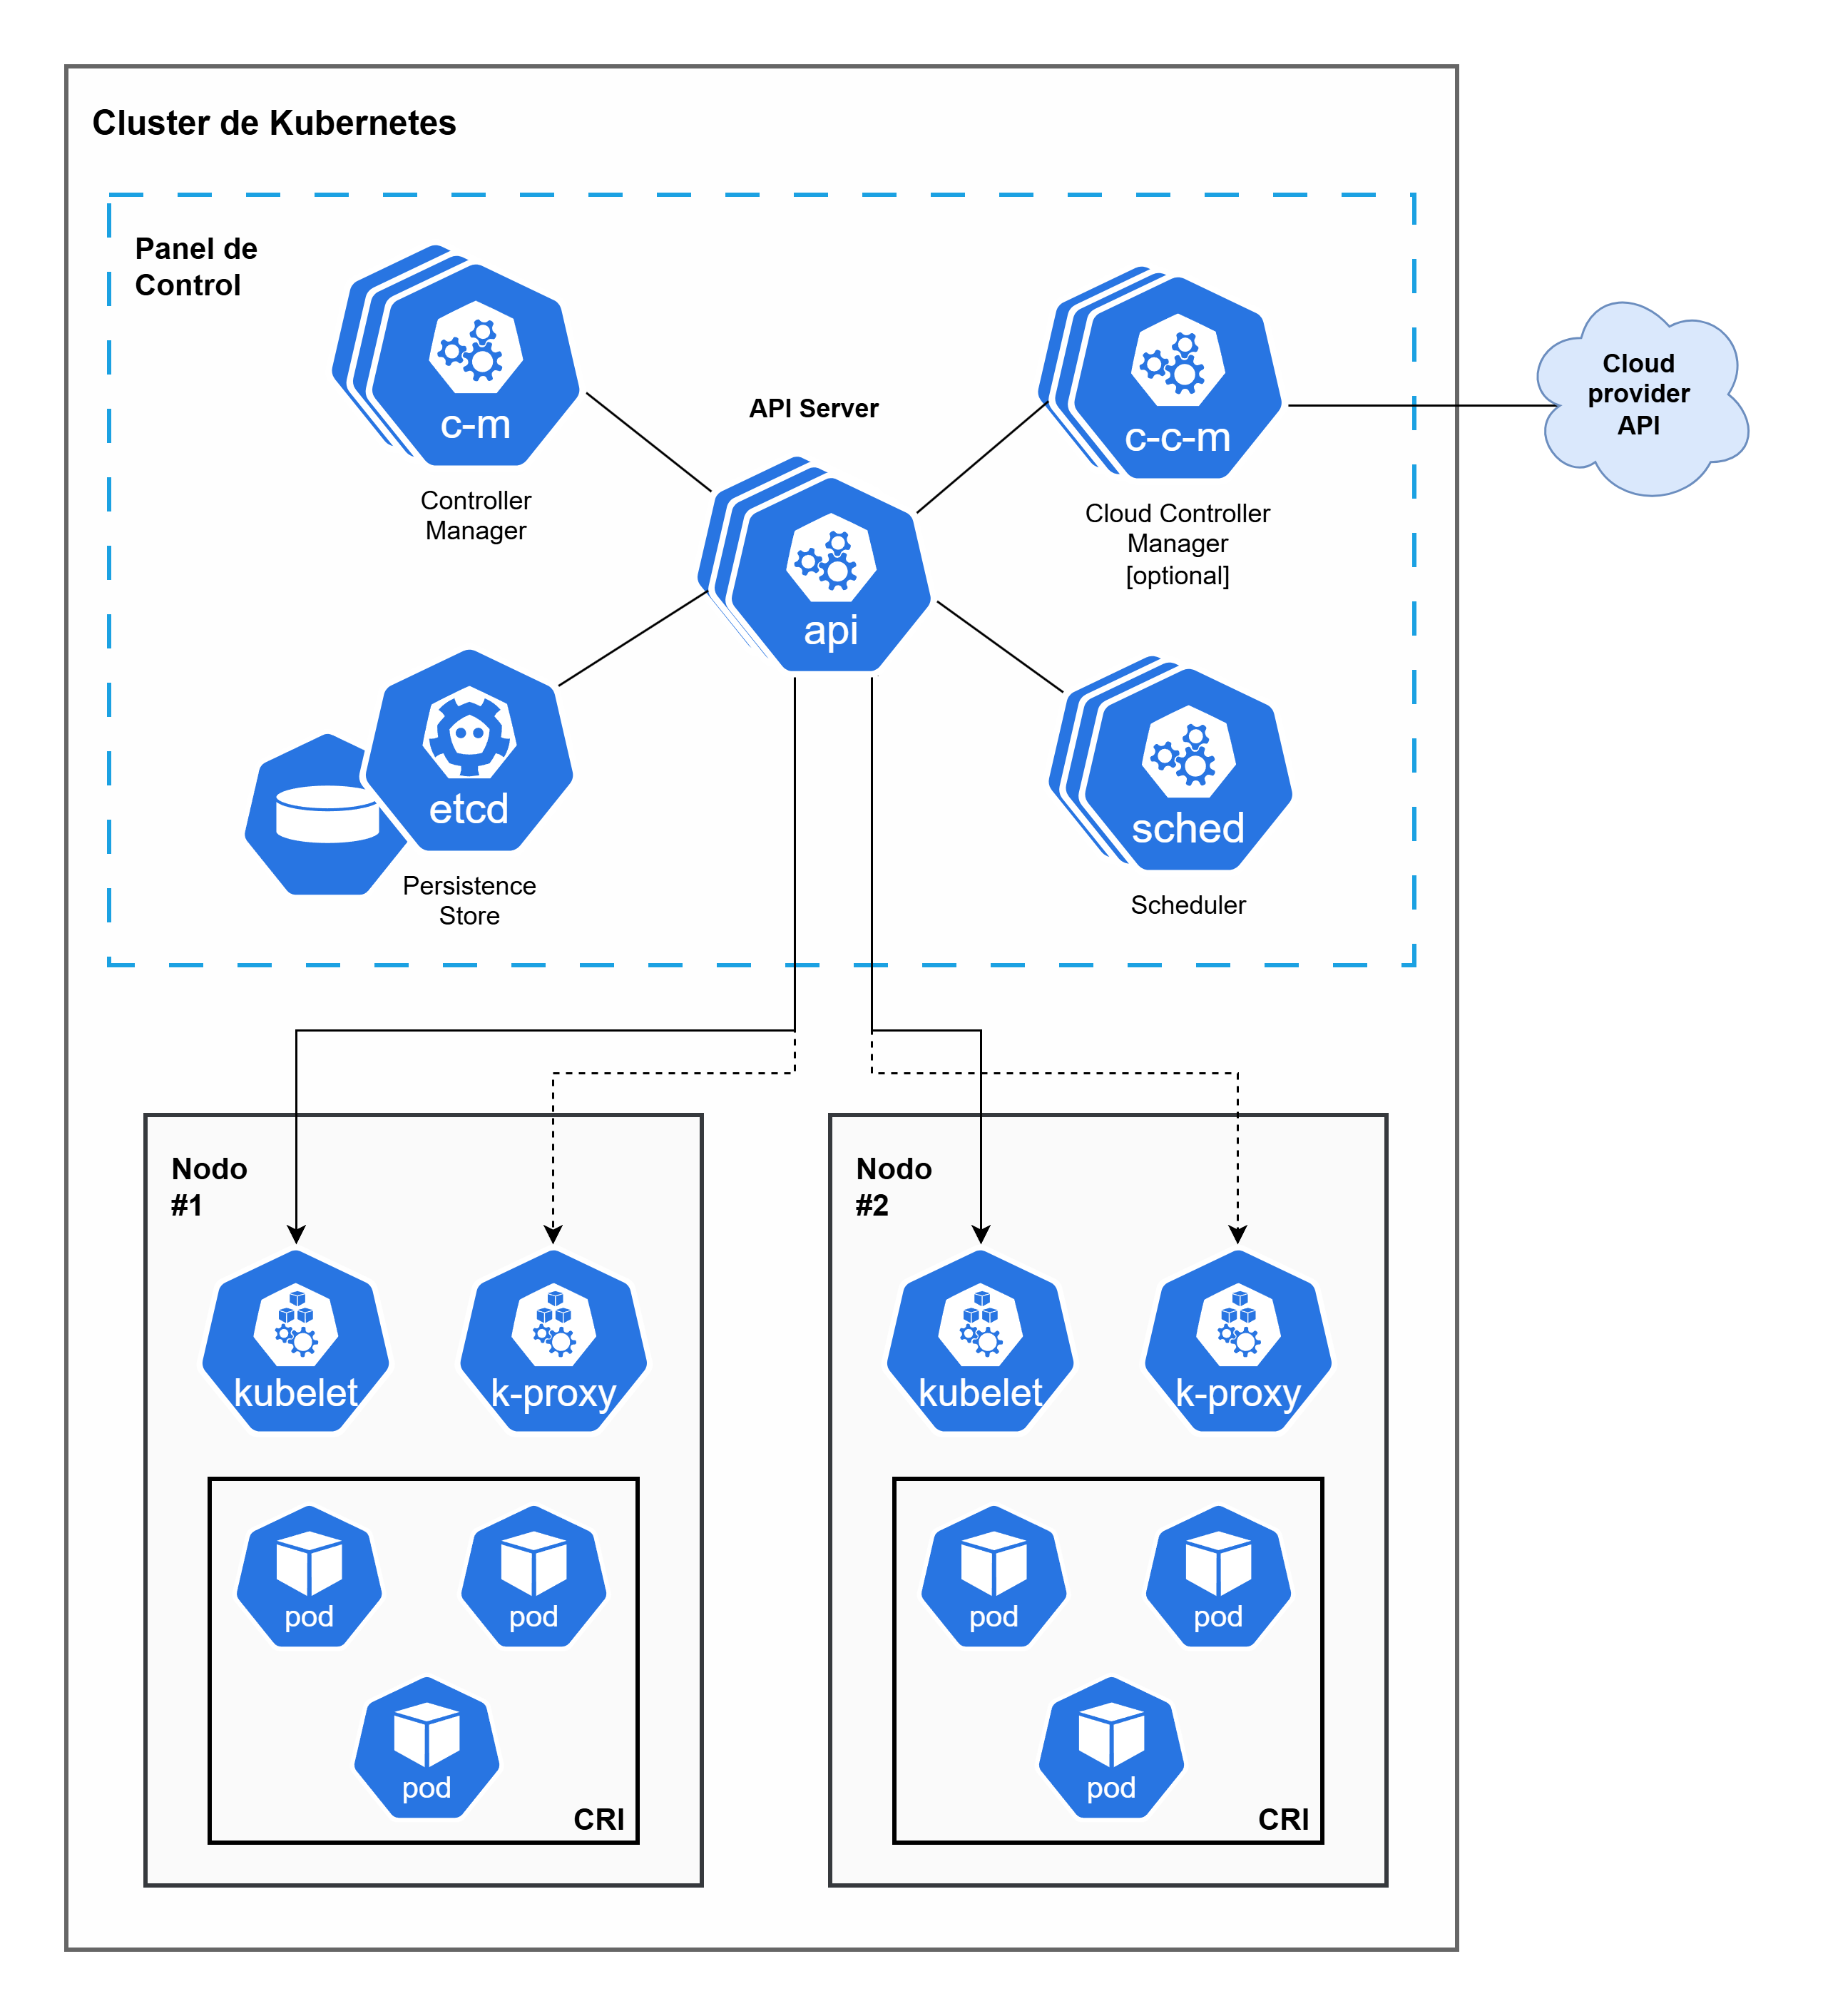
Control Plane
- etcd: Highly available key-value data store that holds the cluster’s configuration state and data. It’s the source of truth for K8s.
- API (kube-apiserver): The connection point for the control plane. Exposes the K8s API. It’s the only component that interacts with
etcd. - sched (kube-scheduler): Watches for newly created Pods without an assigned node and selects a node for the Pod to run on (based on resources, policies, etc.).
- c-m (kube-controller-manager): Runs the control processes. Each controller handles a type of resource (e.g. Deployment, StatefulSet, Node). Its focus is bringing the cluster’s current state to the desired state.
- c-c-m (cloud-controller-manager): Runs controllers specific to interacting with the underlying cloud provider’s API (AWS, Azure, GCP, etc.). Handles provisioning resources like nodes, load balancers and persistent storage. (Only needed in cloud clusters).
Worker Nodes
- kubelet: An agent running on each node. Communicates with the API Server, ensures Pods are running on the node and that their state matches what the API Server has indicated. It’s responsible for creating and managing containers in the Pod.
- k-proxy (kube-proxy): Maintains network rules on the host and acts as a network proxy for K8s Services.
Other concepts
CRI, or Container Runtime Interface: An interface that allows kubelet (the agent on each K8s node) to communicate with different container runtimes (CRI-O or containerd), without needing to recompile cluster components. It defines the protocol for kubelet to create, start and manage containers on nodes, ensuring K8s can work with a variety of container runtime solutions in a standardized way.
- Plugin Interface: Allows kubelet to work with any compatible container runtime, making K8s more flexible.
- gRPC Protocol: The interface defines gRPC-based communication between kubelet and the container runtime.
- Runtimes: Popular CRI implementations include CRI-O (developed by Red Hat) and Containerd.
- OCI Standards: CRI-compatible K8s runtimes are typically compatible with Open Container Initiative (OCI) standards, ensuring interoperability.
Taint/Toleration: The Taints and Tolerations mechanism works as a pair to ensure Pods aren’t scheduled on inappropriate nodes.
Taint: Applied to the node. Marks the node to prevent or evict Pods that don’t tolerate that taint.
Toleration: Applied to the Pod. It’s a Pod’s ability to accept or “tolerate” a specific taint on a node, allowing the Pod to be scheduled there.
Of course, this is just scratching the surface. K8s has much more: Services, Deployments, ConfigMaps, Secrets, Namespaces… but to get started and understand how the basics work, this is enough. If you want to go deeper, I recommend the official K8s documentation.
Working with the Cluster
Once K3s is installed and now that we have access, let’s work with the Cluster, see if it’s running, if my single node is Master and Worker, etc. In K3s, by default, a master node can run workloads (pods), unlike standard K8s where master nodes usually have a taint that prevents pods from running on them.
To verify that the Node tierra can run Pods, I use these commands.
1. View node roles and labels:
[⚡] luis@kymeraw:~ ❯ kubectl get node tierra -o wide
NAME     STATUS   ROLES                  AGE   VERSION        INTERNAL-IP     EXTERNAL-IP   OS-IMAGE             KERNEL-VERSION     CONTAINER-RUNTIME
tierra   Ready    control-plane,master   13d   v1.33.5+k3s1   192.168.103.1   <none>        Ubuntu 24.04.3 LTS   6.8.0-86-generic   containerd://2.1.4-k3s1

[⚡] luis@kymeraw:~  ❯ kubectl get node tierra --show-labels
NAME     STATUS   ROLES                  AGE   VERSION        LABELS
tierra   Ready    control-plane,master   13d   v1.33.5+k3s1   beta.kubernetes.io/arch=amd64,beta.kubernetes.io/instance-type=k3s,beta.kubernetes.io/os=linux,kubernetes.io/arch=amd64,kubernetes.io/hostname=tierra,kubernetes.io/os=linux,node-role.kubernetes.io/control-plane=true,node-role.kubernetes.io/master=true,node.kubernetes.io/instance-type=k3s
I see roles like control-plane,master and the Ready status, which is a good sign.
2. Check node taints:
Taints are “marks” that would prevent pods from running on a node. If it has taints that block pods, it won’t act as a worker:
[⚡] luis@kymeraw:~ ❯ kubectl describe node tierra | grep -i taint
Taints:             <none>

# Or more directly:
[⚡] luis@kymeraw:~ ❯ kubectl get node tierra -o jsonpath='{.spec.taints}'
kubectl get node tierra -o jsonpath='{.spec.taints}'
If the result is empty ([] or null), it means there are no taints and the node can run pods. In K3s, no taints are added to the master node by default, so it can act as a worker.
3. View pods running on the node:
A practical way to verify is to check if system pods are running on the node:
[⚡] luis@kymeraw:~ ❯ kubectl get pods -A -o wide | grep tierra
kube-system   coredns-64fd4b4794-dl9th                  1/1     Running     2 (4h51m ago)   13d   10.42.0.18   tierra   <none>           <none>
kube-system   helm-install-traefik-crd-dwb4w            0/1     Completed   0               13d   <none>       tierra   <none>           <none>
kube-system   helm-install-traefik-nwtpb                0/1     Completed   1               13d   <none>       tierra   <none>           <none>
kube-system   local-path-provisioner-774c6665dc-2hqnz   1/1     Running     2 (4h51m ago)   13d   10.42.0.15   tierra   <none>           <none>
kube-system   metrics-server-7bfffcd44-p6ghl            1/1     Running     2 (4h51m ago)   13d   10.42.0.16   tierra   <none>           <none>
kube-system   svclb-traefik-195315a9-9jnnq              2/2     Running     4 (4h51m ago)   13d   10.42.0.17   tierra   <none>           <none>
kube-system   traefik-c98fdf6fb-wjknn                   1/1     Running     2 (4h51m ago)   13d   10.42.0.14   tierra   <none>           <none>
I didn’t do anything, the K3s installation installed those system Pods (like coredns, traefik, local-path-provisioner, etc.) and they’re running on tierra.
4. Deploy a test pod:
The most direct way to start playing is to try deploying a pod and see if it gets scheduled on the Node:
[⚡] luis@kymeraw:~ ❯ kubectl run test-pod --image=nginx --restart=Never
pod/test-pod created

[⚡] luis@kymeraw:~ ❯ kubectl get pod test-pod -o wide
NAME       READY   STATUS    RESTARTS   AGE   IP           NODE     NOMINATED NODE   READINESS GATES
test-pod   1/1     Running   0          17s   10.42.0.19   tierra   <none>           <none>
If the pod gets scheduled on tierra and reaches Running status, then your node is correctly acting as both Master and Worker. Once verified, you can delete the test pod:
[⚡] luis@kymeraw:~ ❯ kubectl delete pod test-pod
pod "test-pod" deleted from default namespace
In summary, it shows roles control-plane,master, has no taints that block pods, and I can run pods on it. Looks good, the single node is acting as Master and Worker simultaneously, which is exactly what I wanted in a single-node cluster with K3s.
5. Additional quick checks
# Verify flannel / coredns / traefik are healthy
kubectl -n kube-system get deploy,ds,po -o wide

# Check cgroup v2 (Ubuntu 24.04 comes OK)
stat -fc %T /sys/fs/cgroup   # => cgroup2fs

# Confirm persistent swap off
swapon --show                 # empty
grep -E '\sswap\s' /etc/fstab # commented out

# Check CRI and version
crictl --version || ctr --version
kubectl version --short
Understanding the Cluster
We’ve already seen what’s in the Cluster and that we can add a test Pod, etc. But first, I’d like to understand what k3s has set up for me.
k3s servicelb (klipper-lb): in your pods you see svclb-traefik-*, a sign you didn’t disable it. On a single node it doesn’t cause issues, but if you later introduce MetalLB there will be a conflict. Decide:
Keep Klipper-LB (simple, local).
Or disable it and use MetalLB (better if you expand the cluster/network).
Graphical Interface (GUI)
I’ve discovered that K3s by default does not install any web graphical interface to manage the cluster. Everything is done from the command line with kubectl. However, I’d like to get some GUI functionality:
K3s by default does not install any web graphical interface to manage the cluster. Everything is done from the command line with kubectl. However, if you prefer to work with a web interface from the browser, you have several options:
Kubernetes Dashboard
The Kubernetes Dashboard is the official K8s web interface. It provides a graphical interface for managing applications, viewing resources, logs, etc.
To install it on K3s:
# Apply the official Dashboard manifest
kubectl apply -f https://raw.githubusercontent.com/kubernetes/dashboard/v2.7.0/aio/deploy/recommended.yaml

# Create a service account for access
kubectl apply -f - <<EOF
apiVersion: v1
kind: ServiceAccount
metadata:
  name: admin-user
  namespace: kubernetes-dashboard
---
apiVersion: rbac.authorization.k8s.io/v1
kind: ClusterRoleBinding
metadata:
  name: admin-user
roleRef:
  apiGroup: rbac.authorization.k8s.io
  kind: ClusterRole
  name: cluster-admin
subjects:
- kind: ServiceAccount
  name: admin-user
  namespace: kubernetes-dashboard
EOF

# Get the token for access
kubectl -n kubernetes-dashboard create token admin-user

# Access via port-forward
kubectl port-forward -n kubernetes-dashboard service/kubernetes-dashboard-kong-proxy 8443:443
Then access from your browser at https://localhost:8443 using the obtained token.
Rancher
Rancher is a very popular K8s management platform, especially for K3s (since K3s is developed by Rancher Labs). It provides a complete and powerful web interface for managing clusters, deploying applications, viewing metrics, etc.
To install it on K3s, the easiest way is using Helm:
# Add the Rancher Helm repository
helm repo add rancher-latest https://releases.rancher.com/server-charts/latest
helm repo update

# Install Rancher
helm install rancher rancher-latest/rancher \
  --namespace cattle-system \
  --create-namespace \
  --set hostname=rancher.tierra.parchis.org \
  --set bootstrapPassword=admin
Rancher is heavier than the Dashboard, but offers many more features. It’s ideal if you want a complete management solution.
k9s (Terminal UI)
Although it’s not a web interface, k9s is a very popular and powerful TUI (Terminal User Interface) tool. While it doesn’t run in the browser, it’s a very efficient graphical alternative for managing K8s from the terminal.
It installs on your workstation (not on the cluster):
# macOS
brew install k9s

# Windows
scoop install k9s

# Linux
curl -sS https://webinstall.dev/k9s | bash
Once installed, simply run k9s and it connects automatically using your kubeconfig. It’s very fast and efficient for working from the terminal.
Recommendation
To get started and test, I recommend k9s if you’re comfortable with the terminal, or the Kubernetes Dashboard if you prefer a web interface. If later you need advanced features, multi-cluster management, or a more complete solution, then Rancher is the best option.