Downloading LLM models locally is something you do occasionally, but when you pull a massive 122B parameter model like Sehyo/Qwen3.5-122B-A10B-NVFP4, the download hogs the entire connection and leaves the rest of the household without internet. The Hugging Face CLI (huggingface-cli or hf) doesn’t have a --limit-rate flag, so you need to find alternatives. In this post I explain two ways to limit bandwidth on Linux using Docker (my preferred method) or Wondershaper at the host level.
The problem
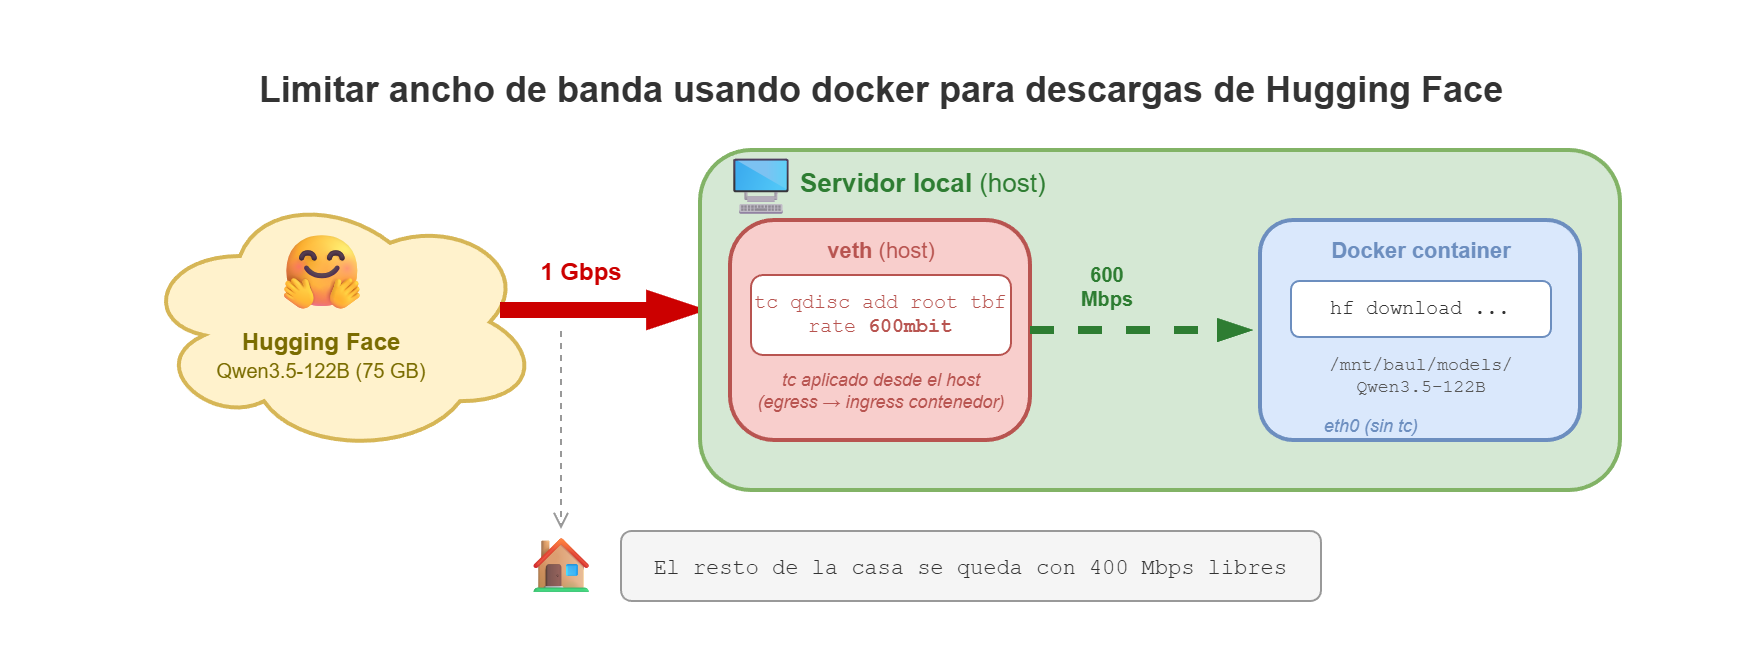
I have a 1 Gbps fiber connection at home. When I launch a massive download from Hugging Face, the CLI tries to use all available bandwidth. That means while a 70GB+ model is downloading, nobody else at home can browse or work normally.
The logical thing would be for huggingface-cli to have a --limit-rate flag like curl does, so the solution is to limit bandwidth at the network level, outside the tool.
Method 1: Docker (recommended)
The idea is to spin up a Docker container for the download and limit its network traffic with tc (Linux Traffic Control). This way the host’s connection stays intact and other devices are unaffected.
Why tc from the host and not from inside the container
The first instinct is to run tc inside the container itself, applying a Token Bucket Filter (TBF) on its eth0. The problem is that tc in root qdisc mode only limits egress (outbound) traffic. Downloads are ingress (inbound) traffic, so the limit doesn’t affect them. I also tried an ingress policer inside the container, but TCP compensates for dropped packets and the actual throttling is minimal.
The solution that works is applying tc from the host on the veth interface that Docker creates for the container. From the host’s perspective, traffic sent toward the container is egress, and there the TBF works perfectly.
The hf-download-limited.sh script
I’ve created a script that automates the entire process:
hf-download-limited.sh
#!/usr/bin/env bash
# hf-download-limited.sh
#
# Descarga un modelo de Hugging Face con ancho de banda limitado.
# Usa Docker + tc aplicado desde el host en la interfaz veth del contenedor.
#
# Requiere: docker, sudo (para tc), iproute2 en el host

set -euo pipefail

CONTAINER="hf-dl-$$"
LATENCY="400ms"

# ─── Ayuda ────────────────────────────────────────────────────
usage() {
    cat <<'EOF'
Uso: hf-download-limited.sh -m MODEL -d DIR [-b BANDWIDTH]

Descarga un modelo de Hugging Face limitando el ancho de banda
mediante Docker + tc (Traffic Control).

Argumentos obligatorios:
  -m, --model MODEL       Modelo de Hugging Face (ej: usuario/modelo)
  -d, --dir   DIR         Directorio local donde guardar el modelo

Argumentos opcionales:
  -b, --bandwidth MBIT    Ancho de banda máximo en Mbps (default: 600)
  -t, --token TOKEN       Token de Hugging Face (o usa env HF_TOKEN)
  -h, --help              Muestra esta ayuda

Ejemplo:
  ./hf-download-limited.sh \
    -m "Sehyo/Qwen3.5-122B-A10B-NVFP4" \
    -d "/home/luis/tmp/Qwen3.5-122B-A10B-NVFP4" \
    -b 600
EOF
    exit "${1:-0}"
}

# ─── Parseo de argumentos ────────────────────────────────────
MODEL=""
LOCAL_DIR=""
RATE_MBIT=600

while [[ $# -gt 0 ]]; do
    case "$1" in
        -m|--model)     MODEL="$2";    shift 2 ;;
        -d|--dir)       LOCAL_DIR="$2"; shift 2 ;;
        -b|--bandwidth) RATE_MBIT="$2"; shift 2 ;;
        -t|--token)     HF_TOKEN="$2"; shift 2 ;;
        -h|--help)      usage 0 ;;
        *)              echo "Error: argumento desconocido '$1'"; usage 1 ;;
    esac
done

if [[ -z "$MODEL" || -z "$LOCAL_DIR" ]]; then
    echo "Error: -m MODEL y -d DIR son obligatorios."
    echo ""
    usage 1
fi

# ─── Calcular parámetros de tc ────────────────────────────────
# burst = 2% del rate, mínimo 1 mbit (suficiente para kernels con HZ=250..1000)
RATE="${RATE_MBIT}mbit"
BURST_MBIT=$(( RATE_MBIT / 50 ))
if (( BURST_MBIT < 1 )); then
    BURST_MBIT=1
fi
BURST="${BURST_MBIT}mbit"

# ─── Limpieza al salir (Ctrl+C, error, etc.) ─────────────────
cleanup() {
    echo ""
    echo "--- Limpiando ---"
    docker stop "$CONTAINER" 2>/dev/null || true
    echo "Contenedor eliminado."
}
trap cleanup EXIT

# 1. Lanzar contenedor en segundo plano
echo "--- Iniciando contenedor ---"
HF_TOKEN_ARGS=()
if [[ -n "${HF_TOKEN:-}" ]]; then
    HF_TOKEN_ARGS=(-e "HF_TOKEN=$HF_TOKEN")
fi

docker run -d --rm --name "$CONTAINER" \
    -v "$(dirname "$LOCAL_DIR"):$(dirname "$LOCAL_DIR")" \
    -e DEBIAN_FRONTEND=noninteractive \
    "${HF_TOKEN_ARGS[@]}" \
    python:3.10-slim \
    sleep infinity > /dev/null

# 2. Instalar huggingface_hub dentro del contenedor
echo "--- Instalando huggingface_hub ---"
docker exec "$CONTAINER" pip install -qqq -U huggingface_hub

# 3. Encontrar la interfaz veth en el host
IFLINK=$(docker exec "$CONTAINER" cat /sys/class/net/eth0/iflink)
VETH=$(ip -o link | awk -v idx="$IFLINK" '$1 == idx":" {print $2}' | sed 's/@.*//')

if [[ -z "$VETH" ]]; then
    VETH=$(ip -o link | grep "^${IFLINK}: " | awk '{print $2}' | sed 's/@.*//' | sed 's/://')
fi

if [[ -z "$VETH" ]]; then
    echo "ERROR: No se encontró la interfaz veth para iflink=$IFLINK"
    exit 1
fi

# 4. Aplicar tc (Token Bucket Filter) en la veth del host
echo "--- Aplicando tc en $VETH: rate=$RATE burst=$BURST ---"
sudo tc qdisc add dev "$VETH" root tbf \
    rate "$RATE" burst "$BURST" latency "$LATENCY"

# 5. Lanzar la descarga (-it para barra de progreso)
echo ""
echo "=== Descargando $MODEL ==="
echo "=== Destino: $LOCAL_DIR ==="
echo "=== Límite: ${RATE_MBIT} Mbps ==="
echo ""
docker exec -it -e "PYTHONWARNINGS=ignore::UserWarning" "${HF_TOKEN_ARGS[@]}" "$CONTAINER" \
    hf download "$MODEL" --local-dir "$LOCAL_DIR"

echo ""
echo "=== Descarga completada ==="
Run it passing the model and destination directory:
chmod +x hf-download-limited.sh
./hf-download-limited.sh \
    -m "Sehyo/Qwen3.5-122B-A10B-NVFP4" \
    -d "/home/luis/tmp/Qwen3.5-122B-A10B-NVFP4" \
    -b 600
The -b flag lets you adjust the bandwidth limit in Mbps (default 600). If you have a Hugging Face token you can pass it with -t for faster downloads and higher rate limits.
What the script does step by step
- Parses the arguments (
-mmodel,-ddirectory,-bbandwidth,-ttoken) and automatically calculates the Token Bucket Filterburstfrom the bandwidth. - Launches a container with
sleep infinityin the background and installshuggingface_hubinside it. - Finds the veth interface on the host. Each Docker container has an internal
eth0interface connected to avethon the host. The script reads the container’siflinkand finds the corresponding interface withip -o link. - Applies
tcfrom the host on thatveth. A Token Bucket Filter (TBF) limits traffic the host sends to the container – i.e., the downloads. - Runs
hf downloadinside the container with-itto see the progress bar. - Cleans up when done. A
trap cleanup EXITtakes care of stopping the container whether the download finishes, fails, or you hit Ctrl+C.
The output is clean:
--- Iniciando contenedor ---
--- Instalando huggingface_hub ---
--- Aplicando tc en vethe4845c6: rate=600mbit burst=12mbit ---

=== Descargando Sehyo/Qwen3.5-122B-A10B-NVFP4 ===
=== Destino: /home/luis/tmp/Qwen3.5-122B-A10B-NVFP4 ===
=== Límite: 600 Mbps ===

Fetching 15 files:  47%|████▋     | 7/15 [02:30<03:00, ...]
When the download finishes, the container disappears along with all network restrictions. The system is left clean without needing to do anything else.
Method 2: Wondershaper on the host
If you prefer not to use Docker, you can limit bandwidth directly on the host’s network interface.
Watch out for apt's Wondershaper
wondershaper package from Ubuntu’s repository – it’s completely outdated and uses deprecated kernel modules (cbq), which causes RTNETLINK errors. Use the modern GitHub fork instead.Install the modern fork
The maintained fork by magnific0/wondershaper uses the htb (Hierarchical Token Bucket) module, which is the current standard.
git clone https://github.com/magnific0/wondershaper.git
cd wondershaper
Apply the limit
First I identify my network interface:
ip route | grep default
In my case it’s enP7s7. The script uses Kilobits per second (Kbps). To limit downloads to about 75 MB/s (600,000 Kbps) and uploads to 40 MB/s (320,000 Kbps):
sudo ./wondershaper -a enP7s7 -d 600000 -u 320000
Download the model
With the host’s network limited, I launch the download:
hf download Sehyo/Qwen3.5-122B-A10B-NVFP4 \
    --local-dir /mnt/baul/models/Qwen3.5-122B-A10B-NVFP
Remove the limit
Don't forget this step
sudo ./wondershaper -c -a enP7s7
Conclusion
If you have Docker available, method 1 is clearly better: it only limits the container’s traffic, you don’t need to touch the host’s network, and it cleans up automatically when done. Method 2 with Wondershaper is a good alternative if you can’t or don’t want to use Docker, but keep in mind it affects the entire machine and you have to remember to remove the limit when you’re done.
Useful links
- Hugging Face CLI - Official CLI documentation
- magnific0/wondershaper - Modern Wondershaper fork
- tc - Traffic Control - Linux
tcmanual - Token Bucket Filter (TBF) - TBF documentation