Dualboot: two operating systems on the same machine, picking one at each boot. The usual path is to install Windows first and Linux second, but here I start from the opposite case — Ubuntu 24.04 already running and filling a 4 TB disk — and walk through adding Windows 11 Pro: resizing the partition, installing Windows, and customizing the GRUB boot menu.
Windows series
- Preparing a PC for Dualboot Linux / Windows and installing Windows 11 Pro.
- Configuring a decent Windows 11 by removing the cruft.
- Preparing Windows for software development: CLI, WSL2, and tools.
- Installing VMWare Workstation Pro on Windows 11 with a Windows 11 Pro VM.
- Installing a Windows 11 VM on Proxmox to run Windows 11 Pro on top of a Proxmox host.
First steps
My PC specs — Slimbook Kymera ATX:
- Motherboard Gigabyte Z790 UD AX with BIOS F11d and an Intel Core i9-14900K CPU.
- Memory: 96 GB (2x48 GB) DDR5 6000MT/s / dual channel.
- Disks: 1 x 4 TB nvme (main) + 2 x 2 TB SSD for data.
- System with UEFI and GPT partitioning scheme.
- Ubuntu 24.04 already installed (Kernel: 6.8.0-41-generic).
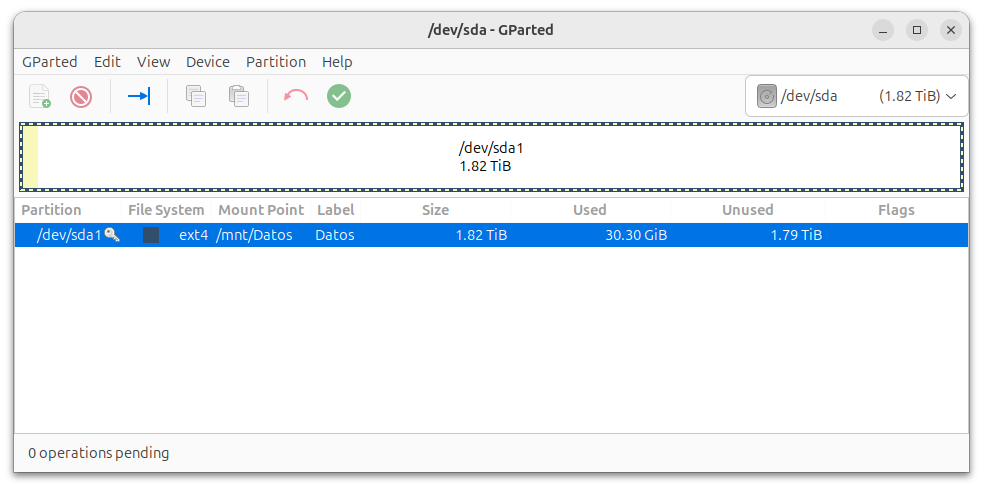
Details of the main disk, currently Linux-only:
Requirements
- Two USB drives, 8 GB minimum (one for Ubuntu Live, another for Windows 11). A single USB also works by reusing it across steps — it’s just more cumbersome.
- Hardware with UEFI support and a GPT partition table (not MBR).
- Internet connection during Windows install (preferred).
- Disk backup. Messing with partitions = real risk of losing data. I use Clonezilla to clone. If your disk is too big to clone, at least save the important files to an external drive.
Create the Ubuntu Live USB
I’ll use it only to shrink the existing partition and make room for Windows. It can’t be done from the running Linux because the partition is mounted. I download the Ubuntu ISO from Download Ubuntu Desktop (Desktop 24.04 LTS (6 GB)).
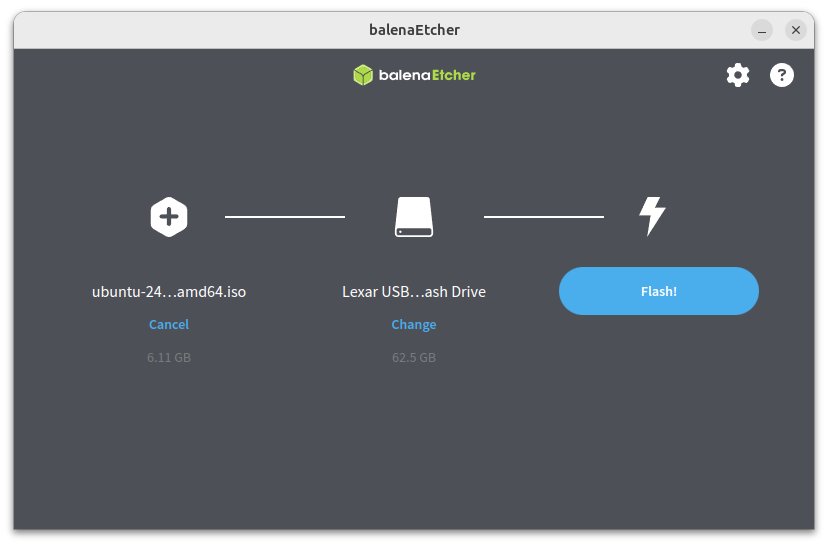
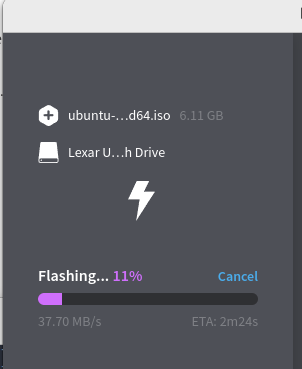
I could have used Startup Disk Creator (it ships with Ubuntu), but I prefer burning the USB with Balena Etcher (external guide). I download Etcher for Linux x64 (64-bit) (zip):
unzip ../Downloads/balenaEtcher-linux-x64-1.19.21.zip
cd balenaEtcher-linux-x64
sudo chown root:root chrome-sandbox
sudo chmod 4755 chrome-sandbox
./balena-etcher.sh
Important: identify the USB device precisely (here /dev/sdc). Mixing it up with another disk erases real data.
# lsblk -p -o NAME,VENDOR,MODEL,SIZE,TYPE,SERIAL
NAME             VENDOR   MODEL                    SIZE TYPE SERIAL
/dev/loop0                                        10,1M loop
/dev/loop1                                        63,9M loop
/dev/loop2                                        74,2M loop
/dev/loop3                                        74,2M loop
/dev/loop4                                        13,9M loop
/dev/loop5                                        38,8M loop
/dev/sda         ATA      CT2000MX500SSD1          1,8T disk
└─/dev/sda1                                        1,8T part
/dev/sdb         ATA      CT2000MX500SSD1          1,8T disk
└─/dev/sdb1                                        1,8T part
/dev/sdc         Lexar    USB Flash Drive         58,2G disk  <-- !!! this one
/dev/nvme0n1              Samsung SSD 990 PRO 4TB  3,6T disk
├─/dev/nvme0n1p1                                   300M part
└─/dev/nvme0n1p2                                   3,6T part
Create the Windows Live USB
First I download Windows 11 from the official downloads page. ISO section, option Windows 11 (multi-edition ISO for x64 devices). Pick the Product language and start the download (around 6.3 GB).
Getting it onto a USB is easy if you already have a Windows machine (instructions here). In my case I do it from Linux with Ventoy (guide).
Installing Ventoy makes the USB bootable and creates two partitions: one for itself (so Ventoy can boot) and another where you drop the Windows ISO. I download the latest release from Ventoy.
cd Downloads
tar xfz ventoy-1.0.99-linux.tar.gz
cd ventoy-1.0.99
sudo ./VentoyWeb.sh
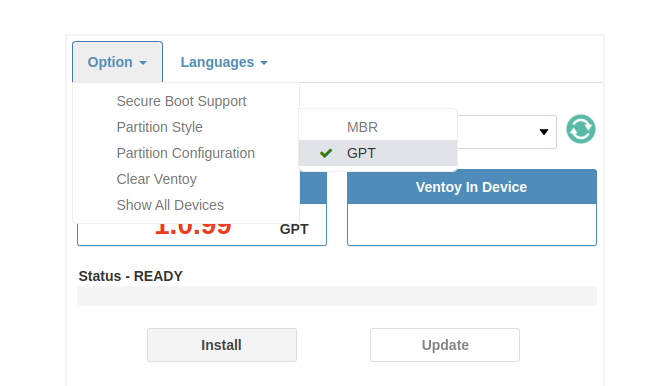
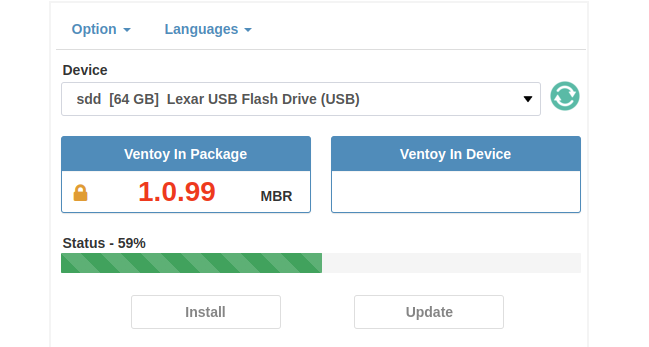
I connect to http://127.0.0.1:24680. Under Option I disable Secure Boot and select GPT as the partition type.
I select the USB device path (now /dev/sdd in my case) and click Install.
I copy the Windows ISO to the second partition, named “Ventoy”.
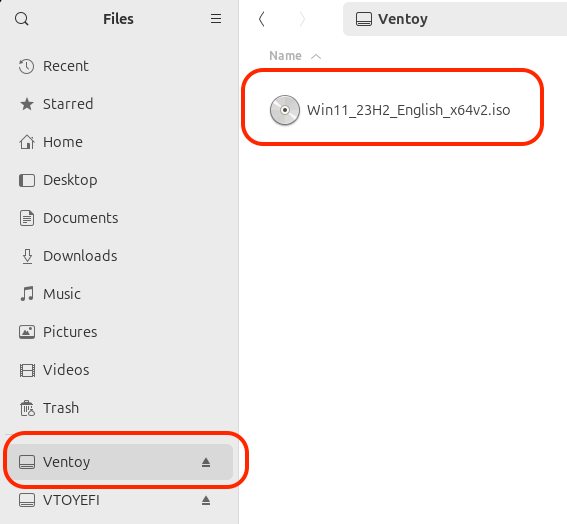
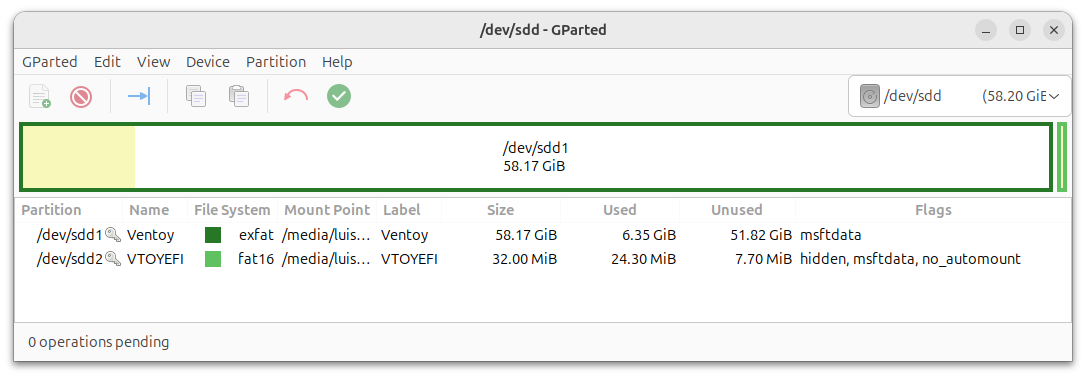
This is how the USB ends up:
I eject both partitions (Ventoy, VTOYEFI). The second Windows USB is ready.
Free up disk space
Boot from the Ubuntu Live USB. To make the BIOS boot from the USB, press the boot-menu key (F2/F7/F10/F12/ESC depending on your BIOS).
Select the USB and press Enter. A menu appears: choose Try or Install Ubuntu, set language, accessibility, keyboard, internet connection, skip the installer update and select Try Ubuntu. Once Ubuntu is running, launch the Disks application.

Select the main disk and the partition where Linux lives — the one to shrink.
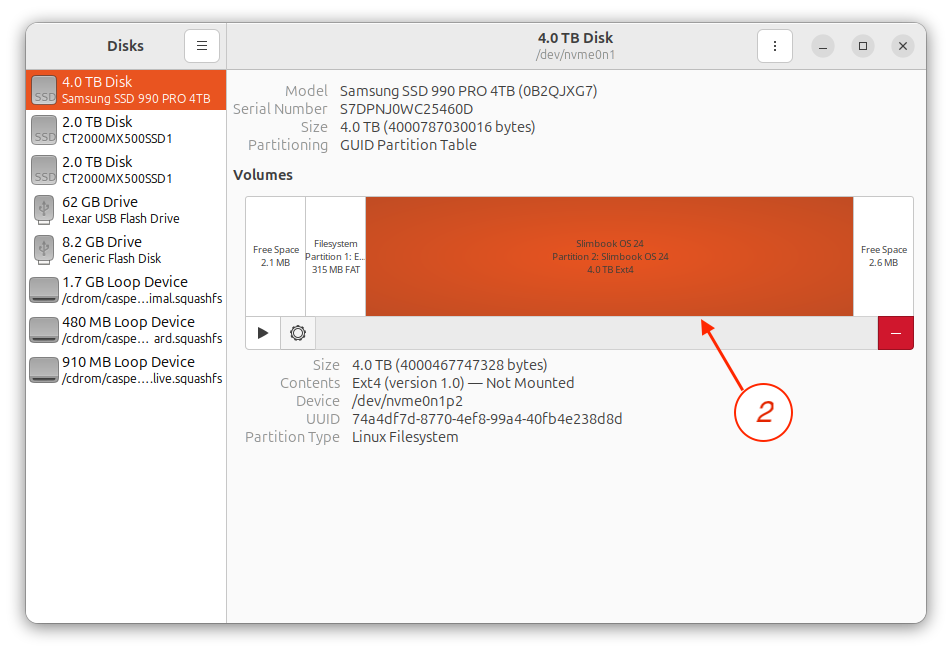
Choose Resize.
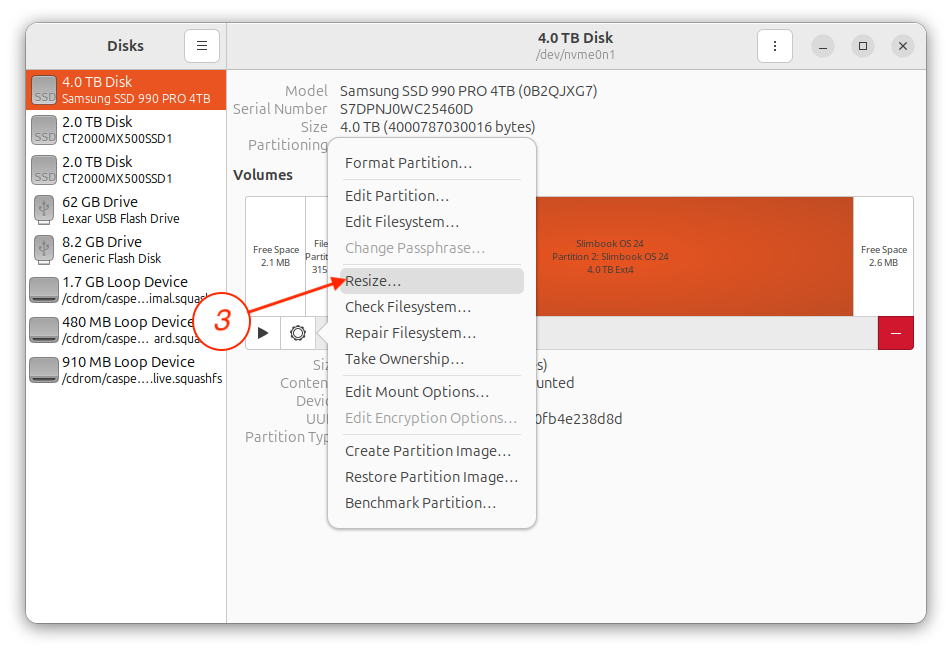
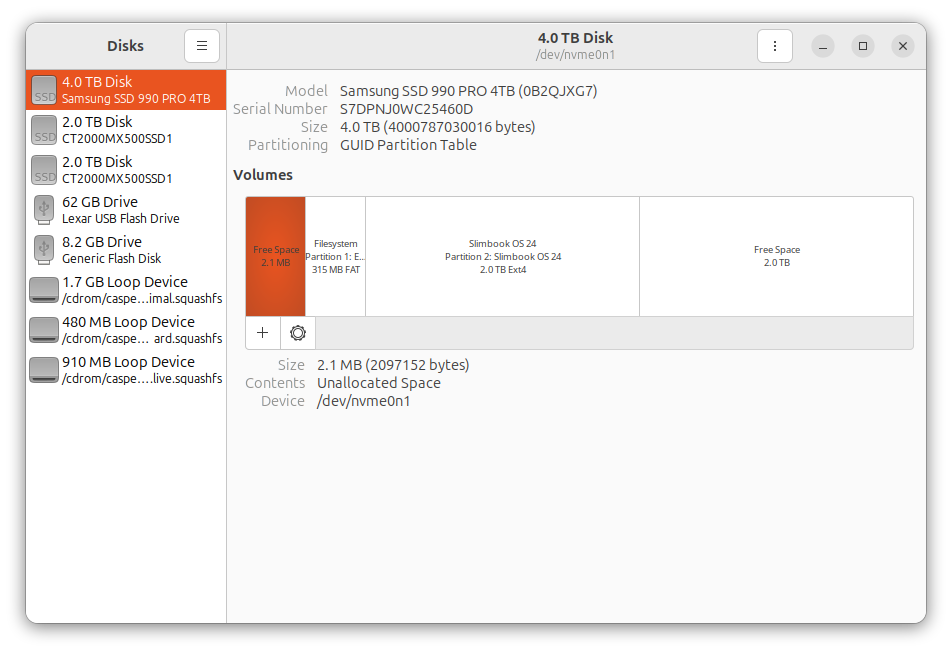
Enter the new value (half the disk), click Resize, click Authenticate (no password needed).

The resize operation starts (takes a while) and finishes as expected.
I reboot, remove the Ubuntu USB and, to be safe, confirm it still boots from the resized partition. Ready to install Windows.
Install Windows
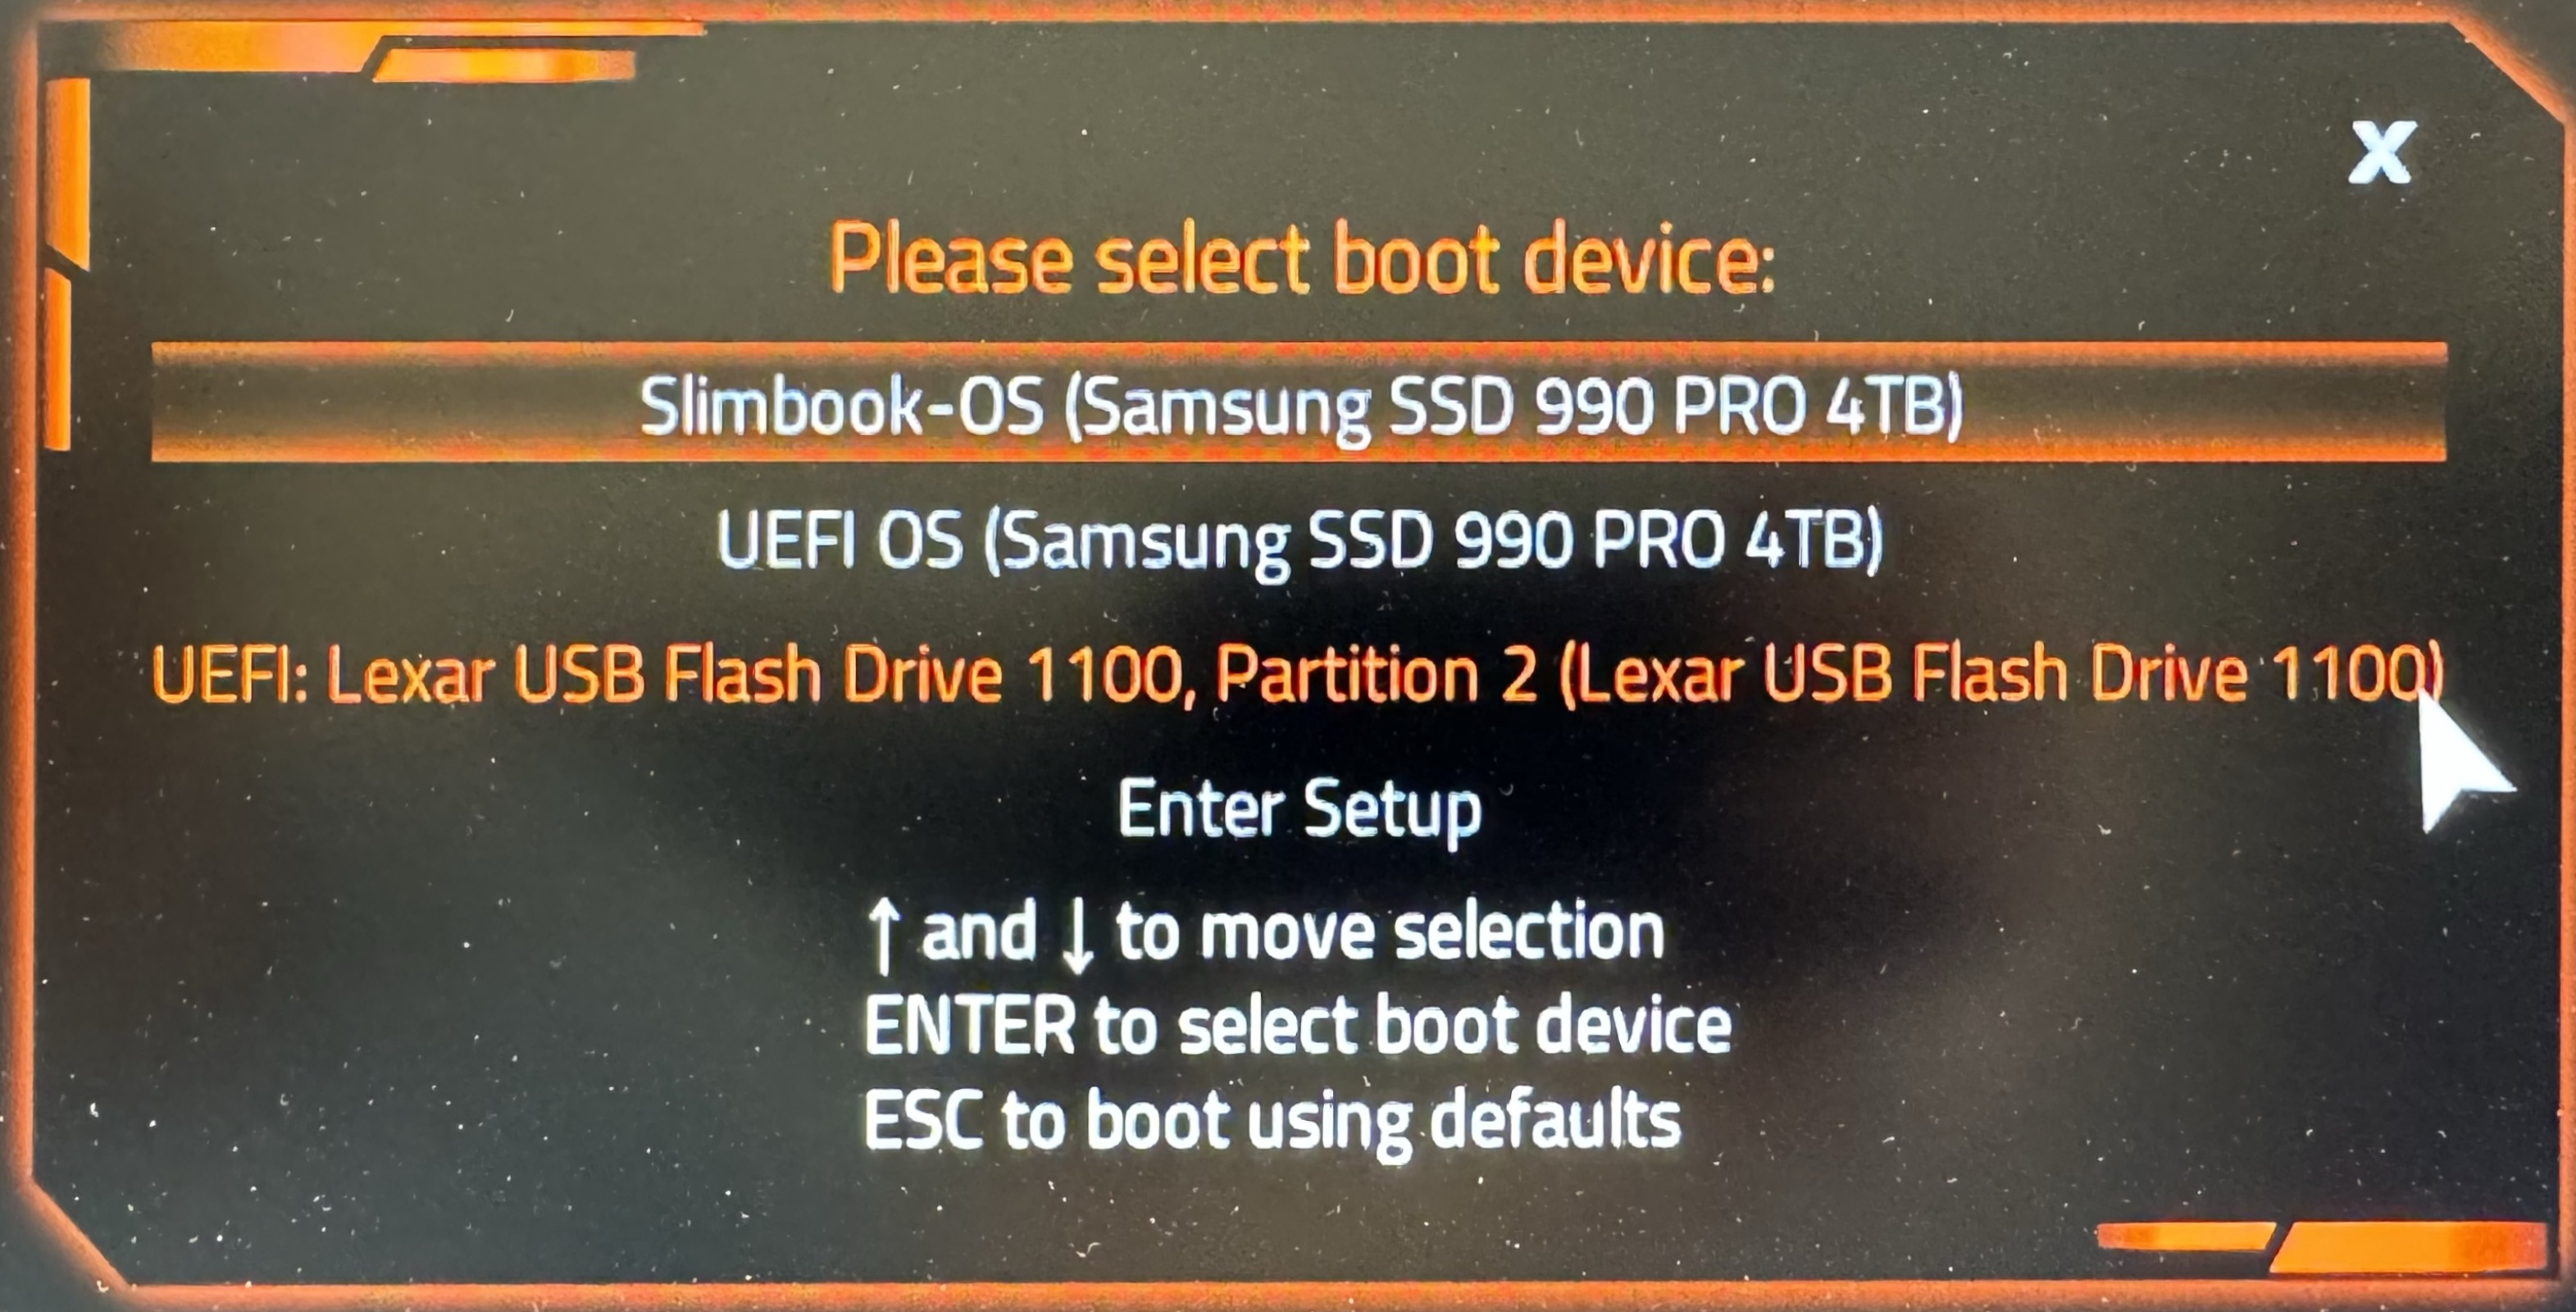
Time to install Windows — be patient, it takes a while. I plug in the Ventoy USB + ISO, reboot, and select the USB from the BIOS boot menu.

Enter on the ISO, Boot in normal mode. In the Windows wizard: language and keyboard, Install now, skip the license (activate later), pick Windows 11 Pro, Install Windows Custom, and select the only free partition (Unallocated Space). Windows copies files and reboots. Note: on older hardware it sometimes rebooted back into the USB — if that happens, enter the BIOS and pick the hard disk as the boot source.
Windows 11 OOBE (first-boot setup)
This sequence of first-boot questions is the same across all the Windows 11 installs in the blog (VMware, Proxmox, dualboot). Keeping it here as a reference:
- Country, keyboard, updates, reboot.
- Device name, reboot.
- Personal vs. work use → Personal.
- Sign in with a Microsoft account (or local — below).
- Create PIN.
- Diagnostics and privacy: say no to location, find my device, diagnostics, inking/typing, tailored experiences and ads ID.
- Skip phone, backups, and browser migration.
- Final update and we’re in.
Set up dual boot with GRUB
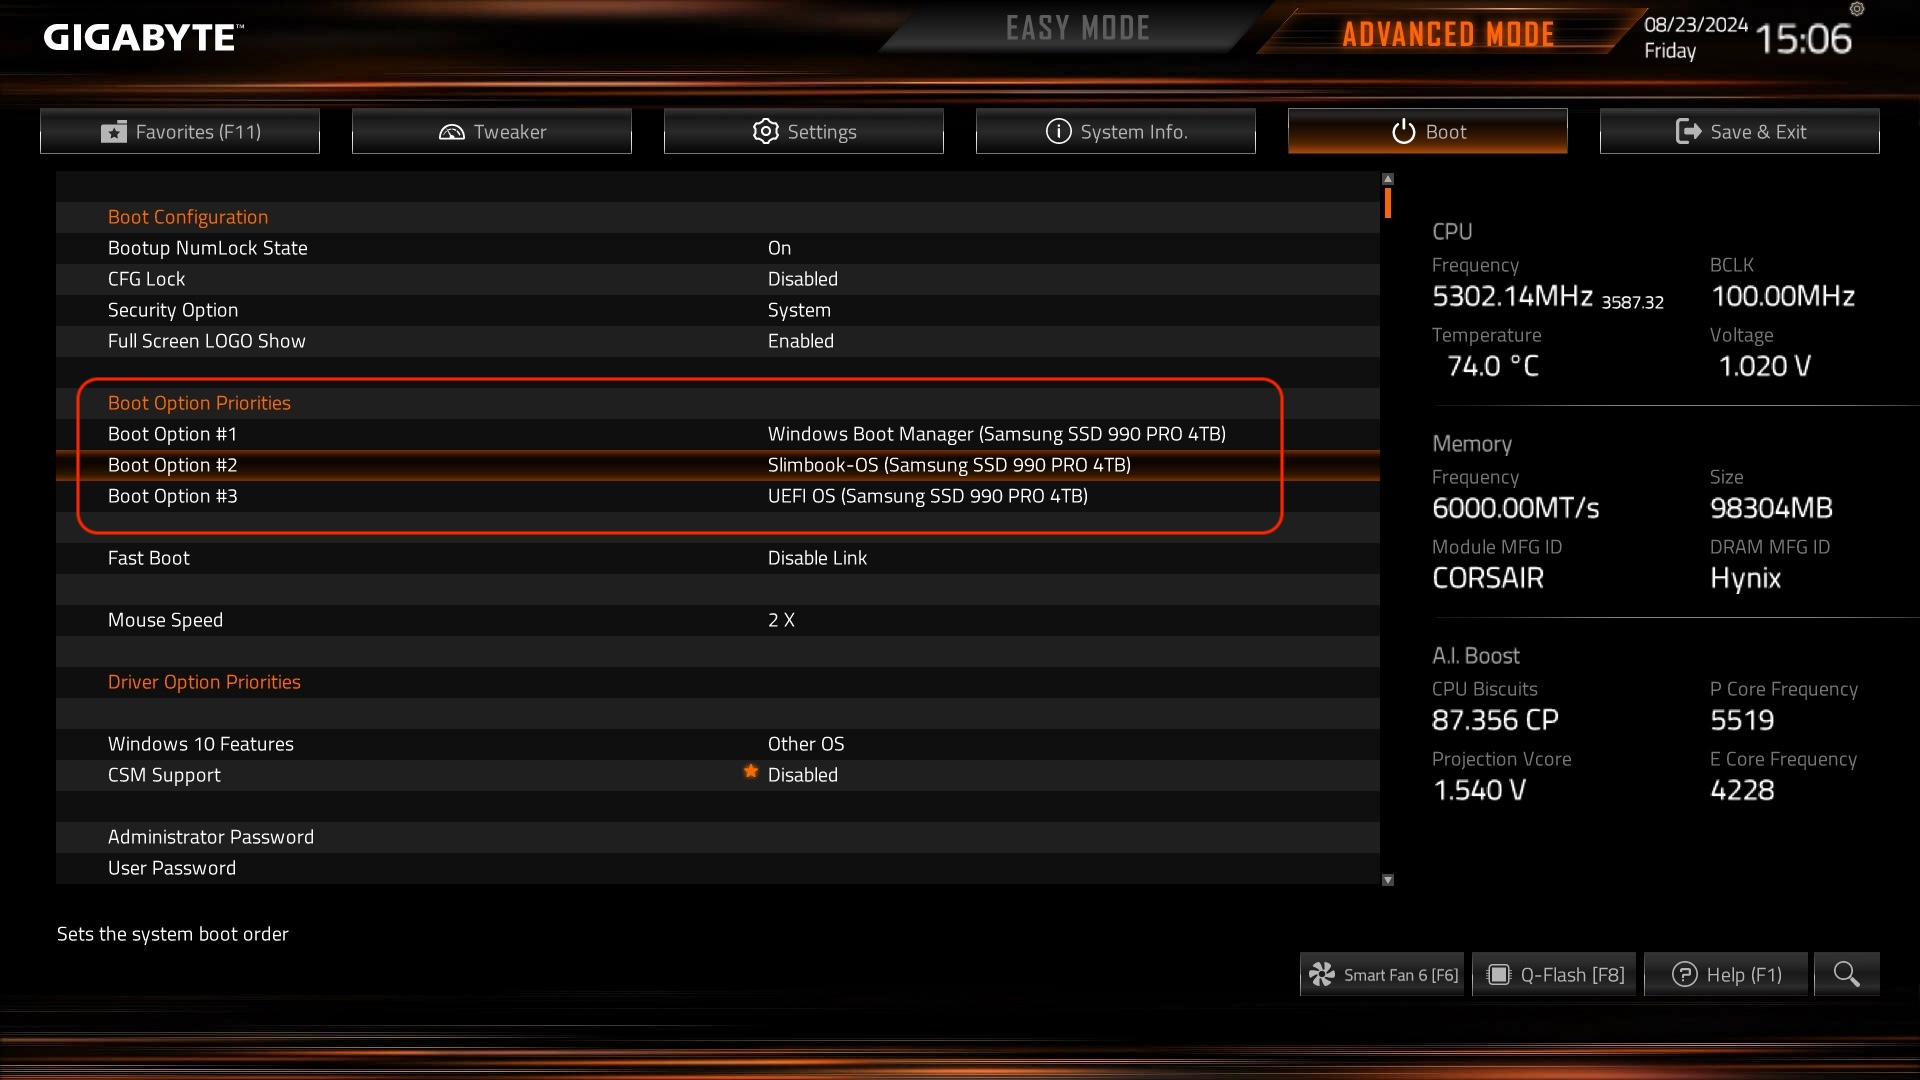
Windows has left its Boot Manager as the first entry in the BIOS. I change that so Linux boots first, and configure GRUB to present the selection menu between both systems.
I enter the BIOS Setup and change the boot order so Ubuntu is first.
Add Windows to GRUB
Back in Linux, as root, I configure grub. First I confirm that os-prober detects the new bootable Windows partition:
os-prober

/dev/nvme0n1p1@/EFI/Microsoft/Boot/bootmgfw.efi:Windows Boot Manager:Windows:efi  <-- !! Correct
I edit /etc/default/grub and uncomment the GRUB_DISABLE_OS_PROBER=false line so that update-grub uses os-prober to add an extra menu entry to /etc/boot/grub/grub.cfg:
cat /etc/default/grub | grep PROBER

GRUB_DISABLE_OS_PROBER=false
I run update-grub to add the Windows partition to the config file (/boot/grub/grub.cfg) as a boot-menu entry.
update-grub

:
Sourcing file `/etc/default/grub'
Warning: os-prober will be executed to detect other bootable partitions.
:
Found Windows Boot Manager on /dev/nvme0n1p1@/EFI/Microsoft/Boot/bootmgfw.efi
:
Note: I later commented that line back out — #GRUB_DISABLE_OS_PROBER=false — in /etc/default/grub and re-ran update-grub. No more detection needed.
I reboot and see the new menu.
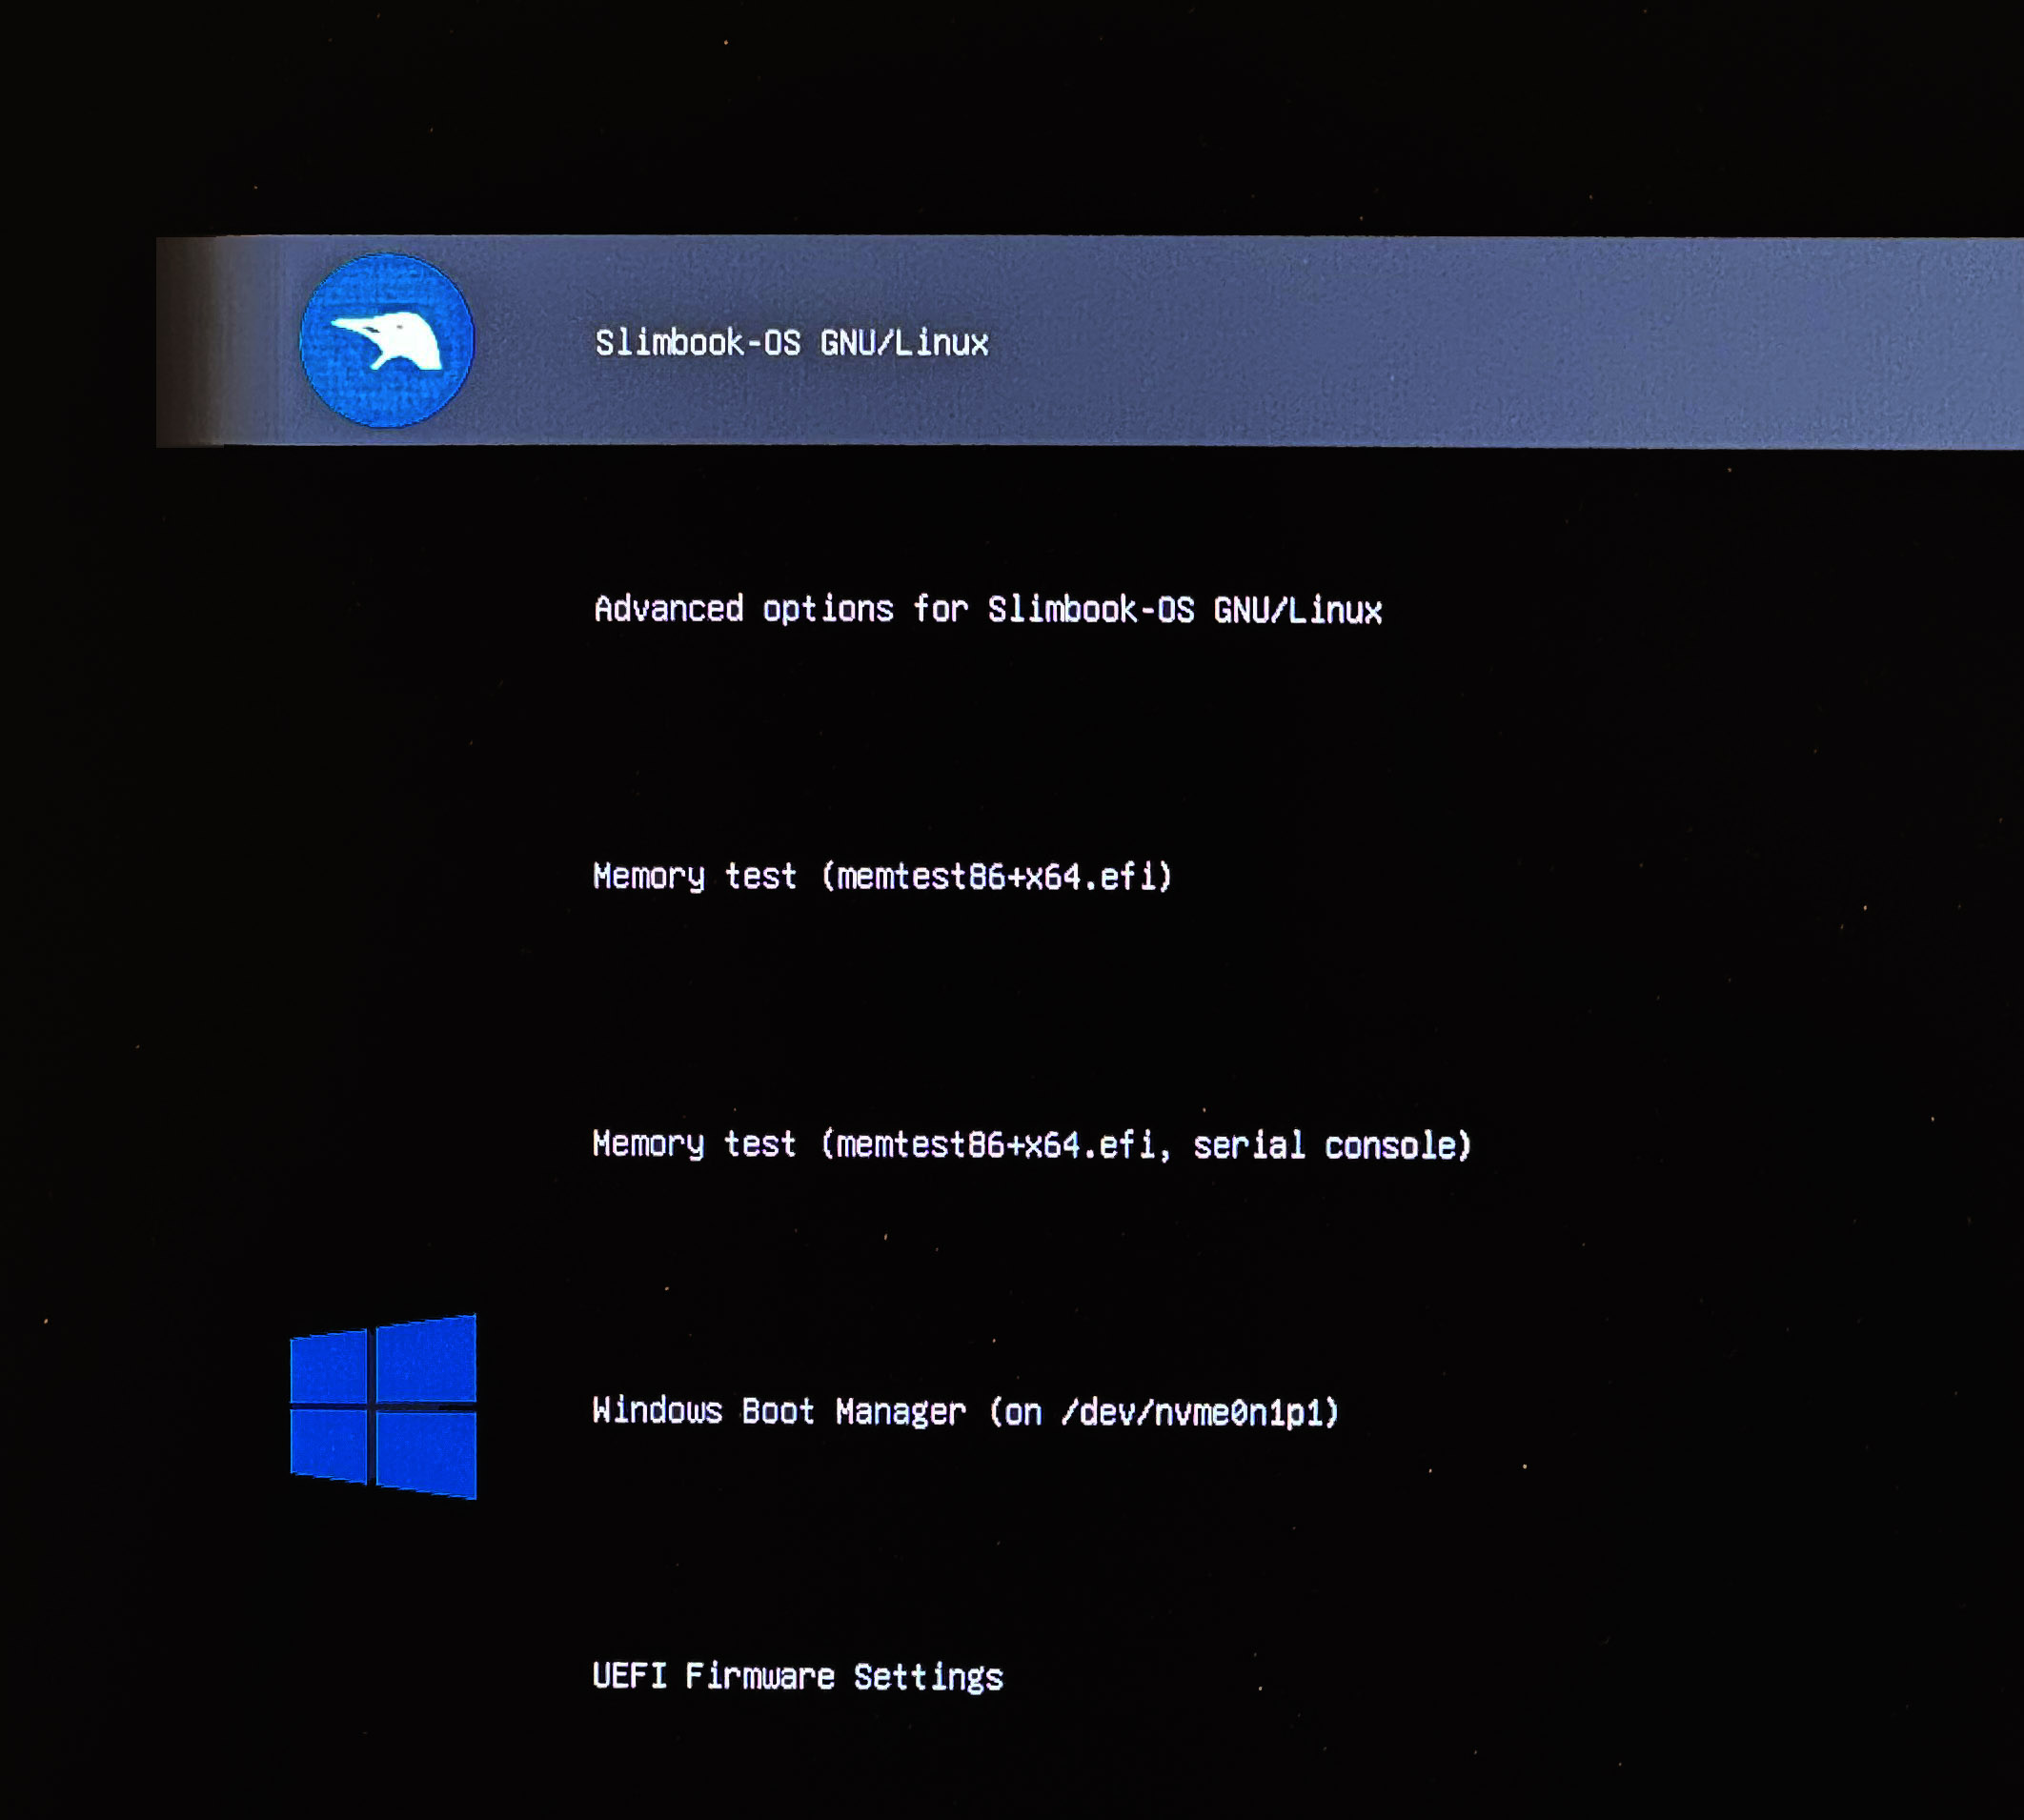
There are several options but I prefer to clean up the menu. I boot back into Linux to install an app called Grub Customizer.
sudo apt update && sudo apt upgrade -y && sudo apt full-upgrade -y
apt install software-properties-common
add-apt-repository ppa:danielrichter2007/grub-customizer
apt-get update
apt install grub-customizer
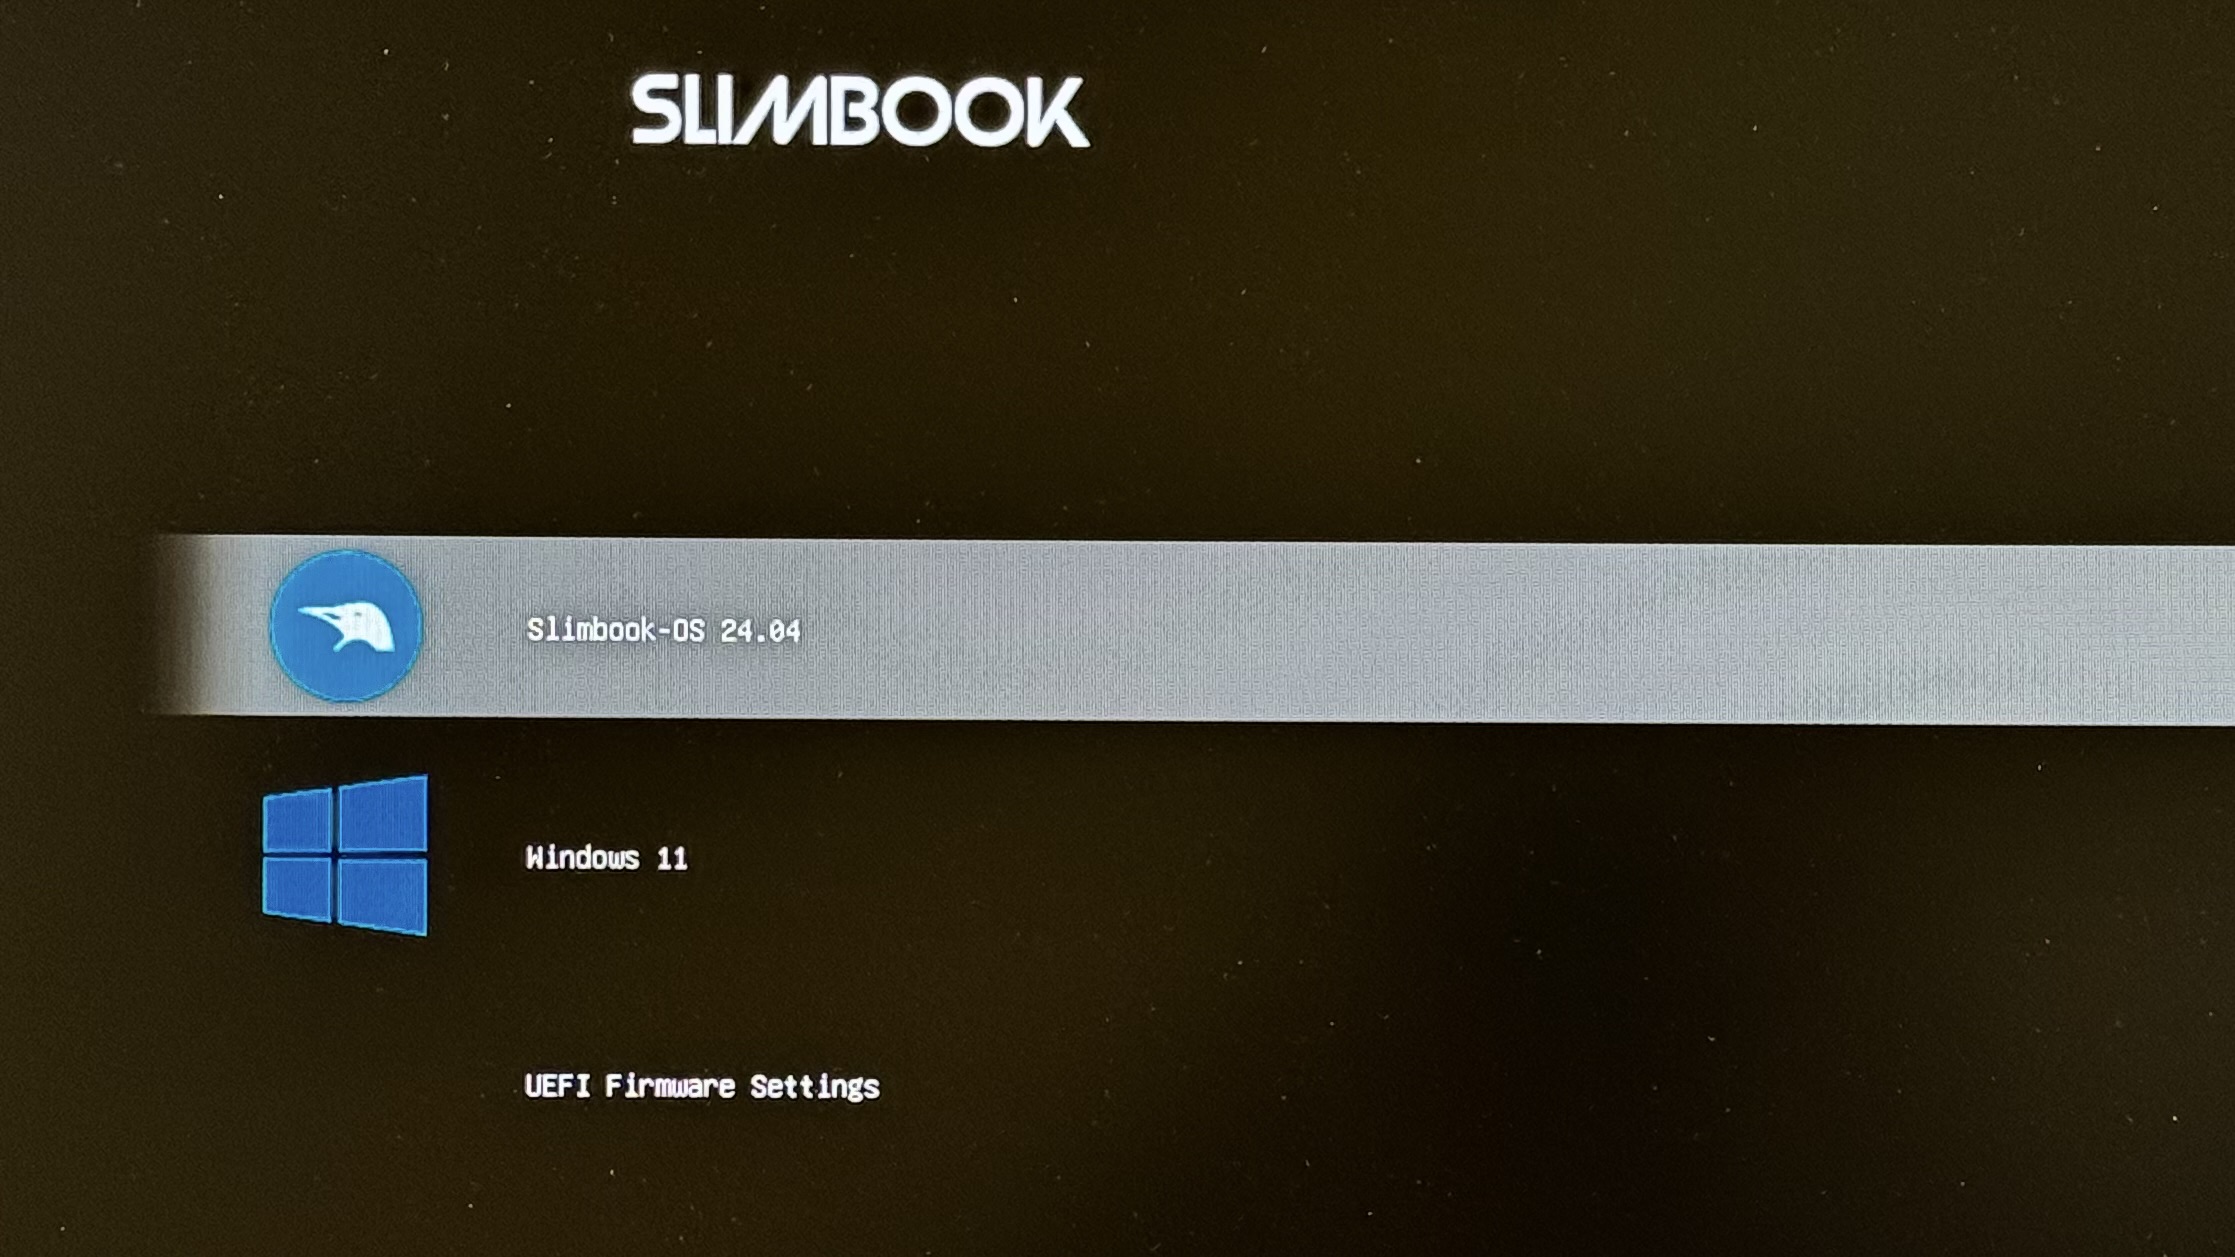
I run grub-customizer from my user account and CLI; it asks for the root password and shows all the entries I saw in the boot menu. I remove the ones I don’t use (advanced options, memtest) and rename the titles.
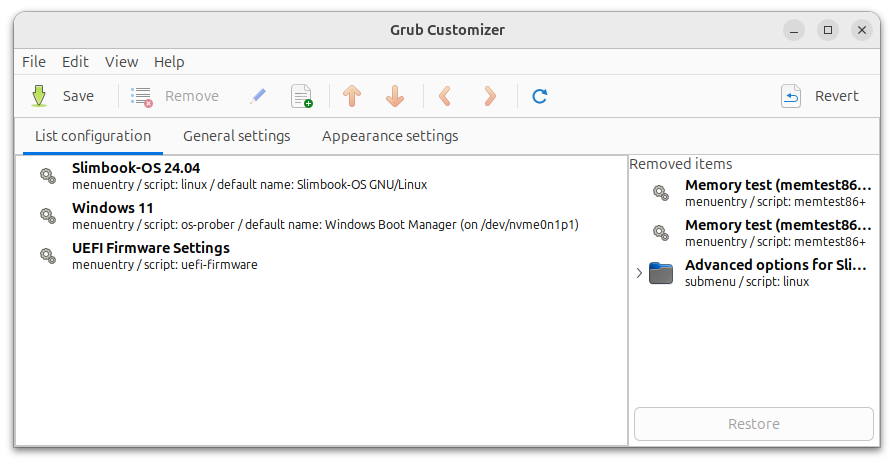
Under General Settings I set auto-boot to 5 sec and under Appearance Settings the resolution to 1920x1080.
After saving, I reboot to check.
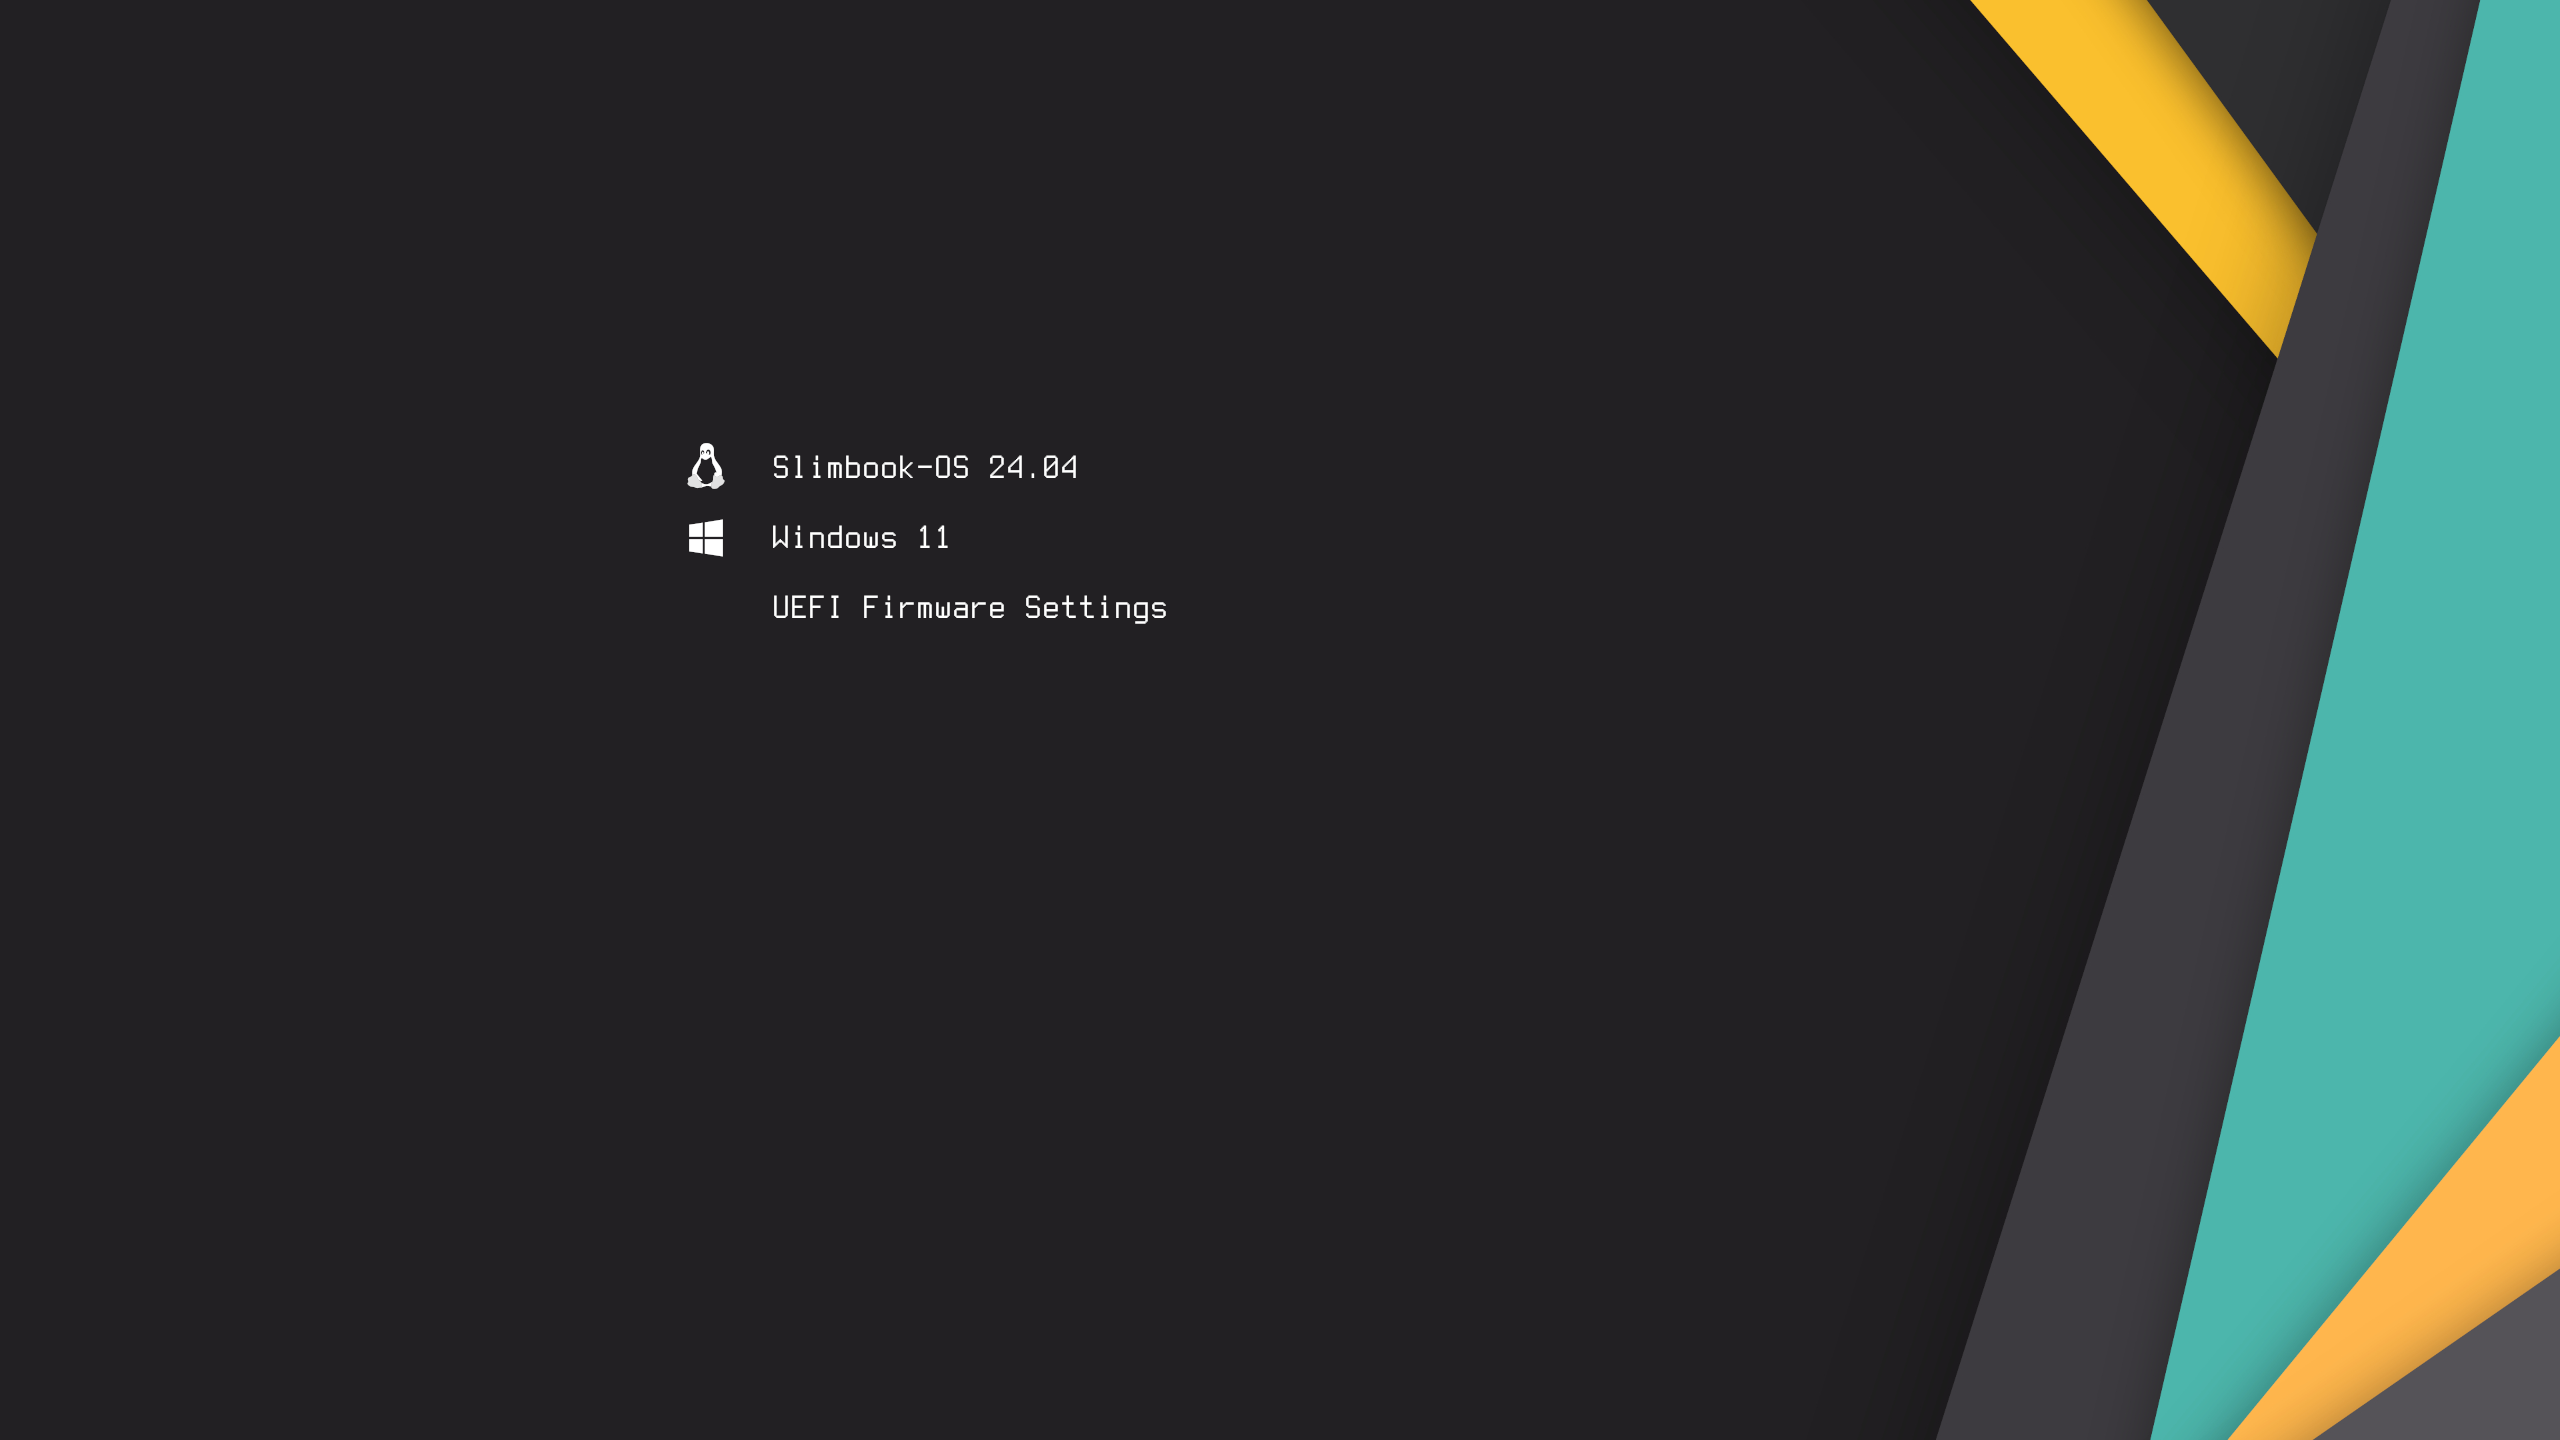
Customize GRUB
GRUB supports themes and customization of the boot manager’s appearance. If you want a boot menu that looks good and is easy to navigate, you can customize it with themes. A good source is Gnome-Look.org. In my example I downloaded Stylish-1080p.tar.xz from its Gnome-Look page.
mkdir -p /boot/grub/themes
cd /boot/grub/themes
tar xvf Stylish-1080p.tar.xz
I edit under /etc/default/grub.d, remove the one that came with my system and drop in the new one:
rm /etc/default/grub.d/slimbook.cfg

cat /etc/default/grub.d/tema-grub.cfg

GRUB_THEME="/boot/grub/themes/Stylish/theme.txt"
For reference, some of the final changes I made to /etc/default/grub:
GRUB_DEFAULT="0"
GRUB_TIMEOUT="5"
GRUB_DISTRIBUTOR="Slimbook-OS"
GRUB_CMDLINE_LINUX_DEFAULT="quiet splash"
GRUB_CMDLINE_LINUX=""
GRUB_GFXMODE="1920x1080x32"
GRUB_GFXPAYLOAD_LINUX="1920x1080x32"
GRUB_INIT_TUNE="1000 334 1 334 1 0 1 334 1 0 1 261 1 334 1 0 1 392 2 0 4 196 2"
GRUB_ENABLE_BLSCFG="false"
Run the update and reboot:
update-grub
reboot -f
Done, dualboot is up and running. I continue with the next post, about making Windows 11 as decent as possible.
Gotcha: the clock in dualboot
Classic Windows/Linux dualboot problem: one of the two shows the wrong time. The reason is that by default Windows assumes the RTC (hardware clock) is in local time, while Linux assumes UTC — which is the correct convention.
- RTC in local time → Windows happy, Linux confused (unless NTP is properly configured).
- RTC in UTC → Linux happy, Windows confused (unless NTP is properly configured).
If you rely on NTP only, it may look fine on the surface but internal inconsistency eventually shows up. External guides: itsfoss, howtogeek.
My solution: set the BIOS to UTC and tell Windows the RTC is UTC.
- BIOS: set the time to UTC. In Madrid in summer that’s two hours behind. Current UTC time.
- Linux: nothing to do — it already expects UTC.
- Windows: tell it that the RTC is UTC via the registry:
regedit→HKEY_LOCAL_MACHINE\SYSTEM\CurrentControlSet\Control\TimeZoneInformation.- Add a string value
RealTimeIsUniversal=1. - Reboot.
- On both OSes, configure an NTP client.
- On both OSes, configure the timezone (
Europe/Madridin my case, with daylight saving).