According to the Spanish RAE dictionary, Deshinchar: v. To deflate or reduce something swollen. That’s what this post is about: stripping Windows 11 of the apps, services, and options that simply get in the way — bloatware — that eat resources and clutter the experience. Works on a fresh Windows install as well as on one already in use.
Windows series
- Preparing a PC for Dualboot Linux / Windows and installing Windows 11 Pro.
- Configuring a decent Windows 11 by removing the cruft.
- Preparing Windows for software development: CLI, WSL2, and tools.
- Installing VMWare Workstation Pro on Windows 11 with a Windows 11 Pro VM.
- Installing a Windows 11 VM on Proxmox to run Windows 11 Pro on top of a Proxmox host.
Strategy

The plan, in order:
- Prepare the OS: updates and essentials (via a script of mine).
- Activate Windows with MAS.
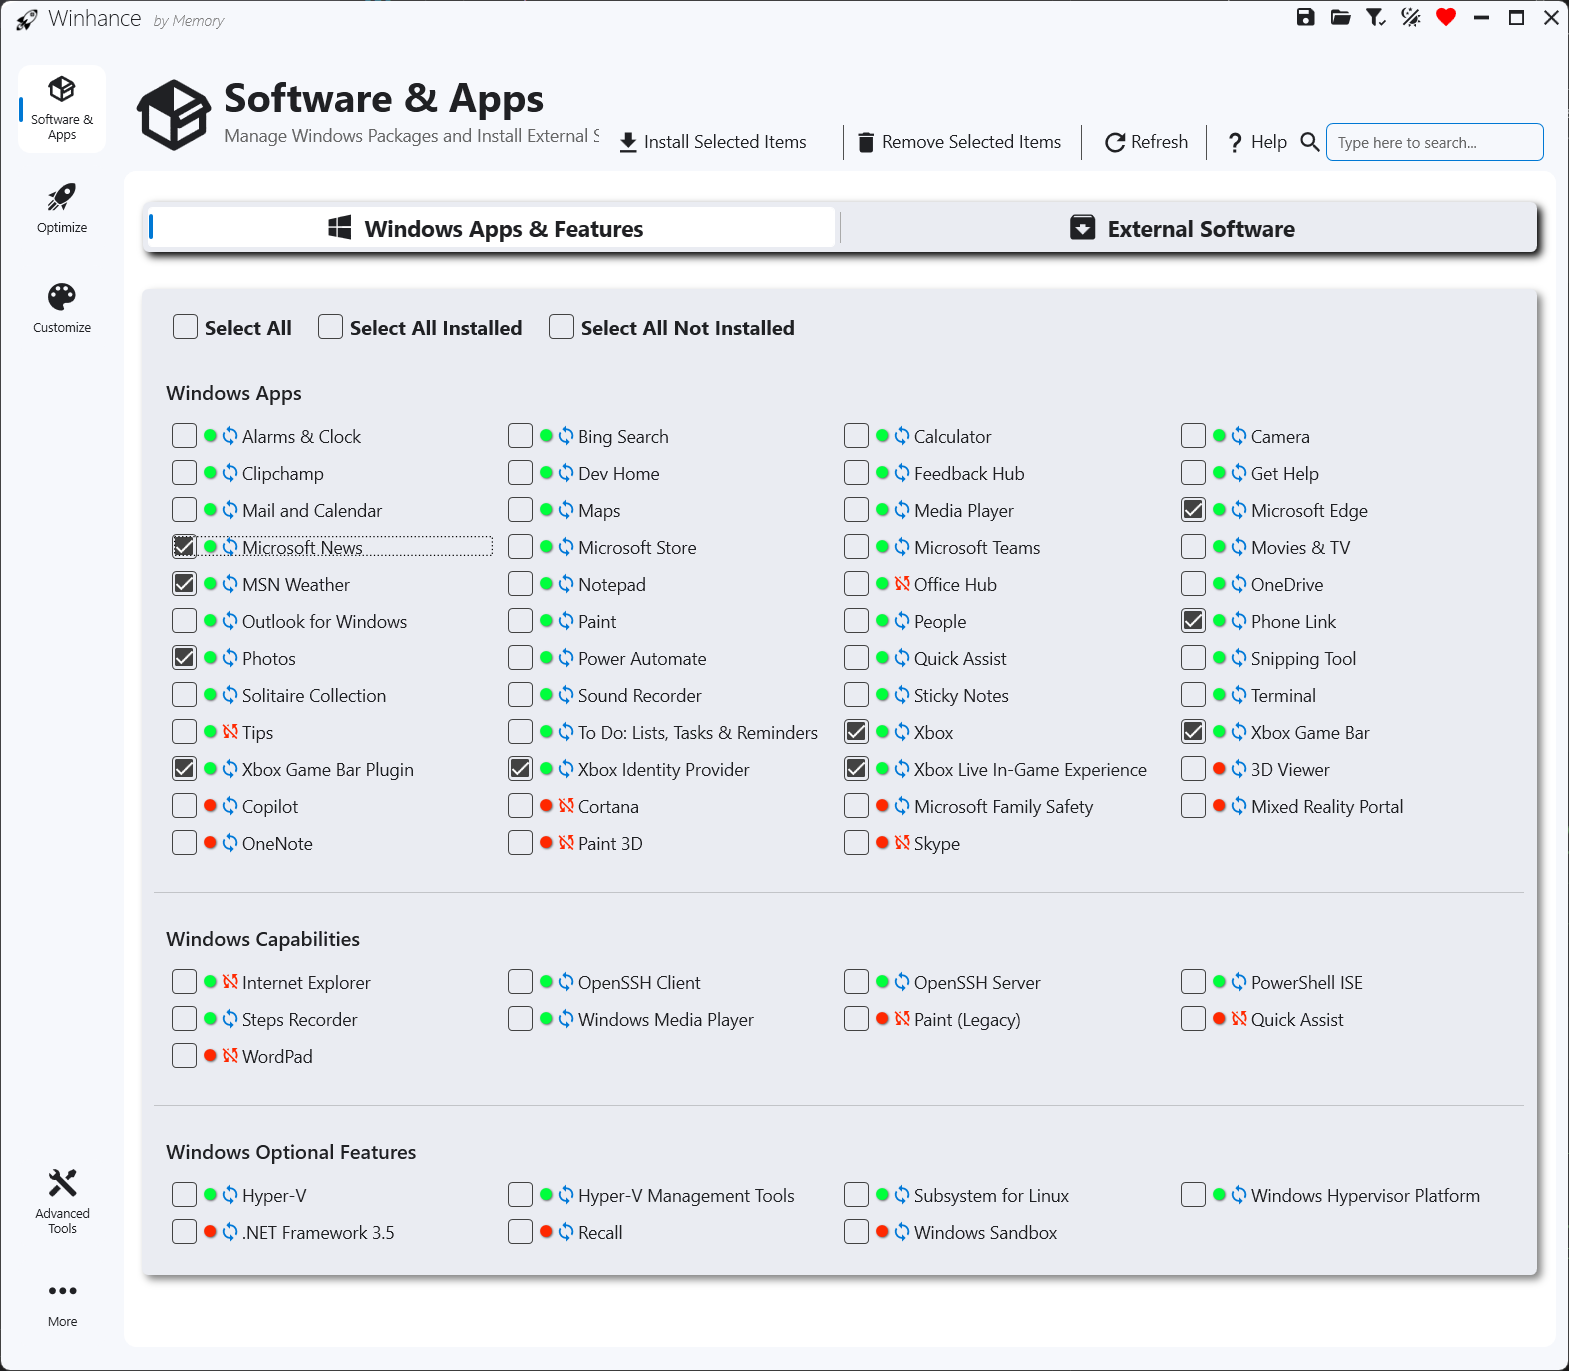
- Debloat with Win11Debloat. Alternatives: Winhance, Andrew Taylor’s Debloat 10/11, Tiny11 Builder.
- Finish off manually what the script doesn’t cover.
- Optional: pre-debloated unattended install to replay the process on more machines.
Step 1 — Prepare the OS
With Windows 11 already installed (normal install from the official ISO, or the unattended one):
Update the system
Start > “Update” > Check for Updates > apply all pending updates and reboot as required.
Run the essentials script
This post is about stripping things, but a few basics are non-negotiable: Chrome, 7-Zip, VSCode, PowerShell 7, and PowerToys. I install them from PowerShell 5 as administrator, running a script from my repo.
Open PowerShell as Administrator: Start > search “PowerShell” > right-click > Run as Administrator.
Enable System Restore and allow script execution:
Enable-ComputerRestore -Drive "C:\"
vssadmin resize shadowstorage /for=C: /on=C: /maxsize=10GB
Set-ExecutionPolicy -ExecutionPolicy RemoteSigned -Scope CurrentUser
Verify
wingetis present (it usually is on an up-to-date Win11) and accept its agreement:winget listReboot.
Run the script — it installs Chrome, 7-Zip, VSCode, PowerShell 7, PowerToys, and downloads Win11Debloat. If you prefer another browser, install it manually:
iex (Invoke-WebRequest -Uri "https://raw.githubusercontent.com/LuisPalacios/devcli/main/addons/windecente-inicio.ps1" -UseBasicParsing).Content

The script leaves Win11Debloat downloaded and ready for Step 3.
Step 2 — Activate Windows
Two options:
Retail key. Buy a digital copy of Windows 11 Pro from an authorized reseller (cheap and quick, you get the key by email). Then: Start > Settings > System > Activation > Change product key and enter the key.
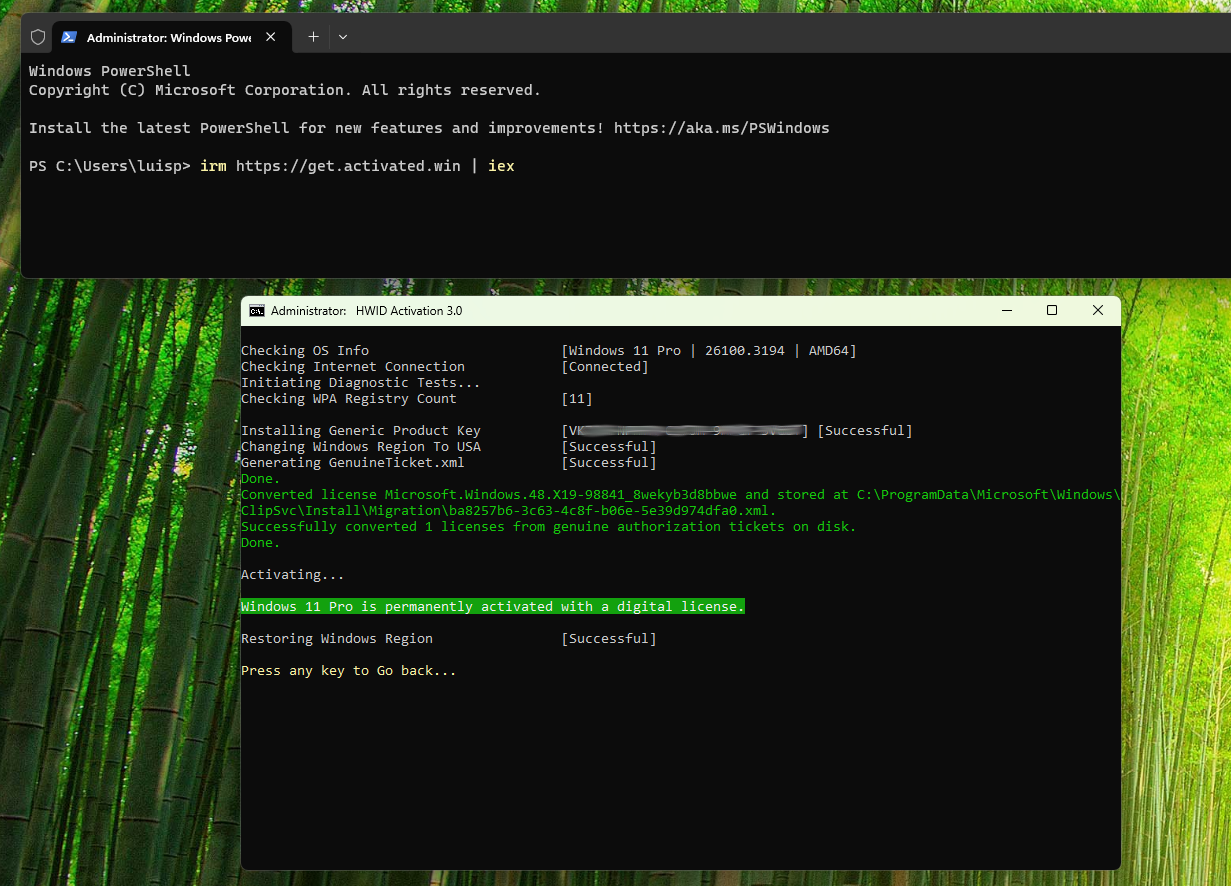
MAS — Microsoft Activation Script. Open-source activator for Windows and Office. Includes HWID, Ohook, TSforge, KMS38, and Online KMS. Worth reading the documentation. I use it for VMs and lab work:
Open PowerShell 7 as Administrator (the one Step 1’s script installed).
Run:
irm https://get.activated.win | iexChoose
(1) HWID for Windows activation.Verify in
Start > Settings > System > Activation.
To activate Office, use
(2) Ohookfrom the same script. See the documentation.
Step 3 — Debloat with Win11Debloat
Win11Debloat is lightweight and direct. Worth reading its wiki and the default settings.
Step 1’s script already dropped it in C:\Users\[user]\Desktop\Win11Debloat\.
Edit
Appslist.txtwith the apps to uninstall:cd Desktop\Win11Debloat\Raphire-Win11Debloat-70ebe29 notepad.exe Appslist.txtYou can start from this Appslist.txt — tick a few more than the defaults, except Edge: Win11Debloat itself recommends not touching it automatically. We’ll do it by hand in Step 4.
Run the script and pick option 1:
.\Win11Debloat.ps1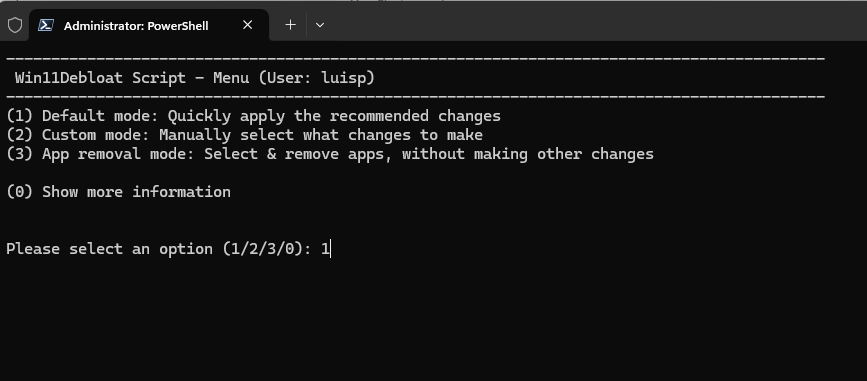 Win11Debloat - option 1
Reboot.
Step 4 — Debloat manually
Time to wrap up what Win11Debloat doesn’t cover.
If you went the unattended route
[unattended ✓] in each heading — feel free to skip those.Registry tweaks [unattended ✓]
Open PowerShell as administrator and run:
Disable “Let websites show me locally relevant content by accessing my language list”:
reg add "HKEY_CURRENT_USER\Control Panel\International\User Profile" /v "HttpAcceptLanguageOptOut" /t REG_DWORD /d 1 /f
Set UAC to “Never notify”:
reg.exe add HKLM\SOFTWARE\Microsoft\Windows\CurrentVersion\Policies\System /v EnableLUA /t REG_DWORD /d 1 /f
reg.exe add HKLM\SOFTWARE\Microsoft\Windows\CurrentVersion\Policies\System /v ConsentPromptBehaviorAdmin /t REG_DWORD /d 0 /f
reg.exe add HKLM\SOFTWARE\Microsoft\Windows\CurrentVersion\Policies\System /v PromptOnSecureDesktop /t REG_DWORD /d 0 /f
Remove Edge and set Chrome as default
Edge isn’t cross-platform, so I remove it.
- Start > Settings > Apps:
- Installed Apps: uninstall Edge.
- Launch Google Chrome and set it as the default browser.
- Default apps > Google Chrome: check that everything is assigned to Chrome.
- Apps for Websites: all off.
Privacy [unattended ✓]
- Privacy & Security:
- Security > Windows Security >
Open Windows Security: everything On. - Windows Permissions: all off (General, Speech, etc.).
- App permissions >
Location: off. The rest at defaults.
- Security > Windows Security >
Rename the user’s home folder [unattended ✓]
During install, Windows creates the short username from the first 5 characters of your email (in my case luisp, with HOME at C:\Users\luisp\). To rename it (full guide):
Enable the Administrator account:
net user Administrator /active:yesReboot and log in as Administrator (no password).
Find your user’s SID:
Get-LocalUser | Select-Object Name, SIDIn
regedit, editHKLM\SOFTWARE\Microsoft\Windows NT\CurrentVersion\ProfileList\S-1-5-21-...\ProfileImagePathwith the new path.In Explorer, rename the folder from
C:\Users\luisptoC:\Users\luis.Create a symbolic link for compatibility with programs that still point to the old folder:
New-Item -ItemType SymbolicLink -Path "C:\Users\luisp" -Target "C:\Users\luis"
If the symlink misbehaves or the old folder gets re-created, delete it and use a Junction instead:
rmdir C:\Users\luisp
mklink /J C:\Users\luisp C:\Users\luis
Remove preinstalled apps [unattended ✓]
Start > right-click on icons you don’t use > Unpin or Uninstall (in my case I removed LinkedIn and similar).
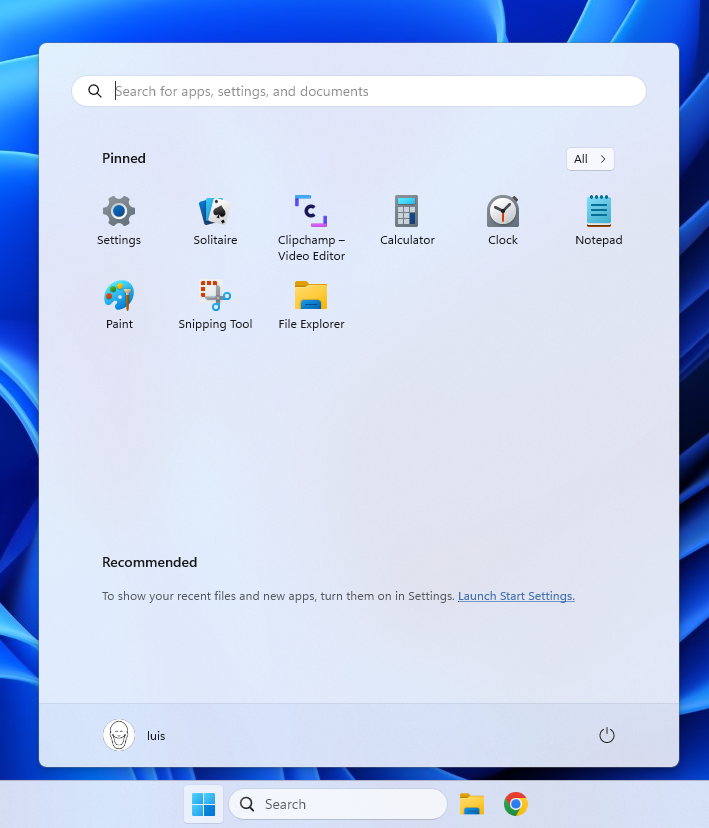
Customize the Taskbar [unattended ✓]
- Right-click the taskbar icons and remove the ones you don’t use.
- Start > search “Start settings”:
- Layout > More pins.
- Show recently added apps: off.
- Show recommended files…: off.
- Show account notifications: off.
- Show recently opened: off.
Remove the English keyboard
Start > Settings > Time & Language > Language & Region > Preferred Languages > “…” > Options > Keyboards > remove US (leave only Spanish).
File Explorer
Show hidden files, extensions, and the full path:
- Start > Settings >
System>For developers:- Enable developer mode if not already on.
- Go to
File Explorer:Show file extensions: On.Show hidden and system files: On.Show full path in title bar: On.Show empty drives: On.
File Sharing (SMB)
- Start > Settings >
Network and Internet>Advanced network settings > Advanced Sharing Settings:File & Printer sharing: On.Public folder sharing: On.
- Start > Settings > System > About >
Advanced System Settings> Computer Name > Change: verify it’s on WORKGROUP. - Enable SMB 1.0 only if you need compatibility with legacy machines:
- Start > “Control Panel” >
Programs>Programs and features>Turn Windows features on or off. - Enable SMB 1.0/CIFS File Sharing Support.
- Start > “Control Panel” >
Firewall
The default install puts the network on Public. If it’s a private network, change it:
Start > Settings > Network & Internet > Ethernet (and WiFi) > Private Network.
To reduce Firewall alerts:
- Start > “Control Panel” > System & Security > Windows Defender Firewall:
Advanced Settings: review inbound and outbound rules.Change notification settings: uncheck “Notify me when Windows Defender Firewall blocks a new app”.
Disable Cortana
- Start > search
gpedit.mscand open the Policy Editor.- Navigate to
Computer Configuration > Administrative Templates > Windows Components > Search. - Double-click Allow Cortana > Disabled > Apply.
- Navigate to
More preinstalled apps
Uninstall OEM crapware via PowerShell. What to uninstall depends on your OEM; Should I Remove It? helps decide.
List all installed apps:
Get-AppxPackage | Select Name, PackageFullName
Uninstall a specific one:
Get-AppxPackage *AppName* | Remove-AppxPackage
Unneeded services
Open services.msc, identify services you don’t use (e.g. the xbox* ones), double-click > Startup type: Disabled > Apply.
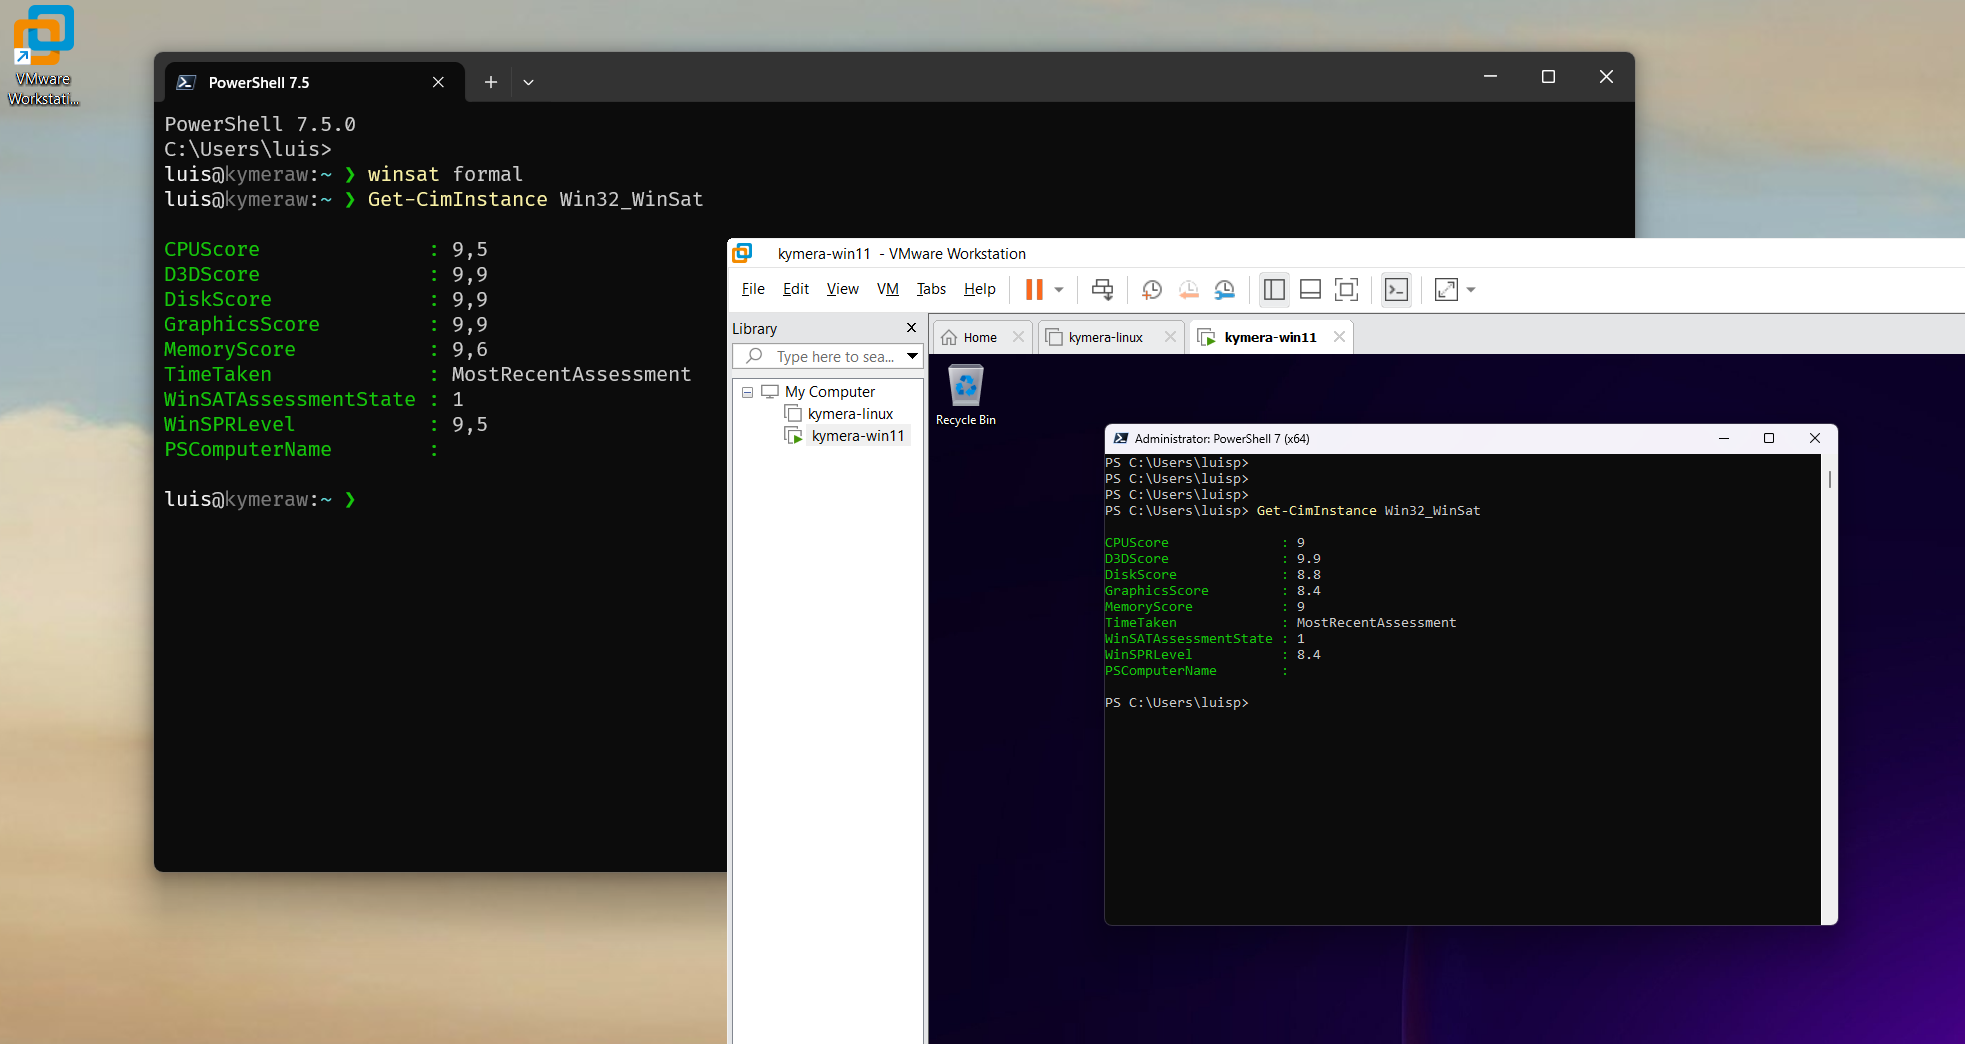
Performance: WinSAT
To check CPU, memory, disk, and graphics:
winsat formal
Get-CimInstance Win32_WinSat
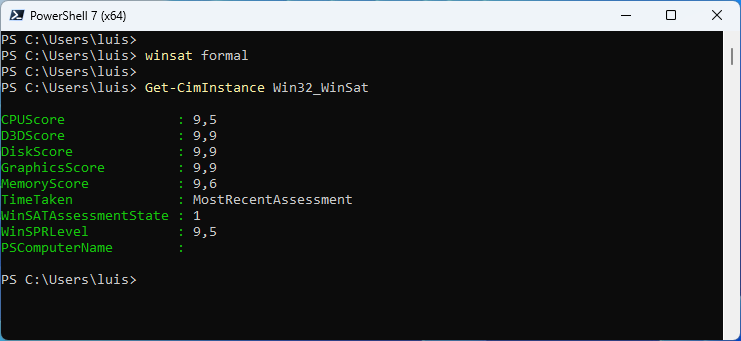
The same steps apply to Windows virtual machines, with very good performance.
Maintenance
Useful commands as administrator:
chkdsk: checks the disk and fixes issues.sfc /SCANNOW: verifies system file integrity.dism /online /cleanup-image /restorehealth: downloads and replaces corrupt files from Windows Update.
Heads up:
sfchad a long-standing false positive withbthmodem.sys(it would flag it as corrupt and remove it). If it happens to you, rundism ... /restorehealthto recover.
The devcli tool
If you spend a lot of time in the CLI, complement this post with Windows for development, where I cover CLI, Terminal, WSL2, and tools.
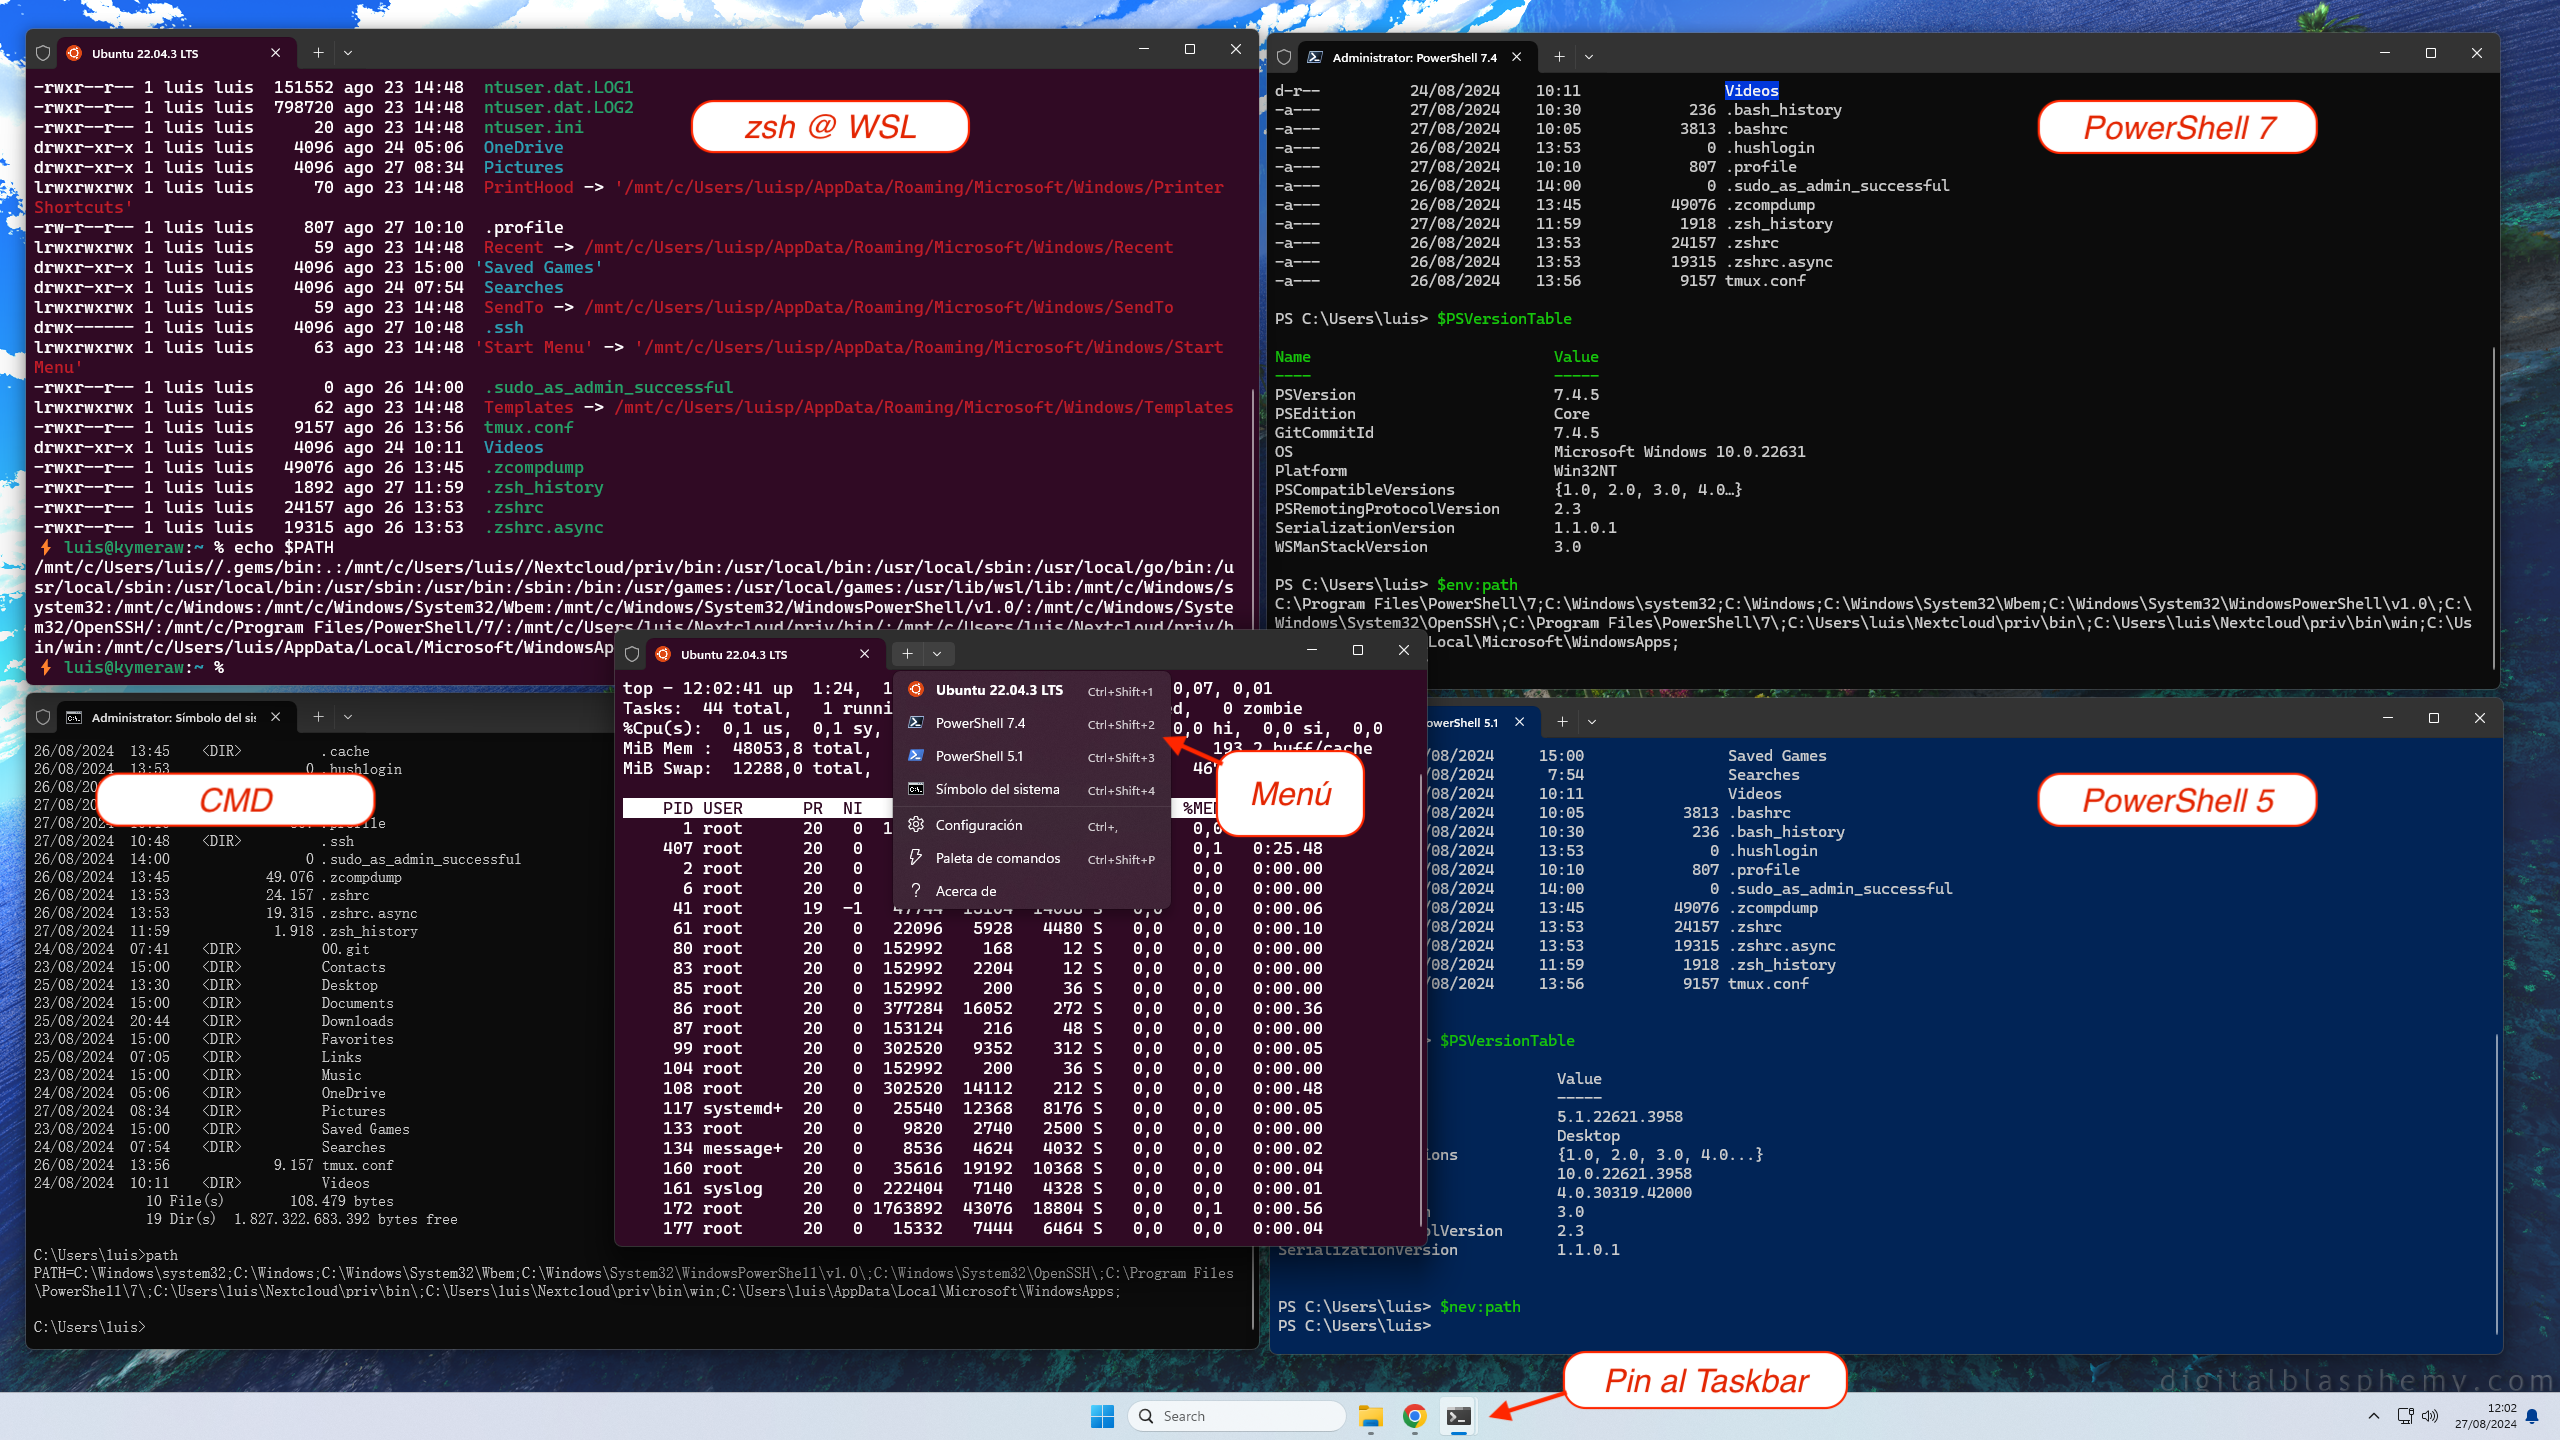
There I mention devcli, a project of mine for setting up the CLI environment on Linux, macOS, WSL2, and Windows. After debloating, it’s worth preparing the CLI:
- Installs tools: git, curl, wget, nano, htop, tmux, fzf, bat, fd-find, ripgrep, tree, jq, lsd, zoxide.
- Installs Oh-My-Posh for any shell.
- Sets
LANG(defaultes_ES.UTF-8) on Linux, macOS, and WSL2. - Copies config files (see the
dotfilessubdirectory). - Copies my Git toolbox from gitbox.
- Creates handy scripts in
~/bin:e,s,confcat. - Installs FiraCode Nerd Font for icons in tools like
lsd.
Unattended install
To replay the process on more machines, it pays to automate the Windows install itself. I tried UnattendedWinstall and WIMUtil.
1. Install Windows ADK (to get oscdimg.exe, used later):
- Download Windows ADK, install it, and select only Deployment Tools.
- Copy the contents of
C:\Program Files (x86)\Windows Kits\10\Assessment and Deployment Kit\Deployment Tools\amd64\Oscdimg\into a directory that’s on your PATH.
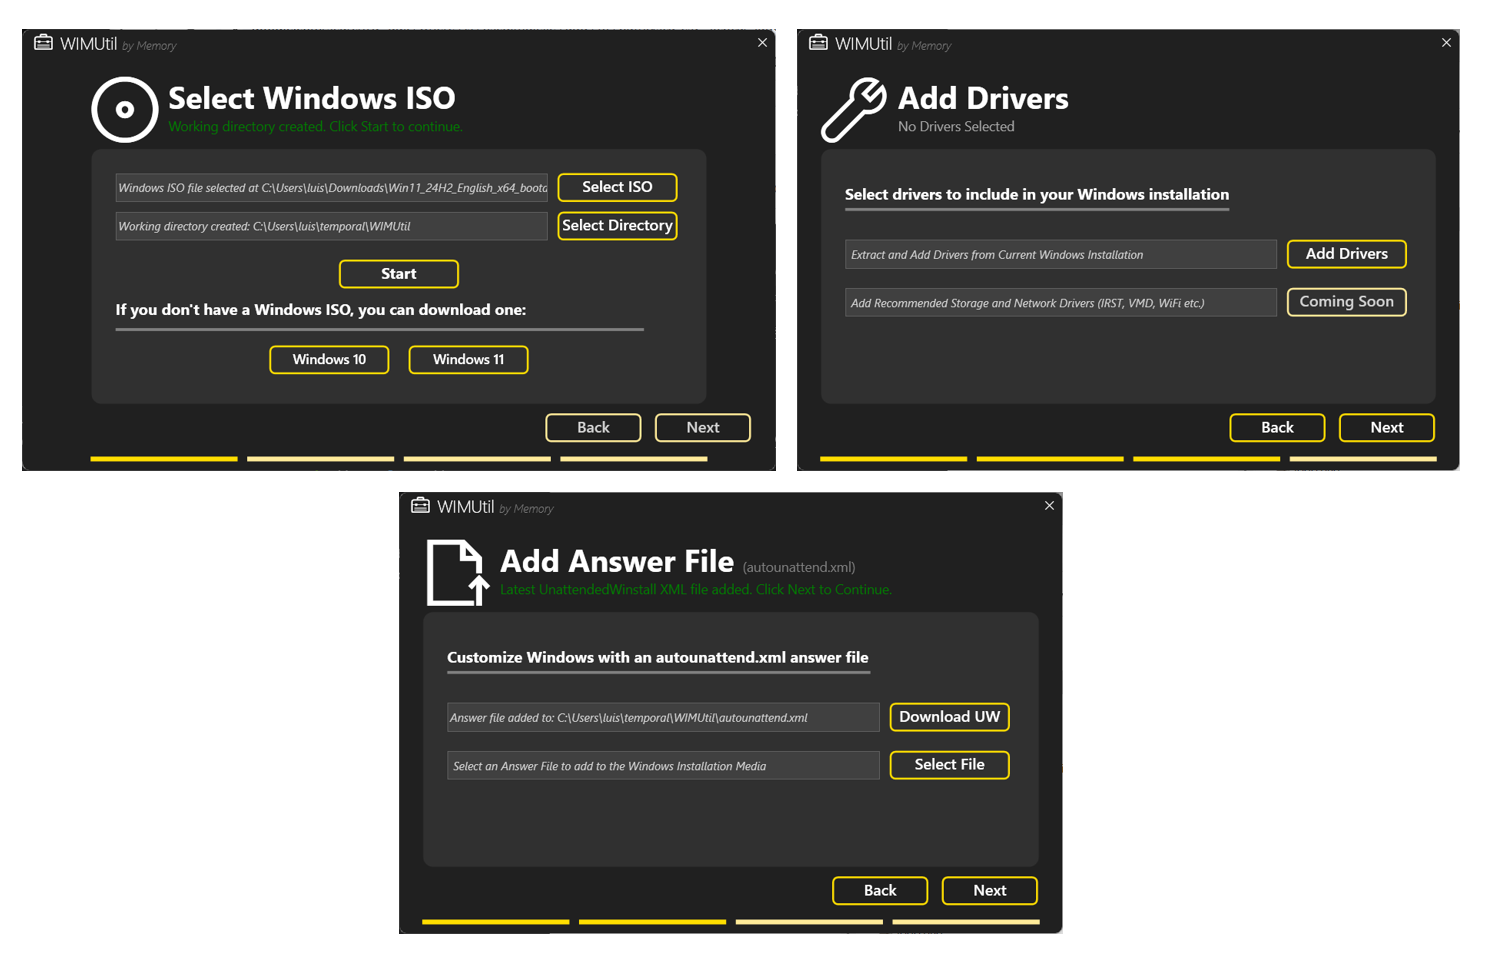
2. Run WIMUtil from PowerShell as administrator:
irm "https://github.com/memstechtips/WIMUtil/raw/main/src/WIMUtil.ps1" | iex
This generates a custom ISO using the autounattend.xml from UnattendedWinstall:
- Select ISO, temp directory, START.
- Next > customize Windows > Download UW (pulls the UnattendedWinstall one). No answer file.
- Next > optionally “Add Drivers” from the Windows you’re running it on.
- Next > Select Location >
win11-custom.iso. - Create ISO.
3. Test the ISO in a VM (see VMWare on Windows):
- VMware Workstation > New virtual Machine > Typical > Installer disc >
win11-custom.iso. - The install only asks for language, time, keyboard, disk type, user, and security questions. Very quick.
Important: at the end of the unattended install, Defender and UAC are disabled. Re-enable at least Defender.
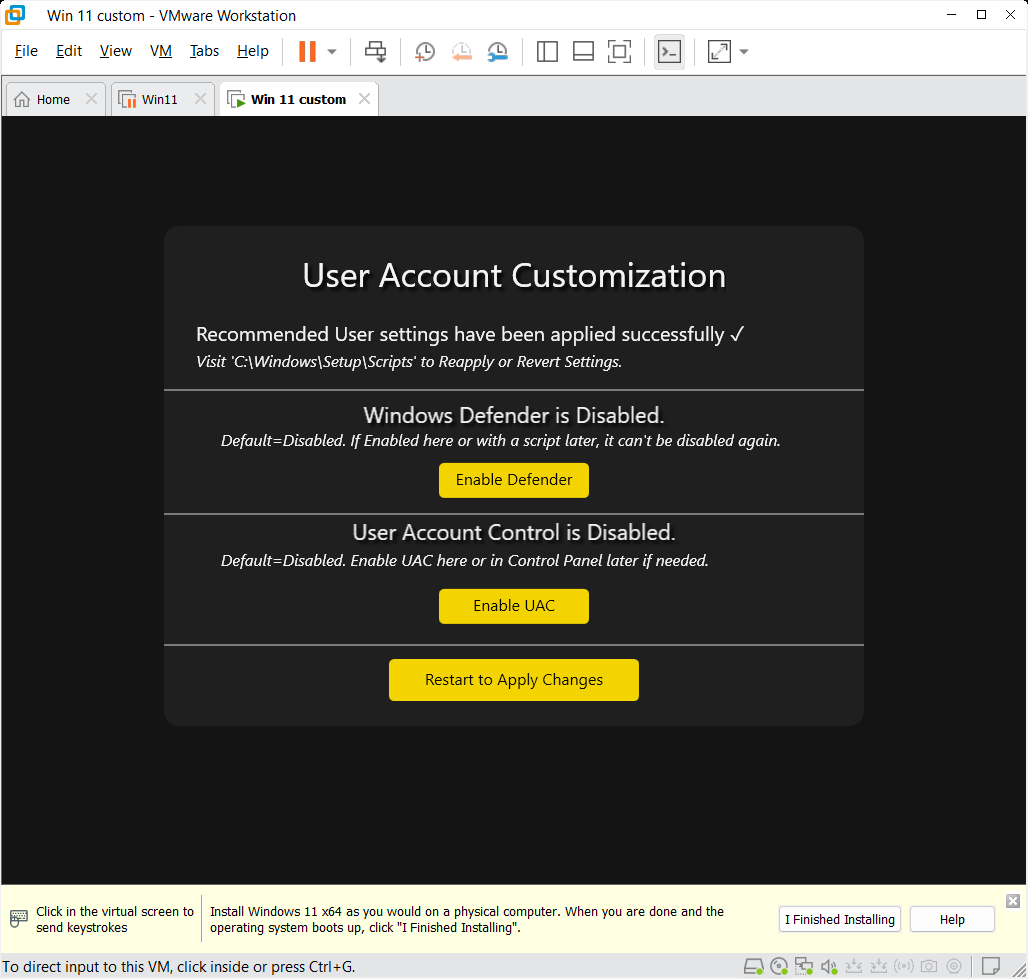
After reboot, install the VMware Tools and return to Step 1 to finish off.
Useful links
- Clink: enriches CMD (
cmd.exe) with Linux-style readline — colors, history, autocomplete. - CCleaner: general cleanup, though the interesting bits require the Pro license.
- BleachBit: Open Source alternative to CCleaner (no Registry or performance optimization). Before installing the latest version, grab the Visual Studio 2019 (VC++ 10.0) redistributable SP1 x86.
- TCPView: live network connections (Sysinternals).
- Autoruns: everything that launches automatically on Windows startup (more complete than Task Manager or MSConfig).
- Sysinternals Suite: the full suite of advanced tools (Russinovich/Cogswell, maintained by Microsoft).
- autounattend.xml generator for Windows 10/11.
- Winhance: after all the cleanup, there were still things left for Winhance to polish.