When you work with an AI harness (Claude Code, Gemini CLI, Codex, …) you end up launching multiple instances over and over. I wanted a keyboard shortcut that would open my typical configuration using panels within a single window.
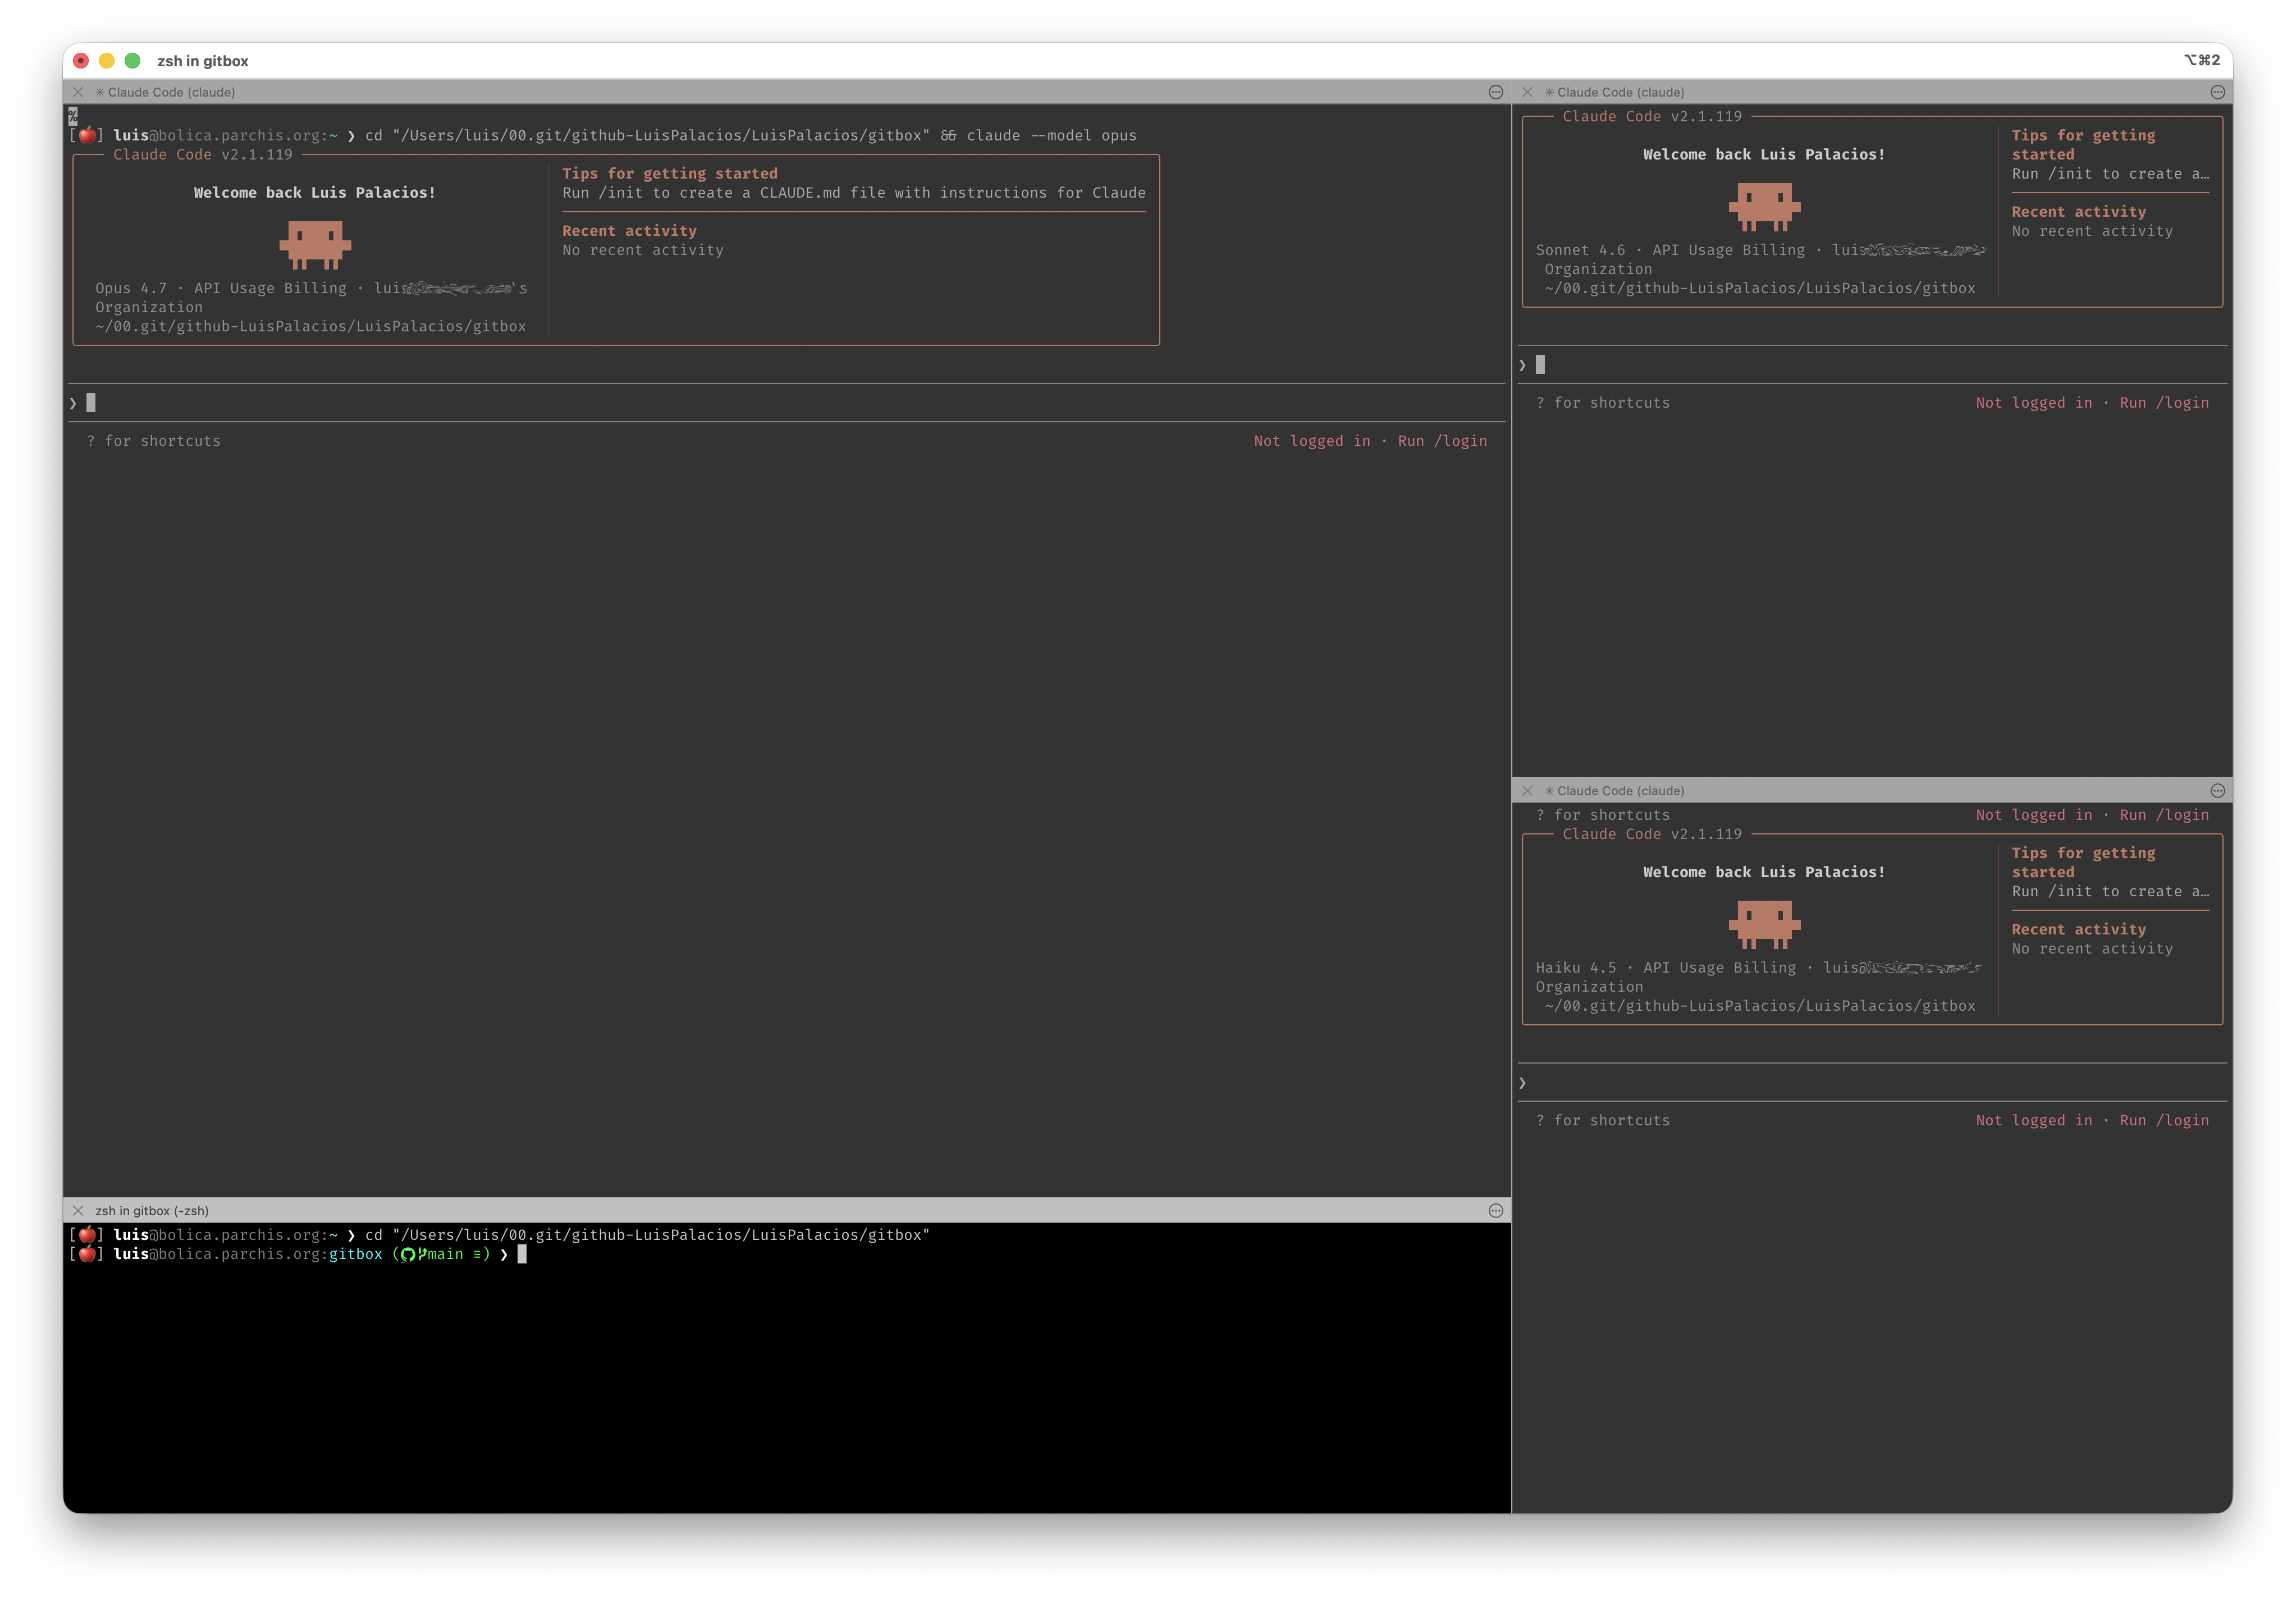
I call it the terminal in “AI Mode”. I launch four panels: three with claude (each running a different model) and a fourth with a clean shell for auxiliary commands.
The non-negotiable requirement is that all four panels start in the directory where I used the shortcut and that there are no manual steps.
The Problem
I instinctively started looking for a “simple” way that would leverage what iTerm2 already comes with out of the box. The options I explored before reaching the final solution were:
iTerm2 Window Arrangements. The “official” way to save a panel layout. The problem is threefold: you can’t invoke it on-demand with parameters, the associated Profiles are rigid, and the Working Directory directive of the Profile has no option to “use the $PWD of the shell that launched me”.
tmux or Zellij. Highly configurable, beautiful declarative layouts, and native support for “open in $PWD”. But they introduce a layer between iTerm2 and the terminal: their own keyboard prefix, copy/paste quirks, shell integrations you have to maintain. For my workflow—where iTerm2 already does the multiplexer’s job—it was trading a small problem for a medium-sized one.
iTerm2 Python API
The solution was to use the embedded Python runtime that comes with iTerm2. It includes a complete API with which you can create windows, split panels, set sizes, read variables from each session, and send text.
The scripts live in ~/Library/Application Support/iTerm2/Scripts/ and, if you put them in the AutoLaunch subfolder, they run as daemons each time iTerm2 opens. Once you register a script (as a named RPC), you can assign it a keyboard shortcut from iTerm2 itself.
Setup Phase
- Enable the Python API in iTerm2
iTerm2 → Settings → General → Magic → Enable Python API. Check the box and confirm the security dialog.
- Create the AutoLaunch folder
Any script inside AutoLaunch executes automatically when iTerm2 starts. This is what we want so the shortcut is always available:
mkdir -p ~/Library/Application\ Support/iTerm2/Scripts/AutoLaunch
- Create the script file with your preferred editor, here’s an example with VSCode:
code ~/Library/Application Support/iTerm2/Scripts/AutoLaunch/aimode.py
- Paste the following content:
aimode.py
#!/usr/bin/env python3
"""
================================================================================
aimode — open a 4-pane Claude Code window from the current directory.
================================================================================

LAYOUT
------
    +-----------------------------+----------------+
    |                             |                |
    |                             |   tr: sonnet   |
    |                             |                |
    |        tl: opus             |                |
    |                             +----------------+
    |                             |                |
    |                             |   br: haiku    |
    +-----------------------------+                |
    |        bl: shell            |                |
    +-----------------------------+----------------+
    <-------- LEFT_RATIO -------->|<- 1-LEFT_RATIO->

The left and right columns split independently — the horizontal divider
on the left (between opus and shell) does NOT have to align with the one
on the right (between sonnet and haiku). That's why we have separate
LEFT_TOP_RATIO and RIGHT_TOP_RATIO knobs.

================================================================================
QUICK ADJUSTMENTS — edit the CONFIG block below
================================================================================

1. RESIZE PANES
   Change the three *_RATIO values. They're fractions of 1.0 — e.g. 0.65
   means "65% of the available space". Increase to make that side bigger.

2. SWAP MODELS / CHANGE COMMANDS
   Edit the commands() function. Each pane (tl, tr, bl, br) maps to a
   shell command. Add flags freely: --permission-mode plan, --add-dir,
   --resume, etc. The shell pane (bl) just runs `cd`, but you can chain
   anything: `cd ... && git status && git log --oneline -10`.

3. CHANGE WHICH PANE GETS WHICH MODEL
   Just rewrite the strings in commands(). E.g. swap opus to bottom-right:
   move the opus command from "tl" to "br" and the haiku command from
   "br" to "tl". The split structure stays the same.

4. ADD A FIFTH PANE
   Pick the parent pane to split from, e.g.:
       mr = await tr.async_split_pane(vertical=False)   # split right col
   Then add it to commands() and to the readiness/send loops below.
   You'll also need to redistribute right-column heights across three
   sessions instead of two.

5. CHANGE THE SPLIT STRUCTURE
   The current order is:
       tr  = split tl vertically      (creates left/right columns)
       bl  = split tl horizontally    (splits left column into rows)
       br  = split tr horizontally    (splits right column into rows)
   If you want, say, a single shell pane spanning the full bottom width
   (so left and right columns share a horizontal divider), the order is:
       bl  = split tl horizontally    FIRST (full-width bottom)
       tr  = split tl vertically      THEN (only top splits in two)
   The variable names then mean different things — adjust commands()
   accordingly.

6. TUNE RELIABILITY KNOBS (rarely needed)
   - READY_TIMEOUT: how long to wait for each shell to finish init
     before falling back to a cushion delay. Bump if your ~/.zshrc is
     slow (mise / nvm / heavy completions).
   - SEND_GAP: pause between consecutive command sends. Bump to 0.1 if
     you ever see a partial command land in a pane.

================================================================================
INSTALLATION (one time)
================================================================================
1. iTerm2 → Settings → General → Magic → Enable Python API.
2. Save this file as:
     ~/Library/Application Support/iTerm2/Scripts/AutoLaunch/aimode.py
3. Restart iTerm2 (or run it once via Scripts → AutoLaunch → aimode.py).
4. Settings → Keys → Key Bindings → +
     Action: Invoke Script Function
     Function: aimode()
   Pick a shortcut (e.g. ⌃⌥⌘A).
5. Press the shortcut from any session, in any directory.

To reload after editing this file: Scripts → Manage → Console, find
`aimode`, stop it, then Scripts → AutoLaunch → aimode.py to restart.
Or just quit and reopen iTerm2.
================================================================================
"""
import asyncio
import iterm2

# ============================================================================
# CONFIG — tune these to your taste
# ============================================================================

# Column width: fraction of total width given to the LEFT column.
# 0.65 = left column is 65% of the window, right column is 35%.
LEFT_RATIO = 0.65

# Left column rows: fraction of left-column height given to the TOP pane.
# 0.82 = opus takes 82% of the left column, shell takes 18%.
LEFT_TOP_RATIO = 0.82

# Right column rows: fraction of right-column height given to the TOP pane.
# 0.50 = sonnet and haiku split the right column evenly.
RIGHT_TOP_RATIO = 0.50

# Per-session readiness timeout in seconds. Bumps to 8.0 or 10.0 are
# reasonable if you have a heavy shell init.
READY_TIMEOUT = 5.0

# Gap between consecutive command sends in seconds. Belt-and-braces
# against iTerm2's redraw cycle dropping a keystroke.
SEND_GAP = 0.05


def commands(cwd: str) -> dict:
    """
    Commands fired in each pane after the layout settles.

    Keys map to pane positions:
      tl = top-left   (the dominant pane on the left)
      tr = top-right
      bl = bottom-left  (small shell strip below opus)
      br = bottom-right

    Each value is a shell command. The `cd` is essential — without it
    the new pane lands in your shell's default startup directory, not
    the directory you launched aimode from.
    """
    return {
        "tl": f'cd "{cwd}" && claude --model opus',
        "tr": f'cd "{cwd}" && claude --model sonnet',
        "bl": f'cd "{cwd}"',
        "br": f'cd "{cwd}" && claude --model haiku',
    }


# ============================================================================
# Internals — usually no need to touch below this line
# ============================================================================


async def wait_ready(session, timeout: float = READY_TIMEOUT) -> bool:
    """
    Wait until a session's shell is interactive and listening.

    Uses iTerm2's per-session `path` variable as the readiness proxy:
    it's populated once the shell has set its working directory, which
    in practice means zsh's line editor (zle) is attached to the TTY
    and ready to accept keystrokes. Without this, fast machines race
    the script ahead of the shell and the cd/claude command lands in
    the void before the prompt appears.

    Returns True if ready within the timeout, False otherwise.
    """
    deadline_steps = int(timeout * 20)  # poll every 50ms
    for _ in range(deadline_steps):
        path = await session.async_get_variable("path")
        if path:
            return True
        await asyncio.sleep(0.05)
    return False


async def main(connection):
    app = await iterm2.async_get_app(connection)

    @iterm2.RPC
    async def aimode():
        # ----------------------------------------------------------------
        # 1. Capture the originating CWD BEFORE creating the new window.
        #    Once async_create runs, current_terminal_window points at
        #    the new (empty) window, not the one you triggered from.
        # ----------------------------------------------------------------
        cwd = "~"
        win = app.current_terminal_window
        if win is not None:
            current = win.current_tab.current_session
            path = await current.async_get_variable("path")
            if path:
                cwd = path

        # ----------------------------------------------------------------
        # 2. Create a new window and split it into 4 panes.
        #
        #    Split order matters for layout independence:
        #      - First we split tl vertically -> creates tr (right column).
        #      - Then we split tl horizontally -> creates bl below opus.
        #      - Then we split tr horizontally -> creates br below sonnet.
        #
        #    Because bl is a child of tl (left column) and br is a child
        #    of tr (right column), the two columns get independent
        #    horizontal dividers — exactly what we want.
        # ----------------------------------------------------------------
        window = await iterm2.Window.async_create(connection)
        if window is None:
            return
        tab = window.current_tab
        tl = tab.current_session
        tr = await tl.async_split_pane(vertical=True)   # left | right
        bl = await tl.async_split_pane(vertical=False)  # opus / shell
        br = await tr.async_split_pane(vertical=False)  # sonnet / haiku

        # ----------------------------------------------------------------
        # 3. Resize panes via preferred_size + async_update_layout.
        #
        #    preferred_size is a hint expressed in character cells (cols
        #    x rows), not pixels. iTerm2's layout engine respects the
        #    hints while keeping aligned panes consistent (e.g. tl and
        #    bl must share a width because they're in the same column).
        #
        #    We compute totals from the current sizes and apply ratios.
        #    The max(...) floors prevent a pathologically small pane if
        #    someone sets a ratio close to 0 or 1.
        # ----------------------------------------------------------------
        total_w = tl.preferred_size.width + tr.preferred_size.width
        left_w = max(20, int(total_w * LEFT_RATIO))
        right_w = max(20, total_w - left_w)

        left_total_h = tl.preferred_size.height + bl.preferred_size.height
        left_top_h = max(10, int(left_total_h * LEFT_TOP_RATIO))
        left_bot_h = max(3, left_total_h - left_top_h)

        right_total_h = tr.preferred_size.height + br.preferred_size.height
        right_top_h = max(10, int(right_total_h * RIGHT_TOP_RATIO))
        right_bot_h = max(6, right_total_h - right_top_h)

        tl.preferred_size = iterm2.Size(left_w, left_top_h)
        bl.preferred_size = iterm2.Size(left_w, left_bot_h)
        tr.preferred_size = iterm2.Size(right_w, right_top_h)
        br.preferred_size = iterm2.Size(right_w, right_bot_h)
        await tab.async_update_layout()

        # ----------------------------------------------------------------
        # 4. Wait for all four shells to be interactive (in parallel).
        #    Total wait is bounded by the slowest shell, not the sum.
        #    Falls back to a cushion delay only if a shell genuinely
        #    didn't report ready in READY_TIMEOUT seconds.
        # ----------------------------------------------------------------
        readiness = await asyncio.gather(
            wait_ready(tl),
            wait_ready(tr),
            wait_ready(bl),
            wait_ready(br),
        )
        if not all(readiness):
            await asyncio.sleep(0.5)

        # ----------------------------------------------------------------
        # 5. Fire commands sequentially with a small inter-command gap.
        #    The gap (50ms) is below human perception but above iTerm2's
        #    redraw window, which prevents the renderer from dropping a
        #    keystroke when four panes update in the same animation
        #    frame.
        # ----------------------------------------------------------------
        cmd = commands(cwd)
        for session, key in [(tl, "tl"), (tr, "tr"), (bl, "bl"), (br, "br")]:
            await session.async_send_text(cmd[key] + "\n")
            await asyncio.sleep(SEND_GAP)

    await aimode.async_register(connection)


iterm2.run_forever(main)
- Start the daemon
Once you’ve saved the file above, you need to tell iTerm2 to read it. You have two options:
- Run it once now from
Scripts → AutoLaunch → aimode.pyin the menu bar. - Restart iTerm2 — Since we saved it under
AutoLaunchit will start automatically on each launch.
The first time iTerm2 runs a script it may ask for permission. Accept it. To verify that the daemon is running, open Scripts → Manage → Console: you should see aimode in the list with no errors.
- Assign the keyboard shortcut
Settings → Keys → Key Bindings → +:
- Keyboard Shortcut: whichever you prefer (I use
⌃⌥⌘A, but any free one works). - Action: Invoke Script Function.
- Function:
aimode()— the parentheses are mandatory.
How to Use
From any iTerm2 session, in any directory, press the shortcut. You end up with a window with four panels that start in the directory you were in, and the three Claude panels launch opus, sonnet, and haiku automatically.
You can tune the script, it has a CONFIG block:
LEFT_RATIO— what percentage of the width the left column takes (0.65= 65%).LEFT_TOP_RATIO— within the left column, how much height the top panel (opus) takes.RIGHT_TOP_RATIO— same for the right column (sonnet vs haiku).READY_TIMEOUT— how long to wait for each shell to initialize before sending commands. Increase it if your~/.zshrcis slow (mise, nvm, heavy completions).SEND_GAP— pause between consecutive commands. Increase to0.1if you ever see a command truncated.
And a commands(cwd) function that maps each panel (tl, tr, bl, br) to its shell command. Changing which model goes where, adding flags like --permission-mode plan, or replacing the shell panel with a git status && git log --oneline -10 is editing one line.
When you edit the script:
Scripts → Manage → Console → search for aimode → Stop → Scripts → AutoLaunch → aimode.py to restart. Or close and reopen iTerm2, it’s the same.
Next Steps
Once you have the foundation, you can create your own scripts. Here are some ideas to experiment with:
aimode plan— the three Claudes starting with--permission-mode planfor planning sessions.aimode review <PR>— open the shell panel with agh pr checkout <PR>and the Claudes in review mode.- Alternative layouts — an
aireview.pyscript with three vertical panels to compare diffs in parallel, anotheraiops.pywith shells on different servers via SSH.
Since each layout is a Python script in AutoLaunch and each registers as its own RPC, you can have multiple shortcuts—⌃⌥⌘A, ⌃⌥⌘P, ⌃⌥⌘R—invoking different layouts without stepping on each other.
Interesting Links
| Type | Links |
|---|---|
| Official | iTerm2 Python API |
| Reference | claude CLI docs |