Cuando trabajas con un harnes de IA (Claude Code, Gemini CLI, Codex, …) acabas arrancando varias instancias una y otra vez. Queríá tener un atajo de teclado para que me abriese mi configuración más típica usando paneles en una ventana.
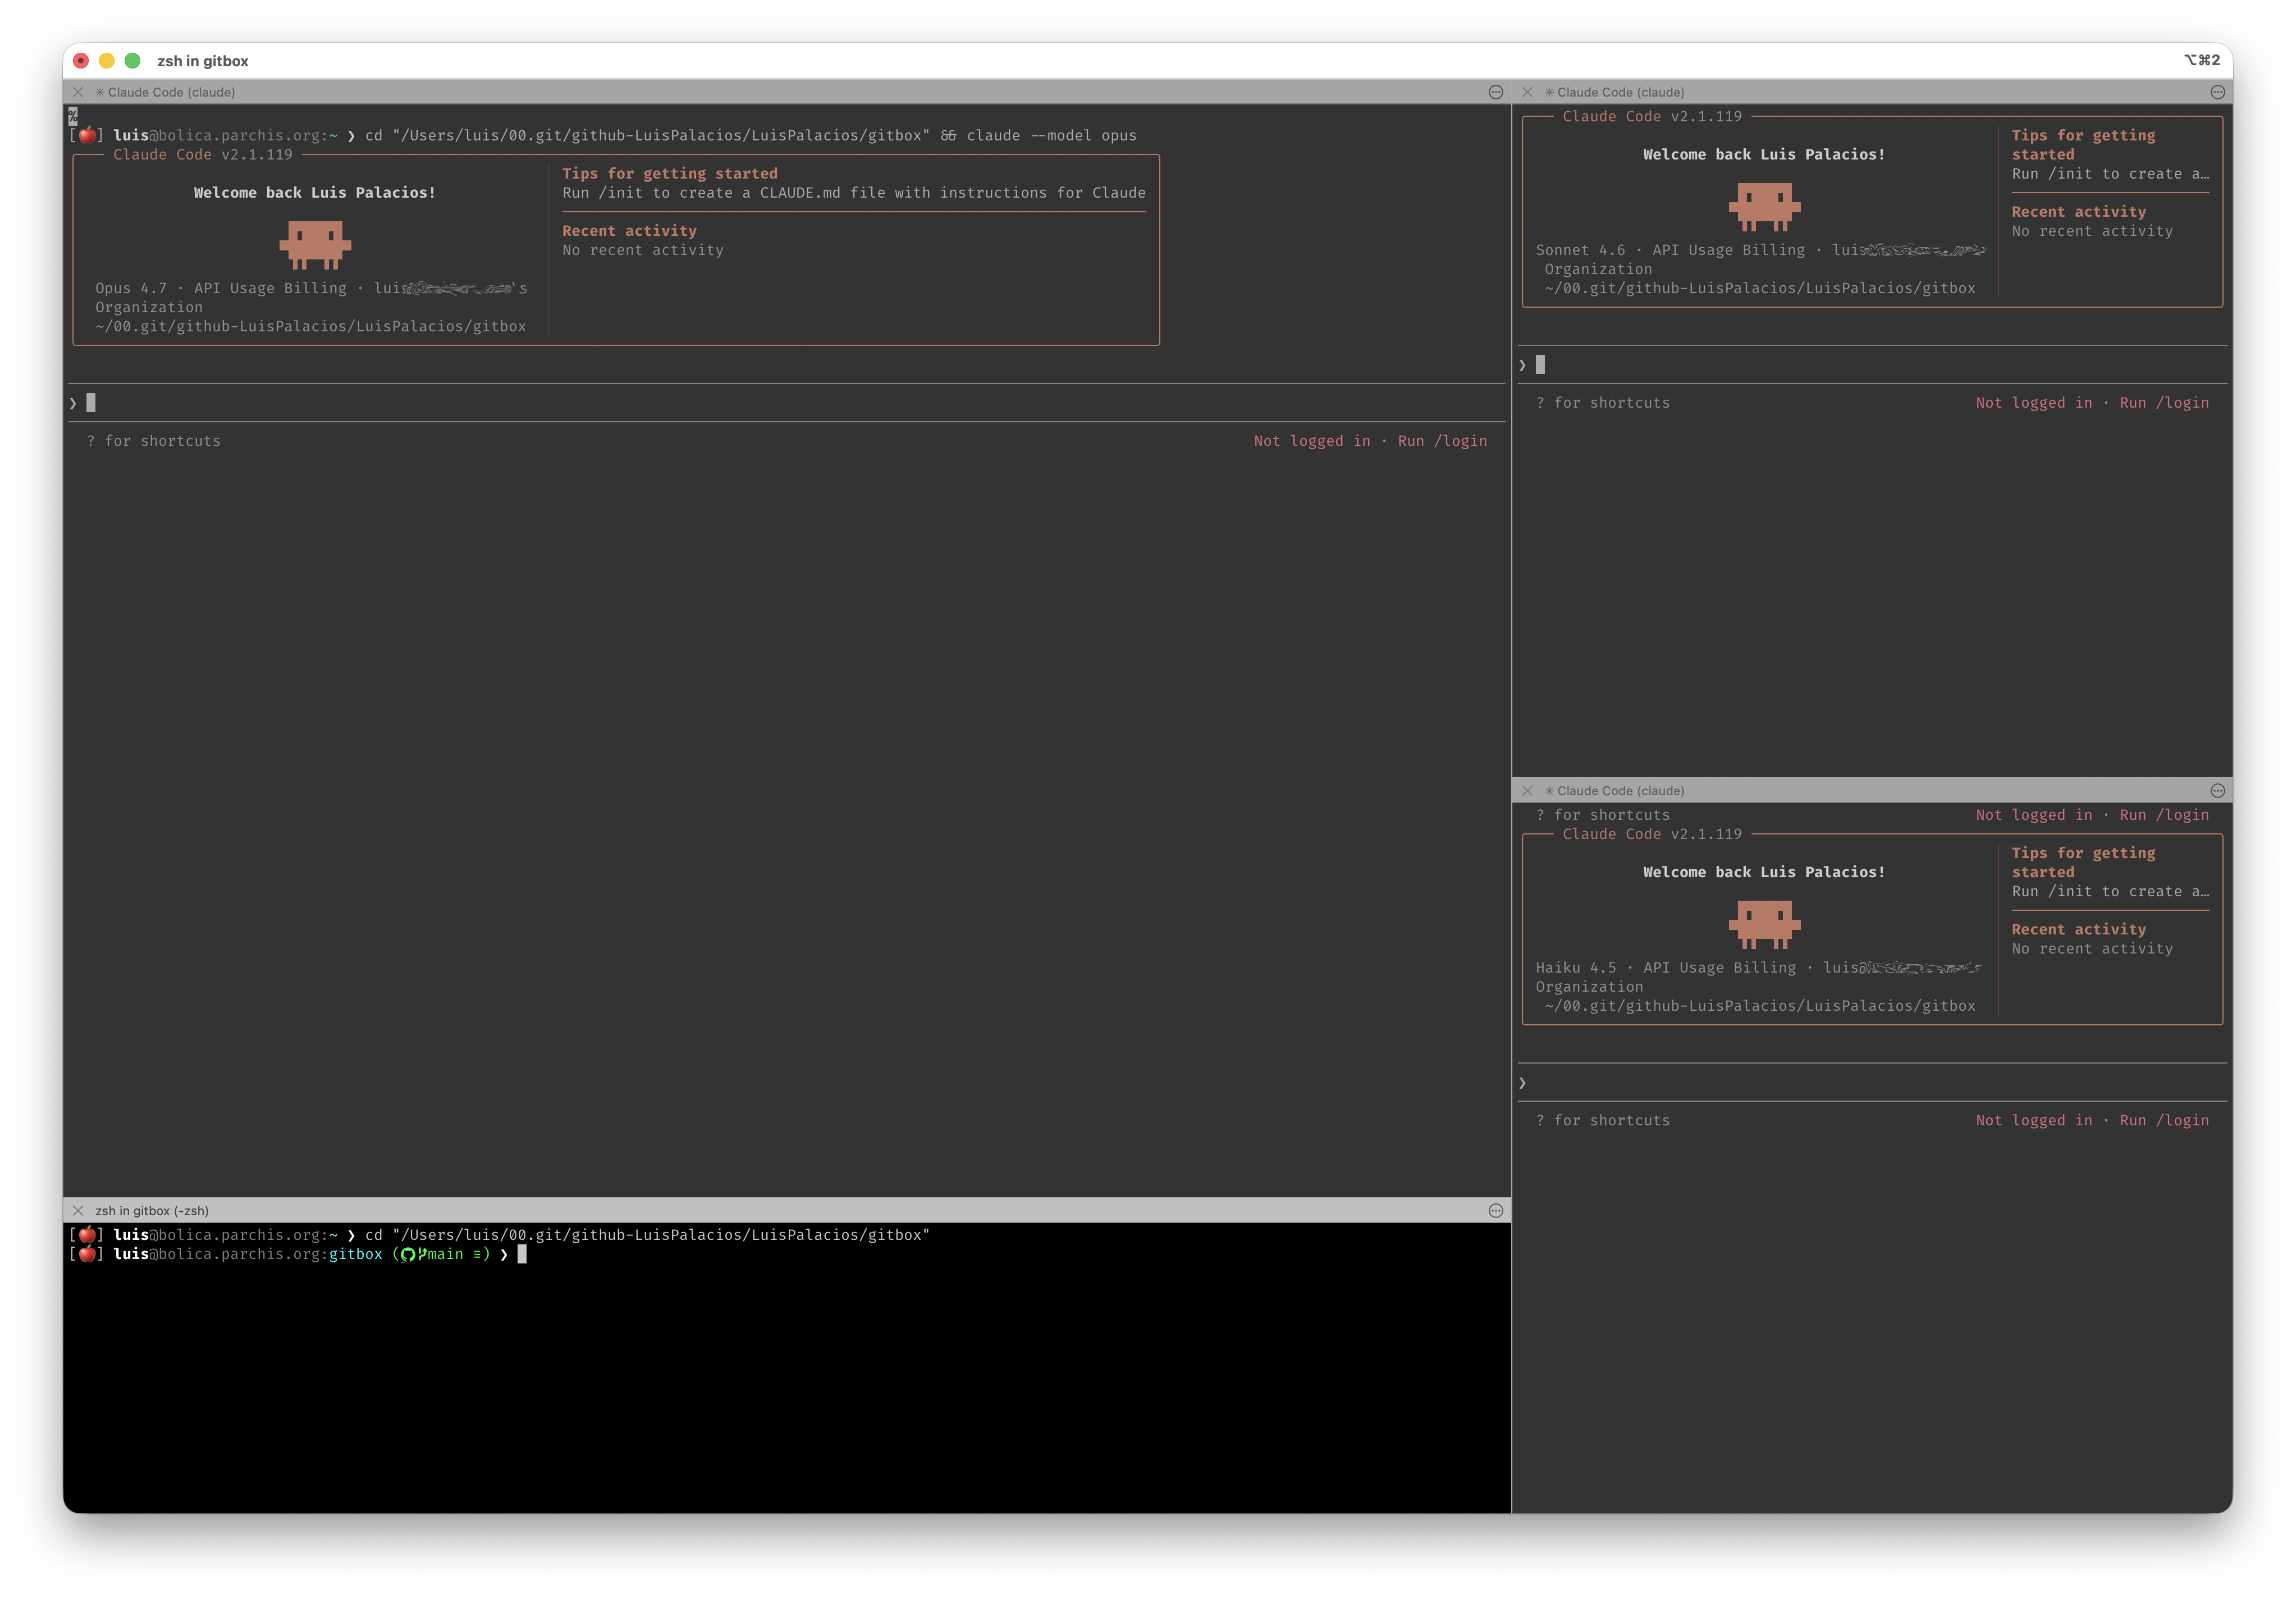
Lo he llamado el terminal en “modo IA”. Arranco cuatro paneles, tres con claude (cada uno con un modelo distinto) y el cuarto con una shell limpia para comandos auxiliares.
El requisito no negociable es que los cuatro paneles arrancasen en el directorio desde el que uso el atajo y que no tenga pasos manuales.
El problema
Instintivamente empecé buscando una forma “simple” que aprovechara lo que iTerm2 ya trae de fábrica:
Window Arrangements de iTerm2. La forma “oficial” de guardar una disposición de paneles. El problema es triple: no se puede invocar bajo demanda con parámetros, los Profiles asociados son rígidos, y la directiva Working Directory del Profile no tiene una opción “usa el $PWD del shell que me lanzó”.
tmux o Zellij. Hiperconfigurables, layouts declarativos preciosos, y soporte nativo para “abrir en $PWD”. Pero introducen una capa entre iTerm2 y la terminal: prefijo de teclado propio, copy/paste con sus particularidades, integraciones con shell que hay que mantener. Para mi flujo —donde iTerm2 ya hace el trabajo del multiplexor— era cambiar un problema pequeño por otro mediano.
iTerm2 Python API
La solución fué usar el runtime de Python embebido que viene con iTerm2. Incluye una API completa con la que se puede crear ventanas, dividir paneles, fijar tamaños, leer variables de cada sesión y enviar texto.
Los scripts viven en ~/Library/Application Support/iTerm2/Scripts/ y, si los pones en la subcarpeta AutoLaunch, arrancan como demonios cada vez que iTerm2 se abre. Una vez registrado un script (como una RPC con nombre), se le puede asignar un atajo de teclado desde el propio iTerm2.
Fase de preparación
- Activar el Python API en iTerm2
iTerm2 → Settings → General → Magic → Enable Python API. Marca la casilla y confirma el diálogo de seguridad.
- Crear la carpeta AutoLaunch
Cualquier script dentro de AutoLaunch se ejecuta automáticamente al arrancar iTerm2. Es lo que queremos para que el atajo esté siempre disponible:
mkdir -p ~/Library/Application\ Support/iTerm2/Scripts/AutoLaunch
- Crea con tu editor preferido el fichero para el script, un ejemplo con vscode:
code ~/Library/Application Support/iTerm2/Scripts/AutoLaunch/aimode.py
- Pega el contenido siguiente:
aimode.py
#!/usr/bin/env python3
"""
================================================================================
aimode — open a 4-pane Claude Code window from the current directory.
================================================================================

LAYOUT
------
    +-----------------------------+----------------+
    |                             |                |
    |                             |   tr: sonnet   |
    |                             |                |
    |        tl: opus             |                |
    |                             +----------------+
    |                             |                |
    |                             |   br: haiku    |
    +-----------------------------+                |
    |        bl: shell            |                |
    +-----------------------------+----------------+
    <-------- LEFT_RATIO -------->|<- 1-LEFT_RATIO->

The left and right columns split independently — the horizontal divider
on the left (between opus and shell) does NOT have to align with the one
on the right (between sonnet and haiku). That's why we have separate
LEFT_TOP_RATIO and RIGHT_TOP_RATIO knobs.

================================================================================
QUICK ADJUSTMENTS — edit the CONFIG block below
================================================================================

1. RESIZE PANES
   Change the three *_RATIO values. They're fractions of 1.0 — e.g. 0.65
   means "65% of the available space". Increase to make that side bigger.

2. SWAP MODELS / CHANGE COMMANDS
   Edit the commands() function. Each pane (tl, tr, bl, br) maps to a
   shell command. Add flags freely: --permission-mode plan, --add-dir,
   --resume, etc. The shell pane (bl) just runs `cd`, but you can chain
   anything: `cd ... && git status && git log --oneline -10`.

3. CHANGE WHICH PANE GETS WHICH MODEL
   Just rewrite the strings in commands(). E.g. swap opus to bottom-right:
   move the opus command from "tl" to "br" and the haiku command from
   "br" to "tl". The split structure stays the same.

4. ADD A FIFTH PANE
   Pick the parent pane to split from, e.g.:
       mr = await tr.async_split_pane(vertical=False)   # split right col
   Then add it to commands() and to the readiness/send loops below.
   You'll also need to redistribute right-column heights across three
   sessions instead of two.

5. CHANGE THE SPLIT STRUCTURE
   The current order is:
       tr  = split tl vertically      (creates left/right columns)
       bl  = split tl horizontally    (splits left column into rows)
       br  = split tr horizontally    (splits right column into rows)
   If you want, say, a single shell pane spanning the full bottom width
   (so left and right columns share a horizontal divider), the order is:
       bl  = split tl horizontally    FIRST (full-width bottom)
       tr  = split tl vertically      THEN (only top splits in two)
   The variable names then mean different things — adjust commands()
   accordingly.

6. TUNE RELIABILITY KNOBS (rarely needed)
   - READY_TIMEOUT: how long to wait for each shell to finish init
     before falling back to a cushion delay. Bump if your ~/.zshrc is
     slow (mise / nvm / heavy completions).
   - SEND_GAP: pause between consecutive command sends. Bump to 0.1 if
     you ever see a partial command land in a pane.

================================================================================
INSTALLATION (one time)
================================================================================
1. iTerm2 → Settings → General → Magic → Enable Python API.
2. Save this file as:
     ~/Library/Application Support/iTerm2/Scripts/AutoLaunch/aimode.py
3. Restart iTerm2 (or run it once via Scripts → AutoLaunch → aimode.py).
4. Settings → Keys → Key Bindings → +
     Action: Invoke Script Function
     Function: aimode()
   Pick a shortcut (e.g. ⌃⌥⌘A).
5. Press the shortcut from any session, in any directory.

To reload after editing this file: Scripts → Manage → Console, find
`aimode`, stop it, then Scripts → AutoLaunch → aimode.py to restart.
Or just quit and reopen iTerm2.
================================================================================
"""
import asyncio
import iterm2

# ============================================================================
# CONFIG — tune these to your taste
# ============================================================================

# Column width: fraction of total width given to the LEFT column.
# 0.65 = left column is 65% of the window, right column is 35%.
LEFT_RATIO = 0.65

# Left column rows: fraction of left-column height given to the TOP pane.
# 0.82 = opus takes 82% of the left column, shell takes 18%.
LEFT_TOP_RATIO = 0.82

# Right column rows: fraction of right-column height given to the TOP pane.
# 0.50 = sonnet and haiku split the right column evenly.
RIGHT_TOP_RATIO = 0.50

# Per-session readiness timeout in seconds. Bumps to 8.0 or 10.0 are
# reasonable if you have a heavy shell init.
READY_TIMEOUT = 5.0

# Gap between consecutive command sends in seconds. Belt-and-braces
# against iTerm2's redraw cycle dropping a keystroke.
SEND_GAP = 0.05


def commands(cwd: str) -> dict:
    """
    Commands fired in each pane after the layout settles.

    Keys map to pane positions:
      tl = top-left   (the dominant pane on the left)
      tr = top-right
      bl = bottom-left  (small shell strip below opus)
      br = bottom-right

    Each value is a shell command. The `cd` is essential — without it
    the new pane lands in your shell's default startup directory, not
    the directory you launched aimode from.
    """
    return {
        "tl": f'cd "{cwd}" && claude --model opus',
        "tr": f'cd "{cwd}" && claude --model sonnet',
        "bl": f'cd "{cwd}"',
        "br": f'cd "{cwd}" && claude --model haiku',
    }


# ============================================================================
# Internals — usually no need to touch below this line
# ============================================================================


async def wait_ready(session, timeout: float = READY_TIMEOUT) -> bool:
    """
    Wait until a session's shell is interactive and listening.

    Uses iTerm2's per-session `path` variable as the readiness proxy:
    it's populated once the shell has set its working directory, which
    in practice means zsh's line editor (zle) is attached to the TTY
    and ready to accept keystrokes. Without this, fast machines race
    the script ahead of the shell and the cd/claude command lands in
    the void before the prompt appears.

    Returns True if ready within the timeout, False otherwise.
    """
    deadline_steps = int(timeout * 20)  # poll every 50ms
    for _ in range(deadline_steps):
        path = await session.async_get_variable("path")
        if path:
            return True
        await asyncio.sleep(0.05)
    return False


async def main(connection):
    app = await iterm2.async_get_app(connection)

    @iterm2.RPC
    async def aimode():
        # ----------------------------------------------------------------
        # 1. Capture the originating CWD BEFORE creating the new window.
        #    Once async_create runs, current_terminal_window points at
        #    the new (empty) window, not the one you triggered from.
        # ----------------------------------------------------------------
        cwd = "~"
        win = app.current_terminal_window
        if win is not None:
            current = win.current_tab.current_session
            path = await current.async_get_variable("path")
            if path:
                cwd = path

        # ----------------------------------------------------------------
        # 2. Create a new window and split it into 4 panes.
        #
        #    Split order matters for layout independence:
        #      - First we split tl vertically -> creates tr (right column).
        #      - Then we split tl horizontally -> creates bl below opus.
        #      - Then we split tr horizontally -> creates br below sonnet.
        #
        #    Because bl is a child of tl (left column) and br is a child
        #    of tr (right column), the two columns get independent
        #    horizontal dividers — exactly what we want.
        # ----------------------------------------------------------------
        window = await iterm2.Window.async_create(connection)
        if window is None:
            return
        tab = window.current_tab
        tl = tab.current_session
        tr = await tl.async_split_pane(vertical=True)   # left | right
        bl = await tl.async_split_pane(vertical=False)  # opus / shell
        br = await tr.async_split_pane(vertical=False)  # sonnet / haiku

        # ----------------------------------------------------------------
        # 3. Resize panes via preferred_size + async_update_layout.
        #
        #    preferred_size is a hint expressed in character cells (cols
        #    x rows), not pixels. iTerm2's layout engine respects the
        #    hints while keeping aligned panes consistent (e.g. tl and
        #    bl must share a width because they're in the same column).
        #
        #    We compute totals from the current sizes and apply ratios.
        #    The max(...) floors prevent a pathologically small pane if
        #    someone sets a ratio close to 0 or 1.
        # ----------------------------------------------------------------
        total_w = tl.preferred_size.width + tr.preferred_size.width
        left_w = max(20, int(total_w * LEFT_RATIO))
        right_w = max(20, total_w - left_w)

        left_total_h = tl.preferred_size.height + bl.preferred_size.height
        left_top_h = max(10, int(left_total_h * LEFT_TOP_RATIO))
        left_bot_h = max(3, left_total_h - left_top_h)

        right_total_h = tr.preferred_size.height + br.preferred_size.height
        right_top_h = max(10, int(right_total_h * RIGHT_TOP_RATIO))
        right_bot_h = max(6, right_total_h - right_top_h)

        tl.preferred_size = iterm2.Size(left_w, left_top_h)
        bl.preferred_size = iterm2.Size(left_w, left_bot_h)
        tr.preferred_size = iterm2.Size(right_w, right_top_h)
        br.preferred_size = iterm2.Size(right_w, right_bot_h)
        await tab.async_update_layout()

        # ----------------------------------------------------------------
        # 4. Wait for all four shells to be interactive (in parallel).
        #    Total wait is bounded by the slowest shell, not the sum.
        #    Falls back to a cushion delay only if a shell genuinely
        #    didn't report ready in READY_TIMEOUT seconds.
        # ----------------------------------------------------------------
        readiness = await asyncio.gather(
            wait_ready(tl),
            wait_ready(tr),
            wait_ready(bl),
            wait_ready(br),
        )
        if not all(readiness):
            await asyncio.sleep(0.5)

        # ----------------------------------------------------------------
        # 5. Fire commands sequentially with a small inter-command gap.
        #    The gap (50ms) is below human perception but above iTerm2's
        #    redraw window, which prevents the renderer from dropping a
        #    keystroke when four panes update in the same animation
        #    frame.
        # ----------------------------------------------------------------
        cmd = commands(cwd)
        for session, key in [(tl, "tl"), (tr, "tr"), (bl, "bl"), (br, "br")]:
            await session.async_send_text(cmd[key] + "\n")
            await asyncio.sleep(SEND_GAP)

    await aimode.async_register(connection)


iterm2.run_forever(main)
- Arrancar el demonio
Una vez salvado el fichero anterior, hay que decirle a iTerm2 que lo lea, tienes dos opciones:
- Ejecutarlo una vez ahora desde
Scripts → AutoLaunch → aimode.pyen la barra de menú. - Reiniciar iTerm2 — Como lo hemos salvado bajo
AutoLaunchlo arrancará solo, en cada apertura.
La primera vez que iTerm2 ejecute un script puede pedirte permiso. Acepta. Para verificar que el demonio está corriendo, abre Scripts → Manage → Console: deberías ver aimode en la lista sin errores.
- Asignar el atajo de teclado
Settings → Keys → Key Bindings → +:
- Keyboard Shortcut: el que prefieras (yo uso
⌃⌥⌘A, pero cualquiera libre vale). - Action: Invoke Script Function.
- Function:
aimode()— los paréntesis son obligatorios.
Cómo se usa
Desde cualquier sesión de iTerm2, en cualquier directorio, pulsas el atajo. Acabas con una ventana con cuatro paneles en el directorio donde estabas, y los tres paneles de Claude lanzan opus, sonnet y haiku automáticamente.
Puedes tunear el script, tiene un bloque CONFIG:
LEFT_RATIO— qué porcentaje del ancho se lleva la columna izquierda (0.65= 65%).LEFT_TOP_RATIO— dentro de la columna izquierda, cuánto del alto se lleva el panel de arriba (opus).RIGHT_TOP_RATIO— lo mismo para la columna derecha (sonnet vs haiku).READY_TIMEOUT— cuánto esperar a que cada shell termine de inicializar antes de enviar comandos. Súbelo si tu~/.zshrces lento (mise, nvm, completions pesados).SEND_GAP— pausa entre comandos consecutivos. Súbelo a0.1si alguna vez ves un comando truncado.
Cuando edites el script:
Scripts → Manage → Console → buscar aimode → Stop → Scripts → AutoLaunch → aimode.py para reiniciar. O cierras y vuelves a abrir iTerm2, da igual.
Próximos pasos
Una vez tienes la base, puedes crearte tus propios scripts, te dejo algunas ideas para que experimentes:
aimode plan— los tres Claudes arrancando con--permission-mode planpara sesiones de planificación.aimode review <PR>— abrir el panel de shell con ungh pr checkout <PR>y los Claudes en modo revisión.- Layouts alternativos — un script
aireview.pycon tres paneles verticales para comparar diffs en paralelo, otroaiops.pycon shells en distintos servidores vía SSH.
Como cada layout es un script Python en AutoLaunch y cada uno se registra como su propia RPC, puedes tener varios atajos —⌃⌥⌘A, ⌃⌥⌘P, ⌃⌥⌘R— invocando layouts distintos sin que se pisen.
Enlaces interesantes
| Tipo | Links |
|---|---|
| Official | iTerm2 Python API |
| Reference | claude CLI docs |